background image

10 

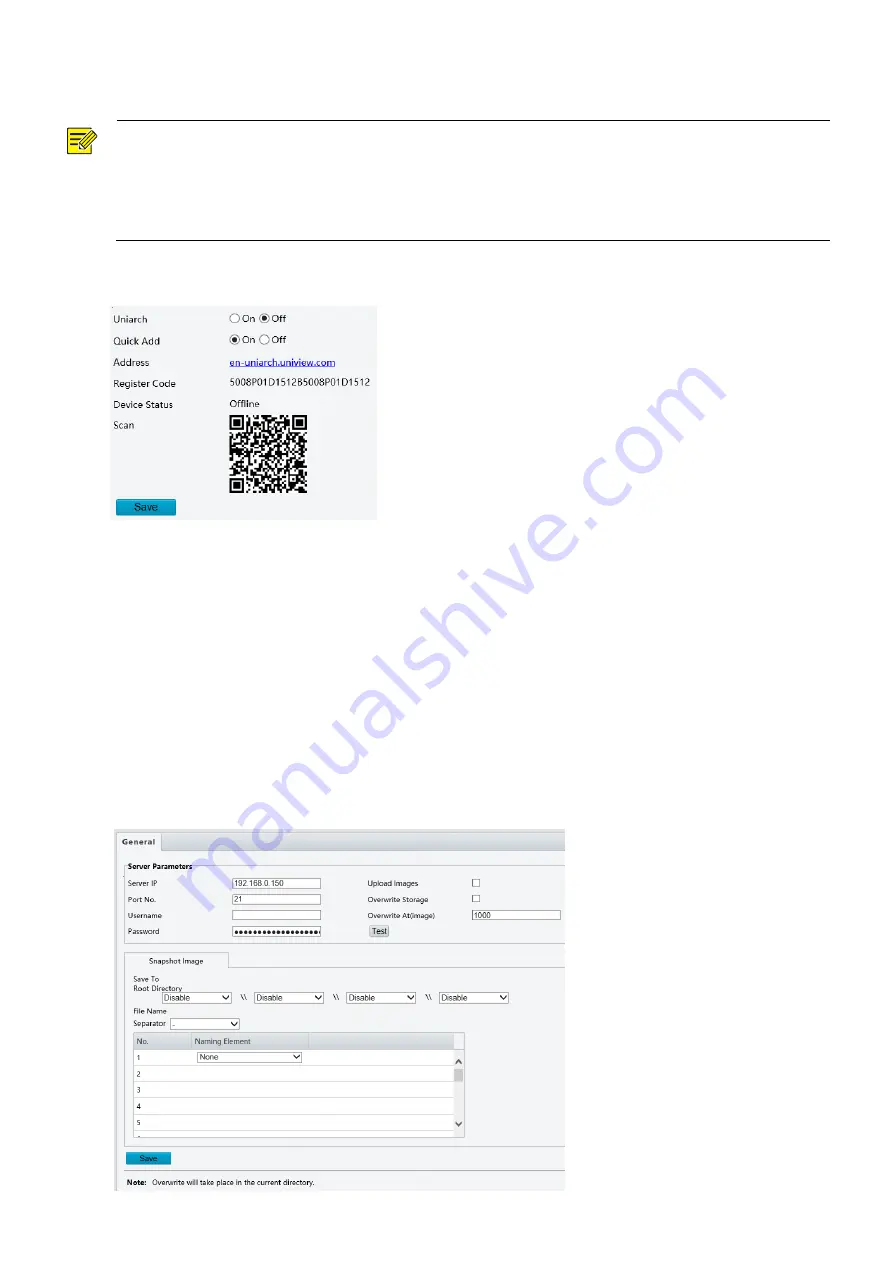
Uniarch 


NOTE! 


This function is not available to all models. 


Scan the QR code with your mobile phone (iOS or Android) to download the APP. 


When installed, run the APP to add the camera. Please refer to the online help in the APP for detailed 
steps. 


1.


Click 

Setup

 > 

Network

 > 

Uniarch

.


2.


Enable 

Uniarch

. Select 

On

 to enable cloud service. 

3.


Enable 

Quick Add

. When the device password is a strong password, you can add the device through 

EZView without account scan code. 

4.


Click 

Save


FTP 

All snapshots (except face detection) are saved through the general FTP service. After the configuration of 
FTP, you will be able to upload snapshots from network cameras to the specified FTP server. 

General 

1.


Click 

Setup

 > 

Storage

 > 

FTP

. Go to 

General

 tab. 


Summary of Contents for Uniarch IPC-B112-PF40

Page 1: ...Network Cameras User Manual Manual Version 1 00 ...

Page 2: ...or any technical or typographical errors in this manual The contents of this manual are subject to change without prior notice Update will be added to the new version of this manual Use of this manual and the subsequent result shall be entirely on the user s own responsibility In no event shall we be reliable to you for any special consequential incidental or indirect damages including among other...

Page 3: ...lowing table may be found in this manual Carefully follow the instructions indicated by the symbols to avoid hazardous situations and use the product properly Symbol Description WARNING Contains important safety instructions and indicates situations that could cause bodily injury CAUTION Means reader be careful and improper operations may cause damage or malfunction to product NOTE Means useful or...

Page 4: ...stment 122 OSD Setting 19 Privacy Mask 20 Audio and Video Configuration 21 Video Configuration 21 Snapshot 22 ROI 23 Media Stream Configuration 24 Common Alarm Configuration 25 Configuring Motion Detection Alarm 25 Configuring Tampering Alarm 288 System Maintenance 29 Security 29 Setting the System Time 32 Upgrading the Device 33 Restarting the System 33 Importing and Exporting System Configuratio...

Page 5: ...ii Appendix B FAQ 37 ...

Page 6: ...ance with the quick guide connect the camera to power to start it After the camera is started you can access the camera from a PC client installed with a web browser or the client software EZStation Internet Explorer IE is a recommended web browser For more information about EZStation refer to the EZStation User Manual The following takes IE on a Microsoft Windows 7 operating system as an example ...

Page 7: ...2 Add the IP address as a trusted site 1 13 1 2 ...

Page 8: ...view the dynamic IP address of your camera The following takes IE as an example to describe the login procedure 1 Browse to the login page by entering the correct IP address of your camera in the address bar 2 If you log in for the first time follow system prompts and install the ActiveX You need to close your browser to complete the installation NOTE To manually load the ActiveX type http IP addr...

Page 9: ...the username and password and then click Login For the first login use the default username admin and password admin or 123456 If you log in with Live View selected live video will be displayed when you are logged in Otherwise you need to start live video manually in the live view window To clear the Username and Password text boxes click Reset Introduction to the Web Interface By default the live...

Page 10: ...system time Set the system time based on the actual situation 4 Optional Set the management server Set the management server based on the actual networking 5 Optional Set the server for storing photos Set the server for storing photos based on the actual networking 6 Set OSD Set the information displayed on the screen as needed for example time 7 Optional Manage users Change the default password a...

Page 11: ...ers Local Parameters Set local parameters for your PC NOTE The local parameters may vary with models Please see the actual Web interface for details 1 Select Setup Common Local Settings 2 Modify the settings as required The following table describes some major parameters Parameter Description Video Processing Mode Real Time Priority Recommended if the network is in good condition Fluency Priority ...

Page 12: ...e max Path length is 260 bytes If the limit is exceeded recording or snapshot during live view will fail and messages will appear on the screen 3 Click Save Network Configuration Ethernet Modify communication settings such as the IP address for the camera so that the camera can communicate with other devices NOTE After you have changed the IP address you need to use the new IP address to log in Th...

Page 13: ... Click Setup Network Network 2 Select DHCP from the Obtain IP Address drop down list 3 Click Save IPv6 NOTE This function is not supported by some models Please see the actual model for details 1 Click Setup Network Network 2 By default the IPv6 mode is set to Manual 3 Enter the IPv6 address set the prefix length and default gateway The IP address must be unique on the network 4 Click Save Port 1 ...

Page 14: ...configured port is occupied then the Status will show Inactive 3 Click Save DNS 1 Click Setup Network DNS 2 Set DNS server addresses 3 Click Save DDNS NOTE This function is not supported by some models Please see the actual model for details 1 Click Setup Network DDNS 2 Enable DDNS Service 3 Select a DDNS type DynDNS NO IP or EZDDNS 4 Complete other settings including server address domain name us...

Page 15: ...Network Uniarch 2 Enable Uniarch Select On to enable cloud service 3 Enable Quick Add When the device password is a strong password you can add the device through EZView without account scan code 4 Click Save FTP All snapshots except face detection are saved through the general FTP service After the configuration of FTP you will be able to upload snapshots from network cameras to the specified FTP...

Page 16: ...l address This function is not supported by some models 1 Click Setup Network E mail 2 Configure relevant parameters of the sender and the recipient Some camera models support Email test You may test email after setting the recipient address The following table describes some major parameters Parameter Description TLS SSL When enabled the e mail will be encrypted using TLS Transport Layer Security...

Page 17: ...o and video is set to 60 alarm report and configuration management is set to 0 and FTP is set to 4 when network congestion occurs the priority is to ensure the smooth running of audio and video 3 Click Save NOTE To use QoS make sure that the switch support QoS mode Image Configuration Image Adjustment NOTE The image parameters displayed and value ranges allowed may vary with camera model For the a...

Page 18: ...ks to suppress lights to capture license plates Custom set a scene name as needed Auto Switching Indicates whether to add a scene to the auto switching list Note If Auto Switching is selected the system switches to a scene automatically when the condition for switching to the scene is met By default the auto switching list includes the default scene Setup Click to set conditions for auto switching...

Page 19: ...to the scene with the minimum number starts from 1 to 5 Image Enhancement NOTE This function may vary with models Please see actual Web interface for details 1 Click Setup Image Image and then click Image Enhancement 2 Use the sliders to change the settings You may also enter values directly The following table describes some major parameters Item Description Brightness Set the degree of brightnes...

Page 20: ...ts in an image Low sharpness High sharpness 2D Noise Reduction Reduce the noise of images The function may cause image blurring 3D Noise Reduction Reduce the noise of images The function may cause motion blur or ghosting in some applications Image Rotation Rotation of the image Normal Flip Vertical Flip Horizontal 180 3 To restore default settings in this area click Default ...

Page 21: ...lity by setting shutter gain and iris manually Low Motion Blur Control the minimum shutter to reduce motion blur in faces captured in motion Shutter s Shutter is used to control the light that comes into the lens A fast shutter speed is ideal for scenes in quick motion A slow shutter speed is ideal for scenes that change slowly Note You can set a shutter speed when Exposure Mode is set to Manual I...

Page 22: ...igh quality color images using the existing light Day Night Sensitivity Light threshold for switching between day mode and night mode A higher sensitivity means that the camera is more sensitive to the change of light and becomes more easily to switch between day mode and night mode Note You can set this parameter only when Day Night Mode is set to Automatic Day Night Switching s Set the length of...

Page 23: ...lows you to manually control the intensity of IR illumination 3 To restore the default settings click Default White Balance White balance is the process of offsetting unnatural color cast in images under different color temperatures so as to output images that best suit human eyes NOTE This function may vary with models Please see the actual Web interface for details 1 Click Setup Image Image and ...

Page 24: ...d off Only some camera models support optical defog When Defog is set to On defog intensity level 6 9 represent optical defog and images change from color to black white when defog intensity is set from level 5 to 6 if Defog is set to Auto and defog intensity level is somewhere between 6 9 images do not automatically change to black white in light fog conditions the camera automatically switches t...

Page 25: ...t After you have set the position and OSD content the symbol appears in the Status column which means that the OSD is set successfully 3 After you have completed the settings a message appears to indicate the successful settings You may right click in the preview window and then choose to view in full screen mode or at an aspect ratio You may also double click the preview window to enter or exit f...

Page 26: ...shape has changed drag the box to the intended position To mask an area Use the mouse to draw a box on the area you want to mask When privacy mask is configured the intended area is blocked The following shows an example 3 Set mask mode You may select regular or irregular mode as needed NOTE Mask mode is only available to certain models Audio and Video Configuration Video Configuration You can set...

Page 27: ...rate changes to the default when you change the setting between H 264 and H 265 The default bit rate for H 265 is half of that for H 264 Frame Rate Frame rate for encoding images Unit FPS frame per second Note To ensure image quality note that the frame rate should not be greater than the reciprocal of shutter speed Bitrate Type CBR Constant Bit Rate which means that the camera transmits data at a...

Page 28: ... set to 2 the camera will take 2 snapshots take one first and then take another after 1 second Number to Snapshot Currently 1 2 and 3 snapshots are allowed Snapshot Mode Schedule You need to set a snapshot time e g 19 12 00 which means the camera takes a snapshot at 19 12 00 Repeat Allows you to set an interval unit sec For example according to the settings shown in the figure above 60 seconds mus...

Page 29: ...reams from a camera You may also set the camera so it transmits code streams by the UDP or TCP protocol to a specified IP address and port number The settings can be saved and take effect after the camera is restarted NOTE This function is not supported by some models Please see the actual model for details Choosing a transport protocol based on your actual needs and network performance Generally ...

Page 30: ...s so that alarms and the triggered actions can be handled in time Alarm reporting can be scheduled for motion detection alarm alarm input alarm output tampering detection alarm and audio detection alarm The supported alarms may vary with device model For the alarm types that your camera supports see the Web interface Configuring Motion Detection Alarm Motion detection detects the object motion in ...

Page 31: ...tion area in the actual motion area accordingly Motion detection results are shown in real time The red lines represent the raised motion detection alarms The longer a line the greater the extent of motion The denser the lines the greater the frequency of motion 5 Set the alarm parameters Suppress Alarm s After an alarm is triggered the same alarm will not be reported within the set time Clear Ala...

Page 32: ...ed by some models Enable Plan Select the check box and set the start and end times during which motion detection alarm is effective You can directly drag the mouse to draw a plan and click Edit to edit time periods in the table The time periods cannot overlap The camera reports alarms during the specified period s only You can select from Monday to Sunday and set four periods for each day Drag the...

Page 33: ...t time the alarm will not be cleared until the suppress alarm time expires Then the same alarm can be reported again 5 Set actions to be triggered by motion detection alarm and the plan For the detailed steps see the descriptions of alarm triggered actions in Area Detection in Configuring Motion Detection Alarm 6 Click Save Configuring Tampering Alarm Configure tampering alarm so that the camera r...

Page 34: ... actions to be triggered by tampering alarms and the plan For the detailed steps see the descriptions of alarm triggered actions in Configuring Motion Detection Alarm 5 Click Save System Maintenance NOTE This function is not supported by some models Please see the actual model for details Security User Management There are two types of users in the system Administrator referred to as admin in this...

Page 35: ...n is not supported by some models Please see the actual model for details 1 Click Setup Network Port 2 Enter the port number in the HTTPS Port text box 3 Click Save 4 Click Setup Security Network Security HTTPS 5 Select On for HTTPS You may import a custom SSL certificate as needed 6 Click Save Next time you log in enter the address in https IP HTTPS port number format for example https 192 168 1 ...

Page 36: ...pecified IP address es NOTE This function is not supported by some models Please see the actual model for details 1 Click Setup Security Network Security IP Address Filtering 2 Select On to enable IP address filtering 3 Select a filtering mode and then add IP address es 4 Click Save NOTE If Filtering Mode is set to Whitelist then only the added IP address es are allowed to access the camera If Fil...

Page 37: ...ve Watermark Use watermark to encrypt custom information with video to prevent unauthorized delete or alteration NOTE Only some camera models support this function 1 Click Setup Security Watermark 2 Select On to enable watermark and then input watermark content 3 Click Save Setting the System Time You can use the following methods to adjust the system time of your device Manually Setting or Synchr...

Page 38: ... for new versions available to cloud upgrade NOTE You must use the correct upgrade file for you camera Otherwise unexpected results may occur The upgrade file is a ZIP file and must include all the necessary files The boot program loads the operating system and then the system starts running The upgrade boot program function is disabled by default and only the camera will be upgraded to the latest...

Page 39: ...sfully 1 Click Setup System Maintenance 2 To import configurations that you have backed up click Browse next to the Import button and select the configurations you want to import and then click Import The result will be displayed 3 To export current system configurations click Browse next to the Exporting field set the destination and then click Export 4 To restore default configurations click Def...

Page 40: ...ying live video real time audio and video received from a camera in a window through the Web interface If you log in with the Live View check box selected live video appears by default when you are logged in You may double click the window to enter or exit full screen mode Live View Toolbar NOTE The supported live view operations may vary with camera model For the operations that your camera suppo...

Page 41: ...floating toolbar Click this button to always display the information With another click the information appears only when you move the mouse cursor over the window or place it at the bottom If the mouse cursor rests on the window for around 3 seconds or leaves the window the information disappears Click this button to open the image setting page Display in full screen mode Select a live video stre...

Page 42: ... Change User Account Control Settings 3 Move the slider to the Never Notify position and then click OK 4 After UAC is turned off log in again What to do if the installation of ActiveX failed Answer If the installation failed add the IP address of the camera as a trusted site open Internet Option in IE click the Security tab click Trusted sites and then click Sites to add the website If you use Win...

Reviews: