background image

05

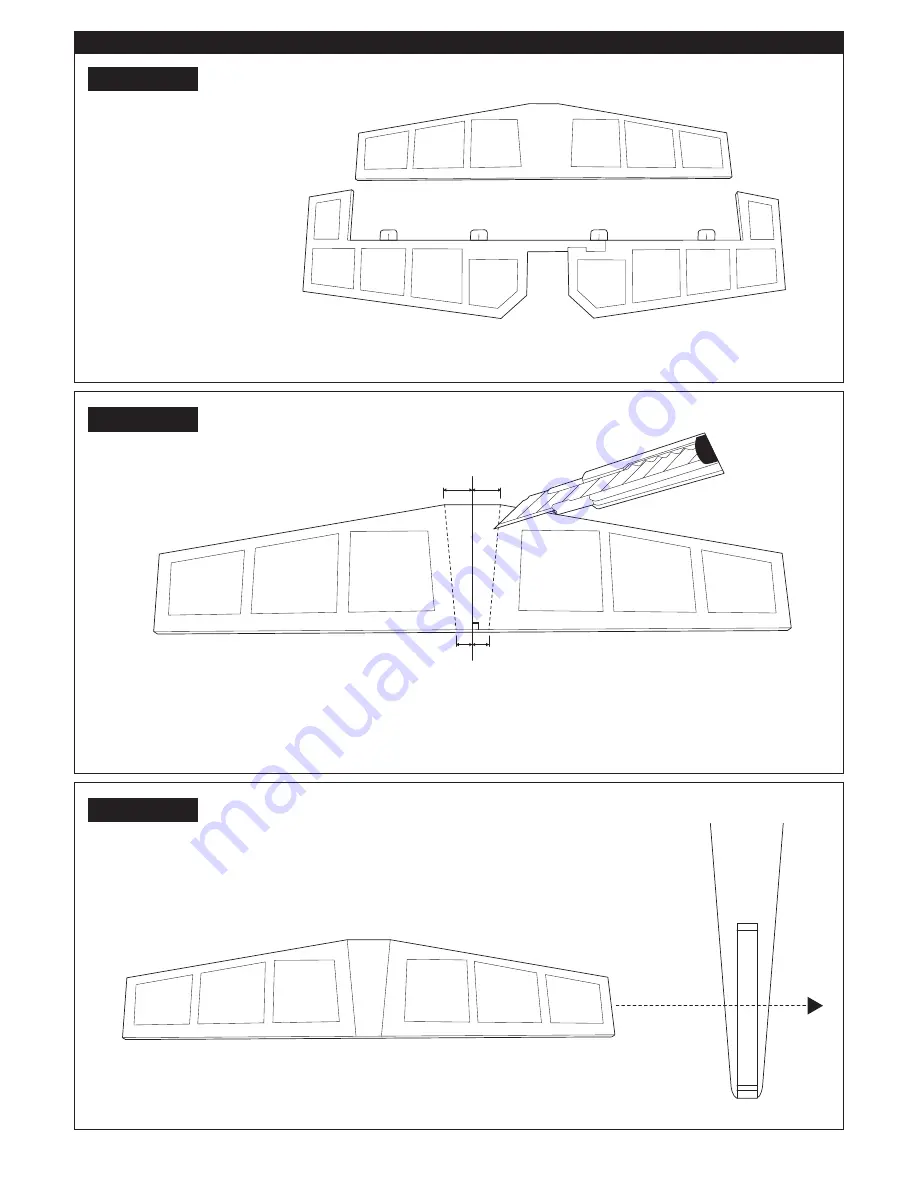
TAIL & LANDING GEAR  ASSEMBLY

Procedure 1

Procedure 2

Procedure 3

7.5mm

7.5mm

19mm

19mm

15mm

90

o

38mm

Take out the elevator from fuselage. Use hobby knife to remove the film in the center section 

between the markings for future assembly as picture shows.

Summary of Contents for Edge 540

Page 1: ...ring purposes INDEX Parts index __________________________________________01 Tools and radio required to assembly __________02 2 Main Wing assembly ____________________________03 3 Tail Landing gear a...

Page 2: ...tuff in Hi alpha approach Ultrafly has find a good balance between the two and create this model that can cover the two requirement properly We hope you can enjoy the fun in practicing your skill with...

Page 3: ...ler Propeller Adapter Wheel Pants Propeller 11x5 5 M6 Nut Screw M2x5 M3x3 Prop adapter Washer M6 2x12 Push Rod Main Landing Gear Strut Set Main Wing Joiner 10x12x408mm Velcro Plastic Screw M2x10 Washe...

Page 4: ...AB C A glue Apply epoxy glue AB Apply C A glue Cutting knife Use screw driver Use drill Important Use soldering lron Hex wrench L Ext wire x1 x1 Battery charger Lipo battery 2500 3200mAh Electronic s...

Page 5: ...m gap between the wing and the aileron This gap is also named as hinge line which will be used in the following procedure You must allow the aileron control surface to move freely Use CA on the Hinge...

Page 6: ...Carbon enhancement tube into the fuselage as shown in the picture then install the main wing Procedure 6 15mm 15mm plastic screw Install the wing onto the fuselage Use a plastic screw to secure the wi...

Page 7: ...LY Procedure 1 Procedure 2 Procedure 3 7 5mm 7 5mm 19mm 19mm 15mm 90 o 38mm Take out the elevator from fuselage Use hobby knife to remove the film in the center section between the markings for future...

Page 8: ...face Install the main wing on the fuselage then install the rudder fin on the fuselage for reference Put the model on your working table and look from the tail side as graphic shows You need to adjust...

Page 9: ...e two parts together Trial fit the rudder fin onto the fuselage Use pen to make a mark at the connecting line between the rudder and fuselage on both sides We will remove the film according to the mar...

Page 10: ...11 Install the tail wheel holding brass FRP palate with two screws as picture shown 1 2 3 Screw M2 6x10 20mm 30mm 90 0 Put the vertical find back to its original position Use CA to glue fix it into po...

Page 11: ...09 Procedure 15 Procedure 14 Procedure 13 1 2 Install the tail wheel landing wire onto the control surface with CA or Epoxy glue Use CA on the hinge to secure the control surface to the rudder C A...

Page 12: ...e wheel pants Wheel pants are a pair On you left side wheel pant you drill a 3mm hole at its right side which will connect to the landing strut And for the right side wheel pants you drill on the left...

Page 13: ...LY 1 2 1 2 Screw M 2 6x8 M3x3 Screw Wheel Stop 2 mm Use 1 2 mm hand drill to pre drill the screw holes Install the motor with the screw provided by the motor maker as picture 2 Mark the screw location...

Page 14: ...tightening the two hex screws on each side of the prop adaptor Make sure these two screws are tight and secured as if they are not the prop may come free from the motor and hurt either yourself or ot...

Page 15: ...the main wing and find the servo hole for aileron servo Cut out the film that covers the hole carefully RADIO SERVO ASSEMBLY Micro servos 4 Please reference your radio hand book to connect the wire t...

Page 16: ...nstalling the aileron servo put the extended wire through the hole to the root of the wing The extension wire should go through the wing root The wire will go through the fuselage and connect to the r...

Page 17: ...15 Procedure 6 Procedure 7 Set the servo to neutral position then fasten the screw on the connector 90 0 Hinge Hole line Procedure 5 1 2...

Page 18: ...ocedure 9 Procedure 10 1 5mm 1 5mm Screw M2x10 Screw M2x10 Procedure 8 Screw M2x10 1 5mm Use CA to hold the horn in position then fastens it up with the screws Use the same method on all horn installa...

Page 19: ...17 Procedure 12 Procedure 13 Velcro Velcro 1 2 1 2 Attach the canopy as picture shown Procedure 11 1st 2nd...

Page 20: ...y have hard time to fly the airplane In you first test flight you should set the CG at 80mm location It will provide a more stable flying performance After you have trimmed the servo and radio you may...

Page 21: ......

Reviews: