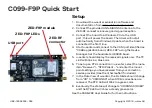


Setup
1. Download the u-center evaluation software and
documentation from www.u-blox.com/u-center.
2. Connect the provided ANN-MB GNSS antenna to the
ZED-RF connector. Ensure good signal reception.
3. Connect the board to a Windows PC via the USB
port; this will power the board. The driver will install
automatically from Windows Update when the board is
connected the first time.
4.
Start u-center and connect to the COM port identified as
“C099 application board, ZED-F9P” using the Device
Manager. Set the baudrate to 460800 baud.
5. u-center should display the received signals now. The TP
LED will blink in a blue color.
6. To set up an RTK connection in u-center, select the menu
item “Receiver” > “NTRIP client...” and enter the mount
point settings you have received from your correction
service provider. (See the other leaflet if included.)
7. In the Data View of u-center, the Fix Mode should change
from “3D” to “3D/DGNSS” when RTCM corrections are
received. The RTK LED will blink in a green color.
8. Eventually, the status will change to “3D/DGNSS/FIXED”
and the RTK LED will show a steady green color.
See the C099-F9P User Guide for further instructions.
C099-F9P Quick Start
Copyright © 2019, u-blox AG
UBX-18052242 - R04
ZED-F9P module
USB port
ZED-RF
connector
ZED-F9P LEDs