Replacing the Battery of a Tool Tag
Replacing the Battery of a Tool Tag
Tag parameters are retained when the power source is removed from the tag.
Tool Tags are supplied with a connectorized A-size 3.6 V battery (Part number: TOOLBAT). Tool
Tags regularly report their battery status to the DIMENSION4 Real-time Location System through
the UWB Sensors.
To replace the battery in a Tool Tag (Battery Unit or an Integrated Tool Tag):
1. Remove the screws on the front cover of the tag.
2. Do one of the following:
l
Battery Unit
: Remove the old battery, and then insert a new battery.
l
Integrated Tool Tag
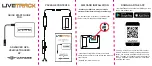
: Remove the old battery by unplugging the battery connector.
Insert a new battery, and then plug the connecter into the battery socket, as shown in
the following figure.
Replacing Battery of an Integrated Tool Tag
3. Replace the front cover of the tag by fixing the screws. The yellow LED on the tag gradually
lights up to indicate that it is working correctly. The DIMENSION4 Real-time Location
System can then find the location of the tag.
If the LED does not flash after you have replaced its battery, remove the battery and then reinsert
the battery. Wait for 30 seconds.
13