background image

Product Overview


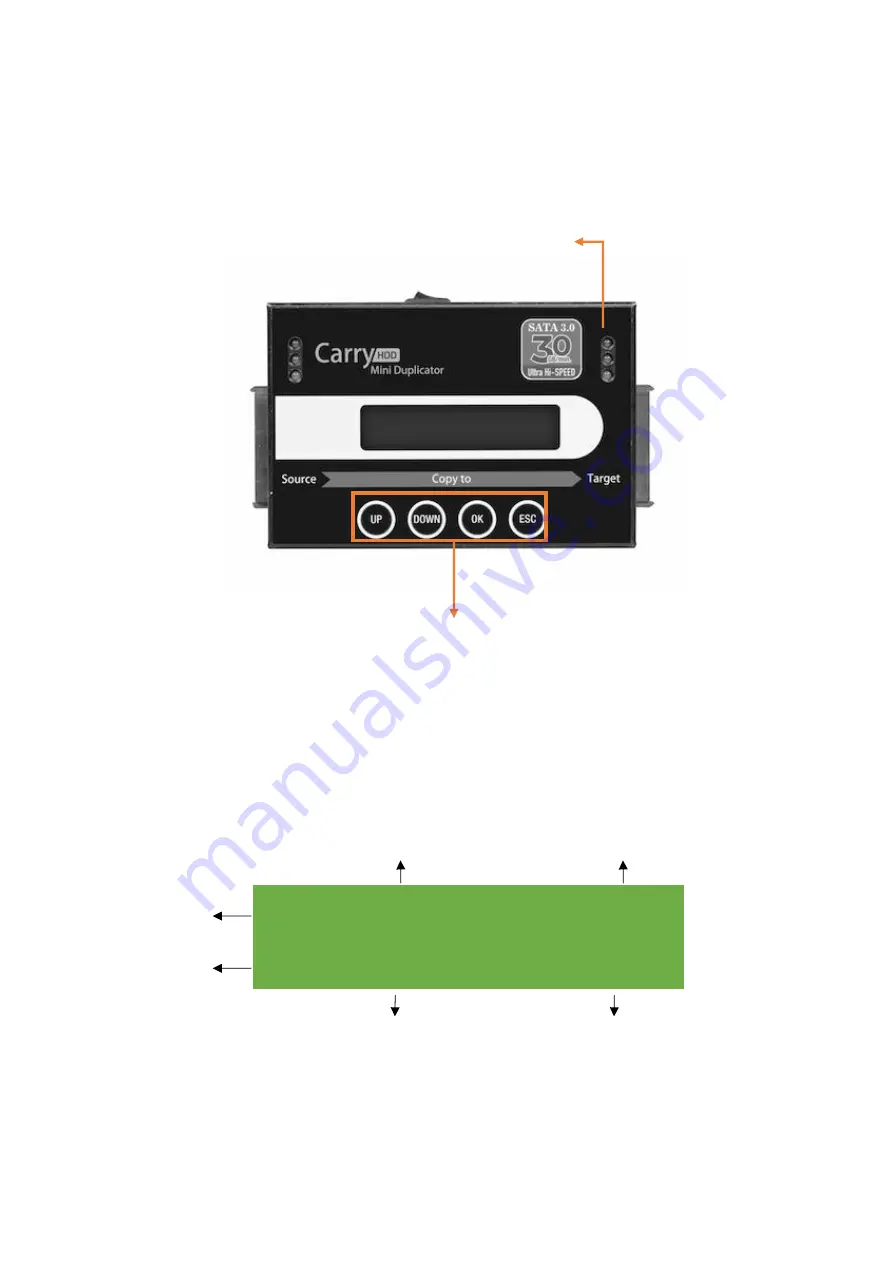
Hardware overview 


LCD configuration 


Port 1


(Source)


Port 2


(Target 1)


UP

: Backward


DOWN

: Forward


OK

: Confirm/OK


ESC

: Cancel/Back


Copy 


                  2047M


0:11    41%              860M


Time


Copy 
Progress %


Target HDD


Total Size


(Source)


Copied Processed Size


(Target)


Function


Red

: Fail


Flashing Green

: Operating


Remain Green

: Pass


Yellow

: Powered 


Summary of Contents for PRO198

Page 1: ...SATA III Ultra High Speed 1 to 1 SATA HDD SSD Sanitizer and Duplicator User Guide v A 02 ...

Page 2: ...CT DISCLAIMER 2 WARRANTY 2 PIRACY STATEMENT 2 BEFORE YOU START 3 NOTICE SYMBOLS 3 PRODUCT OVERVIEW 4 FUNCTION TABLE 5 FUNCTIONS 8 1 COPY 8 2 COMPARE 8 3 COPY COMPARE 8 4 ERASE 8 5 UTILITY 10 6 SETUP 12 PRO198 v A 02 ...

Page 3: ... of our product and or software program or hardware issues can cause loss of data defective formatting or data loading The manufacturer will make efforts to resolve or repair any issues recognized by customer either within the warranty period or on a time and materials basis Specifications and features subject to change without notice or obligation Warranty The manufacturer provides a basic one ye...

Page 4: ...r cord for 2 minutes for discharging Use product only in a clean dry dust free and ventilated area Liquids or foreign debris can severely damage your duplicator It is typical for the machine to heat up during operation While in use do not move the duplicator or remove SSDs Static electricity may cause duplication error Please pay attention to the duplicator s environment while operating equipment ...

Page 5: ...rt 1 Source Port 2 Target 1 UP Backward DOWN Forward OK Confirm OK ESC Cancel Back Copy 2047M 0 11 41 860M Time Copy Progress Target HDD Total Size Source Copied Processed Size Target Function Red Fail Flashing Green Operating Remain Green Pass Yellow Powered ...

Page 6: ...f Defense DoD standard 4 4 DoD EraseComp To erase HDDs three times complying with USA Department of Defense DoD standard and bit by bit to check if data is completely erased 4 5 7 Pass Erase Erases device s 7 times complying with DoD 5220 22 M ECE Standards 4 6 Secure Erase The international authorized high standard Secure Erase function It is able to erase the area which is not loadable 4 7 Enhan...

Page 7: ...l partitions 6 1 3 Whole HDD To copy the whole source HDD 6 1 4 Percentage To copy percentage range of source HDD 6 1 5 Deep Analysis Scanning the entire source HDD first only copy the blocks with data 6 2 Reduce Partition in Copy if necessary Enable this function can reduce partition size when execute copying function 6 3 HPA Copy Mode Do Not Copy HPA Keep Target HPA Does not copy HPA data but ke...

Page 8: ...nnot identify the format 6 7 Erase Pattern One Byte Writes a random character per byte Big Random Data Writes a set of random characters into a set area 6 8 Clear HPA at Erase Clear HPA Setting Clears HPA setting during erase Keep HPA Setting Keeps original HPA setting during erase 6 9 Language Selects preferred language 6 10 Delete Disk Signature After Copy No Yes Do not copy the disk signature o...

Page 9: ...ntially automates from Function 1 Copy to Function 2 Compare Scroll to select 3 Copy Compare then press OK to start the automated duplication and verification process Caution User is responsible for verification of targets quality Testing a few completed targets in a mass production environment for quality control is recommended 4 Erase There are 7 submenu modes Step 1 Connect device s for sanitiz...

Page 10: ... Full Erase This function will erase all data per NIST 800 88 Standards on the connected device s Scroll to select 4 2 Full Erase then press OK to start the erasing process 4 3 DoD Erase This function will erase all data per DoD 5220 22 M Standards on the connected device s Scroll to select 4 3 DoD Erase then press OK to start the erasing process 4 4 DoD Erase Comp This function will erase all dat...

Page 11: ...ain and wait until it finishes 4 7 Enhanced Secure Erase This function erases devices that supports this feature Scroll to select 4 7 Enhanced Secure Erase then press OK to start the erasing process 5 Utility This menu contains submenus related to device information system information and updates Scroll to 5 Utility then press OK to view the submenus 5 1 Show Device Info This function will display...

Page 12: ...te to complete Caution Please do not disrupt during BIOS update otherwise it would cause irretrievable error on duplicator We are not held responsible for any damages 5 3 System Info This function will display basic information such as controller model number software version etc Scroll to select 5 3 System Info then press OK to view all information 5 4 Read Speed This function is to measure the r...

Page 13: ...source device and identify the data area to copy If the source device s data is within the target device s capacity the copy will be processed FAT16 32 64 NTFS EXT2 EXT3 EXT4 and HFS HFS HFSX are supported in this copy mode 6 1 2 All Partitions Copies all partitions and data unallocated partitions not included Scroll to select All Partitions then press OK to save the copy method The target device ...

Page 14: ...ity to copy Scroll to select Percentage set the upper and lower then press OK to save the copy method 350GB of all Partitions along with its contents will be copied Source Duplication Target 500GB 150GB Unallocated Partition Partition1 150GB Data 30 GB Partition2 200GB Data 90GB 350GB All 500GB of data will be copied Source Duplication Target 500GB 150GB Unallocated Partition 150GB Unallocated Par...

Page 15: ...and the last partition is in NTFS format 2 The actual data location in the master disk does not exceed the target capacity 6 3 Copy HPA Area This menu contains submenus related to HPA Copy Modes Scroll to select Copy HPA Area then press OK to view the submenus The default setting is Copy and Setting Do Not Copy HPA This menu contains submenu settings from which users can select Scroll to select Co...

Page 16: ...e Master This function allows user to enable or disable the source port for sanitization Scroll to select Erase Master then press OK Then scroll through to select one of two settings Disabled Devices connected to source port cannot be erased Scroll to select Erase Master Disabled then press OK to save this setting Enabled Devices connected to source port can be erased Scroll to select Erase Master...

Page 17: ...tting Big Random Data Random character written in a set of area Scroll to select Erase Pattern Big Random Data then press OK to save this setting 6 8 Clear HPA at Erase Sets to clear HPA setting during erase Scroll to select Clear HPA at Erase then press OK to save this setting Clear HPA Setting Clears HPA setting and data during erase Scroll to select Clear HPA at Erase Clear HPA Setting then pre...

Page 18: ...he same disk signature 6 11 Restore Default Restores all settings back to manufacturer defaults Scroll to select Restore Defaults then press OK to restore settings back to manufacturer defaults The above information is for marketing reference only The actual specification may subject to change without notice Caution Compare function will always Fail if Delete Disk Signature After Copy is set at Ye...

Reviews: