background image

u-line.com

FOR PRODUCT ASSISTANCE, CALL 1-800-779-2547

MILWAUKEE, WI U.S.A.

Serial/Serie:

Model/Modele:

HIGH SIDE DESIGN PRESSURE 300 PSI
LOW SIDE DESIGN PRESSURE 140 PSI

REFRIGERATOR AND/

BTL

LISTED 674R

OR FREEZER

HOUSEHOLD

U

C

L

R

US

www.u-line.com

1

2

Introduction

Congratulations on your purchase of a U-Line refrigerator. 

For nearly five decades and three generations, U-Line continues to 
be the leader in innovation, quality and value in the premium 
built-in undercounter ice making, refrigeration and wine 
preservation market. U-Line has captivated those with an 
appreciation for the finer things with exceptional functionality, 
style, inspired innovation and attention to even the smallest details. 
We are known and respected for our unwavering dedication to 
product design, quality and selection.

In 1962, Henry Uihlein founded U-Line Corporation as an 
outgrowth of Ben-Hur Freezer Company and was the first to 
develop and patent an automatic stand-alone undercounter 
residential ice maker. His foresight and determination to develop 
new ideas and to succeed when there were no clear guidelines or 
solutions are evident today. The newest Uihlein generation 
continues to build upon the family’s innovative legacy at the 
Milwaukee, Wisconsin based business by providing continuity and 
vision from which new designs and technology continue to be 
born.

Today the complete U-Line product collection includes Ice Makers, 
Wine Captain® Models, Combo® Models, a Refrigerator / 
Freezer, Refrigerators, Drawers and Beverage Centers. The U-Line 
brand offers products in the 1000 Series, 2000 Series and the 
Modular 3000 Series. The 1000 Series offers a more targeted 
priced product with appropriate features, while the 2000 Series 
offers upscale features, advanced technology and specialized 
product families. U-Line’s approach to its breadth of products, 
multiple price points and features allows a choice and product that 
will fit any lifestyle.

Read and save this Use and Care Guide.

NOTICE

READ all instructions in this guide completely before 
using the appliance for the first time.

For future reference, keep this guide in a safe, accessible location. If 
you need additional information or assistance, please contact U-
Line Corporation direct. Contact information appears on the back 
cover of this guide.

Before Calling Service. 

If you think your U-Line product is 

malfunctioning, read the OPERATION section of this guide to 
understand clearly the function of the control. If the problem 
persists, read the TROUBLESHOOTING GUIDE section of this 
guide to help you quickly identify common problems, and provide 
information on possible causes and remedies.

Please record the model number (1), serial number (2), date of 
purchase, and dealer contact information for your U-Line product 
below:

Model Number:

________________________________________________

Serial Number:

________________________________________________

Purchase Date:

________________________________________________

Dealer Name:

________________________________________________

Dealer Address:

________________________________________________

Dealer Telephone:

________________________________________________

Please Record Your Model Information

You will need your product model and serial number when you 
request additional information or services. You can find this 
information on the serial plate located on the upper right or back 
wall in the interior of your product. This information also appears 
on the warranty registration card. Please complete and mail your 
warranty registration card. You may also register online at 
www.u-line.com

Summary of Contents for U-CO29B-00

Page 1: ...CO1175S 00 U CO1175S 01 U CO1175S 20 U CO1175S 22 U BI2115B 00 U BI2115B 20 U BI2115S 00 U BI2115S 01 U BI2115S 20 U BI2115S 22 U BI2115SOD 00 U BI2115SOD 01 U BI2115SOD 20 U BI2115SOD 22 U BI2115W 00...

Page 2: ...es while the 2000 Series offers upscale features advanced technology and specialized product families U Line s approach to its breadth of products multiple price points and features allows a choice an...

Page 3: ...nce Leveling 6 Removing and Installing Interior Shelves 6 Removing and Installing Grille 7 Removing and Installing Door Shelves 7 Standard Doors Door Alignment and Adjustment 8 Door Reversability 8 Re...

Page 4: ...and leave shelves in place so children may not easily climb inside WARNING SHOCK HAZARD Electrical Grounding Required Never attempt to repair or perform maintenance on the unit until the electricity h...

Page 5: ...rounding cabinetry Defrost Type Manual Defrost For indoor use only ADA15IM Model Features Factory installed door locks Provides security and safety Stainless steel models Offers a bold stainless steel...

Page 6: ...de during the first two to three hours of operation To turn the unit on or off Press the rocker switch located below the temperature control dial in the center of the grille 2 inside the door on the f...

Page 7: ...s Checking Product Temperature To check the actual product temperature in the unit 1 Partially fill a plastic nonbreakable bottle with water 2 Insert an accurate thermometer 3 Tighten the bottle cap s...

Page 8: ...tly shake the bucket to break apart cubes If not using the ice maker regularly empty the ice bucket periodically to ensure fresh cubes It is normal for cubes to appear cloudy The cause is air trapped...

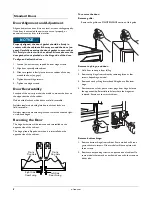
Page 9: ...ICE The unit must be located on a level surface for proper door and ice maker if equipped operation Use a level to check the levelness of the unit from front to back and from side to side Place the le...

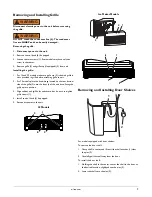
Page 10: ...rille to unit 2 For 75 models place the hook hinge located on the rear bottom side of the grille 2 onto the front lip of the unit base Swing the grille up into position 3 Align cabinet and grill holes...

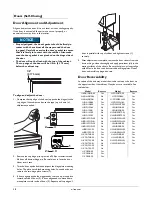
Page 11: ...lass doors without locks are field reversible Stainless steel models without glass doors must be ordered right or left hand hinged Reversing the Door The hinge hardware will be removed and reinstalled...

Page 12: ...emove the two screws holding the actuator to the door Reinstall the actuator 4 on the opposite end of the door where the nameplate was removed 6 Install new nameplate where the actuator assembly was r...

Page 13: ...edge needs to move down move plate toward inside of door 3 Repeat until top edge of door is parallel with top of cabinet and tighten screws 1 securely 5 After adjustment is complete remove the door cl...

Page 14: ...r 3 Remove door by tilting forward and lifting door off bottom hinge closer inserts 4 Reinstall hinge screw pin 1 into top hinge using a Phillips screwdriver Remove hole plugs Remove plastic screw plu...

Page 15: ...into position 4 Hold door to keep it from falling 5 Reinstall hinge screw pin 1 into top hinge using a Phillips screwdriver Align and adjust the door Align and adjust the door see DOOR ALIGNMENT AND A...

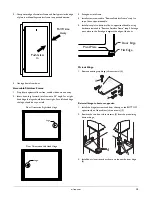
Page 16: ...p 1 to top of door opposite handle 5 Install pivot plat to bottom of door opposite of handle using hardware removed in Remove Stainless Frame step 2 Arrange pivot plate so the flat edge is against the...

Page 17: ...lugs 1 Install plastic screw plugs three each top and bottom 3 into holes where hinge hardware was removed Install Door 1 Hold door upright and tilted forward 2 Lift door on to bottom hinge closer ins...

Page 18: ...the interior and all removed components using a mild nonabrasive detergent and warm water solution applied with a soft sponge or non abrasive cloth Rinse the interior using a soft sponge and clean wa...

Page 19: ...e ambient temperature is expected to drop below 50 F turn off and unplug unit and drain all water from the unit to prevent freezing damage not covered by the warranty 1 Remove all consumable contents...

Page 20: ...t may be heard when it operates Evaporator Refrigerant flowing through an evaporator may sound like boiling liquid Condenser Fan Air moving through a condenser may be heard Automatic Defrost Drain Pan...

Page 21: ...ne Captain Models Combo Models Refrigerator Freezers Refrigerators Drawer Models and Beverage Centers The U Line brand offers products in the 1000 Series 2000 Series and the Modular 3000 Series The 10...

Reviews: