background image

PAGE 1 OF 6 

1014 IH-3542

π

  H-3542

RUBBERMAID

®

 CONTINUOUS 

AIR FRESHENER DISPENSER

1-800-295-5510

uline.com

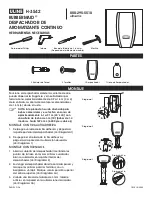
PARTS

MOUNTING

Wall Anchor x 2

Screw x 2

Dispenser x 1

Dispenser Key x 1

TOOLS NEEDED

Phillips Screwdriver

Drill

3 or 6mm Drill Bit

(Depends on mounting method)

Hammer

Para Español, vea páginas 3-4.

Pour le français, consulter les pages 5-6.

Position dispenser where moving air will disperse 

fragrance and neutralizer throughout the entire area, 

approximately 3-6' from entrance. Recommended 

mounting height is 6' from the floor.

NOTE: This product is designed for commercial 
restrooms and is effective in areas approximately 

20 x 30' with a ceiling height of 10' (1-4 stall 

restrooms, up to 6,000 cubic feet).

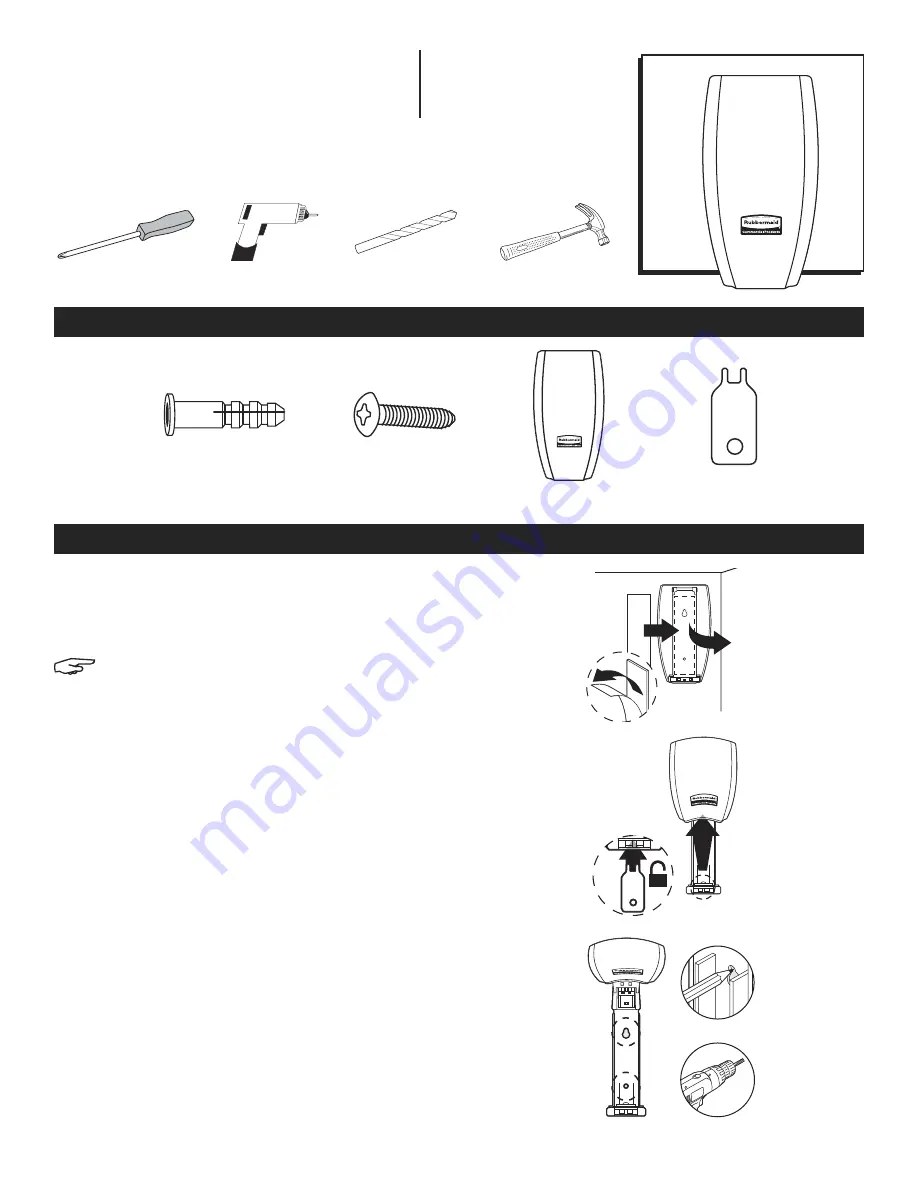
MOUNTING WITH ADHESIVE STRIP

1.  Peel one side of adhesive strip and adhere to the 

rear side of the dispenser. (See Figure 1)

2.  Peel other side of adhesive strip and adhere to wall 

at desired location. (See Figure 1)

MOUNTING WITH SCREWS

1.  Unlock dispenser cover by inserting prongs of key 

into two white square holes in bottom of dispenser. 

(See Figure 2)

2.  Hold the opened dispenser to the wall and mark 

screw holes with a pen or pencil. Only mark top 

portion of the top hole. (See Figure 3a)

3.  Using a 3mm drill bit, drill holes into wall at marked 

locations. (See Figure 3b)

3

2

1

Figure 1

2

1

Figure 2

Figure 3

Figure 3a

Figure 3b

Summary of Contents for Rubbermaid H-3542

Page 1: ...r commercial restrooms and is effective in areas approximately 20 x 30 with a ceiling height of 10 1 4 stall restrooms up to 6 000 cubic feet MOUNTING WITH ADHESIVE STRIP 1 Peel one side of adhesive strip and adhere to the rear side of the dispenser See Figure 1 2 Peel other side of adhesive strip and adhere to wall at desired location See Figure 1 MOUNTING WITH SCREWS 1 Unlock dispenser cover by ...

Page 2: ...ow part of the top hole See Figure 4 5 Finish screwing in top screw and then screw in bottom screw completely See Figure 5 MOUNTING WITH SCREWS AND WALL ANCHORS 1 Unlock dispenser cover by inserting prongs of key into two white square holes in bottom of dispenser See Figure 2 2 Hold the opened dispenser to the wall and mark screw holes with a pen or pencil Only mark top portion of the top hole See...

Page 3: ...UTOADHESIVA 1 Despegue un lado de la tira adhesiva y péguela a la parte posterior del despachador Ver Diagrama 1 2 Despegue el otro lado de la tira adhesiva y péguela a la pared en la ubicación deseada Ver Diagrama 1 MONTAJE CON TORNILLOS 1 Abra la cubierta del despachador insertando las puntas de la llave en los dos orificios cuadrados blancos ubicados en la parte inferior del despachador Ver Dia...

Page 4: ... Abra la cubierta del despachador insertando las puntas de la llave en los dos orificios cuadrados blancos ubicados en la parte inferior del despachador Ver Diagrama 2 2 Sostenga el despachador abierto contra la pared y marque los orificios para los tornillos con un bolígrafo o un lápiz Marque solo la porción superior del orificio superior Ver Diagrama 3a 3 Usando una broca de taladro de 6 mm tala...

Page 5: ...s du distributeur Voir Figure 1 2 Retirez l autre côté de la bande adhésive et collez au mur à l emplacement souhaité Voir Figure 1 MONTAGE AVEC DES VIS 1 Déverrouillez le couvercle du distributeur en insérant les broches de la clé dans les deux trous blancs carrés au bas du distributeur Voir Figure 2 2 Maintenez le distributeur ouvert sur le mur et marquez les trous de vis avec un stylo ou un cra...

Page 6: ... inférieure en totalité Voir Figure 5 MONTAGE AVEC DES VIS ET DES DISPOSITIFS D ANCRAGE 1 Déverrouillez le couvercle du distributeur en insérant les broches de la clé dans les deux trous blancs carrés au bas du distributeur Voir Figure 2 2 Maintenez le distributeur ouvert sur le mur et marquez les trous de vis avec un stylo ou un crayon Ne marquez que la partie supérieure du trou supérieur Voir Fi...

Reviews: