Tunturi FitRace 40HR User Manual Download Page 15

1 5

English  

Weight loss

The important factor here is the amount of effort you 

put in. The harder and longer you work the more 

calories you will burn. Effectively this is the same as if 

you were training to improve your fitness, the difference 

is the goal.

Use 

Adjusting the support feet

The equipment is equipped with 4 support feet. If 

the equipment is not stable, the support feet can be 

adjusted.


-

Turn the support feet as required to put the 

equipment in a stable position.


-

Tighten the lock-nuts to lock the support feet.

Adjusting the horizontal seat position

The horizontal seat position can be adjusted by setting 

the seat to the required position.


-

Loosen the seat adjustment knob.


-

Move the seat to the required position.


-

Tighten the seat adjustment knob.

Adjusting the vertical seat position

The vertical seat position can be adjusted by setting the 

seat tube to the required position. With the leg almost 

straight, the arch of the foot must touch the pedal at its 

lowermost point.


-

Loosen the seat tube adjustment knob.


-

Move the seat tube to the required position.


-

Tighten the seat tube adjustment knob.

Adjusting the handlebar

The handlebar can be adjusted according to the height 

and the exercise position of the user.


-

Loosen the handlebar adjustment knob.


-

Move the handlebar to the required position.


-

Tighten the handlebar adjustment knob.

Adjusting resistance (Fig. F-1)

To increase or decrease resistance, turn the 

adjustment knob at the top of the handlebar support 

tube clockwise (+ direction) to increase resistance 

and Distanceer-clockwise (- direction) to decrease 

resistance. 


Emergency break knob (Fig. F-2)

To apply the brake, press down on the brake tension

knob.

Use our dual function pedal (Fig. F3)

Attaching Cleats to Your Shoes:

If you have questions it is recommended that you 

consult a bicycle dealer for assistance, or refer to your 

shoe manufacturer’s instructions. 

When fixing the cleat the lateral centre line should be 

under the centre of the ball of the foot. Adjust forward 

and backward via the slots in the shoe sole. Adjust 

laterally via play between cleat washer and cleat. 

Tighten cleats very firmly. Cleat position can be fine-

tuned, according to personal preference, after trial use. 

It may take time to find your optimum cleat set-up.

Toe Clips:

All standard toe clips can be attached to the pedals. 

Use fixing hardware and installation instructions 

supplied with toe clips and ensure the attachment 

screws are firmly tightened before use.

To Use Pedals:

Engage cleated shoes in pedals by placing cleat 

between bindings while pushing down.

Disengage by twisting heel outwards away from 

exercise bike.

Binding tension is adjustable and should be set so that 

cleat and shoe do not disengage when pedalling. Use 

an Allen key to turn tension adjusting screws, clockwise 

to increase binding tension, counter-clockwise to 

decrease binding tension.

Replacing the battery (Fig. E-2)

The console is equipped with 1 CR2032 (3Volt) battery 

at the rear of the console.


-

Remove the console.


-

Remove the old batteries.


-

Insert the new batteries. Make sure that battery 

match the (+) and (-) polarity markings.


-

Mount the console.

Console (Fig. E-1)

CAUTION

• 

Keep the console away from direct sunlight.

• 

Dry the surface of the console when it is covered 

with drops of sweat.

• 

Do not lean on the console.

• 

Only touch the display with the tip of your finger. 

Make sure that your nails or sharp objects do not 

touch the display.

Summary of Contents for FitRace 40HR

Page 1: ...innen Veuillez lire ce manuel avant de commencer le montage de ce produit Leest u deze handleiding voordat u dit apparaat installeert www tunturi com User manual Benutzerhandbuch Manuel de l utilisate...

Page 2: ......

Page 3: ...3 FitRace 40HR A...

Page 4: ...4 FitRace 40HR B...

Page 5: ...5 FitRace 40HR C 100 cm 100 cm 100 cm 100 cm D 0...

Page 6: ...6 FitRace 40HR D 1...

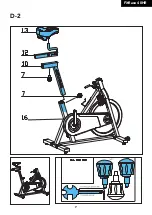
Page 7: ...7 FitRace 40HR D 2...

Page 8: ...8 FitRace 40HR D 3...

Page 9: ...9 FitRace 40HR D 4...

Page 10: ...1 0 FitRace 40HR E 1 E 1...

Page 11: ...1 1 FitRace 40HR F 1 F 2...

Page 12: ...1 2 FitRace 40HR F 3A F 3B...

Page 13: ...their safety must give explicit instructions or supervise the use of the equipment Before starting your workout consult a physician to check your health If you experience nausea dizziness or other abn...

Page 14: ...cal fitness tone muscle and in conjunction with a calorie controlled diet help you lose weight The warming up phase This stage helps get the blood flowing around the body and the muscles working prope...

Page 15: ...ob Fig F 2 To apply the brake press down on the brake tension knob Use our dual function pedal Fig F3 Attaching Cleats to Your Shoes If you have questions it is recommended that you consult a bicycle...

Page 16: ...art pedalling to power on the console when being in sleep mode Power off Without any signal being transmitted into the monitor for 4 minutes the monitor will enter SLEEP mode automatically Active trai...

Page 17: ...uring loading or transportation are not covered The warranty does not cover sounds or noises emitted during use where these do not substantially impede the use of the equipment and where they are not...

Page 18: ...Das Ger t ist nicht f r den gewerblichen Gebrauch geeignet Die maximale Verwendung ist auf 3 Stunden pro Tag beschr nkt Wenn dieses Ger t von Kindern oder Personen mit k rperlicher sensorischer geisti...

Page 19: ...rs was wiederum die Ausdauer und Fitness verbessert Sie sollten w hrend des Trainings zwar ins Schwitzen aber nicht au er Atem kommen Um eine Basisfitness zu erreichen und zu halten ben Sie mindestens...

Page 20: ...ie Sicherungsmuttern an um die St tzf e zu sichern HINWEIS Die Maschine steht am stabilsten wenn alle St tzf e vollst ndig eingeschraubt sind Nivellieren Sie die Maschine daher indem Sie alle St tzf e...

Page 21: ...Lehnen Sie sich nicht auf die Konsole Ber hren Sie die Anzeige nur mit Ihrer Fingerspitze Vergewissern Sie sich dass Ihre N gel oder andere scharfe Gegenst nde die Anzeige nicht ber hren HINWEIS Die K...

Page 22: ...ursachte St rungen und Fehlfunktionen am Ger t auftreten In den meisten F llen ist es ausreichend das defekte Teil zu erneuern Falls das Ger t nicht ordnungsgem funktioniert wenden Sie sich unverz gli...

Page 23: ...nderer entsprechender einfacher Teile Andere als die durch einen autorisierten Tunturi Vertreter ausgef hrten Garantieleistungen werden nicht ersetzt Durch unsachgem e d h nicht der Bedienungsanleitun...

Page 24: ...r des enfants ou des personnes affect s d un handicap physique sensoriel mental ou moteur voire dont l exp rience ou les connaissances s av rent insuffisantes est une source de risques Les personnes c...

Page 25: ...sivement le temps d exercice quotidien pour atteindre une heure Commencez vos exercices une vitesse lente et avec une faible r sistance pour viter de soumettre le syst me cardiovasculaire une contrain...

Page 26: ...on horizontale de la selle est r glable en l amenant la position requise Desserrez le bouton de r glage de la selle Amenez la selle la position requise Serrez le bouton de r glage de la selle R glage...

Page 27: ...tra nement Plage 0 0 99 9 Unit s KM H SPEED affiche 0 0 si aucun signal n est transmis au moniteur pendant 4 secondes au cours de l entra nement Distance Additionne automatiquement la distance parcour...

Page 28: ...on nationale applicable au commerce des produits de consommation courante et cette garantie ne limite ces droits en aucun cas La Garantie du propri taire est valable uniquement si l quipement est util...

Page 29: ...mentations gouvernementales nous demandent de r duire la quantit de mat riaux d pos s dans les d charges C est pour cela que nous faisons appel votre responsabilit et vous demandons de d poser les emb...

Page 30: ...onen met fysieke sensorische geestelijke of motorische handicaps of met gebrek aan ervaring en kennis kan gevaar veroorzaken De personen die verantwoordelijk zijn voor hun veiligheid moeten uitdrukkel...

Page 31: ...het bereiken en in stand houden van een basisconditie moet u minstens drie keer per week steeds 30 minuten trainen Verhoog het aantal trainingssessies ter verbetering van uw conditie Het is de moeite...

Page 32: ...gedraaid Nivelleer het toestel eerst door alle steunvoeten volledig in te draaien alvorens de nodige steunvoeten uit te draaien om het toestel te stabiliseren Afstellen van de horizontale zadelpositie...

Page 33: ...een met uw vingertop aan Raak de display niet aan met uw nagels of een scherp voorwerp LET OP De console gaat naar standby wanneer het toestel gedurende 4 minuten niet wordt gebruikt Uitleg van de wee...

Page 34: ...g de draaipunten Defecten en storingen Ondanks voortdurende kwaliteitscontrole kan het gebeuren dat het toestel door individuele onderdelen defect is of niet goed werkt In de meeste gevallen zal het v...

Page 35: ...niet wezenlijk belemmeren en niet veroorzaakt zijn door een defect aan het apparaat De garantie omvat ook geen onderhouds maatregelen zoals reiniging smering of normale inspectie van onderdelen noch d...

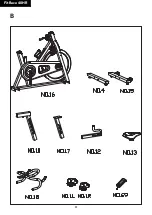
Page 36: ...M8 40 1 33 Left crank 1 34 Crank cover 1 35 Bearing 6004ZZ 2 36 Right crank 1 37 Self tapping screw 4 2 38 Flange nut M12 2 39 Eye bolt M6 58 2 40 Hex head nut M6 2 41 Self tapping screw 1 11 42 Self...

Page 37: ...47 35 48 46 49 42 50 31 51 20 36 1R 28 29 45 41 44 43 58 63 60 61 66 60 59 65 58 63 68 52 72 53 54 41 27 38 39 9 15 2 14 14 3 57 56 5755 2 65 31 16 40 9 39 38 37 42 22 37 73 31 30 7 70 35 64 34 33 1L...

Page 38: ......

Page 39: ......
Page 40: ...www tunturi com Tunturi New Fitness BV Purmerweg 1 NL 1311 XE Almere P O Box 60001 NL 1320 AA Almere The Netherlands www tunturi tness com info tunturi tness com 20180417...

Reviews: