background image

- 23 - 


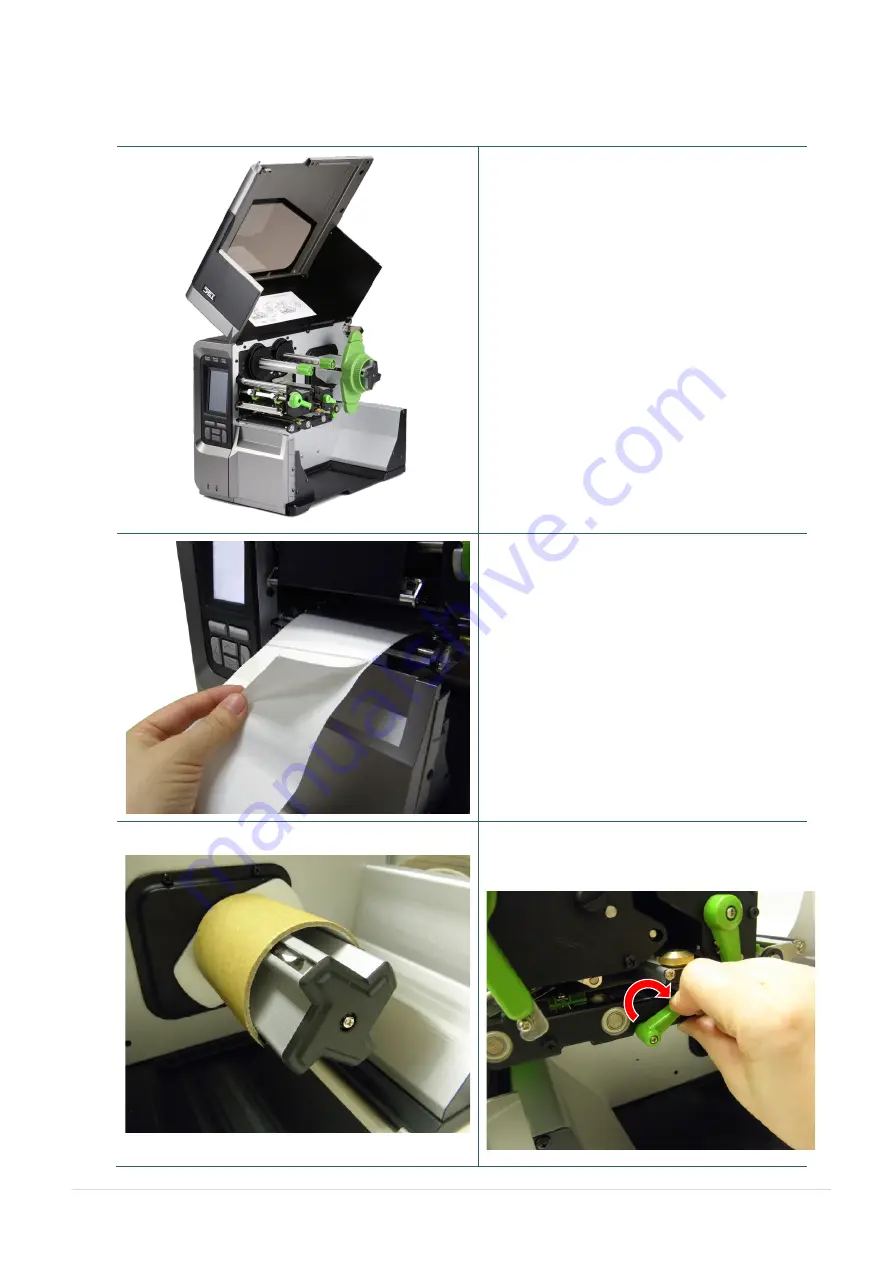
3.3.3 Loading Media in Peel-off Mode (Option) 


1.  Open the printer right side cover.


2.  Please refer to section 3.3.1 step 3~9 for 

loading media.


3.  Using the front display panel to do the 

calibration first and set the printer mode to 

peeler mode.


Note:  

Please calibrate the gap/black mark 

sensor before loading media in peel-off 

mode to avoid paper jam.


4.  Open print head release lever and label 

guide bar release lever to pull 

approximately 650mm of label through the 

front of the printer. 

5.  Remove several labels to leave liner. 


6.  Install the paper core onto the liner rewind 

spindle. Open the peel-off roller release 

lever. 


Summary of Contents for 99-151A001-0002

Page 1: ...USER S MANUAL MX240P MX340P MX640P Series THERMAL TRANSFER DIRECT THERMAL BAR CODE PRINTER...

Page 2: ...e from the Monotype Corporation Windows is a registered trademark of Microsoft Corporation All other trademarks are the property of their respective owners Information in this document is subject to c...

Page 3: ...em for later use 2 Follow all warnings and instructions on the product 3 Disconnect the power plug from the AC outlet before cleaning or if fault happened Do not use liquid or aerosol cleaners Using a...

Page 4: ...erates uses and can radiate radio frequency energy and if not installed and used in accordance with the instructions may cause harmful interference to radio communications However there is no guarante...

Page 5: ...r modifications not expressly approved by the grantee of this device could void the user s authority to operate the equipment CAUTION This equipment is not suitable for use in locations where children...

Page 6: ...v Equipment name Type designation Type MX240P nit Restricted substances and its chemical symbols...

Page 7: ...1 wt and exceeding 0 01 wt indicate that the percentage content of the restricted substance exceeds the reference percentage value of presence condition Note 2 indicates that the percentage content o...

Page 8: ...vii...

Page 9: ...Operator Control 12 2 3 1 LED Indication and Keys 12 2 3 2 Main page Icons 13 2 3 3 Touch Screen 14 3 Setup 15 3 1 Setting up the printer 15 3 2 Loading the Ribbon 16 3 3 Loading the Media 19 3 3 1 L...

Page 10: ...sing Ethernet interface to setup Ethernet interface 37 7 LCD Menu Function 39 7 1 Enter the Menu 39 7 2 Menu Overview 40 7 3 Setting 41 7 3 1 TSPL 41 7 3 2 ZPL2 43 7 4 Sensor 46 7 5 Interface 47 7 5 1...

Page 11: ......

Page 12: ...print and other ultra high resolution images The MX240P Series printers are loaded with standard features including a color touch display with new GUI design and six menu buttons to provide a great us...

Page 13: ...de support USB HID only Sensors Gap transmissive sensor Position adjustable 5 mm 100 mm Black mark reflective sensor Position adjustable 0 mm 93 5 mm Ribbon end sensor transmissive Ribbon encoder sens...

Page 14: ...I PLESSEY China Post ITF14 EAN14 Code 11 TELPEN PLANET Code 49 Deutsche Post Identcode Deutsche Post Leitcode LOGMARS CODABLOCK F mode DataMatrix Maxicode PDF 417 Aztec MicroPDF417 QR code RSS Barcode...

Page 15: ...display unit KU 007 Plus programmable smart keyboard Note Except for the linerless cutter all TSC regular heavy duty care label cutters DO NOT cut on media with glue 1 3 Printer Specifications Printe...

Page 16: ...er second 2 3 4 5 18 ips selectable 2 3 4 5 14 ips selectable 1 5 2 3 6 ips selectable Up to 18 IPS Up to 14 IPS Up to 6 IPS Max 4 ips for peeler mode Max print width 4 09 104 mm Max print length 1000...

Page 17: ...nuous die cut black mark external fan fold notch Media wound type Outside wound Media width 20 mm 114 mm 0 78 4 49 Media thickness 0 076 mm 0 305 mm 2 99 12 01 mil Label length 3 mm Label length peele...

Page 18: ...e printer Please retain the packaging materials in case you need to reship the printer Unpacking the printer the following items are included in the carton If any parts are missing please contact the...

Page 19: ...8 2 2 Printer Overview 2 2 1 Front View 1 LED indicators 2 LCD display 3 Front panel buttons 4 USB host x 2 5 Media view window 6 Paper exit chute 7 Printer cover 2 1 3 4 6 7 5...

Page 20: ...ide bar release lever 5 Ribbon supply spindle 6 Ribbon tension adjustment knobs 7 Media capacity sensor 8 Label supply spindle 9 Rear label guide 10 External label entrance chute 11 Print head pressur...

Page 21: ...Wi Fi module Option 5 RS 232C interface 6 GPIO interface Option 7 Ethernet interface 8 USB interface 9 Micro SD card socket 10 Centronics interface 1 3 2 4 7 6 5 8 9 10 Note The interface picture here...

Page 22: ...G Transcend V3 0 Class 10 UHS I 16G Transcend V3 0 Class 10 UHS I 32G Transcend V3 0 Class 10 16G Kingston V2 0 Class 4 16G Scandisk V3 0 Class 10 UHS I 16G Scandisk The DOS FAT file system is support...

Page 23: ...tatus Indication POWER Off Printer power off On Printer power on ON LINE On Printer is ready Blinking Printer is paused Printer is downloading data LEDs Touch screen Keys Icons Printer model Printer f...

Page 24: ...een The meaning of the soft keys will vary Navigational keys Used to select icons menu selection and navigation in the UI Indicated icon Indication Wi Fi device is ready option Ethernet is connected B...

Page 25: ...14 2 3 3 Touch Screen Tap an item to open use it Note For LCD Menu panel please refer to section 7 for more details Be selected Green Return Enter Set Scroll down Scroll up Up page...

Page 26: ...off 3 Connect the printer to the computer with the provided USB cable 4 Plug the power cord into the AC power cord socket at the rear of the printer and then plug the power cord into a properly groun...

Page 27: ...2 Loading the Ribbon 1 Open the printer right side cover 2 Install the ribbon and paper core onto ribbon supply spindle and ribbon rewind spindle 3 Push print head release lever to open print head mec...

Page 28: ...r to Loading path for ribbon as following fig 5 Wind the ribbon rewind spindle counterclockwise roughly 3 5 circles until ribbon is smooth properly stretched and wrinkle free 6 Close the print head me...

Page 29: ...18 Loading path for ribbon Ink coated outside wound Ink coated inside wound...

Page 30: ...inter right side cover 2 Place the roll of media on the label supply spindle Note For 1 2 5 width media please install label roll guard on the supply spindle to fix media 3 Push open the print head re...

Page 31: ...er 5 Adjust the rear label guide green to fit the label width 6 Adjust the front label guide green to fit the label width 7 Move the media sensor by adjusting the media sensor position adjustment knob...

Page 32: ...r and label guide bar release lever 9 Set media sensor type and calibrate the selected sensor Note Please calibrate the gap black mark sensor when changing media Please refer to video on TSC YouTube o...

Page 33: ...r right side cover 2 Insert the fan fold media through the bottom or rear external label entrance chute 3 Please refer to section 3 3 1 step 3 9 for loading media Note Please calibrate the gap black m...

Page 34: ...et the printer mode to peeler mode Note Please calibrate the gap black mark sensor before loading media in peel off mode to avoid paper jam 4 Open print head release lever and label guide bar release...

Page 35: ...he peeler sensor and peel off roller 8 Wrap the liner onto the paper core and wind the spindle until the liner stretched properly 9 Press the middle of the peel off roller to close the peel off roller...

Page 36: ...25 10 Close print head release lever and label guide bar release lever 11 Press the FEED button to test...

Page 37: ...e front display panel to do the calibration and set the printer mode to rewind mode 4 Install the paper core onto the rewind spindle 5 Open print head release lever and label guide bar release lever t...

Page 38: ...the label onto the paper core Wind the spindle until the label stretched properly 8 Adjust the supply holder guide to fit the supply width Turn the screw to fix the supply holder guide 9 Close print h...

Page 39: ...ent pressure to print correctly Therefore it may require to adjust the pressure knob to get your best print quality For example if the label width is 4 adjust both print head pressure adjustment knobs...

Page 40: ...from label lower right to upper left direction Wrinkle Example If the wrinkle on the label starts from the lower left side to upper right side please do following adjustment 1 Decrease the right side...

Page 41: ...nism different ribbon width require different tension to print correctly Therefore it may require to adjust the ribbon tension knob to get your best print quality The biggest tension is 1 Adjust the t...

Page 42: ...obs to the 1 on ribbon supply rewind spindles Factory default tension is 1 For 3 width ribbon If the ribbon width is 3 adjust both ribbon tension adjustment knobs to the 2 on ribbon supply rewind spin...

Page 43: ...32 For 2 width ribbon If the ribbon width is 2 adjust both ribbon tension adjustment knobs to the 3 on ribbon supply rewind spindles Ribbon Supply Spindle Tension 3 Ribbon Rewind Spindle Tension 3...

Page 44: ...s to a printer With the aid of this powerful tool you can review printer status and setting in an instant which makes it much easier to troubleshoot problems and other issues 6 1 Start the Diagnostic...

Page 45: ...he Printer Setup group media sensor field Ethernet Setup Setup the IP address subnet mask gateway for the on board Ethernet RTC Setup Synchronize printer Real Time Clock with PC Factory Default Initia...

Page 46: ...terface to setup Ethernet interface 1 Connect the printer and computer with USB cable 2 Turn on the printer power switch 3 Start the Diagnostic Utility by double clicking on the icon 4 The Diagnostic...

Page 47: ...gnostic Utility by double clicks on the icon 4 Select COM as interface then click on the Setup button to setup the serial port baud rate parity check data bits stop bit and flow control parameters 5 C...

Page 48: ...d Ethernet 5 Click the Discover Device button to explore the printers that exist on the network 6 Select the printer in the left side of listed printers the correspondent IP address will be shown in t...

Page 49: ...up and go back to Diagnostic Tool main screen Factory Default button This function will reset the IP subnet mask gateway parameters obtained by DHCP and reset the printer name Web setup button Except...

Page 50: ...n 7 1 Enter the Menu By touch display Tap the Menu icon on LCD main page to enter the menu By Keys Use navigational keys to select the Menu icon be marked in green and press the left soft key button m...

Page 51: ...s used to calibrate the selected media sensor We recommend calibrate the sensor before printing when changing the media This Interface option is used to set the printer interface settings This Advance...

Page 52: ...item to setup print speed Available setting range is 2 18 for 203dpi 2 14 for 300dpi and 1 5 6 for 600dpi 203 dpi 6 300 dpi 4 600 dpi 3 Density Use this option to setup printing darkness The available...

Page 53: ...able the label rewinder mode Batch Mode Offset This item is used to fine tune media stop location Available setting value range is from 999 dots to 999 dots 0 dot Shift X This item is used to fine tun...

Page 54: ...ed Available setting range is 2 18 for 203dpi 2 14 for 300dpi and 1 5 6 for 600dpi 203 dpi 6 300 dpi 4 600 dpi 3 Menu ZPL2 Darkness Print Speed Tear Off Print Mode Tear Off Peeler Off Cutter Rewind Pr...

Page 55: ...to set control prefix character N A Format Prefix This feature is used to set format prefix character N A Delimiter Char This feature is used to set delimiter character N A Media Power Up This option...

Page 56: ...45 you would like to scale Note If printing from enclosed software driver the software driver will send out the commands which will overwrite the settings set from the panel...

Page 57: ...et the paper length and gap bline size then scan the backing mark to calibrate the sensor sensitivity Note The Media Capacity item is used to calibrate the media capacity sensor N A Threshold Detect T...

Page 58: ...et the RS 232 baud rate 9600 Parity This item is used to set the RS 232 parity None Data Bits This item is used to set the RS 232 Data Bits 8 Stop Bit s This item is used to set the RS 232 Stop Bits 1...

Page 59: ...t module Item Description Default Status Use this menu to check the Ethernet IP address and MAC setting status N A Config DHCP This item is used to ON or OFF the DHCP Dynamic Host Configuration Protoc...

Page 60: ...ID Use this menu to set the Wi Fi SSID N A Security Use this menu to set the Wi Fi security Open Password Use this menu to set the Wi Fi password N A 7 5 4 Bluetooth This option is used to set the pri...

Page 61: ...set the password for locking the menu or favorites The default password is 8888 Disable Cutter Type This item is used to set the cutter type Guillotine Media Low Warning This item is used to set the w...

Page 62: ...rning icon will be shown on printer UI for reminding user to clean the print head The default setting is disable Reset Counter This item is used to reset the print head clean warning mileage after cle...

Page 63: ...File Manager This feature is used to check the printer available memory show the files list delete the files or run the files that saved in the printer DRAM Flash Card memory Menu File Manager DRAM FL...

Page 64: ...guration file System date System time Printed mileage meter Cutting counter Print speed inch sec Print darkness Label size inch Gap distance inch Gap black mark sensor intension Code page Country code...

Page 65: ...0 46 2C 22 54 45 53 T4 DAT 5 54 34 2E 44 41 54 22 2C 35 CLS DOW 2C 43 4C 53 0D 0A 44 4F 57 NLOAD TE 4E 4C 4F 41 44 20 22 54 45 ST2 DAT 53 54 32 2E 44 41 54 22 2C 5 CLS DO 35 2C 43 4C 53 0D 0A 44 4F WN...

Page 66: ...Favorites list Touch and hold a favorite option item unit Join Favorites setting screen pops up Tap Yes to add this setting option item to Favorites list Delete option item Touch and hold the option...

Page 67: ...NT at the end of the file and there must have CRLF at the end of each command line No print on the label Label or ribbon is loaded not correctly Use wrong type paper or ribbon Follow the instructions...

Page 68: ...e printer is in Hex Dump mode The RS 232 setting is incorrect Turn off and on the printer to skip the dump mode Re set the Rs 232 setting Label feeding is not stable skew when printing The media guide...

Page 69: ...rameter Shift Y in the LCD menu is incorrect The vertical offset setting in the driver is incorrect Calibrate the sensor sensitivity again Set the correct label size and gap size Press MENU SELECT x3...

Page 70: ...e Clean the print head when changing a new label roll Platen Roller 1 Turn the power off 2 Rotate the platen roller and wipe it thoroughly with water Clean the platen roller when changing a new label...

Page 71: ...18 8 13 Modify Ch 1 2 1 Printer Standard Feature Gap transmissive sensor and Black mark reflective sensor position adjustable range Kate 2019 1 30 Modify Ch 2 3 Operator Control LCD main screen Modify...

Page 72: ...indian Dist No 35 Sec 2 Ligong 1st Rd Wujie Township New Taipei City 23141 Taiwan R O C Yilan County 26841 Taiwan R O C TEL 886 2 2218 6789 TEL 886 3 990 6677 FAX 886 2 2218 5678 FAX 886 3 990 5577 We...

Reviews: