


2-16
Installing and Setting up the Machine > Network Setup
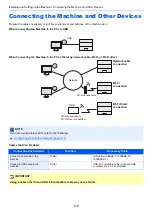
Preparation before configuring the Wireless Network by Using Computer
Before configuring the wireless network by using computer, connect the machine with the following methods.
Wired Connection directly by Using LAN Cable
1
Connect the machine with a computer via LAN cable when the
machine is powered on.
2
Turn on the computer.
The Auto-IP (Link-local) address will be assigned to the machine and the computer. This
machine applies Auto-IP as the default settings.
3
Prints the status page.
Press the [
Go
] key for 3 to 9 seconds.
4
Note the IP address.
Wireless LAN Connection by Using Wi-Fi Direct
1
Enable Wi-Fi Direct mode.
Simultaneously press the [
Go
] key and [
Wi-Fi Direct
] key on the operation panel for 3
seconds.
2
Turn the machine OFF and then ON.
3
Connect a computer or a handheld device with the machine.
4
Prints the network status page.
Press the [
Go
] key for 10 seconds or more.
5
Note the network name (SSID), IP address, and password.
This is printed in Wi-Fi Direct on the Network Status Page.
NOTE
You can also enable Wi-Fi Direct from Embedded Web Server RX.
Embedded Web Server RX User Guide
Setting Wi-Fi Direct (page 2-20)
NOTE
You can also check the network name (SSID), IP address, and password from Embedded
Web Server RX.
Embedded Web Server RX User Guide
Summary of Contents for P-3522DW
Page 1: ...Operation Guide P 3522DW ...
Page 128: ...6 27 Troubleshooting Indicator pattern when an error occurs Example F 5 2 6 ...
Page 132: ...6 31 Troubleshooting Clearing Paper Jams 4 Open the front cover 5 Close the front cover ...
Page 134: ...6 33 Troubleshooting Clearing Paper Jams 4 Open the front cover 5 Close the front cover ...
Page 136: ...6 35 Troubleshooting Clearing Paper Jams 4 Open the front cover 5 Close the front cover ...
Page 140: ...6 39 Troubleshooting Clearing Paper Jams 12Close the front cover ...
Page 145: ...6 44 Troubleshooting Clearing Paper Jams 14Close the front cover ...
Page 149: ...7 4 Appendix Optional Equipment 4 Replace the covers ...
Page 168: ......