

Product description
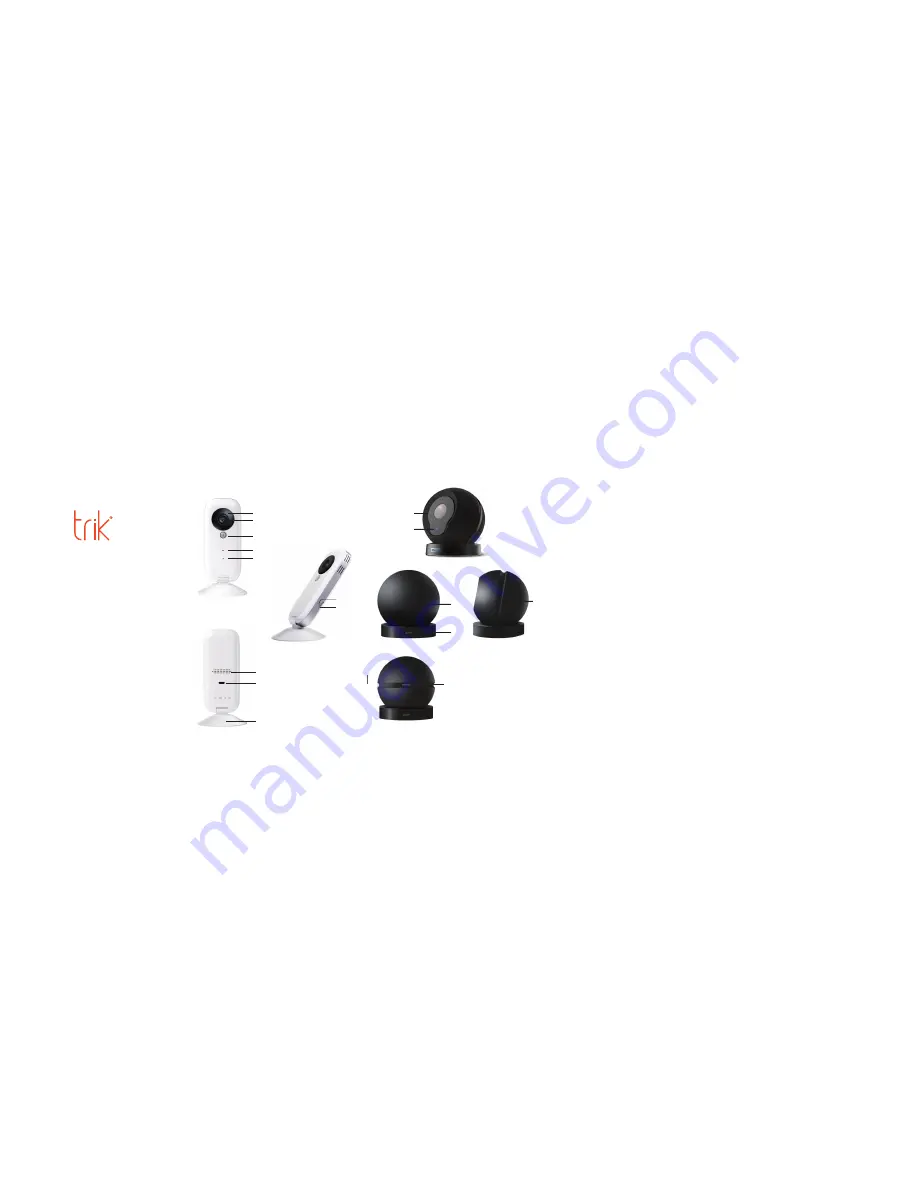
Trik Cam
Model 312312
4
5
8
9
10
2
1
3
6
7
1 Infrared night vision
2 Camera
3 PIR motion sensor
4 Status
LED
5 Microphone
6 Reset / Reset
7 Memory slot for micro SD card
8 Speakers
9 Power Input USB
10 Foot / Magnetic base
Product description
Trik Cam
Model 312313
1
2
3
4
5
6
1 Microphone
2 Status
LED
3 Reset / Reset
4 Speakers
5 Power Input USB
6 Memory slot for
micro SD card
2. Installation
Application
For Android users:
Download TRIKCAM application via Google Play
Go to Google Play and search for TRIKCAM.
Download and install TRIKCAM application via Google Play for free.
For iOS users (iPhone, iPad, etc.):
Download TRIKCAM application via the Apple App store
Go to the App Store and search for TRIKCAM application.
Download and install TRIKCAM application via the App Store for free.
3. Registration of user
Register user account and log into the application TRIK CAM.
Choose your username and password, then click Sign Up.
Use only letters, numbers and underscores when the username is created.
The minimum number of characters is 8 and the maximum number of characters 16.
4. Installing the camera
- Place the camera on a selected point in the wireless network coverage area.
- Connect the USB cable to the USB adapter and the camera.
The camera can be separated from the magnetic base and mounted on the metal surface. The camera
can also be mounted to the wall or stand independently.
With the magnetic foot the camera can easily be taken with them to another location if needed:
- Use a coin or similar tool to unscrew the bottom bracket from the base, the bracket can then be
mounted to the wall with screws. (Screws included)
- After the wall bracket screwed then easily mount the camera with the magnetic base.
Suggestion:
Selecting the location of the camera should be planned so camera don’t capture videos/images out of
your own property.
Camera 312312 and 312313 is made for indoor use.
Suitable locations for placement: Corridor / Hallway, Kitchen, Living Room, Baby room, garage, etc.
Camera Status
Start-up -
LED flashes yellow
Programming mode -
Green LED flashes slowly (once per second)
Connect to Wi-Fi -
LED flashes green quickly (3 flashes per second)
The camera installed correctly -
LED lights green continuously
5. Installing the camera into your application
An installation wizard takes you step by step through the installation
- Click the "+" sign in the top left corner of the application.
- Click "Connect my camera”.
- Select the camera model, check that the green indicator light flashes slowly.
- Click on the" Green light is flashing ".
- Connect to a 2.4GHz wireless network: Select the wireless network that the camera will connect to
(best if it your device are connected to same network) and type in the password for your wireless
network, then click "Next".
Binding Method 1: Sound Wave
- Point your phone or tablet speaker in front of the cameras microphone.
- It should be quiet in the surrounding area so there is no noise.
- Click (Send sound wave) and hold your phone or tablet steadily few seconds through the binding
process.
After the binding process is completed, you will be redirected automatically to the video list and can
start using the camera.
Binding Method 2: QR Code
If a problem occurs with the binding method 1 (Send sound wave), then click on (Add camera by QR
code scanning) and connect the camera via QR Code.
- After clicking (Add camera by QR code scanning) then the QR code comes automatically.
Hold the camera 10-15cm from the camera and the camera reads the QR code and implement
binding.
After the binding process is completed, you will be redirected automatically to the video list and can
start using the camera.
6. Camera list
Each user can install an unlimited number of cameras.
Remember that the more cameras you have installed on the same account, the more memory is
required for saving data in your phone or tablet. The cameras fall into a camera list so you can easily
switch between the cameras and adjust camera settings.
7. Playback live
Click on the camera you want to see, you can watch live streaming video or take snapshots.
8. Recording Video
Users can record video by pressing the icon “Video Recording”.
The recorded video is saved in the Albums and can be easily replayed.
9. The playback of stored video
You can play saved video.
Click "Play back", then select the video you want to watch.
Note: Recording videos from alarm activity needs to have a memory card installed.
USER MANUAL
Read the manual before installation


