WASHER-DRYER
WDR 1020
CWD 1010
OPERATING & INSTALLATION
INSTRUCTIONS
124975250
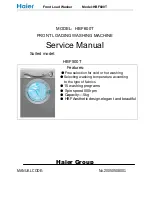
DRYING TIME
SELECTOR
MAINS
ON
CWD 1010
1
2
2
3
4
5
6
7
COTTONS - LINENS
95
°
95
°
60
°
60
°
40
°
IMPORTANT: PLEASE READ THE INSTRUCTION BOOK BEFORE USE.
MIXED FABRICS
SPIN 850
HALF HEAT DRYING
8
9
10
SYNTHETICS
50
°
DELICATES
WOOL WASH
QUICK & COOL WASH
RINSES
DRAIN
11
12
13
14
15
DELICATES - WOOL
40
°
40
°
30
°
WHITES WITH PREWASH
WHITES
WHITES ECONOMY
FAST COLOUREDS
NON FAST COLOUREDS
RINSES
SPIN 1000
FULL HEAT DRYING
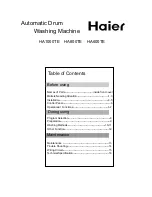
two
ONE
I N
WASHER DRYER
HALF
LOAD
RINSE
HOLD
ECO
WASH
rpm
1OOO
5
Eco
COTTONS - LINENS
DELICATES - WOOL
DELICATES
WOOL WASH
QUICK & COOL WASH
RINSES
DRAIN
1
2
2
3
4
5
6
7
11
12
13
14
15
MIXED FABRICS - SYNTHETICS
MIXED FABRICS
SPIN 850
HALF HEAT DRYING
8
9
10
IMPORTANT: PLEASE READ THE INSTRUCTION BOOK BEFORE USE.
30
°
WHITES WITH PREWASH
WHITES
WHITES ECONOMY
FAST COLOUREDS
NON FAST COLOUREDS
RINSES
SPIN 1000
FULL HEAT DRYING
WDR 1020
DRYING TIME
PROGRAMME
HALF
LOAD
RINSE
HOLD
1OOO
W A S H & D R Y
MAINS ON
ECO
WASH