background image

38

3. 

Time lapse interval: off, 1s, 1.5s, 2s, 2.5s, 3s, 5s, 10s

4.

 Video quality: low, medium, high, fine

IMAGES

  Open images

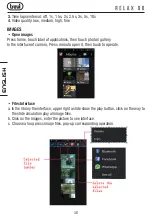
Press home, touch label of applications, then touch photos’ gallery.
In the interface of camera, Press menu to open it, then touch to operate.

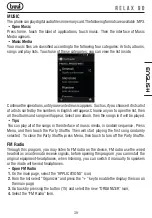
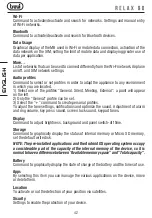
  Files Interface

a. In the library the interface, upper right a slide show the play button, click on the way to
  the slide circulation play all image files.
b. Click on the images, enter the picture to see interface.
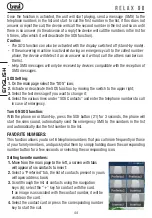
c. Choose a long press image files, pop-up corresponding operation.

ENGLISH

Summary of Contents for RELAX 90

Page 1: ...SH GUIDE DE L UTILISATEUR FRANCAIS BEDIENUNGSANLEITUNG DEUTSCH MANUAL DE USUARIO ESPANOL Per informazioni integrative e aggiornamenti di questo prodotto vedi www trevi it For additional information and updates of this product see www trevi it ...

Page 2: ...2 ...
Page 3: ...ONI Sélectionnez SETTAGGIO Sélectionnez CAMBIA LINGUA Trouvez et sélectionnez leur propre langue parmi les langues disponibles Pour plus d informations et pour obtenir des mises à jour sur ce produit consultez www trevi it IHRE SPRACHE GERÄT EIN Wählen Sie IMPOSTAZIONI Symbol Wählen Sie den SETTAGGIO Wählen Sie CAMBIA LINGUA Finde und wähle ihre eigene Sprache aus den verfügbaren Sprachen Ergänzen...

Page 4: ...DISPOSITIVO Seleccione o ícone IMPOSTAZIONI Selecione SETTAGGIO Selecione CAMBIA LINGUA Encontre e selecione seu próprio idioma a partir de idiomas disponíveis Para mais informações e atualizações deste produto consulte www trevi it Να ρυθμίσετε τη συσκευή ΓΛΩΣΣΑ ΣΑΣ Επιλέξτε το εικονίδιο IMPOSTAZIONI Επιλέξτε SETTAGGIO Επιλέξτε CAMBIA LINGUA Βρείτε και επιλέξτε τη δική τους γλώσσα από τις διαθέσι...

Page 5: ...aSIMdevesupportarequestotipodiconnessioneedavereuncontrattocheincluda questa navigazione contattare il vostro gestore telefonico per maggiori informazioni I servizi e le funzioni disponibili possono variare in base al software dell apparecchio o ai piani tariffari del gestore telefonico di conseguenza alcune voci del menu potrebbero non essere disponibili I collegamenti ai menu e le caratteristich...

Page 6: ...zioni NOTE D USO Questoapparecchioèunostrumentoelettronicodialtaprecisione evitatequindidiutilizzarlo nei seguenti casi Vicino a forti fonti di calore come caloriferi e stufe In ambienti troppo freddi o troppo caldi In luoghi molto umidi come stanze da bagno piscine ecc In luoghi molto polverosi In ambienti immersi in campi magnetici In luoghi soggetti a forti vibrazioni L uso prolungato del telef...

Page 7: ...incendio Non scollegate il dispositivo durante il caricamento di file si potrebbero produrre errori nel programma Spegnere il telefono cellulare nelle zone in cui il telefono non è consentito come ad esempio in aeroporto o negli ospedali Si prega di non utilizzare il telefono cellulare in prossimità di dispositivi elettronici di alta precisione Interferenze RF potrebbe causare malfunzionamenti di ...

Page 8: ...ite dalla batteria surriscaldamento rotture e prendere fuoco Si prega di non utilizzare fili aghi o altri oggetti metallici a cortocircuitare la batteria Inoltre non mettere la batteria in prossimità di collane o altri oggetti metallici ciò potrebbe causare perdite di liquido dalla batteria surriscaldamenti rotture e prendere fuoco Si prega di non saldare i punti di contatto della batteria ciò cau...

Page 9: ...are la posizione dell angolo tagliato della SIM 3 Inserire la batteria facendo attenzione ai contatti metallici 4 Riposizionate il coperchio posteriore con cautela facendo attenzione a non danneggiare gli ancoraggi in plastica 5 Prima di utilizzare l apparecchio per la prima volta occorre caricare completamente la batteria per far ciò utilizzate il cavo USB e l alimentatore in dotazione Note Se la...

Page 10: ...ori per micro nano SIM Non inserire schede di memoria nella Slot della SIM 3 INSERIMENTO DI UNA MEMORIA ESTERNA MICRO SD Lamemoriainternadeltelefonoèdedicataallagestionedeldispositivoedeveesserelasciata ibera per eventuali aggiornamenti del software Per memorizzare riprodurre scattare archiviare foto vedere Video o ascoltare musica occorre inserire una memoria esterna di tipo micro SD non inclusa ...

Page 11: ...lti funzione sul display viene indicato ogni volta la sua funzione 8 Tasto avvio chiamata conversazione 9 Tasto asterisco 10 Presa Auricolari Jack 3 5mm 11 Presa Micro USB 4 5 11 1 2 17 7 8 9 12 14 15 3 16 6 13 10 19 18 12 Tasto cancelletto se usato in SMS o WhatsApp modifica il metodo di inserimento testo 13 Tastiera numerica caratteri 14 Tasto ON OFF Fine chiamata ritorno Home page 15 Tasto INDI...

Page 12: ...unzionano con questo apparecchio Utilizzare solamente l alimentatore in dotazione differenti alimentatori potrebbero danneggiare la batteria Potete utilizzare il dispositivo anche quando è sotto carica ma per una maggiore durata della batteria se ne sconsiglia l utilizzo inoltre utilizzando l apparecchio i tempi di ricarica si allungano Durante la ricarica l apparecchio può aumentare di temperatur...

Page 13: ...te e tenete premuto per 2 secondi un elemento questo si ingrandirà leggermente quindi trascinate il dito per spostare l elemento e raggiunta la posizione desiderata sollevare il dito dal pannello Quando guardate un Video o ascoltate la musica potete spostarvi direttamente in un determinato punto semplicemente toccando la barra di progressione oppure utilizzando il dito trascinare il cursore della ...

Page 14: ...Icone funzioni Applicazioni A Modifica sfondo sulla pagina principale Nella pagina principale selezionare l icona IMPOSTAZIONI Selezionare la voce SETTAGGIO Selezionarelavoce FONDO esceglierel immaginepreferitadaimpostarecomesfondo Modifica tema icone Nella pagina principale selezionare l icona IMPOSTAZIONI Selezionare la voce TEMA Selezionare la voce TEMA e scegliere il tema preferito per le icon...

Page 15: ...nti in elenco Attivazione modalità silenzionsa selezione Profili Utente 1 Nella pagina principale selezionare l icona IMPOSTAZIONI 2 Selezionare la voce IMP ANDROID 3 Selezionare la voce PROFILI AUDIO 4 Selezionare il profilo che si desidera attivare tra Generale Silenzioso Riunione ed Esterno 11 FUNZIONI BASE TELEFONO Effettuare una chiamata 1 Comporre direttamente il numero utilizzando la tastie...

Page 16: ...ALLA RUBRICA Per aggiungere dei contatti alla vostra rubrica personale 1 Nella videata principale selezionare l icona CONTATTO 2 Selezionare l icona CREA NUOVO 3 Inserire i dati del contatto e selezionare l icona Fatto MESSAGGI SMS Potete utilizzare Trevi RELAX 90 per inviare e ricevere messaggi SMS Scrivere e Inviare un messaggio SMS 1 Nella pagina principale selezionare l icona MESSAGGIO 2 Selez...

Page 17: ... 12 FUNZIONI PARTICOLARI WHATSAPP Per utilizzare WhatsApp il telefono deve essere connesso alla rete 3G tramite SIM oppure ad una rete Wi Fi 1 Nella pagina principale selezionare l icona WhatsApp 2 Seguire le indicazioni richieste inserendo il numero telefonico della SIM ll interno del telefono 3 Completare l installazione inserendo un codice di attivazione che vi verrà inviato tramite SMS 4 Ora p...

Page 18: ...ttivata anche a display spento modalità stand by Se durante una chiamata d emergenza al numero chiamato si attiva la segreteria telefonica l apparecchio la rileverà come una risposta per cui non chiamerà i successivi numeri della lista Gli SMS di aiuto saranno ricevuti solo da apparecchi compatibili con la ricezione di messaggi SMS Impostazione della funzione SOS 1 Nella pagina principale selezion...

Page 19: ...ta TORCIA Potete utilizzare il vostro telefono come torcia grazie all indicatore LED 18 Per poter attivare la funzione torcia seguire i passi successivi 1 Nella pagina principale selezionare l icona APPLICAZIONI 2 Dalla lista selezionare Organizer e premere sul tasto per abilitare la visualizzazione dell icona sulla pagina principale 3 Tornare indietro premendo il tasto 15 e selezionare la nuova i...

Page 20: ...OOTH Bluetooth è una tecnologia di comunicazione senza fili a corto raggio in grado di inviare dati entro distanze di circa 10 metri senza richiedere una connessione con cavi NonènecessarioallineareidispositivipertrasmettereidatitramiteBluetooth Seidispositivi sono accoppiati potete scambiare dati tra di loro anche se si trovano in stanze diverse Note Verificate sempre di condividere e ricevere da...

Page 21: ... gestore Wi Fi Attivazione disattivazione rete Wifi e impostazini alla rete Wifi TEMA Impostazioni del Tema e stile Menu SETTAGGIO Impostazione dello Sfondo Lingua del Menu e Orario IMP ANDROID Si accede alle impostazioni standard del sistema Android Gestione SIM Comando per attivare disattivare la SIM abilitare la connessione dati e il Roming Wi Fi Comando per attivare disattivare ed effettuare u...

Page 22: ...llamemoriainternadeldispositivo quindi risulta normale avere una differenza tra Spazio di memoria disponibile e Capacità totale Batteria Comandopervisualizzaregraficamentelostatodicaricadellabatteriaeitempidiutilizzo App Selezionandoquestavoceèpossibilegestirelevarieapplicazionipresentisuldispositivo spostarle o eliminarle Geolocalizzazione Per attivare o meno il rilevamento della propria posizion...

Page 23: ...ttive garantiscono un considerevole margine di sicurezza mirato alla salvaguardia di tutti gli individui indipen dentemente dall età o dalle condizioni di salute Lo standard di esposizione a dispositivi mobili utilizza un unità di misura nota come SAR SpecificAbsorptionRate tassospecificodiassorbimento IllimiteSARstabilitodalledirettive internazionali è di 2 W kg calcolati su una media di dieci gr...

Page 24: ...olto separatamente dagli altri rifiuti L utente dovrà pertanto conferire l apparecchiatura integra dei componenti essenziali giunta a fine vita agli idonei centri di raccolta differenziata dei rifiuti elettronici ed elettrotecnici oppure riconsegnarla al rivenditore al momento dell acquisto di nuova apparecchiatura di tipo equivalente in ragione di uno a uno oppure 1 a zero per le apparecchiature ...

Page 25: ...ono in aree con segnale forte o spegnere temporaneamente il telefono Errore SIM Nessuna SIM inserita oppure inserita in modo errato Accertarsi che la scheda SIM sia inserita in modo corretto Impossibile accendere il telefono Il pulsante On Off non è stato premuto abbastanza a lungo Premere il pulsante On Off per almeno quattro secondi Batteria scarica Contatti della batteria sporchi Lasciare il ca...

Page 26: ...ire la batteria Impossibile aggiungere contatti in rubrica Lo spazio di memoria della rubrica è esaurito Eliminare alcuni contatti dalla rubrica Impossibile impostare alcune caratteristiche Il fornitore dei servizi di rete non fornisce i servizi o non li avete sottoscritti Contattare il fornitore dei servizi di rete 18 SPECIFICHE TECNICHE DISPLAY 2 8 pollici TFT LCD RISOLUZIONE 240x 320 QVGA TOUCH...

Page 27: ...it becomes known to a third party Please keep the phone out of sight when leaving it in a vehicle It is better to carry the phone with you or lock it in the trunk Set call barring Safety warnings and notices Before using your mobile phone read and understand the following notices carefully to ensure you will use it safely and properly General attention Only the battery and battery charger specifie...

Page 28: ... to impact or use the screen to strike things as this will damage the LCD board and cause leakage of the liquid crystal There is a risk of blindness if the liquid crystal substance gets into the eyes If this occurs rinse eyes immediately withclearwater undernocircumstancesrubyoureyes andgoimmediatelytoahospital for treatment Do not dissemble or modify your mobile phone as it will lead to damage to...

Page 29: ...b the eyes but immediately rinse eyes with clear water and go to the hospital for treatment Please do not disassemble or modify the battery as this will cause the battery to leak overheat crack and catch fire Please do not use or place the batteries near high temperature places such as near a fire or heating vessel as this will cause the battery to leak overheat crack and catch fire If the battery...

Page 30: ...ring off your mobile phone wait for a few seconds before removing or inserting an SIM card ExercisecautionwhenoperatinganSIMcard asfrictionorbendingwilldamagetheSIMcard ProperlykeepthemobilephoneanditsfittingssuchastheSIMcardsbeyondchildren sreach Installation Hold the End key for a while to power off the mobile phone Push the back cover above the battery and remove it Pull the left battery buckle...

Page 31: ...d Then input the new PIN and press the ok key Input the new PIN again and then press the ok key If the input PUK is correct the SIM card will be unlocked and the PIN will be reset Note The SIM card will be locked if you input wrong PIN code for three times To unlock the SIM card you need to input the PUK In general the PUK can be obtained from the network operator PUK ThePUKcode PersonalUnlockingK...

Page 32: ...ard brands may not be compatible with the phone The use an incompatible memory may be damaged or the card memory itself The appliance only supports memory formatted in FAT If you enter formatted cards differently the phone will ask you to reformat the memory card 4 Charging battery CHARGING THROUGH POWER SUPPLY 1 A device turned off connect the Micro USB plug of the supplied cable to the Micro USB...

Page 33: ...ROUGH COMPUTER You can also charge your phone by plugging it into a USB port of a computer using simply the supplied USB cable Notes Use only the Micro USB cable supplied Use only the mains adapter supplied different power supplies may damage the battery You can use the device even when it is charging but for longer life battery not recommended for use Furthermore using the apparatus the timing of...

Page 34: ...isplay screen Input the PIN and press the ok key if the mobile phone prompts you to input the PIN The PIN is provided by the network operator for new opening SIM card Enter the standby interface To power off the mobile phone hold the power ON OFF button for a while 1 Frontal Camera 2 Speaker Phone 3 Touch screen Display 4 Volume 5 Volume 6 Left Right Up Down navigation keys 7 Multifunction button ...

Page 35: ...r do other operations Receive callings When calling press Answer and slide towards right until the middle button then you can receive callings Refuse to answer the phone a When standby calling comes press refuse button and slide towards left side until the middle button then you could refuse the calling b When using calling comes click on the refuse button to refuse the calling Telephone recording...

Page 36: ... can touch the button of setting Menu in the interface of camera to do the settings Under camera viewfinder mode press Menu you can switch to video or photos gallery On the top right of camera viewfinder mode display the preview of the previous picture Touch preview box the photo display on full screen and you can enlarge it to view details Shared Settings of Camera and Video camera 1 Flash mode A...

Page 37: ...n of set in the interface of camera to do the settings Under camera viewfinder mode press Menu you can switch to video or photos gallery On the top right of camera viewfinder mode display the preview of the previous video Touch preview box the video will display on full screen and you can touch the play button to view it Shared Settings of Camera and Video camera 1 Flash mode Auto On off 2 Whiteba...

Page 38: ...otos gallery In the interface of camera Press menu to open it then touch to operate Files Interface a In the library the interface upper right a slide show the play button click on the way to the slide circulation play all image files b Click on the images enter the picture to see interface c Choose a long press image files pop up corresponding operation ENGLISH ...

Page 39: ...played Tips You can play all of the songs in the interface of music media in random sequence Press Menu and then touch the Party Shuffle Then will start playing the first song randomly selected To close the Party Shuffle press Menu then touch to turn off the Party Shuffle FM Radio Through this program you may listen to FM radio on the device FM radio use the wired headset as an antenna to receive ...

Page 40: ...ityandcoverageofWi Fisignaldependonthenumber infrastructure and other objects penetrated by the signal Open Wi fi and to connect to the wireless network 1 Press home menu then touch settings wifi and internet 2 Select the wi fi box to open Wi Fi Phone will automatically scan for available wireless networks 3 Touch Wi Fi settings Then a list of Wi Fi network will show the founded network name and s...

Page 41: ...sure that the devices wanted are under the detected mode 3 Touch headset in the equipment list to finish the connection 4 The pairing and connecting status will show under the headset in the Bluetooth devices list When the headset connected to your phone the status box will show BT icon means connected Then you can use the headset to make or receive callings Notices generally Bluetooth devices nee...

Page 42: ...n be set 3 Select the command to create personal profiles To adjust the tone settings notifications and optimize the sound Adjustment of alarm and ring volume key press sound screen lock sound keypad tones Display Command to adjust brightness background and panel switch off time Storage Command to graphically display the status of internal memory or Micro SD memory set the default write disk NOTE ...

Page 43: ...this item you can view all the information concerning the appliance SOS SOS function settings as an application UNINSTALL APP To remove applications from the device CLEAN DATA Erasing data from the phone and restoring factory data 10 Organizer Calendar Onceyouenterthismenu thereisamonthly viewcalendarforyoutokeeptrackofimportant appointments etc Days with events entered will be marked Calculator T...

Page 44: ...the text message if you want to change it 4 Select the various lines under SOS Contacts and enter the telephone numbers to call in case of emergency Turn ON SOS function With the phone on or Stand by press the SOS button 21 for 3 seconds the phone will start the siren sound automatically send the emergency SMS to the numbers in the list and automatically dial the first number in the list FAVORITE ...

Page 45: ...bol on the product indicates that at the end of its life must be collected separatelyfromotherwaste Theusermust therefore taketheremotecontrolintegratesthe essential components that got to its life to the appropriate differentiated collection centers for electronic and electro technical waste or return it to the dealer when purchasing a new appliance of equivalent type in terms of one to one or on...

Page 46: ...elevant to network settings In poor reception areas turn off your phone temporarily Replace the batteries Change with a new battery When no signals are received your phone will continue searching for base stations thus consuming a large amount of battery power and reducing standby time Use your phone at strong signal areas or Turn off the phone temporarily Failed to turn on your phone The battery ...

Page 47: ...ace of phonebook is used up Delete some contacts from the phonebook Failed to set up some features Your network not provider the services Contact your network service provider 14 TECHNICAL SPECIFICATIONS DISPLAY 2 8 inch TFT LCD RESOLUTION 240x 320 QVGA TOUCH SCREEN Touch screen capacitivo CPU MTK6572 Dual Core 1 2GHz RAM 512Mb OPERATIVE SISTEM Android 4 4 2 INTERNAL MEMORY 4GB EXTERNAL MEMORY Mic...

Page 48: ...tre téléphone mobile et changer ce numéro immédiatement si elle devient connue à un tiers S il vous plaît gardez le téléphone hors de vue lorsque vous le laissez dans un véhicule Il est préférable de porter le téléphone avec vous ou le verrouiller dans le coffre Interdit les appels Mises en garde et avis Avant d utiliser votre téléphone portable lire et comprendre attentivement les consignes suiva...

Page 49: ...utomatiques et d autres installations de commande automatique Pour connaître l effet des téléphones portables sur un stimulateur cardiaque ou d autres pièces d équipement médical électronique veuillez contacter le fabrique ou agents de vente locaux de l équipement Ne soumettez pas l écran LCD à des impacts ou utiliser l écran pour frapper les choses car cela endommager la carte LCD et causer une f...

Page 50: ...batterie ne pas utiliser la force ou la pression car cela provoquerait la batterie à couler surchauffer et d eclatement Veuillez ne pas utiliser des fils des aiguilles ou d autres objets métalliques de court circuiter la batterie aussi ne mettez pas la batterie à proximité des colliers ou autres objetsmétalliquescarcelapourraitcauserlabatterieàcouler surchaufferetd eclatement Ne pas souder les poi...

Page 51: ...cela pourrait causer un incendie ou choc électrique S il vous plaît immédiatement nettoyer toute la poussière recueillie sur la prise électrique Ne placez pas de récipients avec de l eau à proximité du chargeur afin d éviter les éclaboussures d eau sur le chargeur et entraînant une pénurie électrique de fuite ou autre dysfonctionnement Silechargeurestencontactavecdel eauoutoutautreliquidelepouvoir...

Page 52: ...de contacts et de courtes données de messages Remarque Après la mise hors tension de votre téléphone mobile attendez quelques secondes avant de retirer ou d insérer une carte SIM Faites preuve de prudence lors de l utilisation d une carte SIM le frottement ou de flexion endommager la carte SIM Bien garder le téléphone mobile et ses accessoires tels que les cartes SIM au delà de la portée des enfan...

Page 53: ...d adaptateurs pour micro nano SIM TREVI se réserve le droit de refuser une assistance gratuite en garantie sur des produits défectueux qui ont causés par l utilisation des cartes SIM pour les micro nano SIM Ne pas insérer la carte mémoire dans la fente de la carte SIM 3 Inscription d une externe mèmoire Micro SD Pour stocker des photos des vidéos et de la musique devrait insérer une micro SD mémoi...

Page 54: ... Description des boutons FRANÇAISE 4 5 11 1 2 17 7 8 9 12 14 15 3 16 6 13 10 19 18 1 Caméra frontale 2 Haut parleur 3 Afficher l écran tactile 4 Contrôle du volume 5 Contrôle du volume 6 Les touches de navigation haut bas droite et gauche 7 Bouton multifonction l écran affiche à chaque fois sa fonction 8 Répondez à des appels 9 Bouton astérisque 10 Prise casque 3 5 mm 11 Prise micro USB 12 Bouton ...

Page 55: ...recommandé pour une utilisation En outre en utilisant l appareil le temps de La charge peut prendre plus de temps Pendantlachargedudispositifpeutaugmenterlatempérature celan aaucuneincidence la performance et de la vie de la machine 6 Allumage arrêt et affichage de verrouillage déverrouillage Pour allumer le téléphone appuyez sur le bouton ON OFF 14 et maintenez le enfoncé pendant 3 secondes Pour ...

Page 56: ...cône d appels manqués Connexion au réseau sans fil Recevoir un nouveau message Bluetooth activé Une application est en cours de téléchargement Aucune carte SIM n est insérée dans le téléphone L alarme a été réglée et activée Accès bloqué USB actif Le téléphone recharge la batterie 8 Description de la page principale L état du téléphone est visible sur l écran principal et l image d arrière plan pe...

Page 57: ...s grandes 9 Réglages principaux Définir la date et l heure 1 Dans la page principale sélectionnez l icône PARAMÈTRES 2 Sélectionnez l élément PARAMÈTRAGE 3 Sélectionnez l élément RÉGLAGE DE L H 4 Définissez tous les paramètres dans cet élément ou sélectionnez Date et heure automatiques et activez Utiliser maintenant fourni par le réseau Réglage de la sonnerie 1 Dans la page principale sélectionnez...

Page 58: ...ois le contact trouvé appuyez sur le bouton 8 pour lancer l appel Répondre à un appel 1 Lorsque vous recevez un appel appuyez sur la touche 7 sous REPONSE ou sur la touche 8 pour ouvrir la conversation 2 Appuyez sur le bouton 14 pour mettre fin à l appel Rejeter un appel Lorsque vous recevez un appel appuyez sur la touche 15 sous REJECT pour rejeter l appel entrant Ajustement du volume pendant l a...

Page 59: ... vous appuyez sur les touches numériques pour trouver les mots qui vous seront suggérés Remarque Certains mots couramment utilisés ne peuvent pas être reconnus Si vous appuyez de nouveau sur la touche livre 12 vous n écrivez plus que des chiffres Appuyez plusieurs fois sur la touche livre 12 pour changer la langue d entrée Les signes de ponctuation les plus courants sont disponibles à la touche nu...

Page 60: ...vée l appareil commence à jouer envoie un message SMS aux numéros de téléphone de la liste et commence à appeler le premier numéro de la liste Si cela ne répond pas ou rejette l appel l appareil appellera le deuxième numéro de la liste et ainsi de suite jusqu à ce qu il n y ait pas de réponse en l absence de réponse l appareil appellera les numéros dans la liste 5 fois après quoi il désactivera la...

Page 61: ...avec les onglets de six contacts à insérer 2 Sélectionnezunonglet Favoris lalistedescontactsdevotrecarnetd adressess ouvrira 3 Faites défiler la liste des contacts à l aide des touches de navigation 6 sélectionnez la touche pour associer le contact à la carte Si une image est associée au numéro de contact elle sera visible sur la carte 4 Sélectionnez la carte de contact ou appuyez sur la touche nu...

Page 62: ...ique avec la liste des chansons 2 Sélectionnez la chanson à lire FM RADIO Pour écouter la radio FM vous devez connecter les écouteurs qui agissent comme une antenne radio 1 Sur la page principale sélectionnez l icône APPLICATIONS 2 Dans la liste sélectionnez Organiseur et appuyez sur la touche pour activer l affichage de l icône sur la page principale 3 Revenez en appuyant sur le bouton 15 et séle...

Page 63: ... appareil possède un code PIN vous devez l entrer APTOIDE Pour garder vos applications à jour vous pouvez utiliser la boutique du marché Aptoide 1 Sur la page principale sélectionnez l icône APPLICATIONS 2 Dans la liste sélectionnez Aptoide et appuyez sur la touche pour activer l affichage de l icône sur la page principale 3 Revenez en appuyant sur le bouton 15 et sélectionnez la nouvelle icône AP...

Page 64: ... adapter l appareil à tout environnement dans lequel vous vous trouvez 1 Sélectionnez l un des profils Général Silencieux Réunion Externe un point apparaîtra sur la gauche 2 Seul le profil Général peut être défini 3 électionnez la commande pour créer des profils personnels Pour ajuster les paramètres de tonalité les notifications et optimiser le son Réglage de l alarme et du volume de la sonnerie ...

Page 65: ... heure En sélectionnant cet élément vous pouvez définir la date et l heure de l appareil le fuseau horaire le format et l affichage jour mois année Programmation mise en marche En sélectionnant cet élément il est possible de régler l heure d enclenchement et l heure d arrêt automatique A propos du téléphone Ensélectionnantcetarticle vouspouvezvoirtouteslesinformationsconcernantl appareil SOS Param...

Page 66: ... l environnement et la santé humaine et favorise le recyclage des matériaux qui composent le produit le dumping illégal du produit par l utilisateur substitutions l ap plication des sanctions administratives prévues par le décret législatif n Décret législatif n 49 du 14 Mars 2014 TREVIpoursuitunepolitiquederechercheetdedéveloppementcontinu lesproduitspeuvent présenter des caractéristiques différe...

Page 67: ...r du service téléphonique La batterie ne charge pas la batterie ou le chargeur sont endommagés changez la batterie ou le chargeur la température est inférieure à 10 ou supérieure à 55 changez d emplacement mauvaise connexion assurez vous que le connecteur est bien inséré Échec de la connexion au réseau La carte SIM est invalide Contactez votre fournisseur de services réseau Au delà de la couvertur...

Page 68: ...K6572 Dual Core 1 2GHz RAM 512Mb SISTEM OPÉRATIONNEL Android 4 4 2 MÉMOIRE INTERNE 4GB MEMOIRE EXTERNE Micro SD jusqu à 32GB non inclus WI FI IEEE 802 11 b g n FRÉQUENCES GSM 850 900 1800 1900MHz FRÉQUENCES 3G 900 2100MHz TRANSMISSION BUETOOTH MAX POWER 0 8mW FRÉQUENCE DE TRANSMISSION BLUETOOTH 2 4GHz BATTERIE 1200mAh BP 4L FRANÇAISE ...

Page 69: ...alten für zukünftige Verwendung UmdenMissbrauchvonIhremMobiltelefonzuvermeiden führenSiefolgendevorbeugende Maßnahmen Stellen Sie die PIN Nummer von Ihrem Handy die SIM Karte und ändern Sie diese Nummer sofort wenn es bekannt einen Dritten wird Bitte halten Sie das Telefon aus den Augen beim Verlassen es in einem Fahrzeug Es ist besser tragen die Telefon mit Ihnen oder sperren ihn in den Kofferrau...

Page 70: ...szufinden die Auswirkungen von Mobiltelefonen auf ein Herzschrittmacher oder andere Stücke von elektronischen medizinischen Geräten kontaktieren Sie bitte die herstellt oder lokalen Verkaufsstellen der Ausrüstung Bitte unterziehen Sie nicht die LCD Stößen oder verwenden Sie den Bildschirm um die Dingezuschlagen alsdieserWilledenLCD BoardundzuUndichtigkeitenderFlüssigkristall beschädigen Es besteht...

Page 71: ...er Batterie auch haben Sie den Akku nicht in der Nähe von Halsketten oder andere Metallgegenstände da dies die Batterie verursachen auslaufen sich überhitzen Crack und Feuer fangen Bitte löten Sie die Kontaktstellen der Batterie dürfen da dies die Batterie verursachen Leck Überhitzung Crack und Feuer fangen WenndieFlüssigkeitindenBatterienindieAugengeht gibteseineGefahrderErblindung Es in diesem F...

Page 72: ... des Ladevorgangs wobei die Lade fertige Bild erscheint auch auf dem Bildschirm Der Ladevorgang dauert oft 3 bis 4 Stunden Während des Lade die Batterie Telefon und Ladegerät warm wird ist dies eine normale Phänomen Nach Abschluss des Lade trennen Sie das Ladegerät von der Netzsteckdose und aus dem Mobiltelefon Hinweise wenn Sie Ihr Ladegerät BitteverwendenSieAC220Volt DieVerwendungeinesanderenBat...

Page 73: ...en Sie keinen Alkohol Verdünner Benzin oder andere Lösungsmittel das Mobiltelefon zu wischen Eine schmutzige Steckdose verursacht schlechten elektrischen Kontakt der Macht zu verlieren und sogar Unfähigkeit wieder aufzuladen Bitte reinigen Sie regelmäßig 2 Einlegen der SIM Karte und Akku Eine SIM Karte trägt nützliche Informationen einschließlich Ihrer Mobiltelefonnummer PIN Personal Identificatio...

Page 74: ...aste zu deaktivieren und dann geben Sie den richtigen Code Hinweise halten den Einsatz von Micro SIM Adapter auf TREVI Produkte Die Steckplätze für SIM Karten sind ausschließlich für die Berücksichtigung SIM Format aufnehmen Die Verwendung von SIM Mikro oder Nano mit Adapter und nicht empfohlen da dies zu Schäden am Gerät und der Mikro Nano SIM selbst verursachen Warnung Trevi haftet nicht für Sch...

Page 75: ...anders das Telefon wird Sie bitten die Speicherkarte zu formatieren 4 Laden des akku LADEN DURCH STROMVERSORGUNG 1 Bei ausgeschaltetem Gerät verbinden Sie den Micro USB Stecker des mitgelieferten Kabels mit dem Micro USB Telefon nur mit dem mitgelieferten Kabel 2 Schließen Sie den USB Anschluss an das gleiche Stromversorgungskabel an und verbinden Sie das Kabel mit einer Standardsteckdose 3 DasGer...

Page 76: ...d des Ladevorgangs kann sich die Temperatur des Geräts erhöhen dies wirkt sich nicht auf die Leistung und die Lebensdauer der Maschine aus 5 Beschreibung der Schaltflächen DEUTSCH 4 5 11 1 2 17 7 8 9 12 14 15 3 16 6 13 10 19 18 1 Frontale Kamera 2 Lautsprecher Telefon 3 Touchscreen Anzeige 4 Lautstärke 5 Lautstärke 6 Navigationstasten Links Rechts Hoch Runter 7 Multifunktionstaste das Display zeig...

Page 77: ...s Display zu drücken einfach das Display mit den Fingern zu berühren oder spezielle Schreibfedern zu verwenden VerwendenSiekeinescharfenGegenstände diedasDisplayverkratzenoderbeschädigen könnten Berühren Sie das Display nicht mit Wasser Reinigen Sie das Display mit einem weichen Tuch ohne Zugabe von Reinigungsmitteln Der Touchscreen wird wie folgt überprüft Berühren Sie einmal mit dem Finger um ei...

Page 78: ...nd sie nach oben oder unten ziehen UmdieSeiteschnellzuvergrößern tippenSiezweimalaufdenBildschirmoderverwenden Sie zwei Finger und ziehen Sie sie nach außen zum Verkleinern nach innen Tippen Sie auf den Link um die Seite zu öffnen Dieses Telefon verfügt neben einem Touch Display auch über eine numerische Tastatur so dass Sie in mehreren Funktionen beides verwenden können z B WhatsApp In anderen Fä...

Page 79: ...Wählen Sie auf der Hauptseite das Symbol EINSTELLUNGEN Wählen Sie den Menüpunkt SHNITTSTELLEN Wählen Sie MODUSSCHALTER und wählen Sie Simple Grafik 6 Bildschirm Anzeige pro Bildschirm Standard und Standard 4 Symbole Grafik pro Bildschirm größere Symbole 10 Haupteinstellungen Datum und Uhrzeit einstellen 1 Wählen Sie auf der Hauptseite das Symbol EINSTELLUNGEN 2 Wählen Sie den Menüpunkt ALLGEMEINE ...

Page 80: ...bol einzugeben und internationale Anrufe zu tätigen drücken Sie einige Sekunden lang die Taste 0 Rufen Sie Kontakte aus dem Verzeichnis an 1 Wählen Sie auf der Hauptseite das Symbol KONTAKT aus 2 Blättern Sie mit den Navigationstasten 6 durch die Liste der Kontakte oder wählen Sie Suchen und geben Sie den ersten Buchstaben des anzurufenden Kontakts über die Zehnertastatur 13 ein durch wiederholtes...

Page 81: ...ma WählenSieTelefonnummernausdemVerzeichnis indemSiedasSymbolauswählen 4 Wählen Sie Textnachricht schreiben und geben Sie den Nachrichtentext ein 5 Wählen Sie das Symbol zum Senden der Nachricht EINGABE VON TEXT Um Text einzugeben müssen Sie die Telefontastatur verwenden die wie folgt eingestellt ist Standardeinstellung ABC Schreiben Drücken Sie wiederholt eine Zifferntaste bis das gewünschte Zeic...

Page 82: ...des Symbols WERKZEUGE stehen Ihnen zur Verfügung TASCHENRECHNE Verwenden Sie die Tastatur oder den Touchscreen um Zahlenauszuwählen ALARM Zum Einstellen der täglichen oder wöchentlichen Alarme ANWENDUNGEN Wenn Sie auf das Symbol APPS klicken können Sie auf die Liste der vorinstallierten Anwendungen zugreifen Drücken Sie die Taste um die Anzeige des Symbols auf der Hauptseite zu aktivieren Drücken ...

Page 83: ...erschiedenen Leitungen unter SOS Kontakte und geben Sie im Notfall die Rufnummern ein Aktivierung der SOS Funktion Wenn das Telefon eingeschaltet ist oder sich im Standby Modus befindet drücken Sie die SOS Taste 21 für 3 Sekunden das Telefon startet das Sirenenignal sendet automatisch die Notfall SMS an die Nummern in der Liste und wählt automatisch die erste Nummer in der Liste SCHNELLE ZUSAMMENS...

Page 84: ... ORGANIZER 4 Wählen Sie den Punkt Taschenlampe und schalten Sie die Brenner LED ein oder aus 13 Multimedia Funktionen KAMERA Legen Sie eine externe Speicherkarte Micro SD Karte ein um die Fotos zu speichern Kameraaktivierung 1 Wählen Sie auf der Hauptseite das Symbol KAMERA 2 Die grafische Oberfläche der Kamera öffnet sich wo Sie Bilder aufnehmen oder Videos aufnehmen können Um ein Bild aufzunehme...

Page 85: ...eschützten Geräten freigegeben und empfangen werden Wenn sich Hindernisse zwischen den Geräten befinden kann sich die Reichweite verringern Einige Geräte sind möglicherweise nicht mit Ihrem Gerät kompatibel Bluetooth Einstellungen 1 Wählen Sie auf der Hauptseite das Symbol EINSTELLUNGEN 2 Wählen Sie den Punkt ANDROID EINST 3 Wählen Sie den Eintrag BLUETOOTH und bewegen Sie den Schalter nach rechts...

Page 86: ...von Hintergrund Menüsprache und Uhrzeit ANDROID EINST Sie greifen auf die Standardeinstellungen des Android Systems zu SIM Verwaltung Befehl zum Aktivieren Deaktivieren der SIM Datenverbindung und Roming aktivieren WLAN Befehl zum Aktivieren Deaktivieren und Suchen nach Netzwerken Einstellungen und manuelle Eingabe von WLAN Netzwerken Bluetooth Befehl zum Aktivieren Deaktivieren und Suchen nach Bl...

Page 87: ...zum grafischen Anzeigen des Ladezustands der Batterie und der Nutzungszeiten Apps Durch Auswahl dieser Option können Sie die verschiedenen Anwendungen auf dem Gerät verwalten verschieben oder löschen Standort Aktivieren oder nicht die Erkennung Ihrer Position über Satelliten Sicherheit Einstellungen um den Schutz Ihres Geräts zu aktivieren Sprake Eingabe Durch Auswahl dieser Option können Sie die ...

Page 88: ...e Fernbedienung die wesentlichen Komponenten integriert die für elektronische und elektrotechnische Abfälle in die entsprechenden differenzierten Sammelstellen zu seinem Leben bekam oder es an den Händler zurückgeben wenn ein neues Gerät gleichwertiger Art Kauf in Bezug auf von 12 59 oder eine für Geräte mit längeren Seite von weniger als 25 cm auf Null Die angemessene getrennte Sammlung für die s...

Page 89: ... Echoes oder Geräusche Die Amtsleitung der Netzwerk ist in einem schlechten Zustand Es ist ein regionales Problem Hängen Sie den Anruf und wählen Sie erneut Wählen Sie eine andere bessere Linie In einigen Bereichen sind die Call Linien in schlechtem Zustand Kürzere Wartezeit Die Standby Zeit ist relevant für Netzwerkeinstellungen In Gebieten mit schlechtem Empfang schalten Sie Ihr Telefon vorüberg...

Page 90: ...ob der Stecker richtig angeschlossen ist Fehler beim Kontakte zu Telefonbuch hinzufügen Der Speicherplatz des Telefonbuchs aufgebraucht ist Löschen Sie einige Kontakte aus dem Telefonbuch Konnte einige Funktionen einrichten Ihre Netzwerk Service Provider nicht die Dienstleistungen oder Sie sie nicht abonniert haben Kontaktieren Sie Ihren Netzbetreiber 17 TECHNISCHE SPEZIFIKATIONEN ANZEIGE 2 8 Zoll...

Page 91: ... tomar las siguientes medidas preventivas Establecer el número PIN de la tarjeta SIM de su teléfono móvil y cambiar este número inmediatamente si se conoce a un tercero Por favor mantenga el teléfono fuera de la vista cuando la deje en un vehículo Es mejor llevar el teléfono con usted o bloquearlo en el maletero Establecimiento de llamada de restricción Los avisos de seguridad y las comunicaciones...

Page 92: ...sos u otros equipos médicos electrónicos por favor comuníquese con el fabrica o agentes de ventas locales del equipo Por favor no exponga la pantalla LCD a impactos o utilizar la pantalla para golpear las cosas ya que esto dañar la placa LCD y causar fugas del cristal líquido Hay un riesgo de ceguera si la sustancia de cristal líquido le entra en los ojos Si esto ocurre enjuague losojosdeinmediato...

Page 93: ...favor no soldar los puntos de contacto de la batería ya que esto hará que la batería se fugas sobrecalentamiento el crack y la captura de fuego Si el líquido en las baterías entra en los ojos hay un riesgo de ceguera Es esto ocurre no se frote los ojos enjuáguese inmediatamente los ojos con agua limpia y vaya al hospital para el tratamiento No desmonte ni modifique la batería ya que esto hará que ...

Page 94: ...y sus accesorios tales como las tarjetas SIM fuera del alcance de los niños Instalación Mantenga oprimida la tecla Fin por un tiempo para apagar el teléfono móvil Empuje la cubierta de nuevo por encima de la batería y retirarla Tire de la hebilla de la batería izquierda hacia afuera y luego levante la batería para sacarla Inserte la tarjeta SIM en la ranura para tarjetas SIM ligeramente con el cor...

Page 95: ...responsable de los daños causados por el uso de adaptadores de nano SIM TREVI se reserva el derecho a denegar la asistencia gratuita en garantía en productos con módulo SIM defectos causada por el uso de adaptadores de micro nano SIM No inserte tarjetas de memoria en la ranura de la tarjeta SIM 3 Inclusiòn de un externo de memoria micro SD Para almacenar fotos vídeos y música debe insertar una mem...

Page 96: ... 2 Teléfono con altavoz 3 Pantalla táctil 4 Volumen 5 Volumen 6 Teclas de navegación hacia la izquierda derecha arriba abajo 7 Botónmultifunción lapantallamuestra cada vez su función 8 Contesta una llamada 9 Clave asterisco 10 Toma de auriculares 3 5 mm 11 Toma Micro USB 12 Tecla si se usa en SMS o WhatsApp cambia el método de entrada de texto 13 Teclas numéricas letras 14 Encienda apague termine ...

Page 97: ...iales de mayo dañar la batería Puede utilizar el dispositivo incluso cuando se está cargando pero para una mayor duraciónbatería noserecomiendasuuso Porotraparte usandoelaparato elmomento de la carga podrá llevar más tiempo Mientras se carga el dispositivo puede aumentar la temperatura esto no afecta el rendimiento y la vida de la máquina 6 Encendido apagado y bloqueo desbloqueo de la pantalla Par...

Page 98: ...geramente luego arrastre el dedo para mover el elemento y cuando llegue a la posición deseada levante el dedo del panel Cuandoveunvideooescuchamúsica puedemoversedirectamenteaunpuntoespecífico simplemente tocando la barra de progreso o con el dedo arrastre el cursor de la barra de progreso hasta cierto punto Al explorar carpetas Archivo Música Video Foto etc puede arrastrar el dedo de abajo hacia ...

Page 99: ...ar Cambiar el fondo en la página principal En la página principal seleccione el icono AJUSTES Seleccione el ítem AJUSTES GENER Seleccione el ítem PAPEL PINTADO y seleccione la imagen preferida para establecer como fondo de pantalla Editar iconos de tema En la página principal seleccione el icono AJUSTES Seleccione el ítem CONFIGURACIÓN Seleccione el elemento TEMA y elija el tema favorito para los ...

Page 100: ...emento PERFILES DE AUDIO 4 Junto a GENARAL selecciona el ícono 5 Seleccione Tono del teléfono y seleccione un tono de llamada de los enumerados Activación en modo silencioso selección de perfiles de usuario 1 En la página principal seleccione el icono AJUSTES 2 Seleccione el elemento CONFIGURACIÓN 3 Seleccione el elemento PERFILES DE AUDIO 4 Seleccione el perfil desde el que desea activar General ...

Page 101: ...zar la lista de todas las llamadas AGREGAR CONTACTOS TELEFÓNICO Para agregar contactos a su libreta de direcciones personal 1 En la pantalla principal seleccione el icono CONTACTO 2 Seleccione el ícono CREAR NUEVO 3 Ingrese la información de contacto y seleccione el ícono Hecho MENSAJES SMS Puede usar Trevi RELAX 90 para enviar y recibir mensajes SMS Escribir y enviar un mensaje SMS 1 En la página...

Page 102: ...leccione el ícono WhatsApp 2 Siga las instrucciones requeridas al ingresar el número de teléfono de la tarjeta SIM dentro del teléfono 3 Complete la instalación ingresando un código de activación que se le enviará por SMS 4 Ahora puedes usar la aplicación libremente Para escribir un texto debe usar el teclado del teléfono consulte el párrafo Escribir y enviar un mensaje SMS y Notas para ingresar t...

Page 103: ...ientes números en la lista Los mensajes de texto de ayuda solo serán recibidos por dispositivos compatibles con la recepción de mensajes SMS Configurando la función SOS 1 En la página principal seleccione el ícono SOS 2 Active o desactive la función SOS moviendo el interruptor a la esquina superior derecha 3 Seleccione el mensaje de texto si desea cambiarlo 4 Seleccione las diversas líneas en Cont...

Page 104: ...lalista seleccione Organizador ypresionelatecla parahabilitarlavisualización del ícono en la página principal 3 Regrese presionando el botón 15 y seleccione el nuevo ícono ORGANIZADOR 4 Seleccione el elemento Antorcha y encienda o apague el LED de la antorcha 13 Funciones multimedia CÁMARA Inserte una tarjeta de memoria externa tarjeta micro SD para almacenar las fotos Activación de la cámara 1 En...

Page 105: ...etooth Si los dispositivos están emparejados puede intercambiar datos entre sí incluso si están en habitaciones diferentes Notas Verifiquesiempreparacompartiryrecibirdatosdedispositivosconfiablesydebidamente protegidos Cuandohayobstáculosentrelosdispositivos ladistanciadeoperaciónpuededisminuir Algunos dispositivos pueden ser incompatibles con su dispositivo Configuración de Bluetooth 1 En la pági...

Page 106: ...dioma del menú y la hora CONFIGURACIÓN Accedes a la configuración estándar del sistema Android Administratión de la SIM Comando para activar desactivar la SIM habilitar la conexión de datos y Roming Wi Fi Comando para activar desactivar y buscar redes Configuración y entrada manual de redes Wi Fi Bluetooth Comando para activar desactivar y buscar dispositivos Bluetooth Uso de datos Visualización g...

Page 107: ... Capacidad total Batería Comandoparamostrargráficamenteelestadodecargadelabateríaylostiemposdeuso Aplicaciones Al seleccionar este elemento puede administrar las diversas aplicaciones en el dispo sitivo moverlas o eliminarlas Ubicación Para activar o no la detección de su posición a través de satélites Seguridad Configuración para habilitar la protección de su dispositivo Idioma e introducción Al ...

Page 108: ...e ser recogido separadamente de los demás residuos El usuario debe por lo tanto tomar el control remoto integra los componentes esenciales que llegaron a su vida útil a los centros adecuados de recogida de residuos electrónicos y electrotécnicos o devolverlo al distribuidor al comprar un nuevo aparato de tipo equivalente en términos de uno a uno o uno a cero para el equipo que tiene lado más largo...

Page 109: ...a la línea local está en mala condición Pobre tiempo de vida de la batería El tiempo de duración está relacionado con la red en áreas de mala recepción apague el teléfono temporalmente Baterías en mal estado reemplace las baterías cuando no se reciba señal el teléfono estará constantemente buscando señal y consumiendo mucha batería use su teléfono en áreas con fuerte señal o apáguelo temporalmente...

Page 110: ... grados cambie de entorno mala conexión mire que el conector esté bien insertado No carga teléfonos a la lista ha usado toda su memoria libere memoria 17 ESPECIFICACIONES TÉCNICAS PANTALLA 2 8 pulgadas TFT LCD RESOLUCIÓN 240x 320 QVGA PANTALLA TÁCTIL pantalla táctil capacitiva CPU MTK6572 Dual Core 1 2GHz RAM 512Mb SISTEMA OPERATIVO Android 4 4 2 MEMORIA INTERNA 4GB MEMORIA EXTERNA Soporta Micro S...

Page 111: ...e al seguente indirizzo Internet https www trevi it dms zidi TREVI DOCRELAX90 pdf SIMPLIFIED EU DECLARATION OF CONFORMITY Hereby TREVI S p a declares that appliance RELAX 90 is in compliance with directive 2014 53 EU The full text of the EU declaration of conformity is available at the following internet address https www trevi it dms zidi TREVI DOCRELAX90 pdf DICHIARAZIONE DI CONFORMITA DECLARATI...

Page 112: ...Trevi S p A Strada Consolare Rimini San Marino 62 47924 RIMINI RN Italy Tel 0541 756420 Fax 0541 756430 www trevi it E mail info trevi it Made In China ...

Reviews: