background image


© Copyright 2015 TRENDnet. All Rights Reserved. 


15


TRENDnet User’s Guide


TEW-734APO 


1. Log into the management page (see “

Access the management page

 on page 27). 

2. Click on 

Wireless 

button


and click on 

Basic Settings

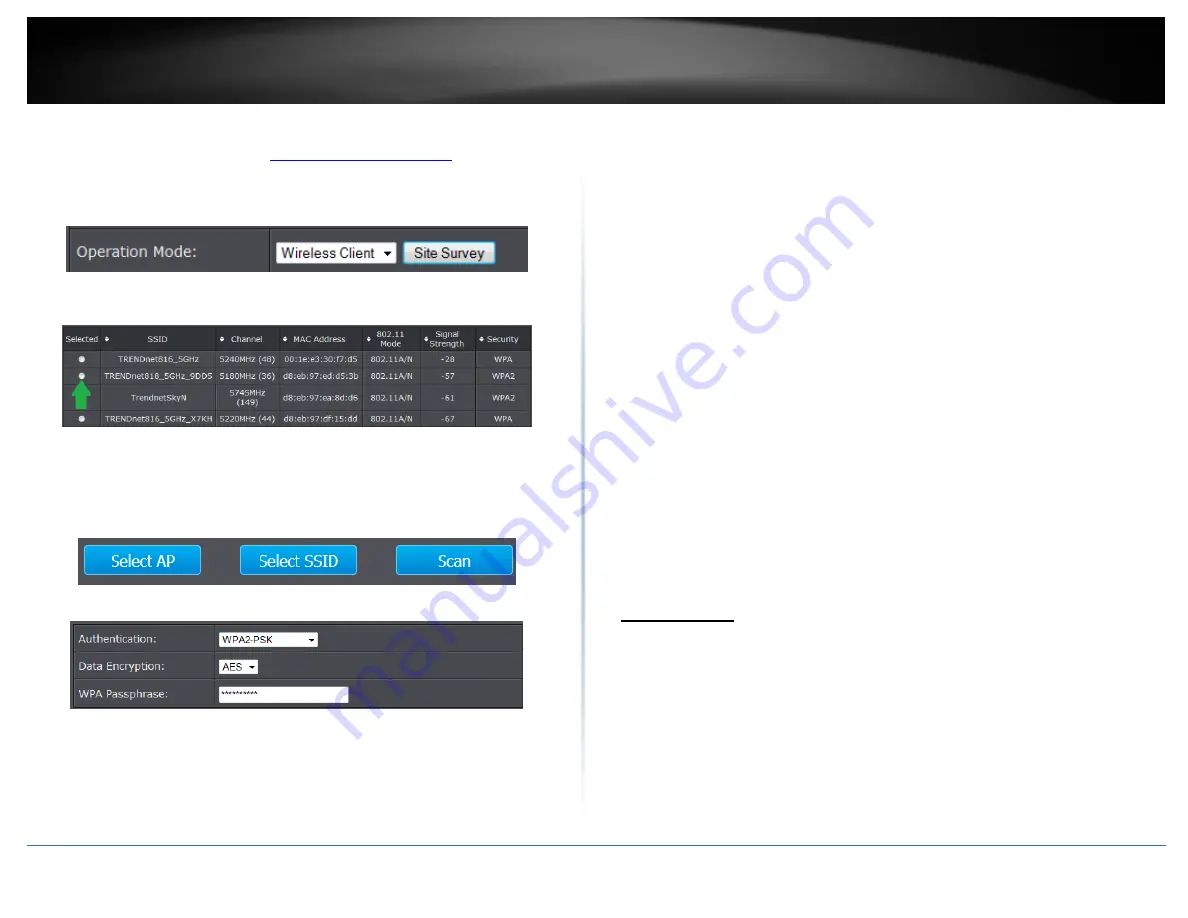
3. Select Wireless Client in the Operation Mode pull down menu and click 

Apply

4. Click 

Site Survey

 button.  


5. The access point will automatically scan for available access points.  
6. Select the access point or wireless network you want to connect.  


7. Click either Select AP , Select SSID or Scan option.  


Select AP:

 Configures the access point based on the selected AP’s SSID and MAC 

address 


Select SSID:

 Configures the access point based on the selected AP’s SSID only  


Scan:

 Scans for available wireless networks.  


8. Click Apply when you have selected the wireless network you want to connect with.  
9. If your wireless network is configured with wireless security, click 

Profile Settings


Security Settings:

 Select and configure the wireless security of your wireless 

network. Click 

Apply

 to save settings. Please refer to 

Wireless Encryption Type


section on page30. 


Bridge Mode  


Summary of Contents for TEW-734APO

Page 1: ...TRENDnet User s Guide Cover Page...

Page 2: ...o choose the type of security for your wireless network 20 Secure your wireless network 21 Wireless access control 23 Advance Settings 23 Change your IP address 24 Configure your Internet connection 2...

Page 3: ...43 DHCP Client 44 Configure Wireless Profile 44 Secure your wireless network 45 Wireless access control 47 Virtual AC Thin AP 47 AP Management 48 System Setting 48 Advance Settings 49 Setting time 49...

Page 4: ...P55 rated TEW 734APO comes with a proprietary PoE injector and a pole mounting kit Multi Mode Support Supports Fat AP Thin AP Virtual Access Control controls compatible Thin AP devices and Virtual AC...

Page 5: ...recautions and proper installation Product Hardware Features Access Point Side View Diagnostic LEDs Provides device status o Wireless Signal Blinks green during wireless network activity Green Good Ye...

Page 6: ...port can function as the network WAN port or LAN port Reset button Press and hold the reset button for 15seconds to reset the unit back the factory default settings PoE Adapter View DC Power port Pow...

Page 7: ...uter Connects multiple devices to the Internet Switch Connect several wired network devices to your home network Your router has a built in network switch the LAN port 1 4 If you have more wired netwo...

Page 8: ...l Dense materials like metal solid wood glass or even furniture may block or degrade the signal 4 Antenna orientation can also have a large impact on your wireless signal Use the wireless adapter s si...

Page 9: ...LAN Blinking Green 7 Open your web browser e g Internet Explorer Firefox Safari Chrome or Opera and go to http 192 168 10 100 The access point will prompt you for a password 8 Enter the default user n...

Page 10: ...ile cabinets and metal furniture reflective surfaces such as glass or mirrors and masonry walls c Any obstruction can weaken the wireless signal even non metallic objects so the fewer obstructions bet...

Page 11: ...when FAT AP is selected as the device system mode o AP Mode Creates a wireless network to your existing network Device Ethernet port serves as a LAN Local Area Network port of the device o Wireless C...

Page 12: ...then System Settings 5 Select Fat AP in the Device Mode drop down menu and Select your Country Region Note FCC domain products will only support United States Country Region 6 Click Apply button to sa...

Page 13: ...an click more to configure additional SSID Broadcast SSID o Enable Access point will broadcast your wireless network name SSID making it easier for wireless clients to find the wireless network o Disa...

Page 14: ...nfigure The following section outlines options to configure the basic settings of the multiple SSID Profile Name Enter the profile name of the network name you are configuring Wireless Network Name SS...

Page 15: ...ss networks around you Ple Lock AP MAC Enter the MAC address of the access point you are connected 802 11 Mode If all of the wireless devices you want to connect with this Access Point can connect in...

Page 16: ...ou want to connect 7 Click either Select AP Select SSID or Scan option Select AP Configures the access point based on the selected AP s SSID and MAC address Select SSID Configures the access point bas...

Page 17: ...on connecting any wireless computers or devices to your network Operation Mode Select the mode you want the access point to operate in o AP refer to page11 for additional information o Wireless Client...

Page 18: ...power is the wider the signal can cover but the power consumption will be greater accordingly Wireless WDS Setting This section outlines the available management options under the WDS Settings of the...

Page 19: ...choosing the appropriate mode If you have some devices that use a different transmission mode choose the appropriate mode o 802 11A N mixed mode This wireless mode works in the 5GHz frequency range a...

Page 20: ...serve as the WAN Wide Area Network or Internet port Please verify your network configuration when using this mode Please refer to Internet Service Types section in the Appendix to help determine your...

Page 21: ...or computers with old embedded wireless cards wireless clients you may have to set your router to WEP to allow the old adapters to connect to the router Note This encryption standard will limit connec...

Page 22: ...guration Open System ASCII 13 characters TKIP Preshared Key 8 63 characters AES Preshared Key 8 63 characters Dependent on the maximum 802 11n data rate supported by the device 150Mbps 300Mbps or 450M...

Page 23: ...ick Generate key to have the access point generate your encryption key Selecting WPA PSK WPA2 PSK or WPA PSK WPA2 PSK WPA2 PSK recommended The following section outlines options when selecting PSK Pre...

Page 24: ...le this option to set the cache period based on seconds Wireless access control The MAC address filter section can be used to filter network access by machines based on the unique MAC addresses of the...

Page 25: ...fault Router or LAN IP Address 192 168 10 1 00 Default Router or LAN IP Network 192 168 10 0 255 255 255 0 1 Log into the management page see Access the management page on page 9 2 Click on System and...

Page 26: ...provided by your ISP Internet Service Provider 4 Complete the fields required by your ISP 5 Complete the optional settings only if required by your ISP 6 To save changes click Save Note If you are uns...

Page 27: ...lt in poor network performance Leave it at its default of 2346 is recommended Fragment Threshold Specify the maximum size in byte for a packet before data is fragmented into multiple packets Setting i...

Page 28: ...ld like to add to distinguish the rule Port Filtering The Port filtering gives you the ability to restrict the computers in LAN from accessing certain websites in WAN according to specified IP address...

Page 29: ...P camera 1 Make sure to configure your network IP camera to use a static IP address or you can use the DHCP reservation feature see Set up DHCP reservation on page 55 Note You may need to reference yo...

Page 30: ...the log message Refresh Click to refresh the displayed log entries Clear Click to clear all current log entries Ping Watchdog You may want to expose a specific computer or device on your network to t...

Page 31: ...and GetNext requests from the management station Set Community Specify the password for the incoming Set requests from the management station Trap Destination Specify the IP address of the station to...

Page 32: ...you may be prompted to save a file specify the location or the file may be downloaded automatically to the web browser settings default download folder Default Filename config bin 4 Save the configur...

Page 33: ...r router to factory defaults Click Yes or OK Certificate configuration settings Under Client mode when EAP TLS is used the RADIUS server must know which user certificates to trust The Server can trust...

Page 34: ...Mask Assigned WAN Subnet Mask Default Gateway Assigned WAN default gateway DNS1 2 Assigned WAN DNS IP address MAC Address Displays the MAC address of the access points WAN port LAN Settings Informati...

Page 35: ...e on page 27 2 Click on Status and click on Connections Refresh Click to refresh to view the current information Statistics You may want to check the statistical received and transmit packets of the w...

Page 36: ...n AP Below describes the configuration settings when the TEW 734APO System Mode is set to Thin AP mode In this mode the access point can only be configured with a device set on Virtual Access Control...

Page 37: ...t mask of the access point o Gateway IP Address Enter the gateway IP address o DNS1 2 Enter the DNS IP address to assign on the access point Access Control Mode LAN Select when your access controller...

Page 38: ...d to the access point Virtual AC In this mode the access point becomes the virtual access controller that can control thin access points on the network Configuration 1 Log into the management page see...

Page 39: ...y time duration Enable VLAN Enable 802 1Q VLAN Select to enable VLAN feature VLAN ID Enter the assigned VLAN ID of the access controller IP Address DHCP Client Select to have access controller to rece...

Page 40: ...his option to upgrade all devices Refresh Click to refresh the access point list Advance Settings Setting time 1 Log into the management page see Access the management page on page 9 2 Click on System...

Page 41: ...configuration and upgrade firmware 1 Log into the management page see Access the management page on page 9 2 Click on Management and click on Configuration File 3 Under Load Settings from file click o...

Page 42: ...Yes or OK Change your login password 1 Log into the management page see Access the management page on page 9 2 Click on Management and click on Password Settings Click Apply to save changes Current Pa...

Page 43: ...ication Select to authenticate SMTP Username Enter SMTP username Password Enter the SMTP password View your log You may want send your router log to your e mail address or to an external log server al...

Page 44: ...on page 9 2 Click on Status and click on Information System Information Firmware Version Current firmware version of the access point MAC Address MAC address of the access controller Device Name Assi...

Page 45: ...ess point SSID Displays the SSID of the access point AP Name Displays the name assigned to the access point Signal Displays the signal strength of the access point Uptime Displays the time duration of...

Page 46: ...o Enter the amount of clients you would like to limit Secure your wireless network After you have determined which security type to use for your wireless network see How to choose the security type fo...

Page 47: ...mended when using WPA2 PSK or WPA PSK WPA2 PSK WPA Passphrase Enter the passphrase o This is the password or key that is used to connect your computer to this router wirelessly Selecting WPA WPA2 or W...

Page 48: ...e Access control is disabled o Allow Listed Enter MAC address allowed to connect to the access point o Deny List Enter MAC addresses to block connection to the access point Virtual AC Thin AP In this...

Page 49: ...d device Upgrade Selected Select this option to upgrade the selected devices Upgrade All Select this option to upgrade all devices Refresh Click to refresh the access point list System Setting This pa...

Page 50: ...IP Address Enter the gateway IP address Advance Settings Setting time 1 Log into the management page see Access the management page on page 9 2 Click on System and click on Time Settings Manual config...

Page 51: ...lename config bin 4 Save the configuration file to location on your computer To restore your router configuration and upgrade firmware 1 Log into the management page see Access the management page on...

Page 52: ...nd click on Configuration File 3 You will be prompted to reset your router to factory defaults Click Yes or OK Change your login password 1 Log into the management page see Access the management page...

Page 53: ...Enter the SMTP password View your log You may want send your router log to your e mail address or to an external log server also known as Syslog server so you can check it periodically while away fro...

Page 54: ...ess points SSID Wireless SSID of the access point Security Assigned wireless security of the access point Clients Number of connected clients on the access point TX Date transmit rate of the access po...

Page 55: ...the access point Uptime Displays the time duration of when the access point has been running Tx Display the transmit data rate of the access point Rx Displays the receive data rate of the access point...

Page 56: ...or off on your router Max Station Num Select this option to limit the amount of clients who can connect to this SSID o Enter the amount of clients you would like to limit Secure your wireless network...

Page 57: ...select Key 2 entering Key 1 3 or 4 will block the ability to connect and enter password 12345 WEP Passphrase Enter a passphrase and click Generate key to have the access point generate your encryptio...

Page 58: ...te o Enable this option to set the cache period based on seconds Wireless access control The MAC address filter section can be used to filter network access by machines based on the unique MAC address...

Page 59: ...able 4 Position both wires inside the access hole and the edge of the case slide the cover back into place Pole mounting The access point comes with a pole mounting clamp that allows you to mount the...

Page 60: ...icon b Right click the Local Area Connection icon and the click Properties c Click Internet Protocol TCP IP and click Properties d Then click Obtain an IP address automatically and click OK Note If y...

Page 61: ...Note If you are experiencing difficulties please contact your computer or operating system manufacturer for assistance How to configure your network settings to obtain an IP address automatically or u...

Page 62: ...network settings can be used as general guidelines however it is strongly recommended that you consult your computer or operating system manufacturer directly for assistance on the proper procedure fo...

Page 63: ...subject to the following two conditions 1 This device may not cause harmful interference and 2 this device must accept any interference received including interference that may cause undesired operati...

Page 64: ...tax and other fees WARRANTIES EXCLUSIVE IF THE TRENDNET PRODUCT DOES NOT OPERATE AS WARRANTED ABOVE THE CUSTOMER S SOLE REMEDY SHALL BE AT TRENDNET S OPTION REPAIR OR REPLACE THE FOREGOING WARRANTIES...

Page 65: ......

Reviews: