ELLIPSEJIG
Please read these instructions before use.
MANU-LEJ v7_MANU-LEJ 12/06/2012 11:11 Page 15
Page 1: ...ELLIPSE JIG Please read these instructions before use MANU LEJ v7_MANU LEJ 12 06 2012 11 11 Page 15...
Page 2: ...________________________________11 MAINTENANCE ______________________________11 RECYCLING __________________________________11 GUARANTEE ________________________________11 SPARE PARTS Spare Parts Lis...
Page 3: ...ays wait for the spindle and cutter to stop rotating before making any adjustments 10 Always keep guards in place and in good working order 11 Remove any nails staples and other metal parts from the w...
Page 4: ...t using the router stop immediately and have the eccentricity of the router router cutter and clamping system checked by competent personnel 15 All fastening screws and nuts should be tightened using...
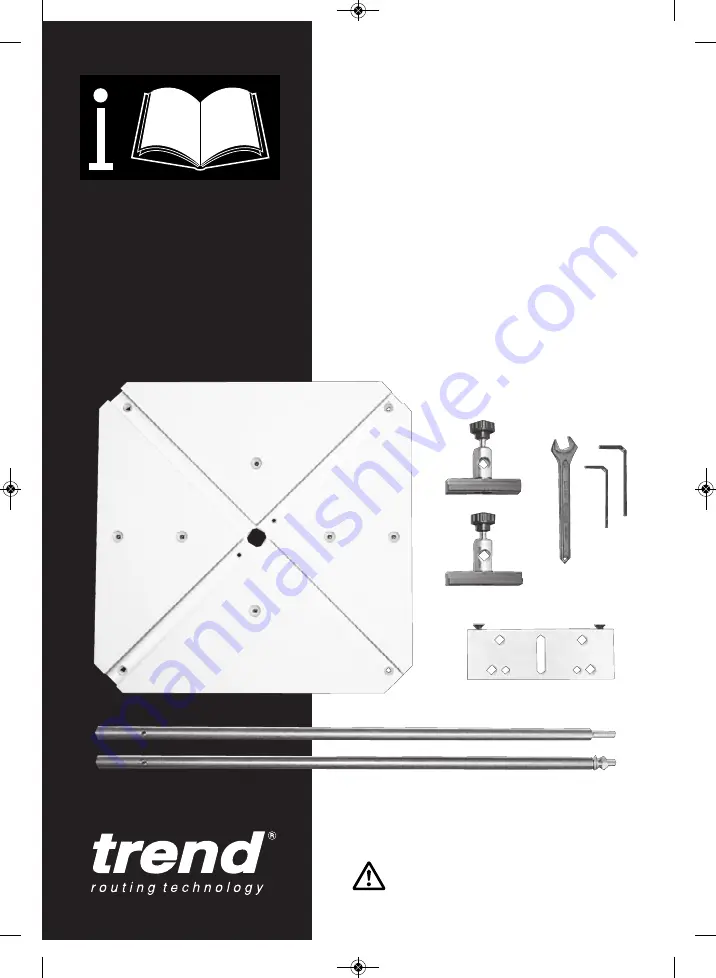
Page 5: ...LIPSEJ A 4 x1 ITEMS ENCLOSED ELLIPSE JIG ELLIPSE JIG GUARANTEE x1 x2 x1 3mm A F x1 4mm A F x1 x1 x1 x2 x1 x2 x2 x2 x2 x4 ITEMS REQUIRED n Router n Hand Tools MANU LEJ v7_MANU LEJ 12 06 2012 11 11 Page...
Page 6: ...plate C Washer D Nut M8 E Grub screw M6 x 5mm F T slotted main plate G Slider D C J K E B A A H H L K E G G I I I I M C F H Circle cutting fixing screws M5 x 20mm I Mounting screws J Hex key 3mm A F...
Page 7: ...6 E DeWalt DW613 620 621 Hole A Rods 10mm x 110mm centres Trend T9 T11 Hole B Rods 10mm x 100mm centres Trend T10 DeWalt DW625E Elu MOF131 177 E Other makes 8mm Rods 10mm Rods Base Plate Adaptor Hex k...
Page 8: ...thread and hand tighten ACCESSORIES Base Plate Adapter to fit non Trend Elu DeWalt routers Ref GB PLATE Extension Bar 500mm for extra large ellipses and circles Ref ELLIPSE J1 Ellipse Major Axis Elli...
Page 9: ...50 1200 1450 1600 1150 1400 1550 1100 1350 1500 1050 1300 1450 950 1250 1400 950 1200 1350 900 1150 1300 850 1100 1250 800 1050 1200 750 1000 1150 710 950 1100 660 900 1050 610 850 1000 580 800 900 58...
Page 10: ...ece mark the centre lines for the major and minor axis n Mark overall dimensions of ellipse onto centre lines Fixing Main Plate n Position main plate using the four sighting holes on the perimeter of...
Page 11: ...then lock knob B Setting up of the Ellipse Jig is now complete Fixing Methods The workpiece should be fixed onto a false or waste piece to stop you damaging your work bench There are many methods depe...
Page 12: ...GUARANTEE The jig carries a manufacturers guarantee in accordance with the conditions on the enclosed guarantee card Routing Operation n Fit cutter switch router on plunge in and make repeat sweeps w...
Page 13: ...n Board WP EJ 06 7 1 Slider Set pair WP EJ 07 8 1 Set Bolt Csk M4 x 25mm Slot WP EJ 08 9 4 Screw Wood No 8 x 32mm Pozi WP SCW 107 10 1 Hex Key 3mm A F WP AP 03 11 2 Machine Screw Csk M6 x 20mm Skt pai...
Page 14: ...ELLIPSEJ A IB 4 13 10 12 14 ELLIPSE JIG 3 11 11 5 5 2 7 9 9 9 9 6 1 1 16 15 8 8 ELLIPSE JIG SPARE PARTS DIAGRAM v7 0 05 2012 MANU LEJ v7_MANU LEJ 12 06 2012 11 11 Page 13...
Page 15: ...specifications may change without notice Trend Machinery and Cutting Tools cannot be held liable for any material rendered unusable or any form of consequential loss E OE RECYCLABLE Trend Machinery C...