background image

2

Install your TPS 8200TX and 8400TX security devices 

Overview

Your TPS security device ships with the following components:

— An 8200TX (1U) or 8400TX (2U) rack-mountable TPS device with redundant power supplies
— 2 AC power cables*
— Rack-mounting slide rail kit
— Null modem cable for the console port

*DC power supplies are available for TX Series devices. Consult your TippingPoint account contact if you require a DC power supply.

Install and configure your device

To install the device, mount the device in a rack, connect the cables, and then complete the software 
setup by using the following steps. 
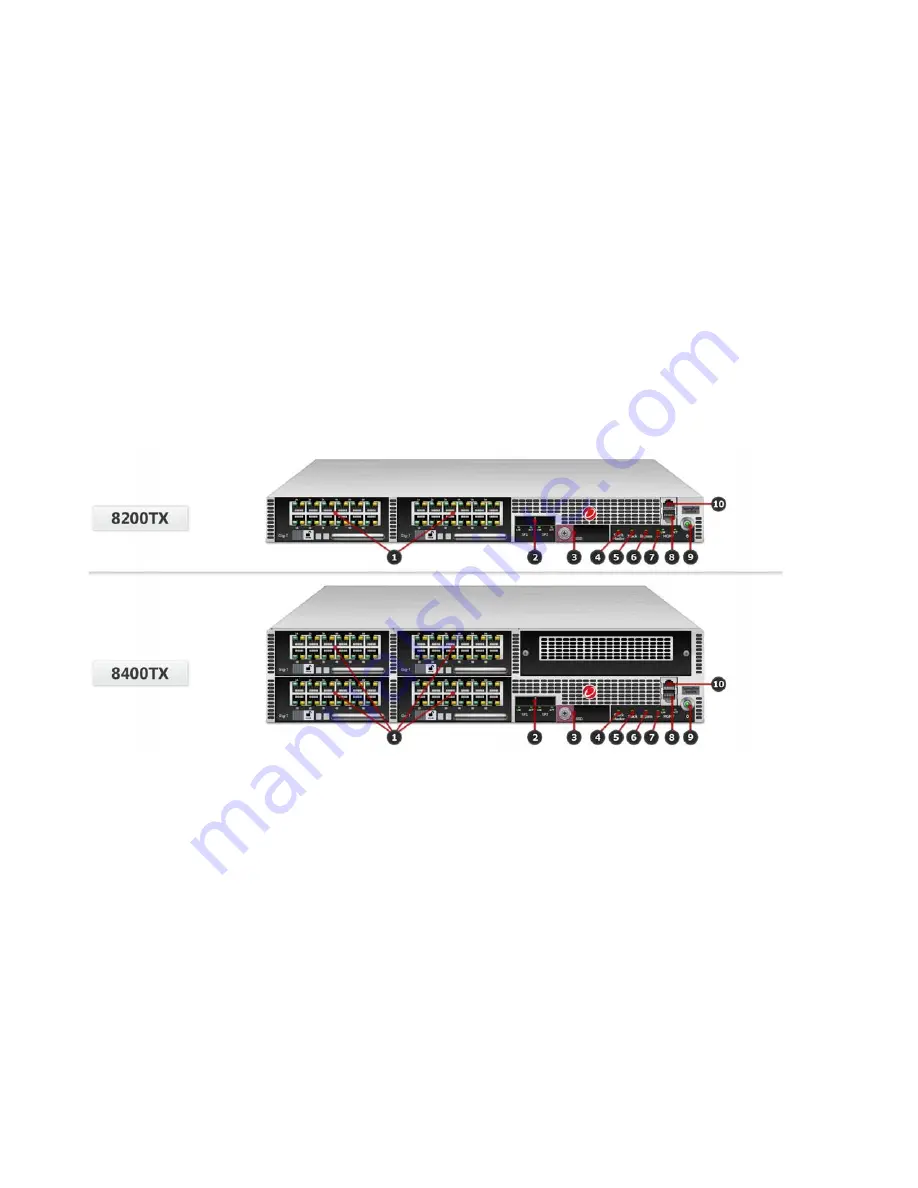
Refer to the following diagram of the chassis front panel when you install and configure the device.

Figure 1.  TippingPoint TPS 8200TX and 8400TX security devices – front panel

Step 1. Determine total rack space

Before you install the chassis, determine the total rack space that is required to install your device. 
The required rack space will increase if you plan to install multiple devices. If you plan to expand your 
security solution to include stacking or additional devices in the future, allow space in the rack for 
additions. 
TippingPoint security devices fit in a 19-inch rack. When you use additional, appropriate accessories, 
each device also fits in a 23-inch rack.

1. I/O modules

5. Stack LED

9. Power button

2. SP ports

6. Bypass LED

10. RJ-45 console port 

3. External storage 1.8-inch SSD (32 GB)

7. System health LED

4. Stack Master LED

8. GbE management port

Summary of Contents for TippingPoint TPS 8200TX

Page 1: ...inspection throughput when you connect to your network For more information see Step 9 Install your license package on page 7 Make sure the power capacity for your installation meets the documented r...

Page 2: ...f the chassis front panel when you install and configure the device Figure 1 TippingPoint TPS 8200TX and 8400TX security devices front panel Step 1 Determine total rack space Before you install the ch...

Page 3: ...t distribution and stability of the rack You can optionally order front mounting ears from TippingPoint to install the devices in two post racks in front mount or mid mount positions For more informat...

Page 4: ...the 8200TX and 8400TX security devices and are hot swappable TippingPoint 6 Segment Gig T I O module TippingPoint 6 Segment GbE SFP I O module TippingPoint 4 Segment 10 GbE SFP I O module TippingPoin...

Page 5: ...management port to the network to enable remote management of the device 1 Locate the management port on the front of the unit directly above the MGMT label see Figure 1 label 8 2 Connect one end of...

Page 6: ...ed Indicates that the system is experiencing a health alert such as a fan failure This state resets to solid green when you view the system log Management port status Link LED Solid green indicates th...

Page 7: ...license package to the device The Local Security Manager LSM When the device is not managed by the SMS download your updated license package from the TMC and then install the package by using the LSM...

Page 8: ...lete your installation see the Release Notes for your product on the TMC at https tmc tippingpoint com The Release Notes provide the latest post installation information for your product You can perfo...

Page 9: ...arranties for Trend Micro Incorporated products and services are set forth in the express warranty statements accompanying such products and services Nothing herein should be construed as constituting...

Reviews: