background image

E-MAXX BRUSHLESS • 21

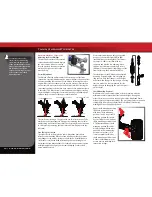
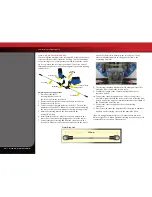
Lower Shock Mounting Positions 

In the out-of-the-box configuration, the shocks are installed in 

position (A) on the shock tower and position (2) on the lower 
suspension arm. This setting allows for firm suspension and low 
ride height, increasing the spring force (at the wheel). This setting 
improves high-speed cornering on smoother terrain by lowering the 
center of gravity. Body roll, brake dive, and squat are also reduced. 

The inner pair of holes on the lower suspension arm should  

be used to increase the ride height of the E-Maxx. The more vertical 
position of the shocks will allow for lower shock progression and the 
soft, plush feel that’s characteristic of a Traxxas Maxx Truck.

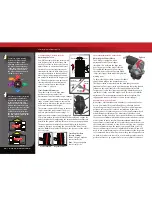
Spring rate

 (at the wheel) increases as the lower shock mounting 

position is moved from position (1) to position (4). This is equivalent 
to using stiffer springs. Use higher spring rate settings for flatter 
terrain with smaller and fewer bumps, and lower spring rate settings 
for bigger bumps.

Ride height

 decreases as the lower shock mounting position is 

moved from position (1) to position (4). Each pair of lower shock 

mounting holes (1,2 and 3,4) has equal ride height. Use lower ride 
height for high-speed cornering and flat terrain, and when racing on 
relatively smooth tracks. Increase the ride height for rougher terrain 
and tracks.

Upper Shock Mounting Positions 

The upper shock mounting positions will have suspension effects 

opposite from the lower shock mounting positions.

Spring rate 

(at the wheel), increases as the upper shock mounting 

position is moved from position (A) to position (B). 

Ride height

 is not affected by changes in the upper shock mounting 

position.

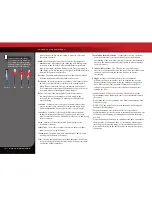
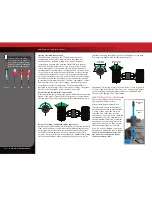
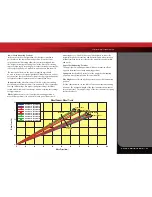
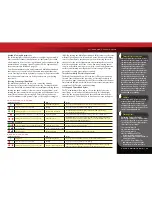
Use the chart below to see the effect of the various shock mounting 

positions.  The horizontal length of the lines indicates the amount of 
suspension travel.  The angle or slope of the lines indicates the spring 
rate (at the wheel). 

2.5

2

1.5

1

0.5

0

0

10

20

30

40

60

70

80

90

100

50

 Wheel Force (lb)

Wheel Travel (mm)

 Wheel Force vs. Wheel Travel

Lower Mount 1, Upper Mount 0
Lower Mount 2, Upper Mount 0
Lower Mount 1, Upper Mount A
Lower Mount 2, Upper Mount A
Lower Mount 3, Upper Mount A
Lower Mount 4, Upper Mount A
Lower Mount 1, Upper Mount B
Lower Mount 2, Upper Mount B
Lower Mount 3, Upper Mount B
Lower Mount 4, Upper Mount B

Less Firm

More Firm

Lower Mount 4

Lower Mount 3

Lower Mount 2

Lower Mount 1

TUNING ADJUSTMENTS

Summary of Contents for E-Maxx 3908

Page 1: ...MODEL 3908L MODEL 3908 owner s manual ...

Page 2: ...raxxas support is with you every step of the way Refer to the next page to find out how to contact us and what your support options are Quick Start This manual is designed with a Quick Start path that outlines the necessary procedures to get your model up and running in the shortest time possible If you are an experienced R C enthusiast you will find it helpful and fast Be sure and read through th...

Page 3: ...ntended for use on public roads or congested areas where its operation can conflict with or disrupt pedestrian or vehicular traffic Never under any circumstances operate the model in crowds of people Your model is very fast and could cause injury if allowed to collide with anyone Because your model is controlled by radio it is subject to radio interference from many sources that are beyond your co...

Page 4: ...r advanced users that are educated on the risks associated with LiPo battery use Traxxas does not recommend that anyone under the age of 14 use or handle LiPo battery packs without the supervision of a knowledgeable and responsible adult Your model is able to use LiPo batteries LiPo batteries have a minimum safe discharge voltage threshold that should not be exceeded The electronic speed control i...

Page 5: ...f the battery to be charged Keep a Class D fire extinguisher nearby in case of fire Do NOT use the 2 3 cell LiPo charger 2935 to charge NiMh batteries Do NOT exceed the maximum battery manufacturer s recommended charge rate Do NOT disassemble crush short circuit or expose the batteries or cells to flame or any other source of ignition If a battery gets hot to the touch during the charging process ...

Page 6: ...a Mount Front Suspension Arm Front Bumper Steering Servos Shock Toe Link Toe Link Rear Shock Tower Traxxas High Current Connector Chassis Front Body Mount Front Shock Tower Front Bulkhead Rear Bulkhead Half Shaft Rear Suspension Arm Rear Body Mount Transmission Skid Plate Skid Plate Hex Hub Pivot Ball Axle Carrier Slipper Clutch Wheelie Bar E MAXX BRUSHLESS EDITION OVERVIEW ...

Page 7: ...iron For more information on batteries see Use the Right Batteries on page 12 A peak detecting charger is recommended for best performance and longest battery life For more information see Use the Right Charger on page 13 2 0mm T wrench Two NiMH battery packs Pre load spacers and shock pistons Suspension multi tool Universal wrench Antenna nut wrench 1 5mm L wrench Body clips 8mm 5mm wrench Foam b...

Page 8: ...0 Maintain your model See page 25 The transmitter requires 4 AA alkaline or rechargeable batteries Follow these critical steps to maintain the performance of your model and keep it in excellent running condition 4 Install battery packs in the model See page 13 Your model requires two fully charged battery packs included 5 Turn on the radio system See page 14 Make a habit of turning the transmitter...

Page 9: ...op It happens for a very short period as the signals from the electronic speed control and the motor synch with each other The VXL 3m is optimized to virtually eliminate cogging Current Current is a measure of power flow through the electronics usually measured in amps If you look at wire like a garden hose current is a measure of how much water is flowing through the hose ESC Electronic Speed Con...

Page 10: ...ns to your model Trim The fine tuning adjustment of the neutral position of the servos made by adjusting the throttle and steering trim sliders on the face of the transmitter Thermal Shutdown Protection Temperature sensing electronics used in the electronic speed control detect overloading and overheating of the transistor circuitry If excessive temperature is detected the unit automatically shuts...

Page 11: ...ceiver Motor Castle 2200Kv High Current Connector Channel 2 Mamba Monster Electronic Speed Control Channel 1 Steering Servos Wiring Diagram Mamba Monster Specifications Cells 18 NiCad NiMH 6s LiPo Continuous More than you can handle Resistance 0 0003 Ohms per phase Brake Proportional with adjustable curve Reversible Yes with lockout Low Voltage Cutoff Programmable Case Size 2 2 x 1 9 x 1 4 Weight ...

Page 12: ... charger and charging jack with the 3037 Traxxas NiMH battery CHARGING THE BATTERY PACK Model 3908 Your model requires two fully charged battery packs Two 2 Traxxas Power Cell NiMH batteries are supplied with your model A charger is not included with your model Traxxas recommends the 2930 EZ Peak NiMH charger for quick charging the included batteries See Traxxas com for more information about char...

Page 13: ... use it on the opposite side of the chassis Accessory hold downs and foam part 3927X are available to accommodate larger battery packs See the 3903 E Maxx parts list for more information The Traxxas High Current Connector Your model is equipped with the Traxxas High Current Connector Standard connectors restrict current flow and are not capable of delivering the power needed to maximize the output...

Page 14: ...l Adjustment The throttle neutral adjustment is located on the transmitter face and controls the forward reverse travel of the throttle trigger Change the adjustment by pressing the button and sliding it to the desired position There are two settings available 50 50 Allows equal travel for both acceleration and reverse 70 30 Allows more throttle travel 70 and less reverse travel 30 Note We strongl...

Page 15: ... the model is elevated 8 Once adjustments are made turn off the receiver on your model followed by the hand held transmitter Range Testing the Radio System Before each running session with your model you should range test your radio system to ensure that it operates properly 1 Turn on the radio system and check its operation as described in the previous section 2 Have a friend hold the model Make ...

Page 16: ... relatively large amount of steering wheel travel results in a smaller amount of servo travel The farther you turn the knob the more pronounced the effect becomes Decreased steering sensitivity may be helpful when driving on low traction surfaces when driving at high speed or on tracks that favor sweeping turns where gentle steering inputs are required The ranges are exaggerated for illustrative p...

Page 17: ...ver and servos The speed control continues to draw power as long as it is plugged in and may over discharge your batteries if they are left connected to the speed control ATTENTION LiPo Battery Users The E Maxx Brushless Edition is programmed at the factory for use with LiPo batteries Your model will run properly with NiMH batteries To obtain the maximum performance from the included batteries dow...

Page 18: ... with the extremely high power output of the included Castle Creations Mamba Monster brushless motor system The slipper clutch has been adjusted to the correct initial setting for break in Follow these steps to ensure maximum performance and life from your slipper clutch 1 Make your first runs with the model using the stock gearing and 6 or 7 cell NiMH packs or 2S LiPo packs 2 Drive normally The s...

Page 19: ... begins to become discharged RECEIVER BOX MAINTAINING A WATERTIGHT SEAL Note The Power System is NOT WATERPROOF Do not expose the power system to any type of water condensation or moisture Removing and Installing Radio Gear The unique design of the receiver box allows the removal and installation of the receiver without losing the ability to maintain a watertight seal in the box The patent pending...

Page 20: ...o hole pistons with a range of oil viscosities from 30W to 50W available from your hobby shop The thinner viscosity oils 30W or less flow with less resistance and provide less damping while thicker oils provide more damping Use only 100 pure silicone shock oil to prolong seal life From the factory the E Maxx uses 30W oil The ride height for the E Maxx can be adjusted by adding or removing the clip...

Page 21: ...ach pair of lower shock mounting holes 1 2 and 3 4 has equal ride height Use lower ride height for high speed cornering and flat terrain and when racing on relatively smooth tracks Increase the ride height for rougher terrain and tracks Upper Shock Mounting Positions The upper shock mounting positions will have suspension effects opposite from the lower shock mounting positions Spring rate at the ...

Page 22: ...arm out Note When camber is changed the toe angle of the wheel has to be reset Static Camber Base Factory Settings Front 1 degree negative camber each side Rear 1 degree negative camber each side TRANSMISSION TUNING Adjusting the Slipper Clutch The E Maxx is equipped with an adjustable Torque Control slipper clutch which is built into the large spur gear The purpose of the slipper clutch is to reg...

Page 23: ... Gear Ratio Pinion Gear Teeth Motor Screw Strip of Paper Your Battery Selection and Pinion Gear Selection Determines Your Speed How Fast Do You Want To Go Battery Nominal Voltage mAh Skill Level Battery Pinion Spur Nominal Voltage mAh Skill Level With Included Optional Gearing 24T pinion not included Optional gearing for high speed running on smooth surfaces only 25 mph 25 mph 35 mph 35 mph 5608 E...

Page 24: ... horns Make sure they are parallel to the center line of the chassis pointing to the rear of the truck 7 Connect the short steering link from the servo saver to the servo horn Make sure the servo saver is parallel to the center line of the chassis also parallel to the servo horns If not make small adjustments to the length of the link so the everything is parallel 8 The steering should operation c...

Page 25: ...te the motor Use a product such as electric motor cleaning spray to flush dirt out of the motor After cleaning lubricate the bushings at each end of the motor with a drop of light weight electric motor oil Shocks Keep the oil level in the shocks full Use only 100 pure silicone shock oil to prolong the life of the seals If you are experiencing leakage around the top of the shock inspect the bladder...

Page 26: ...stalling Your Mobile Device Model 3908L The TQi Docking Base has a unique clamping mechanism that allows the Apple iPhone and iPod touch to be easily installed and removed The clamp s self adjusting design allows it to accommodate the wide variety of protective cases available for Apple products Follow these steps to install your mobile device 1 Swing the Docking Base Clamp lever from position A l...

Page 27: ...n 0 15 sec off Throttle Trim Seek Mode Turn the Multi Function knob right or left until the LED stops flashing See sidebar for more information Flashing medium red 0 25 sec on 0 25 sec off Low Battery Alarm Put new batteries in the transmitter See page 12 for more information Flashing fast red 0 125 sec on 0 125 sec off Link Failure Error Transmitter and receiver are no longer bound Turn the syste...

Page 28: ... throw setting you selected previously Likewise setting the Multi Function knob to disabled will prevent the knob from making further adjustments but the last setting of the Multi Function knob will still apply TRAXXAS LINK MODEL MEMORY Traxxas Link Model Memory is an exclusive patent pending feature of the TQi transmitter Each time the transmitter is bound to a new receiver it saves that receiver...

Page 29: ...rward to desired endpoint and press set to save To reset max throw Let go of controls and press SET The menu tree below shows how to navigate through the TQi transmitter s various settings and functions Press and hold MENU to enter the menu tree and use the following commands to navigate through the menu and select options MENU When you enter a menu you always start at the top Press MENU to move d...

Page 30: ... SET green LED blinks Press SET red LED blinks x3 Press MENU twice red LED blinks x3 Turn steering wheel to desired max left and right travel x8 Press SET to save each position Turn steering wheel to test settings IF END POINTS ARE OK Press hold MENU returns to driving mode IF END POINTS NEED TO BE CHANGED Press SET and repeat steps 6 8 To reset the END POINTS of STEERING servo to defaults Press h...

Page 31: ...120917 3908OM LN EN R00 owners manual 1100 Klein Road Plano Texas 75074 1 888 TRAXXAS ...

Reviews: