background image


10 

TRAK Machine Tools 

Southwestern Industries, Inc. 

Airwolf EVO 3D Printers - Installation, Printing, Maintenance & Troubleshooting Manual 

3.3


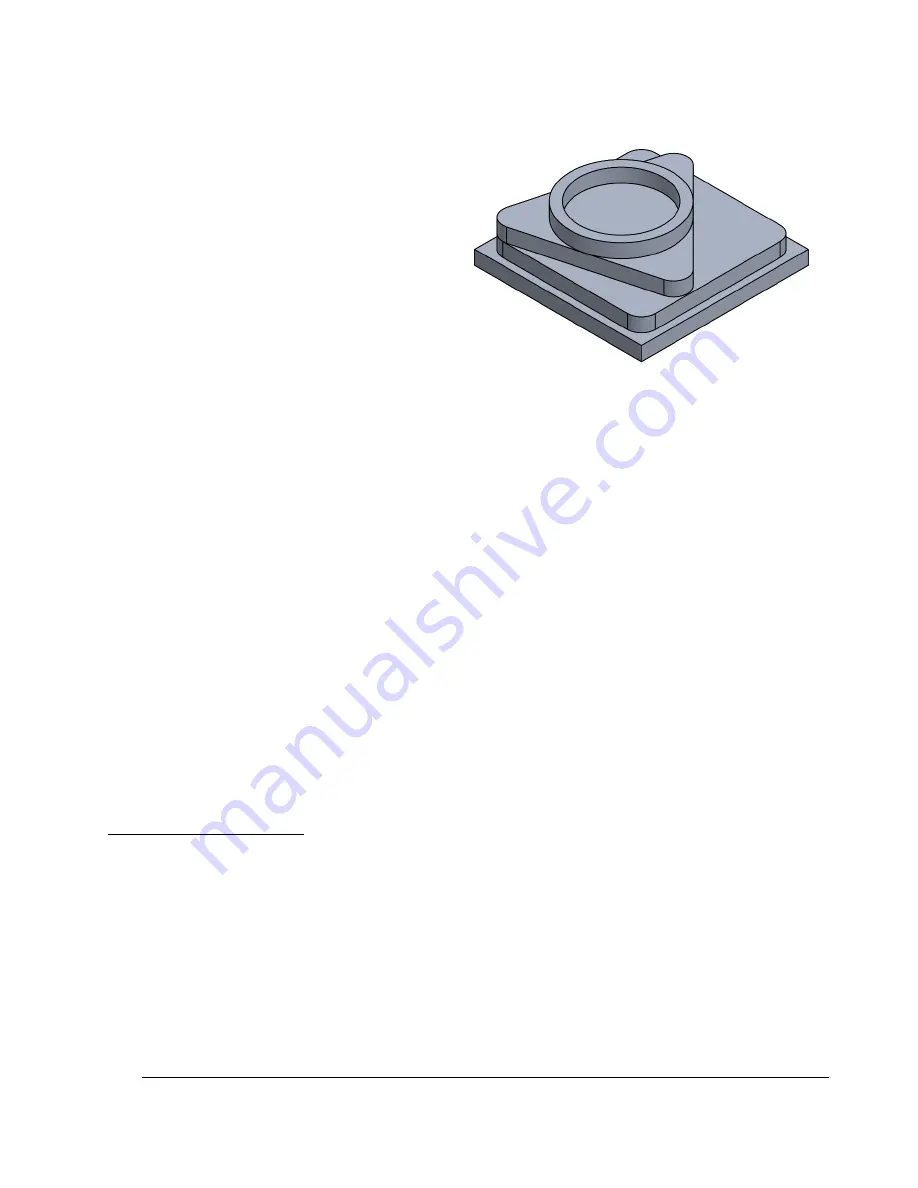
Benchmark Part: Euclid Block 

In the accessory box, with your new printer, you will 
find a 3D printed part, called a Euclid Block. We 

printed it directly from your printer, using MG94 
ABS, and the exact same G-Code file that we saved 
onto your printer's Internal Drive as "LEFT TRAK".  

 
Purpose 

The Euclid Block helps establish a printing baseline 
for your printer, which we can reference if/when you 
are experiencing any printing issues. 

 
Because 3D printed parts can differ from one 
another based on many variables; material type, material care, slicer settings, printer, printer 
maintenance, and so on, diagnosing a problem can be difficult to isolate.  

 
Therefore, by using the G-Code we provided, we are controlling the slicer setting variables. By using the 
material we provided (make sure its dried!), we are controlling the material variables.  

 
Now we can begin to isolate the problem in a much more controlled manner! 


Printing the Euclid Block 

When you print it, make sure you follow the requirements below: 


Use MG94 ABS, natural color, and make sure it is DRY. 


Use the exact same G-Code we saved on your internal drive. If you need another copy, call TRAK 

Customer Service. 


Make sure you watch the first layer print before walking away from your printer. 


Troubleshooting 

Once the Euclid Block is printed, you can look at it, and see what it is telling you. Is there warping? Are 
the layers delaminating? Are there bubbles on the top layer? Are the top and bottoms layers bigger than 

the middle layers? Is the overall print quality bad? 


Below is an example of how we can help you start troubleshooting, using the Euclid Block: 
 

Example #1 

The first layer of your block did not adhere to the build plate. One potential cause could be the WolfBite. 
 

WolfBite Issues and Solutions 

1.


Not enough was applied initially. Remove & apply more before restarting the print. 

2.


Too much was applied initially. Remove & apply again before restarting the print. 

3.


It did not dry sufficiently, allow 5 minutes the next time you apply it 

4.


It needs to be replaced, it is either too old or the wrong kind 

 
If the WolfBite suggestions above did not fix the problem, the next steps would be to check if the 

chamber heater needs to be on. If 

that didn’t work, then you would move onto the next potential cause.


Regardless, if your printer has an issue, call TRAK Customer Service to have a Technical Support, or 
Applications Specialist walk you through the process 


you’re not alone! We’re here t

o help.  


Summary of Contents for Airwolf EVO-T

Page 1: ...roubleshooting Manual Covers Current Models EVO T EVO22 T 2615 Homestead Place Rancho Dominguez CA 90220 5610 USA T 310 608 4422 F 310 764 2668 Service Department 800 367 3165 e mail sales trakmt com...

Page 2: ...the information required for the purposes of this guide Southwestern Industries Inc assumes no responsibility for inaccuracies or omission and accepts no liability for damages resulting from the use o...

Page 3: ...3 1 Lifting Moving Uncrating and Unpacking 7 3 2 Packing List 9 3 3 Benchmark Part Euclid Block 10 3 4 Orientation Controls Functions 11 3 5 Installation of Additional Components 16 3 5 1 Top Cover 1...

Page 4: ...lacement 43 5 4 Feeder Removal Replacement 44 5 5 Clean Bed Rails 45 5 6 Clean Nozzles 45 5 7 Replace HEPA Filters 46 5 8 Replace Brass Cleaning Brush 46 5 9 Borosilicate Glass Build Plate 47 5 10 Lub...

Page 5: ...ing Manual Printer Model Serial Number The plate below is for you to write down your model and serial number Keep this info handy for when you contact Customer Service Serial Number __________________...

Page 6: ...you come in contact with Always close the print chamber door and make sure the HEPA filter is replaced as recommended 1 2 Safety Labels Notices as Used in this Manual DANGER Immediate hazards that wi...

Page 7: ...to the printer before performing any repairs Never touch moving parts or place your fingers in or on any of the belts pulleys or gears while the printer is operational Make sure to tie back hair and...

Page 8: ...y Ethernet Wi Fi Printing Specifications Build Volume Single Nozzle 12 X 12 X 11 12 x 12 x 22 Build Volume Dual Nozzle 12 x 11 25 x 11 12 x 11 25 x 22 Recommended Max Print Speed 80 mm s Minimum Layer...

Page 9: ...Industries Inc Airwolf EVO 3D Printers Installation Printing Maintenance Troubleshooting Manual 2 2 Floor Plan Layout Space Requirements This section has dimension information for the EVO T and EVO22...

Page 10: ...6 TRAK Machine Tools Southwestern Industries Inc Airwolf EVO 3D Printers Installation Printing Maintenance Troubleshooting Manual 2 2 2 EVO22 T Front View...

Page 11: ...oxes together 3 Remove the secondary box that contains the 3D Printer accessories and put it aside for now 4 Cut open the taped flaps that cover the main box by using a box cutter Be careful not to cu...

Page 12: ...Remove the tape that keeps the 3D Printer door closed and open the printer door 12 Remove the two 2 zip ties around the two 2 chamber heaters inside the 3D Printer 13 Remove both the zip ties and the...

Page 13: ...from the list that comes in the box Starter Bundle EVO T Includes Parts Toolkit Accessory Bag Materials listed above 1 EVO T 1 Printer Workstation Extension 1 Spare Parts Kit 1 ABS Value Pack Starter...

Page 14: ...exact same G Code we saved on your internal drive If you need another copy call TRAK Customer Service Make sure you watch the first layer print before walking away from your printer Troubleshooting On...

Page 15: ...roubleshooting Manual 3 4 Orientation Controls Functions Once you are satisfied with the placement of your printer and have made sure everything in your packing list has been received it s time to go...

Page 16: ...12 TRAK Machine Tools Southwestern Industries Inc Airwolf EVO 3D Printers Installation Printing Maintenance Troubleshooting Manual 3 4 1 1 Internal Components...

Page 17: ...zzles filament sensors and mounts 3 Nozzles The nozzle is a precision piece of metal where melted filament is extruded out from The nozzles are interchangeable and come in various sizes The nozzles he...

Page 18: ...r to the Print Head 9 Chamber Heaters There are two chamber heaters installed to help prevent your filaments from getting wet and to prevent part warping The chamber heaters heat up to 70 C 10 Z Stage...

Page 19: ...n work as an external hard drive NOTE Although there is an embedded keyboard you may also connect your keyboard here to type NOTE This is NOT the place to plug in your PC to control the printer see be...

Page 20: ...e top of the printer 2 With your other hand place one side of the glass on the two rear support tabs 3 With the hand inside the printer use your finger to support the bottom of the glass 4 Slowly lowe...

Page 21: ...Manual 3 5 3 Connecting the Cables Powering ON Steps Images 1 Your printer was shipped with a 110v cable 2 Connect the female end to the power inlet on the back of the printer 3 Connect the male end t...

Page 22: ...fault password is 0000 2 Printer Model Touchscreen Software Version 3 Printer I P Address The IP address shows up when your printer is connected to the network for updates 4 Controller Name The EVO T...

Page 23: ...the Printer Head at the center of the print bed and moves the print bed down providing you with the access to service your printer 15 Print Duration This is a progress bar that let you know what perc...

Page 24: ...optional When you print the bed is automatically preheated but if you d like you could get it pre heated before you start the print to save some time Component Description 1 Most Commonly Printed Mate...

Page 25: ...can select X Y or Z 2 Auto Home Auto homes the print head and print bed 3 Service Mode Moves the print head to the center of the print bed and moves the print bed down to make the print head accessibl...

Page 26: ...d your network and connect to it 2 Update Genesis Firmware You can update the firmware using a USB Drive or the Internal Drive NOTE When you update the controller touchscreen software any available fi...

Page 27: ...screen 2 Diagnostics Takes you to another menu where you can get print logs change your passcode auto home or check your auto level values 3 About In this screen you can find important information suc...

Page 28: ...release 2 My Notes This is where you can store any notes you would like to keep There is an embedded keyboard that will pop up so you can type in your notes NOTE You may also connect your own keyboar...

Page 29: ...Select CONNECT 6 Once verified your printer will be connected to your Wi Fi You should be able to see your IP address on the top of the screen In this example it displays 0 0 0 0 but on your printer...

Page 30: ...r printer so you never miss a step Basic Printing Checklist Pre Printing 1 Verify all printer maintenance firmware is up to date 2 Slice your file and save on a USB Drive 3 Verify material type quanti...

Page 31: ...cklist as a best practice Before you start a new print check the last time maintenance was performed or firmware was updated and perform any of the tasks that are due 4 1 2 Slice your file and save on...

Page 32: ...he list can be found on our website NOTE We are actively testing materials and will update this list as we get them qualified When you print with materials NOT qualified or recommended by TRAK we cann...

Page 33: ...ilament required If you end up with a positive number then you have enough If you end up with a negative number then you are short on filament and should either put on a new spool or prepare for a mid...

Page 34: ...surface finish is critical TRAK recommends changing the WolfBite after every print Reusing the WolfBite from the last print can sometimes leave a faint mark on the bottom of the newly printed part Se...

Page 35: ...he plate hence warping The WolfBite starts to look a bit burnt yellow brownish Steps Images 1 Let build plate cool and remove from the print bed 2 Clean glass plate with clean water only 3 NOTE Soap a...

Page 36: ...steps are followed exactly as outline below to avoid possible damage to the printer 4 1 5 1 Pre Heating the Nozzles Bed Chamber or All Steps Images 1 Select PREHEAT 2 Select the material you loaded 3...

Page 37: ...g you will see PRE HEATING flashing in the screen 2 Load the new spool of filament on the spool holder 3 Cut the filament tip at an angle for easier insertion into the feeder port 4 Push the filament...

Page 38: ...ilament vertically into the correct feeder port 8 Select the nozzle you are loading 9 Press LOAD 10 Feeder will pull filament into the nozzle and prime a bit of filament NOTE If filament is not extrud...

Page 39: ...g a new filament is a good idea in the event that the filament did not feed well into the nozzle during the loading process Steps Images 1 Pre heat the nozzle you want to prime if the nozzle is not al...

Page 40: ...eeder will not operate under 175 C 13 Select the nozzle you are unloading 14 Select Remove 15 If needed remove the top window for better access to the feeder port 16 Remove filament from the nozzle to...

Page 41: ...wn button to cool the nozzles down before you touch them 4 Use a 2 5mm hex wrench and loosen each of the three screws holding the nozzle to the heater body 5 Remove the nozzle 6 Place the replacement...

Page 42: ...chamber before attempting to take it off the build plate Most prints should come right off when build plate is cooled If the part gets stuck on the build plate washing the plate with water helps or so...

Page 43: ...al hours but can be sped up by agitating or warming the solvent for some support materials Additional Post Processing You may choose other types of post processing which include sanding gluing paintin...

Page 44: ...ng steps Steps Images 1 Place printer in SERVICE MODE 2 Cool down printer components WARNING Not allowing printer to cool down properly can result in serious burns 3 Insert 3mm allen wrench into right...

Page 45: ...eps Images 1 Remove filament 2 Cool down printer components WARNING Not allowing printer to cool down properly can result in serious burns 3 Place printer in SERVICE MODE 4 Power down printer CAUTION...

Page 46: ...cover and loosen NOTE Due to the depth of the hole the loosened screws may not come out but you will still be able to proceed 7 Repeat for right recess 8 After both bolts are completely loosened remov...

Page 47: ...down printer components WARNING Not allowing printer to cool down properly can result in serious burns 4 Place printer in SERVICE MODE 5 When printer is cooled power down the printer 6 Remove the two...

Page 48: ...two 2 M3 screws that hold feeder assembly NOTE You will need to use one hand to push the feeder assembly together while you loosen the screws with the other hand The spring in between the feeder assem...

Page 49: ...CE MODE 3 Use a scraper to remove film off steel bed rails for precise contact between rails and nozzles 5 6 Clean Nozzles TRAK recommends cleaning your nozzles every 100 print hours for more accurate...

Page 50: ...5 Unscrew the filter cover and both filters should easily drop out 6 If necessary use a small screwdriver to gently pry out the filter 7 Once removed dispose of used filter 8 Replace in reverse order...

Page 51: ...hat you are experiencing issues with the first layer being too close or too far from the build plate 5 10 Lubricate Z Stage Ballscrew TRAK recommends lubricating your Z Stage Ballscrew every 1000 hour...

Page 52: ...on Apex Slicer Always print your Euclid Block using dried MG94 ABS natural color and the G Code stored onto your printers Internal Drive 6 1 Running Out of Filament Steps Images 1 Pre heat nozzle to r...

Page 53: ...oo Far from Bed Printing Too Close to Bed You can tell this when the printer can t extrude a solid bead throughout the first layer Printing Too Far from Bed You can tell this when the first layer won...

Page 54: ...le to move around yellow arrows as the full upward force of the spring red arrow clamps the underside of the glass 6 5 Filament Jam Steps Images 1 Preheat nozzle to recommended temperature for loaded...

Page 55: ...must be followed as shown below Any deviations from the procedure may result in serious printer damage and or personal injury Steps Images 1 Remove filament 2 Select COOL DOWN WARNING Not allowing pri...

Page 56: ...s off their central position making it harder to loosen them see image to the right 8 Push the feeder assembly together and pull towards you to remove NOTE If the feeder assembly is stuck try using a...

Page 57: ...O 3D Printers Installation Printing Maintenance Troubleshooting Manual 12 Power the printer back on 13 Test that the jam has cleared by loading filament and priming 14 If this did not clear the jam pl...

Page 58: ...d warranty of merchantability or fitness for a particular purpose and of any other obligations or liability on the part of TMT SWI or any producing entity if different Warranty repairs exchanges do no...

Reviews: