background image

19

Chapter 4


Configure the Access Point

4. 1.  Status

1. Visit 

http://tplinkap.net

, and log in with the username and password you set for the 

access point.

2. Go to 

Status

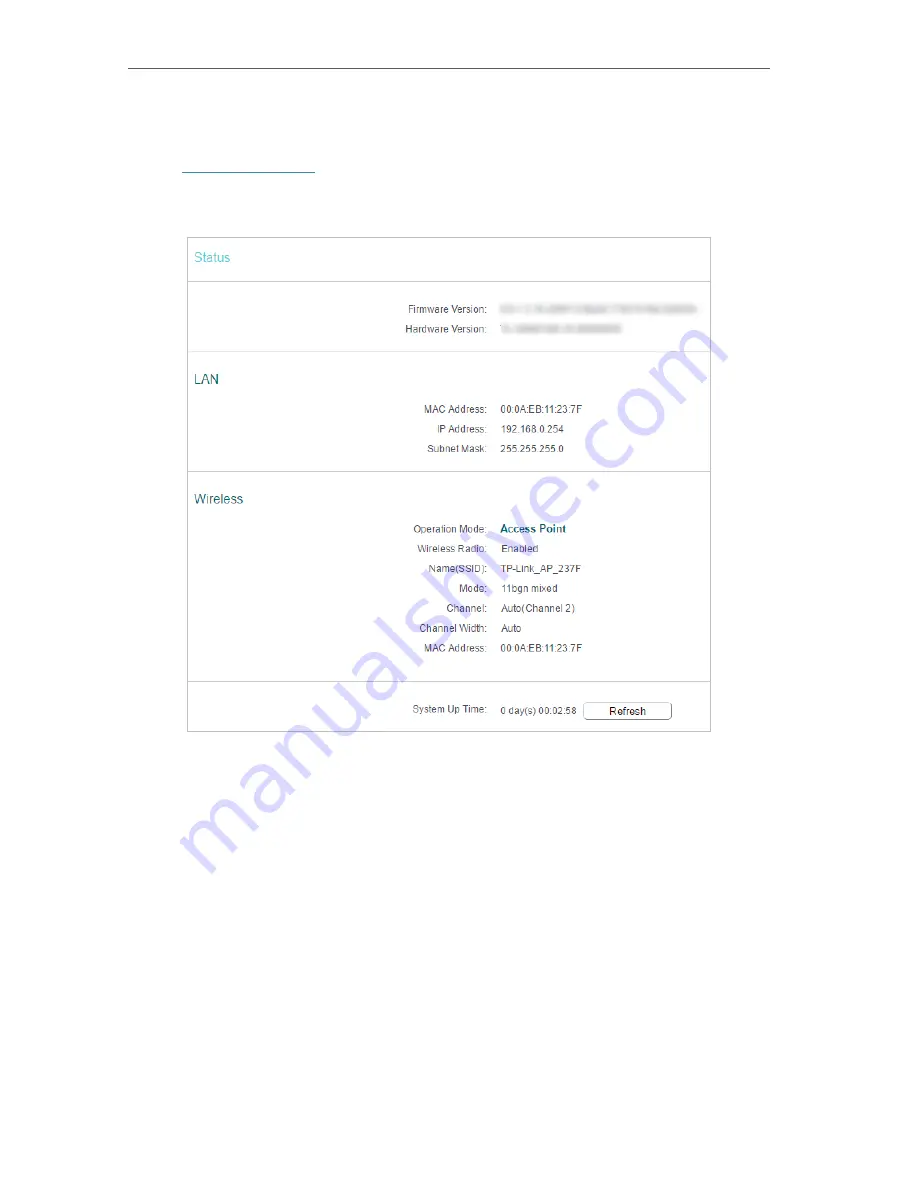
. You can view the current status information of the access point.

•  Firmware Version

 - The version information of the access point’s firmware.

•  Hardware Version

 - The version information of the access point’s hardware.

•  LAN

 - This field displays the current settings of the LAN, and you can configure them 

on the 

Network

 > 

LAN

 page. 

•  MAC address

 - The physical address of the access point.

•  IP address

 - The LAN IP address of the access point.

•  Subnet Mask

 - The subnet mask associated with the LAN IP address.

•  Wireless

 - This field displays the basic information or status of the wireless function, 

and you can configure them on the 

Wireless

 > 

Wireless Settings

 page. 

•  Operation Mode

 - The current wireless working mode in use.

•  Wireless Radio

 - The status of wireless radio.

•  Name (SSID)

 - The SSID of the access point.

Summary of Contents for WA801ND

Page 1: ...r Guide 300Mbps Wireless N Access Point TL WA801ND Questo manuale d istruzione fornito da trovaprezzi it Scopri tutte le offerte per TP Link TL WA801ND o cerca il tuo prodotto tra le migliori offerte...

Page 2: ...et Connection Via Quick Setup Wizard 10 3 1 Log In to the Access Point 11 3 2 Configure the Access Point 11 3 2 1 Access Point Mode 12 3 2 2 Repeater Bridge Mode 13 3 2 3 Client Mode 14 3 2 4 Multi SS...

Page 3: ...CP 34 4 4 1 DHCP Settings 34 4 4 2 DHCP Client List 36 4 4 3 Address Reservation 36 4 5 System Tools 37 4 5 1 Diagnostic 37 4 5 2 SNMP Settings 39 4 5 3 Ping Watch Dog 40 4 5 4 Firmware Upgrade 41 4 5...

Page 4: ...he Advanced tab Note Ignoring this type of note might result in a malfunction or damage to the device Tips Indicates important information that helps you make better use of your device More Info The l...

Page 5: ...Chapter 1 Get to Know About Your Access Point This chapter introduces what the access point can do and shows its appearance It contains the following sections Product Overview Panel Layout...

Page 6: ...adapters printers or network attached storage devices The AP supports a host of different functions that make your wireless networking experience more flexible than ever before Now you can enjoy a bet...

Page 7: ...oint Off Power is off Wireless On The wireless function is enabled Off The wireless function is disabled Ethernet On The ETHERNET port is connected to a powered on device Off The ETHERNET port is not...

Page 8: ...port connects to a network device such as a switch or a router WPS If your client devices such as wireless adapters support Wi Fi Protected Setup then you can press this button to quickly establish a...

Page 9: ...Chapter 2 Connect the Hardware This chapter contains the following sections Position Your Access Point Connect Your Access Point...

Page 10: ...ortedbythisaccesspoint AccessPoint Repeater Bridge Client and Multi SSID Please determine which operation mode you need and carry out the corresponding steps 2 2 1 Access Point Mode In Access Point mo...

Page 11: ...untilthePower andWireless LEDsarelitandstable andusethedefaultSSIDandPasswordprintedonthelabeloftheaccesspointtojoinits Wi Fi network 2 2 3 Client Mode In Client mode the access point connects your wi...

Page 12: ...le when you want your devices connected to different wireless networks and become isolated by VLANs TL WA801ND s SSID VLAN 2 VLAN 1 Wired Router Internet A C B D 1 Connect the access point according t...

Page 13: ...nection Via Quick Setup Wizard This chapter introduces how to connect your access point to the internet via the web based Quick Setup Wizard It contains the following sections Log In to the Access Poi...

Page 14: ...me and password you set for the access point Note If the login window does not appear please refer to the FAQ Section 3 2 Configure the Access Point The Quick Setup Wizard will guide you through the p...

Page 15: ...eless Network Name and Wireless Password or keep the default ones and then click Next 2 Select the LAN IP type of the access point or leave the default setting Smart DHCP for most cases and then click...

Page 16: ...extend from the AP List and click Connect Enter the host network s password in the Password field choose to copy the wireless name from the host network or customize your own and then click Next 2 Se...

Page 17: ...he configuration 4 Relocate the access point about halfway between your host AP and the Wi Fi dead zone 3 2 3 Client Mode 1 Choose a network you want to connect to from the AP List and click Connect E...

Page 18: ...eave the default setting Smart IP for most cases and then click Next 3 Click Finish to complete the configuration Now your wired device can surf the internet 3 2 4 Multi SSID Mode 1 Enable the VLAN fu...

Page 19: ...r 3 SetUpInternetConnectionViaQuickSetupWizard 2 Select the LAN IP type of the access point or leave the default setting Smart IP for most cases and then click Next 3 Click Finish to complete the conf...

Page 20: ...imply by pressing the WPS button of your access point and the host router 1 Connect the hardware of your access point according to the mode needed 2 Press the WPS button of your access point 3 Within...

Page 21: ...hapter 4 Configure the Access Point This chapter presents how to configure the various features of your access point It contains the following sections Status Network Wireless DHCP System Tools Log Ou...

Page 22: ...are LAN This field displays the current settings of the LAN and you can configure them on the Network LAN page MAC address The physical address of the access point IP address The LAN IP address of the...

Page 23: ...in with the username and password you set for the access point 2 Go to Network LAN 3 Configure the IP parameters of the LAN and click Save Type Either select Smart IP DHCP to get IP address from DHCP...

Page 24: ...Name Identifies your wireless network name Create a name up to 32 characters and make sure all wireless points in the wireless network with the same SSID The default SSID is TP Link_AP_XXXX XXXX indi...

Page 25: ...rk Security Select one of the security options to match with the host network No Security This option disables the wireless security WPA PSK This option supports implementation of the WPA Wi Fi Protec...

Page 26: ...ber between 1 and 4095 for VLAN This will cause the device to send packets with VLAN tags The switch connecting with the device must support VLAN IEEE802 1Q frames The wireless stations connecting to...

Page 27: ...nsitive SSID of the host network which the extender wille be connecting to or click Wireless Scanner and select a Wi Fi network BSSID to be bridged Enter the MAC Address of the host network which the...

Page 28: ...quickly and securely connect to a network This section will guide you to add a new wireless device to your access point s network quickly via WPS Note The WPS function cannot be configured if the wir...

Page 29: ...TWO Enter the Client s PIN 1 Keep the WPS Status as Enabled and click Add Device 2 Select Enter the new device s PIN enter your client device s current PIN in the PIN filed and click Connect 3 A succ...

Page 30: ...Access Point and Multi SSID 4 Configure the security settings of your wireless network and click Save The security options are different for different operation mode Access Point Disable Wireless Secu...

Page 31: ...which can select Shared Key or Open System authentication type automatically based on the wireless client s capability and request WEP Key Format Hexadecimal and ASCII formats are provided here Hexad...

Page 32: ...al characters For Hexadecimal the length should be between 8 and 64 characters for ASCII the length should be between 8 and 63 characters Group Key Update Period Specify the group key update interval...

Page 33: ...Enable or disable the 2 4GHz wireless function of the range extender Extended 2 4GHz SSID Either use the Copy Host SSID button to automatically copy the main router AP s SSID or enter a new name up to...

Page 34: ...7 5F to access the access point but other wireless clients cannot access the access point 1 Visit http tplinkap net and log in with the username and password you set for the access point 2 Go to Wirel...

Page 35: ...it s strongly recommended to keep the provided default values otherwise it may result in lower wireless network performance Transmit Power Select High Middle or Low which you would like to specify fo...

Page 36: ...le Short GI It is recommended to enable this function for it will increase the data capacity by reducing the guard interval time Enable Client Isolation This function isolates all connected wireless s...

Page 37: ...tion Click Start Stop to start or stop wireless throughput monitor 4 4 DHCP By default the DHCP Dynamic Host Configuration Protocol Server is enabled and the access point acts as a DHCP server it dyna...

Page 38: ...current dynamic IP Address When time is up the user will be automatically assigned a new dynamic IP address The range of the time is 1 2880 minutes The default value is 120 Default Gateway Optional It...

Page 39: ...DHCP client Lease Time The time of the DHCP client leased After the dynamic IP address has expired a new dynamic IP address will be automatically assigned to the user You cannot change any of the val...

Page 40: ...address 2 Enter the IP address in dotted decimal notation which you want to reserve for the client 3 Leave the Status as Enabled 4 Click Save 4 5 System Tools 4 5 1 Diagnostic Diagnostic is used to t...

Page 41: ...omain name you are specifying can be resolved by using Domain Name System DNS queries IP Address Domain Name Enter the destination IP address such as 192 168 0 254 or Domain name such as www tp link c...

Page 42: ...t for the access point 2 Go to System Tools SNMP Read Community Enter the community name that allows Read Only access to the Device s SNMP information The community name can be considered a group pass...

Page 43: ...ess it can be the internet gateway for example If it is unable to ping under the user defined constraints the access point will automatically reboot 1 Visit http tplinkap net and log in with the usern...

Page 44: ...file for the access point from our website www tp link com 2 Visit http tplinkap net and log in with the username and password you set for the access point 3 Go to System Tools Firmware Upgrade 4 Clic...

Page 45: ...uter A bin file of the current settings will be stored in your computer To restore configuration settings 1 Click Choose File to locate the backup configuration file stored in your computer and click...

Page 46: ...name and password of the access point It is strongly recommended that you change the default username and password of the access point for all users that try to access the access point s web based uti...

Page 47: ...level will be shown Refresh Refresh the page to show the latest log list Clear Log All the logs will be deleted from the access point permanently not just from the page 4 6 Log Out Click Logout at th...

Page 48: ...ofthewebmanagement page The default username and password of the web management page are admin in lowercase If you have altered the username and password but Password Recovery is disabled 1 Reset the...

Page 49: ...or the repeater is about halfway between your wireless router and your wireless clients and make sure that the location you choose is within the range of the host router If that is not possible place...

Page 50: ...roduct names are trademarks or registered trademarks of their respective holders No part of the specifications may be reproduced in any form or by any means or used to make any derivative such as tran...

Page 51: ...ed radio TV technician for help This device complies with part 15 of the FCC Rules Operation is subject to the following two conditions 1 This device may not cause harmful interference 2 This device m...

Page 52: ...wo conditions 1 This device may not cause interference and 2 This device must accept any interference including interference that may cause undesired operation of the device Le pr sent appareil est co...

Page 53: ...nvironment This equipment should be installed and operated with minimum distance 20cm between the radiator your body D claration d exposition aux radiations Cet quipement est conforme aux limites d ex...

Page 54: ...considered as disconnect device of adapter Use only power supplies which are provided by manufacturer and in the original packing of this product If you have any questions please don t hesitate to co...

Reviews: