background image

104

Chapter 15


Manage the Router 

15  5   Local Management

This feature allows you to limit the number of client devices on your LAN from accessing 
the router by using the MAC address-based authentication.
1. Visit

 http://tplinkwifi.net

, and log in with your TP-Link ID or the password you set for 

the router.

2. Go to 

Advanced

 > 

System 

Administration

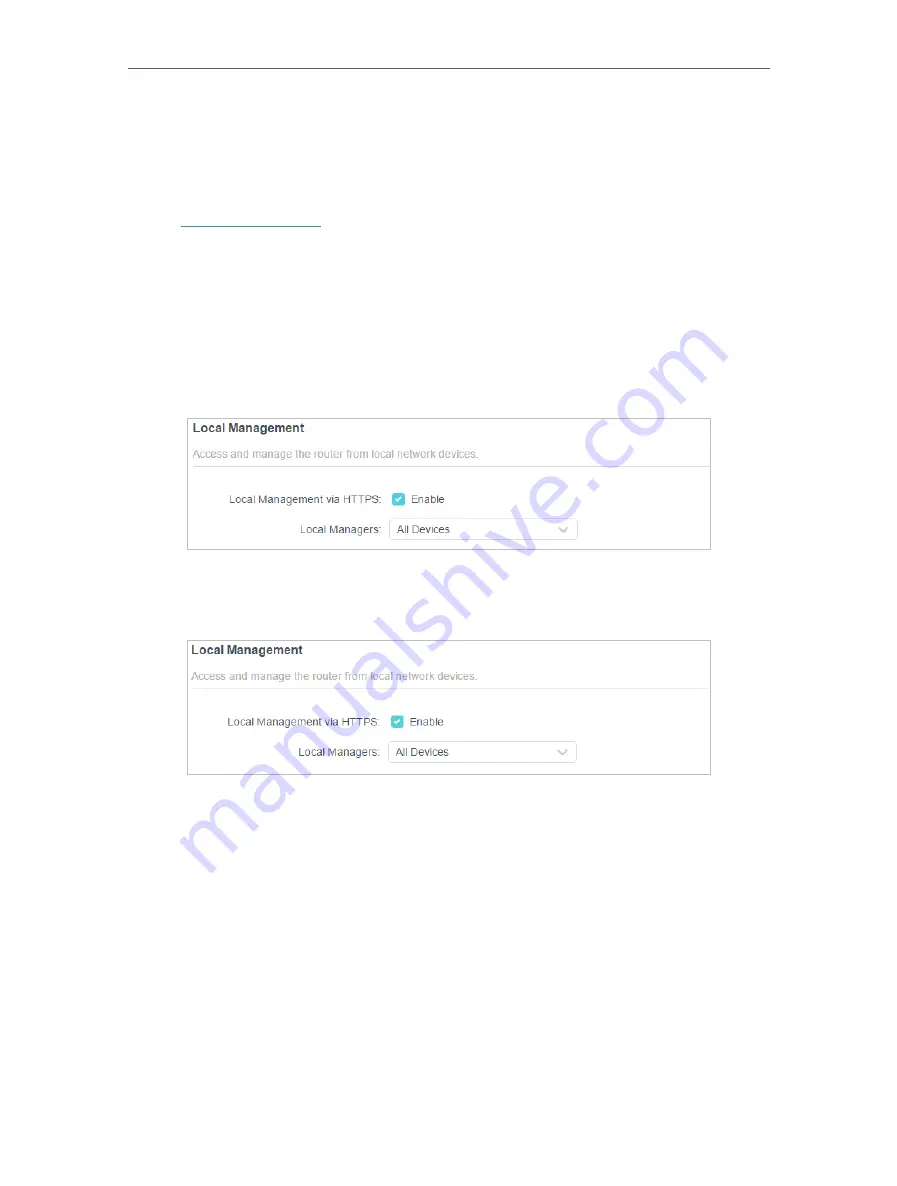
 and complete the settings In 

Local 

Management

 section as needed.

• 

Access the router via HTTPS and HTTP:

Tick the 

Enable 

box of

  Local Management via HTTPS

 to access the router via HTTPS 

and HTTP, or keep it disabled to access the router only via HTTP.

• 

Allow all LAN connected devices to manage the router: 

Select 

All Devices

 for 

Local Managers

.

• 

Allow specific devices to manage the router:


1. Select 

All Devices

 for 

Local Managers

 and click 

SAVE

.

Summary of Contents for Archer AX95

Page 1: ... 2022 TP Link 1910013198 REV1 0 0 User Guide AX7800 Tri Band 8 Stream Wi Fi 6 Router Archer AX95 ...

Page 2: ...4 4 3 Manually Set Up Your Internet Connection 15 4 4 Set Up the Router as an Access Point 18 4 5 Set Up an IPv6 Internet Connection 19 Chapter 5 TP Link Cloud Service 23 5 1 Register a TP Link ID 24 5 2 Change Your TP Link ID Information 24 5 3 Manage the User TP Link IDs 25 5 3 1 Add TP Link ID to Manage the Router 26 5 3 2 Remove TP Link ID s from Managing the Router 26 5 4 Manage the Router vi...

Page 3: ...ter 10 HomeShield 54 10 1 Network Security 55 10 2 Parental Controls 55 10 3 Network Analysis Optimization 56 Chapter 11 Network Security 58 11 1 Protect the Network from Cyber Attacks 59 11 2 Access Control 59 11 3 IP MAC Binding 61 Chapter 12 NAT Forwarding 64 12 1 Share Local Resources on the Internet by Port Forwarding 65 12 2 Open Ports Dynamically by Port Triggering 67 12 3 Make Applications...

Page 4: ...e the Router 98 15 1 Upgrade the Firmware 99 15 1 1 Auto Update 99 15 1 2 Online Upgrade 99 15 1 3 Local Upgrade 100 15 2 Backup and Restore Configuration Settings 101 15 3 Change the Login Password 102 15 4 Password Recovery 103 15 5 Local Management 104 15 6 Remote Management 105 15 7 System Log 107 15 8 Test the Network Connectivity 109 15 9 Set Up System Time 111 15 10 Set the Router to Reboot...

Page 5: ...ing page For example Advanced Wireless Guest Network means the Guest Network function page is under the Wireless menu that is located in the Advanced tab Note Ignoring this type of note might result in a malfunction or damage to the device Tips Indicates important information that helps you make better use of your device symbols on the web page Click to edit the corresponding entry Click to delete...

Page 6: ...se of Wi Fi 6 802 11ax and features including OFDMA MU MIMO 1024 QAM and HT160 require clients to also support the corresponding features 2 5 Gbps internet speeds require compatible service plans and equipment 2 5 Gbps and 1 Gbps ports cannot be concurrently configured as WAN ports Saving clients battery power requires clients to also support the 802 11ax Wi Fi standard Actual power reduction may ...

Page 7: ...Chapter 1 Get to Know About Your Router This chapter introduces what the router can do and shows its appearance It chapter contains the following sections Product Overview Appearance ...

Page 8: ... backwards compatible with 802 11a b g n ac Moreover it is simple and convenient to set up and use the TP Link router due to its intuitive web interface and the powerful Tether app 1 2 Appearance 1 2 1 Top Panel The router s LED is located on the front You can check the router s working status by following the LED Explanation table LED Explanation Status Indication Solid orange The Wi Fi is off Pu...

Page 9: ...wer On Off Button Press this button to power on or off the router Reset Button Press and hold the button until the LED blinks to reset the router to its factory default settings 2 5 Gbps WAN LAN Port For connecting to your modem the Ethernet outlet or other internet devices Used as the WAN or LAN port 1 Gbps WAN LAN Port For connecting to your modem the Ethernet outlet or other internet devices Us...

Page 10: ...PS Button Press this WPS button and immediately press the WPS button on your client device to start the WPS process The LED of the router should change from pulsing blue to solid on indicating successful WPS connection Wi Fi Button Press and hold this button for about 2 seconds to turn on or off the wireless function of your router LED Button Press the LED button to turn on or off the LED of your ...

Page 11: ...Chapter 2 Connect the Hardware This chapter contains the following sections Position Your Router Connect Your Router ...

Page 12: ...urface such as on a shelf or desktop The device also can be mounted on the wall as shown in the following figure NOTE 4 67mm D 9 85mm d 4 0mm H 3mm 4 6mm N 20 M 18 5 200 96 10 3 2 Note The diameter of the screw head 4 67mm D 9 85mm and the distance of two screws is 200 96mm The screw that project from the wall need around 5mm based and the length of the screw need to be at least 20mm to withstand ...

Page 13: ...restart 3 Connect the power adapter to the router and turn on the router 4 Verify the LED is solid on red or blue before moving on 5 Connect your computer to the router Method 1 Wired Turn off the Wi Fi on your computer and connect the devices as shown below Ethernet cable Method 2 Wirelessly 1 Find the SSID Network Name and Wireless Password printed on the label at the bottom of the router 2 Clic...

Page 14: ...phones tablets and most USB network cards can be connected to your router through this method Note WPS is not supported by iOS devices The WPS function cannot be configured if the wireless function of the router is disabled Also the WPS function will be disabled if your wireless encryption is WEP Please make sure the wireless function is enabled and is configured with the appropriate encryption be...

Page 15: ...Chapter 3 Log In to Your Router ...

Page 16: ...as Microsoft Internet Explorer Mozilla Firefox or Apple Safari Follow the steps below to log in to your router 1 Set up the TCP IP Protocol in Obtain an IP address automatically mode on your computer 2 Visit http tplinkwifi net and create a login password for secure management purposes Then click Let s Get Started to log in Note If the login window does not appear please refer to the FAQ Section ...

Page 17: ...ion built in automates many of the steps and verifies that those steps have been successfully completed Furthermore you can also set up an IPv6 connection if your ISP provides IPv6 service It contains the following sections Use Quick Setup Wizard Quick Setup Via TP Link Tether App Manually Set Up Your Internet Connection Set Up the Router as an Access Point Set Up an IPv6 Internet Connection ...

Page 18: ...omplete service from TP Link remote management TP Link DDNS and more log in with your TP Link ID or click Sign Up Now to get one Then follow the instructions to bind the cloud router to your TP Link ID Note To learn more about the TP Link Cloud service please refer to the TP Link Cloud Service section If you do not want to register a TP Link ID now you may click Skip to proceed If you have changed...

Page 19: ...n check your current internet connection settings You can also modify the settings according to the service information provided by your ISP Follow the steps below to check or modify your internet connection settings 1 Visit http tplinkwifi net and log in with your TP Link ID or the password you set for the router 2 Go to Internet 3 Select a port for internet service Make sure the cable is securel...

Page 20: ...ne the MAC address Dynamic IP users are usually equipped with a cable TV or fiber cable 2 If you choose Static IP enter the information provided by your ISP in the corresponding fields 3 If you choose PPPoE enter the username and password provided by your ISP PPPoE users usually have DSL cable modems ...

Page 21: ...ry Connection provided by your ISP Different parameters are needed according to the Secondary Connection you have chosen 5 If you choose PPTP enter the username and password and choose the Secondary Connection provided by your ISP Different parameters are needed according to the Secondary Connection you have chosen ...

Page 22: ...still cannot access the internet refer to the FAQ section for further instructions 4 4 Set Up the Router as an Access Point The router can work as an access point transforming your existing wired network to a wireless one 1 Visit http tplinkwifi net and log in with your TP Link ID or the password you set for the router 2 Go to Advanced System Operation Mode select Access Point and click Save The r...

Page 23: ...same as those in the Router mode 4 5 Set Up an IPv6 Internet Connection Your ISP provides information about one of the following IPv6 internet connection types PPPoE Dynamic IP SLAAC DHCPv6 Static IP 6to4 tunnel Pass Through Bridge 1 Visit http tplinkwifi net and log in with your TP Link ID or the password you set for the router 2 Go to Advanced IPv6 3 Enable IPv6 and select the internet connectio...

Page 24: ...d then click Renew 3 PPPoE By default the router uses the IPv4 account to connect to the IPv6 server Click Advanced to input further information if your ISP requires Click Save and then click Connect Note If your ISP provides two separate accounts for the IPv4 and IPv6 connections manually enter the username and password for the IPv6 connection ...

Page 25: ...4 internet connection type is a prerequisite for this connection type Manually Set Up Your Internet Connection Click Advanced to input further information if your ISP requires Click Save and then click Connect 5 Pass Through Bridge Click Save and skip to Step 6 ...

Page 26: ...indows users are recommended to choose from the first two types Fill in Address Prefix provided by your ISP and click Save 6 Click Status to check whether you have successfully set up an IPv6 connection Tips Visit the FAQ section if there is no internet connection ...

Page 27: ...ill notify you when an important firmware upgrade is available Surely you can also manage multiple TP Link Cloud devices with a single TP Link ID This chapter introduces how to register a new TP Link ID bind or unbind TP Link IDs to manage your router and the Tether app with which you can manage your home network no matter where you may find yourself It contains the following sections Register a T...

Page 28: ... the router is bound to your TP Link ID you need to log in to the router with the TP Link ID Once you have registered a TP Link ID on the web management page you can only register another TP Link ID via the Tether APP Please refer to Manage the Router via the TP Link Tether App to install the app If you want to unbind the admin TP Link ID from your router please go to Advanced TP Link ID an click ...

Page 29: ...assword 2 Enter the current password then a new password twice And click Save 5 3 Manage the User TP Link IDs The TP Link ID used to log in to the router for the first time will be automatically bound as the Admin account An admin account can add or remove other TP Link IDs to or ...

Page 30: ... TP Link ID and focus on the Bound Accounts section 3 Click enter another TP Link ID as needed and click Save Note If you need another TP Link ID please register a new one via the Tether app Refer to Manage the Router via the TP Link Tether App to install the app and register a new TP Link ID 4 The new TP Link ID will be displayed in the Bound Accounts table as a User 5 3 2 Remove TP Link ID s fro...

Page 31: ...nd log in with your TP Link ID Note If you don t have a TP Link ID create one first 3 Connect your device to the router s wireless network 4 GobacktotheTetherapp selectthemodelofyourrouterandloginwiththepassword you set for the router 5 Manage your router as needed Note If you need to remotely access your router from your smart devices you need to Log in with your TP Link ID If you don t have one ...

Page 32: ...Chapter 6 Network Map ...

Page 33: ... and log in with your TP Link ID or the password you set for the router 2 Go to Network Map 3 Click each network device icon to check and manage general network settings Click Internet to check internet status Click the router to check device status and network settings You can turn on or off the wireless network or guest network or click Edit to change related settings ...

Page 34: ...30 Chapter 6 Network Map Click Mesh Devices to view the devices that form a mesh network with the router ...

Page 35: ...s so they cannot access your network or set Speed Limit to limit their upload and download speeds To limit the speeds of a device 1 Click in the Speed Limit column 2 Enable Speed Limit 3 Set the download and upload speed limit according to your needs 4 Click SAVE The speeds of the device will be limited ...

Page 36: ...tings This chapter guides you on how to configure the wireless settings It contains the following sections Specify Wireless Settings Schedule Your Wireless Function Use WPS for Wireless Connection Advanced Wireless Settings ...

Page 37: ...and log in with your TP Link ID or the password you set for the router 2 Go to Wireless or Advanced Wireless Wireless Settings To enable or disable TWT TWT Target Wake Time allows 802 11ax routers and clients to negotiate their periods to transmit and receive data packets Clients only wake up at TWT sessions and remain in sleep mode for the rest of the time which significantly extend their battery...

Page 38: ... and 5GHz wireless networks If you want to configure the wireless settings separately for each band untick the checkbox to disable this feature To enable or disable the wireless function 1 Go to Wireless or Advanced Wireless Wireless Settings 2 The wireless function is enabled by default If you want to disable the wireless function of the router just untick the Enable checkbox of each wireless net...

Page 39: ...erating channel for the wireless network It is recommended to leave the channel to Auto if you are not experiencing the intermittent wireless connection issue Mode Select a transmission mode according to your wireless client devices It is recommended to just leave it as default 7 2 Schedule Your Wireless Function The wireless network can be automatically off at a specific time when you do not need...

Page 40: ...t 7 3 Use WPS for Wireless Connection Wi Fi Protected Setup WPS provides an easier approach to set up a security protected Wi Fi connection 1 Visit http tplinkwifi net and log in with your TP Link ID or the password you set for the router 2 Make sure the Wi Fi of your router is on and go to Advanced Wireless WPS 7 3 1 Connect via the Client s PIN Enter the PIN of your device and click Connect Then...

Page 41: ... supported devices can connect to your router with the PIN The default PIN is printed on the label of the router 7 3 3 Push the WPS Button Click Start on the screen or directly press the router s WPS button Within two minutes enable WPS on your personal device Success will appear on the screen and the WPS LED of the router should change from flashing to solid on indicating successful WPS connectio...

Page 42: ...nnel once the radar signal is detected on a channel allocated to radar devices to ensure lag free network experience Beacon Interval Enter a value between 40 and 1000 in milliseconds to determine the duration between beacon packets that are broadcasted by the router to synchronize the wireless network The default value is 100 milliseconds RTS Threshold Enter a value between 1 and 2346 to determine...

Page 43: ...Chapter 7 Wireless Settings Group Key Update Period Enter a number of seconds minimum 30 to control the time interval for the encryption key automatic renewal The default value is 0 meaning no key renewal ...

Page 44: ...ou have guests in your house apartment or workplace you can create a guest network for them In addition you can customize guest network options to ensure network security and privacy It contains the following sections Create a Network for Guests Set Up Portal Authentication for the Guest Network Customize Guest Network Options ...

Page 45: ... SSID unless you want your guests to manually input the SSID for guest network access 3 Enable Bandwidth Control for one or multiple networks as you need then set the limits of the Download Bandwidth and Upload Bandwidth 4 Set the Effective Time to specify how long the guest network will be effective 5 Select the Security type and customize your own password If No security is selected no password ...

Page 46: ... to seize every opportunity to promote your shop which makes portal authentication an excellent choice Customers will be directed to a web page for access verification on which your personalized promotion is displayed Moreover you can specify a web link so that newly connected guests will be redirected to for example the official website of your shop 1 Visit http tplinkwifi net and log in with you...

Page 47: ...ion 5 SpecifytheAuthenticationTimeout Whenaguest sauthenticationexpires theyhave to reconnect to the network The default value Always indicates that authentication will never time out 6 Optional Enable Redirect and enter your desired web link Newly connected guests will be redirected to the website you specify 7 Optional Click to edit the Login Page You can customize the appearance and content of ...

Page 48: ... Allow guests to see each other Tick this checkbox if you want to allow the wireless clients on your guest network to communicate with each other via methods such as network neighbors and Ping Allow guests to access your local network Tick this checkbox if you want to allow the wireless clients on your guest network to communicate with the devices connected to your router s LAN ports or main netwo...

Page 49: ... to share files and media from the USB storage devices over your home network locally or remotely through the internet The router supports USB external flash drives and hard drives It contains the following sections Access the USB Storage Device Media Sharing Time Machine ...

Page 50: ...ake sure its file system is FAT32 exFat NTFS or HFS Before you physically disconnect a USB device from the router safely remove it to avoid data damage Go to Advanced USB USB Storage Device and click Remove 9 1 1 Access the USB Device Locally Insert your USB storage device into the router s USB port and then refer to the following table to access files stored on your USB storage device Windows com...

Page 51: ... and a password to deny anonymous access to the USB disks you should select the Registered User radio box To learn how to set up an account for the access refer to To Set Up Authentication for Data Security Tablet Use a third party app for network files management Tips You can also access your USB storage device by using your Network Media Server Name as the server address Refer to To Customize th...

Page 52: ...urney Note If your ISP assigns a private WAN IP address such as 192 168 x x or 10 x x x you cannot use this feature because private addresses are not routed on the internet Follow the steps below to configure remote access settings 1 Visit http tplinkwifi net and log in with your TP Link ID or the password you set for the router 2 Go to Advanced USB USB Storage Device 3 Tick the Internet FTP check...

Page 53: ...third party app for network files management Tips Click Set Up a Dynamic DNS Service Account to learn how to set up a domain name for you router 9 1 3 Customize the Access Settings By default all the network clients can access all folders on your USB disk You can customize your sharing settings by setting a sharing account sharing specific contents and setting a new sharing address on the router s...

Page 54: ...Focus on the File Sharing section Specify sharing folders that you want to share and click Save To Set Up Authentication for Data Security You can set up authentication for your USB storage device so that network clients will be required to enter username and password when accessing the USB storage device 1 In the File Sharing section enable Secure Sharing ...

Page 55: ...required to enter the sharing password for USB access 2 Due to Windows credential mechanism you might be unable to access the USB disk after changing Authentication settings Please log out from the Windows and try to access again Or you can change the address of the USB disk by referring to To Customize the Address of the USB Storage Device 9 2 Media Sharing The feature of Media Sharing allows you...

Page 56: ...s section Note Here we take Windows 7 as an example Tablet Use a third party DLNA supported player 9 3 Time Machine Time Machine backs up all files on your Mac computer to a USB storage device connected to your router 1 Visit http tplinkwifi net and log in with your TP Link ID or the password you set for the router 2 Go to Advanced USB Time Machine ...

Page 57: ...apter 9 USB Settings 3 Tick the checkbox to enable Time Machine 4 Click Select to select a location for Time Machine backups 5 Set the Size Limit for Backups Note 0 means no limit for the space 6 Click Save ...

Page 58: ...ures built in TP Link HomeShield Whether protecting your sensitive data or limiting the access of kids and guests TP Link HomeShield provides you the tools you need to fully manage your network It contains the following sections Network Security Parental Controls Network Analysis Optimization ...

Page 59: ...nd tap the HomeShield tab to use this feature 10 2 Parental Controls Parental Controls allows you to set up unique restrictions on internet access for each member of your family You can block inappropriate content set daily limits for the total time spent online and restrict internet access to certain times of the day Network Analysis Analyze and optimize your network IoT Protection Get real time ...

Page 60: ...des many tools for you to analyze and optimize your network To use this feature download Tether to enjoy the HomeShield service 1 Scan the QR code or get the Tether app from the Apple App Store or Google Play OR Child Protection Keep your child away from inappropriate content Family Incentive Program Manage screen time and create rewards Family Time Pause the internet to enjoy family time Weekly a...

Page 61: ...57 Chapter 10 HomeShield 2 Launch the Tether app and log in with your TP Link ID If you don t have an account create one first 3 Log in to your router and tap the HomeShield tab to use this feature ...

Page 62: ...t your home network from cyber attacks block or allow specific client devices to access your network using Access Control or you can prevent ARP spoofing and ARP attacks using IP MAC Binding It contains the following sections Protect the Network from Cyber Attacks Access Control IP MAC Binding Tips You can go to HomeShield to get a more comprehensive network protection system for your home network...

Page 63: ...ettings 11 2 Access Control Access Control is used to block or allow specific client devices to access your network via wired or wireless based on a list of blocked devices Blacklist or a list of allowed devices Whitelist I want to Block or allow specific client devices to access my network via wired or wireless How can I do that 1 Visit http tplinkwifi net and log in with your TP Link ID or the p...

Page 64: ... means the selected devices have been successfully added to the blacklist To allow specific device s 1 Select Whitelist and click SAVE 2 Your own device is in the whitelist by default and cannot be deleted Click to add other devices to the whitelist Add connected devices 1 Click Select From Device List 2 Select the devices you want to be allowed and click ADD ...

Page 65: ...e will appear on the screen which means the device has been successfully added to the whitelist Done Now you can block or allow specific client devices to access your network via wired or wireless using the Blacklist or Whitelist 11 3 IP MAC Binding IP MAC Binding namely ARP Address Resolution Protocol Binding is used to bind network device s IP address to its MAC address This will prevent ARP Spo...

Page 66: ...e password you set for the router 2 Go to Advanced Security IP MAC Binding 3 Enable IP MAC Binding 4 Bind your device s according to your need To bind the connected device s 1 Click in the Binding List section 2 Click VIEW CONNECTED DEVICES and select the device you want to bind The MAC Address and IP Address fields will be automatically filled in 3 Click SAVE ...

Page 67: ...rk Security To bind the unconnected device 1 Click in the Binding List section 2 Enter the MAC Address and IP Address that you want to bind 3 Click SAVE Done Now you don t need to worry about ARP spoofing and ARP attacks ...

Page 68: ...rwarding feature the router can penetrate the isolation of NAT and allows devices on the internet to initiatively communicate with devices on the local network thus realizing some special functions The TP Link router supports four forwarding rules If two or more rules are set the priority of implementation from high to low is Port Forwarding Port Triggering UPNP and DMZ It contains the following s...

Page 69: ...ed in HTTP service port 21 in FTP service port 25 in SMTP service and port 110 in POP3 service Please verify the service port number before the configuration I want to SharemypersonalwebsiteI vebuiltinlocalnetworkwithmyfriendsthroughtheinternet Forexample thepersonalwebsitehasbeenbuiltonmyhomePC 192 168 0 100 Ihope that my friends on the internet can visit my website in some way The PC is connecte...

Page 70: ...ommended to keep the default settings of Internal Port and Protocol if you are not clear about which port and protocol to use If the service you want to use is not in the common services list you can enter the corresponding parameters manually You should verify the port number that the service needs You can add multiple port forwarding rules if you want to provide several services in a router Plea...

Page 71: ...he triggering port all the external ports will be opened for subsequent connections The router can record the IP address of the host When the data from the internet return to the external ports the router can forward them to the corresponding host Port Triggering is mainly applied to online games VoIPs video players and common applications including MSN Gaming Zone Dialpad and Quick Time 4 players...

Page 72: ...the internet which can realize the unlimited bidirectional communication between internal hosts and external hosts The DMZ host becomes a virtual server with all ports opened When you are not clear about which ports to open in some special applications such as IP camera and database software you can set the PC to be a DMZ host Note When DMZ is enabled the DMZ host is totally exposed to the interne...

Page 73: ... devices to automatically find the front end NAT device and send request to it to open the corresponding ports With UPnP enabled the applications or host devices on the local network and the internet can freely communicate with each other thus realizing the seamless connection of the network You may need to enable the UPnP if you want to use applications for multiplayer gaming peer to peer connect...

Page 74: ...herefore you can play Xbox online games without a hitch INTERNET If necessary you can follow the steps to change the status of UPnP 1 Visit http tplinkwifi net and log in with your TP Link ID or the password you set for the router 2 Go to Advanced NAT Forwarding UPnP and toggle on or off according to your needs ...

Page 75: ...TP VPN is easy to use with the built in VPN software of computers and mobile devices but it is vulnerable and may be blocked by some ISPs L2TP IPSec VPN is more secure but slower than PPTP VPN and may have trouble getting around firewalls VPN Client allows devices in your home network to access remote VPN servers without the need to install VPN software on each device This chapter contains the fol...

Page 76: ...or the password you set for the router 2 Go to Advanced VPN Server OpenVPN and tick the Enable box of OpenVPN Note Before you enable VPN Server we recommend you configure Dynamic DNS Service recommended or assign a static IP address for router s WAN port and synchronize your System Time with internet The first time you configure the OpenVPN Server you may need to generate a certificate before you ...

Page 77: ... you want to run the OpenVPN client utility Note You need to install the OpenVPN client utility on each device that you plan to apply the VPN function to access your router Mobile devices should download a third party app from Google Play or Apple App Store 2 After the installation copy the file exported from your router to the OpenVPN client utility s config folder for example C Program Files Ope...

Page 78: ...f IP addresses up to 10 that can be leased to the devices by the PPTP VPN server 4 Set the PPTP connection permission according to your needs Select Allow Samba Network Place access to allow your VPN device to access your local Samba server Select Allow NetBIOS passthrough to allow your VPN device to access your Samba server using NetBIOS name Select Allow Unencrypted connections to allow unencryp...

Page 79: ...n use the Windows built in PPTP software or a third party PPTP software to connect to PPTP Server Here we use the Windows built in PPTP software as an example 1 Go to Start Control Panel Network and Internet Network and Sharing Center 2 Select Set up a new connection or network 3 Select Connect to a workplace and click Next ...

Page 80: ...76 Chapter 13 VPN Server Client 4 Select Use my Internet connection VPN 5 Enter the internet IP address of the router for example 218 18 1 73 in the Internet address field Click Next ...

Page 81: ...77 Chapter 13 VPN Server Client 6 Enter the User name and Password you have set for the PPTP VPN server on your router and click Connect 7 Click Connect Now when the VPN connection is ready to use ...

Page 82: ...ow to set up the L2TP IPSec VPN connection INTERNET Home Network Router VPN Server Remote Devices Step 1 Set up L2TP IPSec VPN Server on Your Router 1 Visit http tplinkwifi net and log in with your TP Link ID or the password you set for the router 2 Go to Advanced VPN Server L2TP IPSec and enable L2TP IPSec Note Firmware update may be required to support L2TP IPSec VPN Server Before you enable VPN...

Page 83: ...er 4 Keep IPSec Encryption as Encrypted and create an IPSec Pre Shared Key 5 Click SAVE 6 Configure the L2TP IPSec VPN connection account for the remote device You can create up to 16 accounts 4 Click Add 5 Enter the Username and Password to authenticate devices to the L2TP IPSec VPN Server 6 Click ADD Step 2 Configure L2TP IPSec VPN Connection on Your Remote Device ...

Page 84: ...are or a third party L2TP IPSec software to connect to L2TP IPSec Server Here we use the Windows built in L2TP IPSec software as an example 1 Go to Start Control Panel Network and Internet Network and Sharing Center 2 Select Set up a new connection or network 3 Select Connect to a workplace and click Next ...

Page 85: ...ternet IP address of the router for example 218 18 1 73 in the Internet address field and select the checkbox Don t connect now just set it up so I can connect later Click Next 6 Enter the User name and Password you have set for the L2TP IPSec VPN server on your router and click Connect ...

Page 86: ...82 Chapter 13 VPN Server Client 7 Click Close when the VPN connection is ready to use 8 Go to Network and Sharing Center and click Change adapter settings ...

Page 87: ... Chapter 13 VPN Server Client 9 Find the VPN connection you created then double click it 10 Enter the User name and Password you have set for the L2TP IPSec VPN server on your router and click Properties ...

Page 88: ...ayer 2 Tunneling Protocol with IPsec L2TP IPSec and click Advanced settings 12 Select Use preshared key for authentication and enter the IPSec Pre Shared Key you have set for the L2TP IPSec VPN server on your router Then click OK Done Click Connect to start VPN connection ...

Page 89: ...hese devices can access the remote VPN server Please follow the steps below INTERNET Home Devices Router VPN Client VPN Servers 1 Visit http tplinkwifi net and log in with your TP Link ID or the password you set for the router 2 Go to Advanced VPN Client Note Firmware update may be required to support VPN Client 3 Enable VPN Client then save the settings 4 Add VPN servers and enable the one you ne...

Page 90: ...nVPN Enter the VPN username and password if required by your VPN provider otherwise simply leave them empty Then import the configuration file provided by your VPN provider PPTP Enter the VPN server address for example 218 18 1 73 and the VPN username and password provided by your VPN provider ...

Page 91: ...er Client L2TP IPSec VPN Enter the VPN server address for example 218 18 1 73 VPN username and password and IPSec pre shared key provided by your VPN provider 4 Save the settings 5 In the server list enable the one you need ...

Page 92: ...PN Server Client 5 Add and manage the devices that will use the VPN function 1 In the Device List section click Add 2 Choose and add the devices that will access the VPN server you have configured 6 Save the settings ...

Page 93: ...89 Chapter 13 VPN Server Client Done Now the devices you specified can access the VPN server you enabled ...

Page 94: ...is chapter guides you on how to configure advanced network features It contains the following sections Change the LAN Settings Configure to Support IPTV Service Specify DHCP Server Settings Set Up a Dynamic DNS Service Account Create Static Routes ...

Page 95: ...te to your needs And leave the Subnet Mask as the default settings 4 Click SAVE Note If you have set the Port Forwarding DMZ or DHCP address reservation and the new LAN IP address is not in the same subnet with the old one then you should reconfigure these features 14 2 Configure to Support IPTV Service I want to Configure IPTV setup to enable Internet IPTV Phone service provided by my internet se...

Page 96: ...f your ISP is not listed and no other parameters are required Select Custom if your ISP is not listed but provides necessary parameters 3 After you have selected a mode the necessary parameters including the LAN port for IPTV connection are predetermined If not select the LAN type to determine which port is used to support IPTV service 4 Click SAVE 5 Connect the set top box to the corresponding LA...

Page 97: ...ses for specified client devices 1 Visit http tplinkwifi net and log in with your TP Link ID or the password you set for the router 2 Go to Advanced Network DHCP Server To specify the IP address that the router assigns 1 Tick the Enable checkbox 2 Enter the starting and ending IP addresses in the IP Address Pool 3 Enter other parameters if the ISP offers The Default Gateway is automatically filled...

Page 98: ...iends to access your router and local servers FTP HTTP etc using a domain name without checking and remembering the IP address Note DDNS does not work if the ISP assigns a private WAN IP address such as 192 168 1 x to the router 1 Visit http tplinkwifi net and log in with your TP Link ID or the password you set for the router 2 Go to Advanced Network Dynamic DNS 3 Select the DDNS Service Provider ...

Page 99: ...ou want to use a new DDNS account please click Logout first and then log in with a new account 14 5 Create Static Routes Static routing is a form of routing that is configured manually by a network administrator or a user by adding entries into a routing table The manually configured routing information guides the router in forwarding data packets to the specific destination ...

Page 100: ... is established To surf the internet and visit my company s network at the same time I need to configure the static routing Company s server PC Router B Router A Switch LAN 192 168 0 1 192 168 0 100 LAN 192 168 0 2 WAN 172 30 30 100 172 30 30 1 How can I do that 1 Change the routers LAN IP addresses to two different IP addresses on the same subnet Disable Router B s DHCP function 2 Visit http tpli...

Page 101: ...r 255 255 255 255 Default Gateway The IP address of the gateway device to which the data packets will be sent This IP address must be on the same subnet with the router s IP which sends out data In the example the data packets will be sent to the LAN port of Router B and then to the Server so the default gateway should be 192 168 0 2 Interface Determined by the port WAN LAN that sends out data pac...

Page 102: ...ng your router It contains the following sections Upgrade the Firmware Backup and Restore Configuration Settings Change the Login Password Password Recovery Local Management Remote Management System Log Test the Network Connectivity Set Up System Time Set the Router to Reboot Regularly Control the LED ...

Page 103: ... Update 1 Visit http tplinkwifi net and log in with your TP Link ID or the password you set for the router 2 Enable Auto Update 3 Specify the Update Time and save the settings The router will update firmware automatically at the specified time when new version is available 15 1 2 Online Upgrade 1 Visit http tplinkwifi net and log in with your TP Link ID or the password you set for the router 2 Whe...

Page 104: ...web browser is opened Click UPGRADE and log in to the web management page with the username and password you set for the router You will see the Firmware Upgrade page 15 1 3 Local Upgrade 1 Download the latest firmware file for the router from www tp link com 2 Visit http tplinkwifi net and log in with your TP Link ID or the password you set for the router 3 Go to Advanced System Firmware Upgrade ...

Page 105: ... router to the default factory settings 1 Visit http tplinkwifi net and log in with your TP Link ID or the password you set for the router 2 Go to Advanced System Tools Backup Restore To backup configuration settings Click BACK UP to save a copy of the current settings to your local computer A bin file of the current settings will be stored to your computer To restore configuration settings 1 Clic...

Page 106: ...r reset the router We strongly recommend you backup the current configuration settings before resetting the router 15 3 Change the Login Password The account management feature allows you to change your login password of the web management page Note If you are using a TP Link ID to log in to the web management page the account management feature will be disabled To manage the TP Link ID go to Adva...

Page 107: ...n 3 Tick the Enable box of Password Recovery 4 Specify a mailbox From for sending the recovery letter and enter its SMTP Server address Specify a mailbox To for receiving the recovery letter If the mailbox From to send the recovery letter requires encryption Tick the Enable box of Authentication and enter its username and password Tips SMTP server is available for users in most webmail systems For...

Page 108: ...or the router 2 Go to Advanced System Administration and complete the settings In Local Management section as needed Access the router via HTTPS and HTTP Tick the Enable box of Local Management via HTTPS to access the router via HTTPS and HTTP or keep it disabled to access the router only via HTTP Allow all LAN connected devices to manage the router Select All Devices for Local Managers Allow spec...

Page 109: ...r this entry 5 Click SAVE 15 6 Remote Management This feature allows you to control remote devices authority to manage the router 1 Visit http tplinkwifi net and log in with your TP Link ID or the password you set for the router 2 Go to Advanced System Administration and complete the settings in Remote Management section as needed Forbid all devices to manage the router remotely Do not tick the En...

Page 110: ...es for Remote Managers 4 Click SAVE Devices on the internet can log in to http Router s WAN IP address port number such as http 113 116 60 229 1024 to manage the router Tips You can find the WAN IP address of the router on Network Map Internet The router s WAN IP is usually a dynamic IP Please refer to Set Up a Dynamic DNS Service Account if you want to log in to the router through a domain name A...

Page 111: ...ogging in to http Router s WAN IP port number such as http 113 116 60 229 1024 Tips The router s WAN IP is usually a dynamic IP Please refer to Set Up a Dynamic DNS Service Account if you want to log in to the router through a domain name 15 7 System Log When the router does not work normally you can save the system log and send it to the technical support for troubleshooting To save the system lo...

Page 112: ...us at a fixed time every day however it s too troublesome to log in to the web management page every time I want to go checking It would be great if the system logs could be sent to my mailbox at 8 a m every day 1 Visit http tplinkwifi net and log in with your TP Link ID or the password you set for the router 2 Go to Advanced System Tools System Log 3 In the Save Log section click MAIL LOG 4 Enter...

Page 113: ...ress Tips SMTP server is available for users in most webmail systems For example the SMTP server address of Hotmail is smtp mail outlook com 6 Email To Enter the recipient s email address which can be the same as or different from the sender s email address 7 Select Mail Log Automatically Tips The router will send the system log to the designated email address if this option is enabled 8 Frequency...

Page 114: ...e is used to display the route path your router has passed to reach the tested host and measure transit delays of packets across an Internet Protocol network 2 Enter the IP Address or Domain Name of the tested host 3 Modify the Ping Count number and the Ping Packet Size It s recommended to keep the default value 4 If you have chosen Traceroute you can modify the Traceroute Max TTL It s recommended...

Page 115: ...nctions like Parental Controls You can choose the way to obtain the system time as needed 1 Visit http tplinkwifi net and log in with your TP Link ID or the password you set for the router 2 Go to Advanced System Time Language To get time from the internet 1 Enable 24 Hour Time if you want the time to display in a 24 hour way 2 In the Set Time field select Get from Internet 3 Select your local Tim...

Page 116: ...er 1 In the Set Time field select Get from Managing Device 2 The time of your computer will then be displayed and click SAVE To manually set the date and time 1 In the Set Time field select Manually 2 Set the current Date In MM DD YYYY format 3 Set the current Time In HH MM SS format 4 Click SAVE To set up Daylight Saving Time 1 Tick the Enable box of Daylight Saving Time ...

Page 117: ... 4 Click SAVE 15 10 Set the Router to Reboot Regularly The Scheduled Reboot feature cleans the cache to enhance the running performance of the router 1 Visit http tplinkwifi net and log in with your TP Link ID or the password you set for the router 2 Go to Advanced System Reboot 3 Tick the Enable box of Reboot Schedule 4 Specify the Reboot Time when the router reboots and Repeat to decide how ofte...

Page 118: ...le the Night Mode feature to specify a time period during which the LED is off 1 Visit http tplinkwifi net and log in with your TP Link ID or the password you set for the router 2 Go to Advanced System LED Control 3 Enable Night Mode 4 Specify the LED off time and the LED will be off during this period every day 5 Click SAVE ...

Page 119: ...ttp tplinkwifi net to create a new login password Note Please refer to Password Recovery to learn how to configure Password Recovery You ll need to reconfigure the router to surf the internet once the router is reset and please mark down your new password for future use Q3 What should I do if I can t log in to the router s web management page This can happen for a variety of reasons Please try the...

Page 120: ...116 4 Click LAN settings and deselect the following three options and click OK 5 Go to Advanced Restore advanced settings click OK to save the settings ...

Page 121: ... even though the configuration is finished 1 Visit http tplinkwifi net and log in with your TP Link ID or the password you set for the router 2 Go to Advanced Network Status to check internet status If IP Address is a valid one please try the methods below and try again Your computer might not recognize any DNS server addresses Please manually configure the DNS server 1 Go to Advanced Network DHCP...

Page 122: ...and check the internet access Reset the router to factory default settings and reconfigure the router Upgrade the firmware of the router Check the TCP IP settings on the particular device if all other devices can get internet from the router As the picture below shows if the IP Address is 0 0 0 0 please try the methods below and try again Make sure the physical connection between the router and th...

Page 123: ...s MAC address to the router The MAC addresses of a computer in wired connection and wireless connection are different Modify the LAN IP address of the router Note Most TP Link routers use 192 168 0 1 192 168 1 1 as their default LAN IP address which may conflict with the IP range of your existing ADSL modem router If so the router is not able to communicate with your modem and you can t access the...

Page 124: ...r 3 Go to Advanced Network Internet 4 Select your Internet Connection Type and fill in other parameters 5 Click Save 6 Restart the modem and the router again Please upgrade the firmware of the router If you ve tried every method above but still cannot access the internet please contact the technical support Q5 What should I do if I can t find my wireless network or I cannot connect the wireless ne...

Page 125: ...in the Services list on the right side 5 Right click Wireless Zero Configuration and then select Properties 6 Change Startup type to Automatic click on Start button and make sure the Service status is Started And then click OK If you can find other wireless network except your own please follow the steps below Check the WLAN LED indicator on your wireless router modem Make sure your computer devic...

Page 126: ...ur wireless router Note Wireless Password Network Security Key is case sensitive Windows unable to connect to XXXX Can not join this network Taking longer than usual to connect to this network Check the wireless signal strength of your network If it is weak 1 3 bars please move the router closer and try again Change the wireless Channel of the router to 1 6 or 11 to reduce interference from other ...

Page 127: ...e is no guarantee that interference will not occur in a particular installation If this equipment does cause harmful interference to radio or television reception which can be determined by turning the equipment off and on the user is encouraged to try to correct the interference by one or more of the following measures Reorient or relocate the receiving antenna Increase the separation between the...

Page 128: ...rporation Address 10 Mauchly Irvine CA 92618 Website http www tp link com us Tel 1 626 333 0234 Fax 1 909 527 6804 E mail sales usa tp link com This equipment has been tested and found to comply with the limits for a Class B digital device pursuant to part 15 of the FCC Rules These limits are designed to provide reasonable protection against harmful interference in a residential installation This ...

Page 129: ...g interference that may cause undesired operation Any changes or modifications not expressly approved by the party responsible for compliance could void the user s authority to operate the equipment We TP Link USA Corporation has determined that the equipment shown as above has been shown to comply with the applicable technical standards FCC part 15 There is no unauthorized change is made in the e...

Page 130: ...uirements and other relevant provisions of directives 2014 53 EU 2009 125 EC 2011 65 EU and EU 2015 863 TheoriginalEUDeclarationofConformitymaybefoundat https www tp link com en support ce RF Exposure Information This device meets the EU requirements 2014 53 EU Article 3 1a on the limitation of exposure of the general public to electromagnetic fields by way of health protection The device complies...

Page 131: ...rference 2 This device must accept any interference including interference that may cause undesired operation of the device L émetteur récepteur exempt de licence contenu dans le présent appareil est conforme aux CNR d Innovation Sciences et Développement économique Canada applicables aux appareils radio exempts de licence L exploitation est autorisée aux deux conditions suivantes 1 L appareil ne ...

Page 132: ...alled and operated with minimum distance 32 cm between the radiator your body Déclaration d exposition aux radiations Cet équipement est conforme aux limites d exposition aux rayonnements IC établies pour un environnement non contrôlé Cet équipement doit être installé et utilisé avec un minimum de 32 cm de distance entre la source de rayonnement et votre corps Industry Canada Statement CAN ICES 3 ...

Page 133: ...及 超出0 01 wt 係指限用物質之百分比含量超出百分比含量基準值 Note 1 Exceeding 0 1 wt and exceeding 0 01 wt indicate that the percentage content of the restricted substance exceeds the reference percentage value of presence condition 備考2 係指該項限用物質之百分比含量未超出百分比含量基準值 Note 2 indicates that the percentage content of the restricted substance does not exceed the percentage of reference value of presence 備考3 係指該項限用物質為排除項目 Note 3 The...

Page 134: ...lds and magnets may interfere with pacemakers and other implanted medical devices Always keep the product and its power adapter more than 15 cm 6 inches away from any pacemakers or other implanted medical devices If you suspect your product is interfering with your pacemaker or any other implanted medical device turn off your product and consult your physician for information specific to your medi...

Page 135: ...nt WEEE This means that this product must be handled pursuant to European directive 2012 19 EU in order to be recycled or dismantled to minimize its impact on the environment User has the choice to give his product to a competent recycling organization or to the retailer when he buys a new electrical or electronic equipment ...

Reviews: