background image

35

1

COROLLA HV_ 国瑞 _GE

1-1. For safe use

For s

afety
 and s

ec

urity

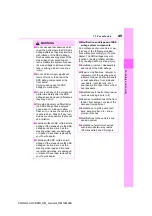
lock if you lean forward too quickly. A 

slow, easy motion will allow the belt to 

extend so that you can move around 

fully. 

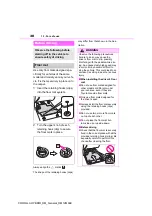
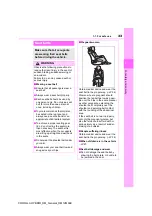
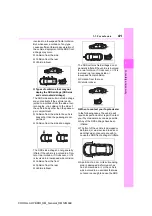
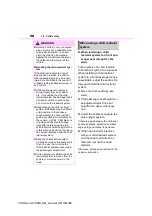
After using the rear center seat belt

Stow seat belt buckle in the pocket.

Rear seat belt

Use the seat belt after passing it through 

the guide if the seat belt comes free 

from the guide.

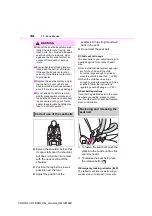
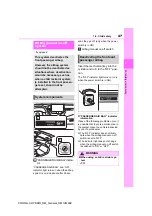
1

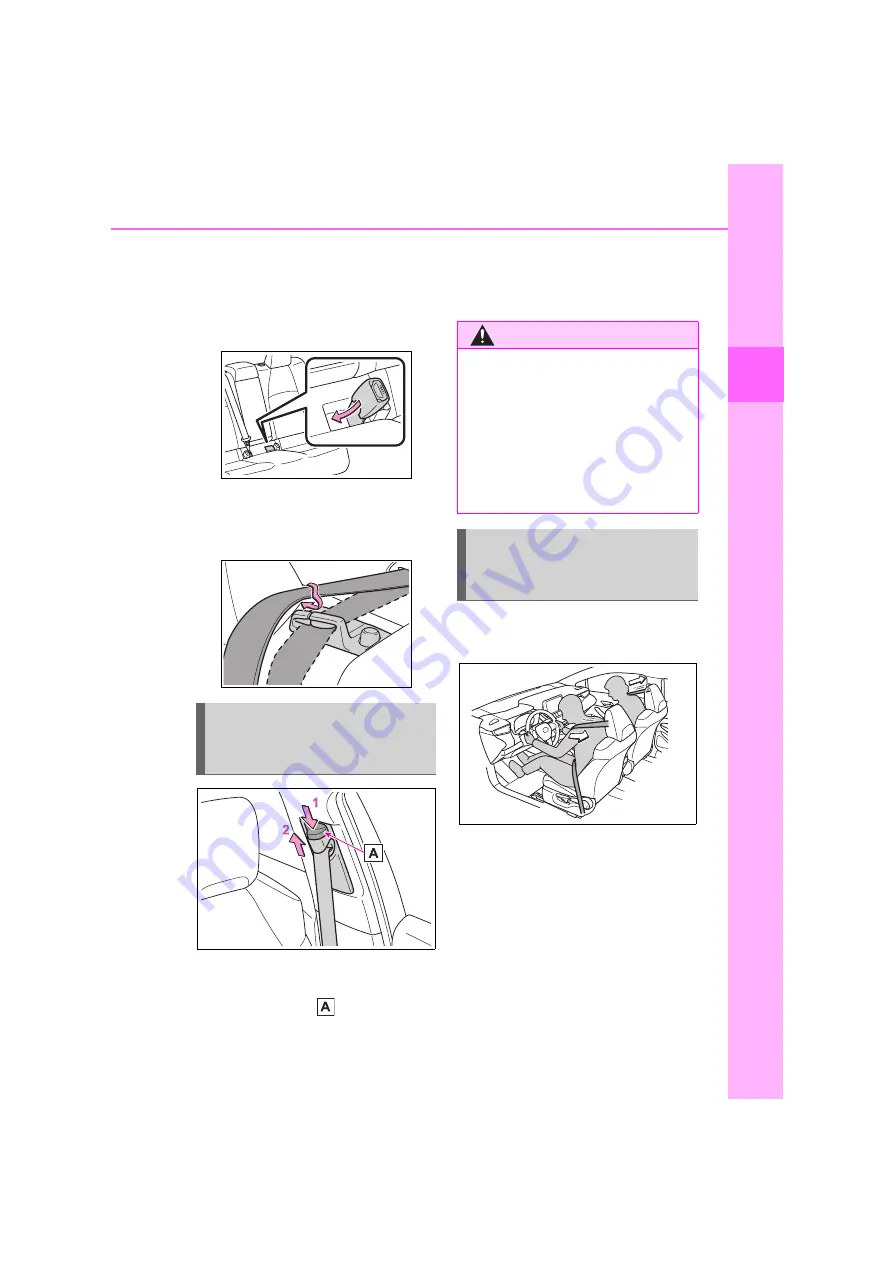
Push the seat belt shoulder 

anchor down while pressing the 
release button  .

2

Push the seat belt shoulder 

anchor up.

Move the height adjuster up and down 

as needed until you hear a click.

*

: If equipped

Except for Taiwan

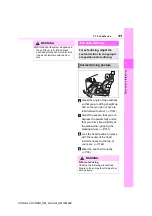
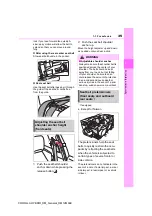
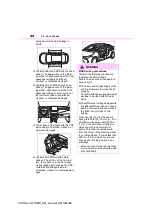
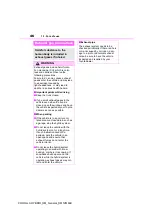
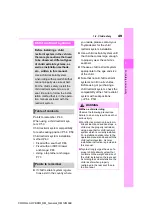
The pretensioners help the seat 

belts to quickly restrain the occu-

pants by retracting the seat belts 

when the vehicle is subjected to 

certain types of severe frontal or 

side collision.

The pretensioners do not activate in the 

event of a minor frontal impact, a minor 

side impact, a rear impact or a vehicle 

rollover.

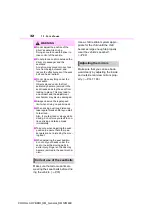
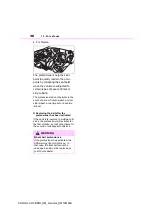
Adjusting the seat belt 
shoulder anchor height 
(front seats)

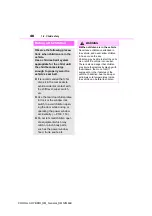
WARNING

Adjustable shoulder anchor

Always make sure the shoulder belt is 

positioned across the center of your 

shoulder. The belt should be kept 

away from your neck, but not falling 

off your shoulder. Failure to do so 

could reduce the amount of protection 

in an accident and cause death or 

serious injuries in the event of a sud-

den stop, sudden swerve or accident.

Seat belt pretensioners 
(front seats and outboard 
rear seats

*

)

COROLLA HYBRID_OM_General_OM12M44E

Summary of Contents for Corolla Hybrid 2019

Page 1: ......

Page 2: ......

Page 3: ...h are necessary for driving Main topics Starting hybrid system refueling Audio system Operating the audio system Main topics Radio CD player Interior features Usage of the interior features Main topics Air conditioner storage features Maintenance and care Caring for your vehicle and maintenance procedures Main topics Interior and exterior light bulbs When trouble arises What to do in case of malfu...

Page 4: ...ay 96 Multi information display 101 Head up display 109 Energy monitor consumption screen 113 3 1 Key information Keys 120 3 2 Opening closing and locking the doors Doors 126 Trunk 132 Smart entry start system 134 3 3 Adjusting the seats Front seats 141 Rear seats 142 Head restraints 144 3 4 Adjusting the steering wheel and mirrors Steering wheel 146 Inside rear view mirror 147 Outside rear view m...

Page 5: ...ntrol 248 BSM Blind Spot Monitor 251 Toyota parking assist sensor 256 RCTA Rear Cross Traffic Alert function 262 Driving mode select switch 267 Driving assist systems 268 4 6 Driving tips Hybrid vehicle driving tips 273 Winter driving tips 275 5 1 Basic Operations Audio system types 280 Using the steering wheel audio switches 281 AUX port USB port 282 5 2 Using the audio system Optimal use of the ...

Page 6: ...ance 356 7 3 Do it yourself maintenance Do it yourself service precau tions 361 Hood 363 Positioning a floor jack 364 Engine compartment 365 Tires 372 Tire inflation pressure 379 Wheels 381 Air conditioning filter 383 Cleaning the hybrid battery trac tion battery air intake vent and filter 384 Wireless remote control elec tronic key battery 388 Checking and replacing fuses 391 Light bulbs 393 8 1 ...

Page 7: ...erate properly 441 If the 12 volt battery is dis charged 443 If your vehicle overheats 447 If the vehicle becomes stuck 450 9 1 Specifications Maintenance data fuel oil level etc 452 Fuel information 461 9 2 Customization Customizable features 462 9 3 Initialization Items to initialize 471 What to do if Troubleshooting 474 Alphabetical Index 477 9 Vehicle specifications Index COROLLA HYBRID_OM_Gen...

Page 8: ...spare parts and accessories which are not genuine Toyota products nor for replacement or installation involving such parts This vehicle should not be modified with non genuine Toyota products Modification with non genuine Toyota products could affect its per formance safety or durability and may even violate governmental regulations In addition damage or performance problems resulting from the mod...

Page 9: ... recorded in this computer to diagnose malfunc tions conduct research and develop ment and improve quality Toyota will not disclose the recorded data to a third party except With the consent of the vehicle owner or with the consent of the lessee if the vehicle is leased In response to an official request by the police a court of law or a govern ment agency For use by Toyota in a lawsuit For resear...

Page 10: ... have access to the vehicle or the EDR Disclosure of the EDR data Toyota will not disclose the data recorded in an EDR to a third party except when An agreement from the vehicle s owner or the lessee for a leased vehicle is obtained In response to an official request by the police a court of law or a govern ment agency For use by Toyota in a lawsuit However if necessary Toyota may Use the data for...

Page 11: ...ction Always give your full attention to driving Anything that distracts the driver such as adjusting controls talking on a cellular phone or reading can result in a collision with resulting death or serious injury to you your occupants or others General precaution regarding children s safety Never leave children unattended in the vehicle and never allow children to have or use the key Children ma...

Page 12: ...age to or a malfunction in the vehicle or its equip ment Indicates operating or working procedures Follow the steps in numerical order Symbols in illustrations Symbols Meanings Indicates the action pushing turning etc used to operate switches and other devices Indicates the outcome of an operation e g a lid opens Symbols Meanings Indicates the compo nent or position being explained Means Do not Do...

Page 13: ...e Alphabetical index P 477 Searching by installation posi tion Pictorial index P 12 Searching by symptom or sound What to do if Troubleshoot ing P 474 Searching by title Table of contents P 2 How to search COROLLA HYBRID_OM_General_OM12M44E ...

Page 14: ...echanical key 1 P 441 Warning messages P 130 Trunk P 132 Opening from inside P 133 Opening from outside P 133 Warning messages P 130 Outside rear view mirrors P 148 Adjusting the mirror angle P 148 Folding the mirrors P 149 Windshield wipers P 192 Precautions for winter season P 275 Precautions for car wash P 349 Fuel filler door P 196 COROLLA HYBRID_OM_General_OM12M44E ...

Page 15: ...e running lights 2 turn signal lightsP 177 184 Front fog lights 2 P 190 Stop lights tail lights turn signal lights P 177 184 License plate lights P 184 Tail light P 184 Rear fog light 2 3 P 190 Back up light 2 Shifting the shift position to R P 174 Tail light P 184 Rear fog light 2 4 P 190 Back up light 2 Shifting the shift position to R P 174 1 Vehicles with a smart entry start system 2 If equipp...

Page 16: ...ybrid system P 400 When the hybrid system will not start P 439 Warning messages P 417 Shift lever P 174 Changing the shift position P 174 Precautions for towing P 403 When the shift lever does not move P 175 Meters P 91 96 Reading the meters adjusting the instrument panel light P 91 96 Warning lights indicator lights P 86 When a warning light turns on P 408 Multi information display P 101 Display ...

Page 17: ...nt fog lights 3 rear fog light 3 P 190 Windshield wiper and washer switch P 192 Usage P 192 Adding washer fluid P 371 Emergency flasher switch P 400 Hood lock release lever P 363 Tilt and telescopic steering lock release lever P 146 Air conditioning system P 324 Usage P 324 Rear window defogger P 326 Audio system 3 4 P 280 1 Vehicles without a smart entry start system 2 Vehicles with a smart entry...

Page 18: ...veling dial P 187 Automatic High Beam switch P 188 Tire pressure warning reset switch P 377 Outside rear view mirror switches P 148 Door lock switches P 129 Power window switches P 151 Window lock switch P 153 If equipped Meter control switches P 102 COROLLA HYBRID_OM_General_OM12M44E ...

Page 19: ...ane Tracing Assist switch 1 P 212 LDA Lane Departure Alert with steering control switch 1 P 221 Phone switch 1 2 P 308 Talk switch 1 2 P 308 1 If equipped 2 Vehicles with navigation multimedia system refer to Navigation and Multimedia System Owner s Manual Driving mode select switch P 267 VSC OFF switch P 269 EV drive mode switch P 172 Parking brake switch P 178 Precautions for winter season P 276...

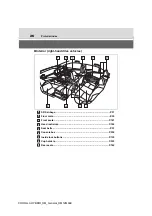
Page 20: ...x Interior left hand drive vehicles SRS airbags P 37 Floor mats P 30 Front seats P 141 Head restraints P 144 Seat belts P 33 Console box P 336 Inside lock buttons P 130 Cup holders P 335 Rear seats P 142 COROLLA HYBRID_OM_General_OM12M44E ...

Page 21: ...344 1 Except for Taiwan NEVER use a rearward facing child restraint on a seat pro tected by an ACTIVE AIRBAG in front of it DEATH or SERIOUS INJURY to the CHILD can occur P 52 2 For Taiwan DO NOT carry baby infant and children on the front passenger seat Except for the front passenger seat NEVER use a rearward facing child restraint on a seat protected by an ACTIVE AIRBAG in front of it DEATH or S...

Page 22: ...20 COROLLA HV_ 国瑞 _GE Pictorial index 3 If equipped COROLLA HYBRID_OM_General_OM12M44E ...

Page 23: ...ybrid system P 400 When the hybrid system will not start P 439 Warning messages P 417 Shift lever P 174 Changing the shift position P 174 Precautions for towing P 403 When the shift lever does not move P 175 Meters P 91 96 Reading the meters adjusting the instrument panel light P 91 96 Warning lights indicator lights P 86 When a warning light turns on P 408 Multi information display P 101 Display ...

Page 24: ...d washer switch P 192 Usage P 192 Adding washer fluid P 371 Emergency flasher switch P 400 Hood lock release lever P 363 Tilt and telescopic steering lock release lever P 146 Air conditioning system P 324 Usage P 324 Rear window defogger P 326 Audio system 3 4 P 280 1 Vehicles without a smart entry start system 2 Vehicles with a smart entry start system 3 If equipped 4 Vehicles with navigation mul...

Page 25: ...re warning reset switch P 377 Automatic High Beam switch P 188 Headlight leveling dial P 187 Outside rear view mirror switches P 148 Door lock switches P 129 Power window switches P 151 Window lock switch P 153 If equipped Meter control switches P 102 COROLLA HYBRID_OM_General_OM12M44E ...

Page 26: ...cing Assist switch 1 P 212 LDA Lane Departure Alert with steering control switch 1 P 221 Phone switch 2 P 308 Talk switch 2 P 308 1 If equipped 2 Vehicles with navigation multimedia system refer to Navigation and Multimedia System Owner s Manual Wireless charger switch P 339 Driving mode select switch P 267 VSC OFF switch P 269 EV drive mode switch P 172 Parking brake switch P 178 Precautions for ...

Page 27: ...25 COROLLA HV_ 国瑞 _GE Pictorial index If equipped COROLLA HYBRID_OM_General_OM12M44E ...

Page 28: ... Interior right hand drive vehicles SRS airbags P 37 Floor mats P 30 Front seats P 141 Head restraints P 144 Seat belts P 33 Console box P 336 Inside lock buttons P 130 Cup holders P 335 Rear seats P 142 COROLLA HYBRID_OM_General_OM12M44E ...

Page 29: ...ity mirrors P 343 Vanity lights 2 P 343 Front personal lights P 332 Intrusion sensor cancel switch 2 P 83 Assist grips P 344 1 NEVER use a rearward facing child restraint on a seat protected by an ACTIVE AIRBAG in front of it DEATH or SERIOUS INJURY to the CHILD can occur P 52 2 If equipped COROLLA HYBRID_OM_General_OM12M44E ...

Page 30: ...28 COROLLA HV_ 国瑞 _GE Pictorial index COROLLA HYBRID_OM_General_OM12M44E ...

Page 31: ...g 31 Seat belts 33 SRS airbags 37 Exhaust gas precautions 46 1 2 Child safety Airbag manual on off system 47 Riding with children 48 Child restraint systems 49 1 3 Hybrid system Hybrid system features 72 Hybrid system precautions 75 1 4 Theft deterrent system Immobilizer system 79 Alarm 81 COROLLA HYBRID_OM_General_OM12M44E ...

Page 32: ...floor mat to slip possibly interfering with the pedals while driv ing An unexpectedly high speed may result or it may become difficult to stop the vehicle This could lead to an accident resulting in death or serious injury When installing the driver s floor mat Do not use floor mats designed for other models or different model year vehicles even if they are Toyota Genuine floor mats Only use floor...

Page 33: ...raint in place with the center of the head restraint closest to the top of your ears P 144 Wear the seat belt correctly P 33 WARNING With the hybrid system stopped and the shift lever in P fully depress each pedal to the floor to make sure it does not interfere with the floor mat For safe driving For safe driving adjust the seat and mirror to an appropri ate position before driving Correct driving...

Page 34: ...elt and head restraint Do not place anything under the front seats Objects placed under the front seats may become jammed in the seat tracks and stop the seat from locking in place This may lead to an accident and the adjustment mechanism may also be damaged Always observe the legal speed limit when driving on public roads When driving over long distances take regular breaks before you start to fe...

Page 35: ...he seat belt is most effective when the occupants are sitting up straight and well back in the seats Do not wear the shoulder belt under your arm Always wear your seat belt low and snug across your hips Pregnant women Obtain medical advice and wear the seat belt in the proper way P 34 Women who are pregnant should position the lap belt as low as possi ble over the hips in the same manner as other ...

Page 36: ...tallation 1 To fasten the seat belt push the plate into the buckle until a click sound is heard 2 To release the seat belt press the release button Emergency locking retractor ELR The retractor will lock the belt during a sudden stop or on impact It may also WARNING Inspect the seat belt system period ically Check for cuts fraying and loose parts Do not use a damaged seat belt until it is replaced...

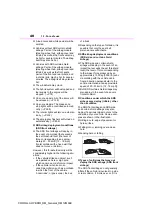
Page 37: ...lp the seat belts to quickly restrain the occu pants by retracting the seat belts when the vehicle is subjected to certain types of severe frontal or side collision The pretensioners do not activate in the event of a minor frontal impact a minor side impact a rear impact or a vehicle rollover Adjusting the seat belt shoulder anchor height front seats WARNING Adjustable shoulder anchor Always make ...

Page 38: ... minor side impact a rear impact or a vehicle rollover Replacing the belt after the pretensioner has been activated If the vehicle is involved in multiple colli sions the pretensioner will activate for the first collision but will not activate for the second or subsequent collisions WARNING Seat belt pretensioners If the pretensioner has activated the SRS warning light will come on In that case th...

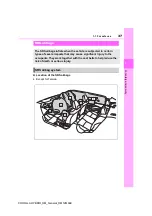
Page 39: ...r Taiwan SRS airbags The SRS airbags inflate when the vehicle is subjected to certain types of severe impacts that may cause significant injury to the occupants They work together with the seat belts to help reduce the risk of death or serious injury SRS airbag system COROLLA HYBRID_OM_General_OM12M44E ...

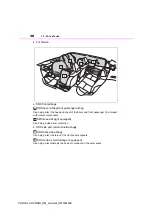
Page 40: ...nt passenger from impact with interior components SRS knee airbag if equipped Can help provide driver protection SRS side and curtain shield airbags SRS front side airbags Can help protect the torso of the front seat occupants SRS curtain shield airbags if equipped Can help protect primarily the head of occupants in the outer seats COROLLA HYBRID_OM_General_OM12M44E ...

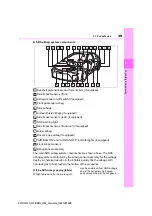
Page 41: ...ver s knee airbag if equipped AIR BAG ON and AIR BAG OFF indicator lights if equipped Front impact sensors Airbag sensor assembly The main SRS airbag system components are shown above The SRS airbag system is controlled by the airbag sensor assembly As the airbags deploy a chemical reaction in the inflators quickly fills the airbags with non toxic gas to help restrain the motion of the occupants I...

Page 42: ... the vehicle strikes an object such as a parked vehicle or sign pole which can move or deform on impact If the vehicle is involved in an underride collision such as a collision in which the front of the vehicle underrides or goes under the bed of a truck Depending on the type of collision it is possible that only the seat belt pretensioners will activate SRS airbag deployment conditions SRS side a...

Page 43: ...if the vehicle is involved in a fron tal or rear collision if it rolls over or if it is involved in a low speed side collision Collision from the front Collision from the rear Vehicle rollover The SRS curtain shield airbags do not generally inflate if the vehicle is involved in a rear collision if it rolls over or if it is involved in a low speed side or low speed frontal collision Collision from ...

Page 44: ...r otherwise dam aged WARNING SRS airbag precautions Observe the following precautions regarding the SRS airbags Failure to do so may cause death or serious injury The driver and all passengers in the vehicle must wear their seat belts properly The SRS airbags are supplemental devices to be used with the seat belts The SRS driver airbag deploys with considerable force and can cause death or serious...

Page 45: ...r is very close to the airbag The front passenger seat should be as far from the airbag as possible with the seatback adjusted so the front passenger sits upright Improperly seated and or restrained infants and children can be killed or seriously injured by a deploying airbag An infant or child who is too small to use a seat belt should be properly secured using a child restraint system Toyota str...

Page 46: ...door windshield and side windows Vehicles with SRS curtain shield airbags Do not attach anything to areas such as a door windshield side windows front or rear pillar roof side rail and assist grip Except for the speed limit label P 421 Vehicles without a smart entry start system and with an SRS driver s knee airbag Do not attach any heavy sharp or hard objects such as keys and accessories to the k...

Page 47: ...ed have them replaced by your Toyota dealer Vehicles with SRS curtain shield airbags If the areas where the SRS airbags are stored such as the steering wheel pad and front and rear pillar garnishes are damaged or cracked have them replaced by your Toyota dealer Modification and disposal of SRS airbag system components Do not dispose of your vehicle or per form any of the following modifica tions w...

Page 48: ... soon as possible When parking If the vehicle is in a poorly venti lated area or a closed area such as a garage stop the hybrid system Do not leave the vehicle with the hybrid system on for a long time If such a situation cannot be avoided park the vehicle in an open space and ensure that exhaust fumes do not enter the vehicle interior Do not leave the hybrid system operating in an area with snow ...

Page 49: ... it is possible that there is a malfunction in the system Have the vehicle inspected by your Toyota dealer The OFF indicator does not illumi nate when the airbag manual on off switch is set to OFF The indicator light does not change when the airbag manual on off switch is switched to ON or OFF Airbag manual on off system This system deactivates the front passenger airbag However the airbag system ...

Page 50: ...hile driving or operating the power window accidentally P 130 153 Do not let small children oper ate equipment which may catch or pinch body parts such as the power window hood trunk seats etc WARNING When children are in the vehicle Never leave children unattended in the vehicle and never allow children to have or use the key Children may be able to start the vehi cle or shift the vehicle into ne...

Page 51: ...tions that need to be observed different types of child restraint systems as well as installation methods etc written in this manual Use a child restraint system when riding with a small child that cannot properly use a seat belt For the child s safety install the child restraint system to a rear seat Be sure to follow the instal lation method that is in the opera tion manual enclosed with the res...

Page 52: ...the holder and the interior of the vehicle Handling the child restraint sys tem If the child restraint system is not properly fixed in place the child or other passengers may be seriously injured or even killed in the event of sudden braking sudden swerving or an accident If the vehicle were to receive a strong impact from an accident etc it is possible that the child restraint system has damage t...

Page 53: ...ng child restraint system on the front pas senger seat The force of the rapid inflation of the front passenger airbag can cause death or serious injury to children in the event of an accident There is a label s on the passen ger side sun visor indicating it is forbidden to attach a rear facing child restraint system to the front passenger seat Details of the label s are shown in the illustration b...

Page 54: ...or or the area of the seat front or rear pillars or roof side rails from which the SRS side airbags or SRS curtain shield airbags if equipped deploy even if the child is seated in the child restraint system It is dangerous if the SRS side and curtain shield airbags if equipped inflate and the impact could cause death or serious injury to the child When a junior seat booster seat is installed alway...

Page 55: ...ssenger seat so that it does not interfere with the child restraint system When using a child restraint sys tem for Taiwan Observe the following precautions Failure to do so may result in death or serious injury Never use a child restraint system on the front passenger seat The force of the rapid inflation of the front passenger airbag can cause death or serious injury to children in the event of ...

Page 56: ...n a junior seat booster seat is installed always ensure that the shoulder belt is positioned across the center of the child s shoulder The belt should be kept away from the child s neck but not so that it could fall off the child s shoulder Use child restraint system suitable to the age and size of the child and install it to the rear seat If the driver s seat interferes with the child restraint s...

Page 57: ...UN ECE R44 1 or UN ECE R129 1 2 The following approval mark is displayed on child restraint sys tems which are conformed Check for an approval mark attached to the child restraint system Example of the displayed regulation number UN ECE R44 approval mark 3 The weight range of the child who is applicable for an UN ECE R44 approval mark is indicated UN ECE R129 approval mark 3 The height range of th...

Page 58: ... 3 The displayed mark may differ depending on the product Compatibility of each seating position with child restraint systems Left hand drive vehicles Right hand drive vehicles 1 2 3 4 3 3 Suitable for universal category child restraint system fixed with the seat belt Suitable for child restraint sys tems given on recommended child restraint systems and compatibility table P 58 Suitable for i Size...

Page 59: ...ld restraint system Detail information for child restraint systems installation ISOFIX child restraint systems are divided into different fixture The child restraint system can be used in the seating positions for fixture mentioned Includes a top tether anchorage point Never use a rear facing child restraint system on the front passenger seat Seating position Seat position number Seating position ...

Page 60: ...g seat belt effec tiveness Be sure your seat belt fits snugly across your shoulder and low on your hips If it does not or if it interferes with the child restraint move to a different position Failure to do so may result in death or seri ous injury Fixture Description F3 Full height forward facing child restraint systems F2 Reduced height forward facing child restraint systems F2X Reduced height f...

Page 61: ...he child seat belt guide move the seat cush ion forward Child restraint system compat ibility for each seating posi tion Compatibility of each seating posi tion with child restraint systems P 60 displays the type of child restraint systems that can be used and possible seating positions for installation using symbols Check the selected child restraint system together with the following Before conf...

Page 62: ...roval mark of the child restraint system for which of the following categories the child restraint system is suitable Also if there are any uncertain ties check the user s guide included with the child restraint system or contact the retailer of the child restraint system universal semi universal restricted vehicle specific 1 UN ECE R44 and UN ECE R129 are U N regulations for child restraint syste...

Page 63: ... for child restraint sys tems given on recommended child restraint systems and compatibility table P 62 Suitable for i Size and ISOFIX child restraint system Includes a top tether anchorage point Not suitable for child restraint system Seating position Seat position number Seating position suitable for universal belted Yes No Yes Yes Yes i Size seating position Yes No Yes No Yes Seating position s...

Page 64: ...eat belts in positions next to the child restraint without interfering with it or affecting seat belt effec tiveness Be sure your seat belt fits snugly across your shoulder and low on your hips If it does not or if it interferes with the child restraint move to a different position Failure Fixture Description F3 Full height forward facing child restraint systems F2 Reduced height forward facing ch...

Page 65: ...child restraint in the rear seats adjust the front seat so that it does not interfere with the child or child restraint system Confirm with the operation manual enclosed with the child restraint system about the installation of the child restraint system Child restraint system installation method COROLLA HYBRID_OM_General_OM12M44E ...

Page 66: ...64 COROLLA HV_ 国瑞 _GE 1 2 Child safety Installation method Page Seat belt attachment P 66 COROLLA HYBRID_OM_General_OM12M44E ...

Page 67: ...HV_ 国瑞 _GE 1 2 Child safety For safety and security ISOFIX lower anchorage attachment Except for GCC countries and Taiwan For GCC countries For Taiwan P 68 Installation method Page COROLLA HYBRID_OM_General_OM12M44E ...

Page 68: ...Vehicle List provided by the child restraint system maker for various possible installation positions or check the compatibility after asking the retailer of the child seat P 54 P 59 1 If installing the child restraint system to the front passenger seat is unavoidable refer to P 50 for the front passenger seat adjustment 2 If the head restraint interferes with your child restraint system Top tethe...

Page 69: ...leasing the buckle the child restraint system may spring up due to the rebound of the seat cushion Release the buckle while holding down the child restraint system Since the seat belt automatically reels itself slowly return it to the stowing position When installing a child restraint system You may need a locking clip to install the child restraint system Follow the instructions provided by the m...

Page 70: ...man WARNING Ensure that the belt and plate are securely locked and the seat belt is not twisted Shake the child restraint system left and right and forward and back ward to ensure that it has been securely installed After securing a child restraint sys tem never adjust the seat When a junior seat booster seat is installed always ensure that the shoulder belt is positioned across the center of the ...

Page 71: ...straint system and the head restraint can be removed remove the head restraint Otherwise put the head restraint in the upper most posi tion P 144 Except for Taiwan 2 Latch the buckles onto the exclusive fixing bars Check the positions of the exclusive fix ing bars and install the child restraint system to the seat The bars are installed in the clearance between the seat cushion and seatback For Ta...

Page 72: ...es Top strap Fixing the top strap to the top tether anchorages Install the child restraint system in accordance to the operation man ual enclosed with the child restraint system 1 Adjust the head restraint to the upmost position If the head restraint interferes with the WARNING When installing a child restraint system Observe the following precautions Failure to do so may result in death or seriou...

Page 73: ...hen installing a child restraint system Observe the following precautions Failure to do so may result in death or serious injury Firmly attach the top strap and make sure that the belt is not twisted Do not attach the top strap to any thing other than the top tether anchorages After securing a child restraint sys tem never adjust the seat Follow all installation instructions provided by the child ...

Page 74: ... When the shift lever is in N the hybrid battery traction battery is not being charged When the hybrid battery traction bat tery requires charging or the engine is warming up etc the gasoline engine will not automatically stop P 73 Hybrid system features Your vehicle is a hybrid vehicle It has characteristics different from conventional vehicles Be sure you are closely familiar with the characteri...

Page 75: ...ions in which the gasoline engine may not stop The gasoline engine starts and stops automatically However it may not stop automatically in the following conditions During gasoline engine warm up During hybrid battery traction battery charging When the temperature of the hybrid battery traction battery is high or low When the heater is switched on Depending on the circumstances the gasoline engine ...

Page 76: ...lerating sharply Sounds may be heard due to regener ative braking when the brake pedal is depressed or as the accelerator pedal is released Vibration may be felt when the gaso line engine starts or stops Cooling fan sounds may be heard from the air intake vent on the side of the lower part of the rear right seat Maintenance repair recycling and disposal Contact your Toyota dealer regarding mainten...

Page 77: ... vehicle with at least enough gasoline to make the low fuel level warn ing light P 411 go off If there is only a small amount of fuel the hybrid sys tem may not be able to start The stand ard amount of fuel is about 7 6 L 2 0 gal 1 7 Imp gal when the vehicle is on a level surface This value may vary when the vehicle is on a slope Add Hybrid system precautions Take care when handling the hybrid sys...

Page 78: ...brid system will become hot after starting as the system uses high voltage Be careful of both the high voltage and the high tempera ture and always obey the warning labels attached to the vehicle Never try to open the service plug access hole located under the right side of the rear seat The service plug is used only when the vehicle is serviced and is subject to high voltage Road accident caution...

Page 79: ... dumped and it is hazardous to the environment or someone may touch a high voltage part resulting in an electric shock The hybrid battery is intended to be used exclusively with your hybrid vehicle If the hybrid battery is used outside of your vehicle or modified in any way accidents such as elec tric shock heat generation smoke generation an explosion and elec trolyte leakage may occur When resel...

Page 80: ...ase try to start the system again If the READY indicator does not come on contact your Toyota dealer NOTICE Hybrid battery traction battery air intake vent Make sure that the air intake vent is not blocked such as by a seat cover plastic cover or luggage If the vent is blocked charging dis charging of the hybrid battery trac tion battery may become limited possibly leading to a malfunction Clean t...

Page 81: ...urned to ACC or ON to indicate that the system has been canceled System maintenance The vehicle has a maintenance free type immobilizer system Conditions that may cause the sys tem to malfunction If the grip portion of the key is in con tact with a metallic object If the key is in close proximity to or touching a key to the security system key with a built in transponder chip of another vehicle Im...

Page 82: ...80 COROLLA HV_ 国瑞 _GE 1 4 Theft deterrent system Certifications for the engine immobilizer system COROLLA HYBRID_OM_General_OM12M44E ...

Page 83: ...y or remove the system If modified or removed the proper operation of the system cannot be guaranteed Alarm The alarm uses light and sound to give an alert when an intrusion is detected The alarm is triggered in the following situations when the alarm is set A locked door or trunk is unlocked or opened in any way other than using the entry function if equipped wire less remote control mechani cal ...

Page 84: ... deactivates the alarm system A person inside the vehicle opens a door the trunk or hood or unlocks the vehicle using a door lock switch or inside lock button The 12 volt battery is recharged or replaced when the vehicle is locked P 445 Alarm operated door lock In the following cases depending on the situation the door may automatically lock to prevent improper entry into the vehicle When a person...

Page 85: ...set a message will be shown on the multi information display Canceling and automatic re ena bling of the intrusion sensor The alarm will still be set even when the intrusion sensor is canceled After the intrusion sensor is canceled pressing the power switch or unlock ing the doors using the entry function or wireless remote control will re ena ble the intrusion sensor The intrusion sensor will aut...

Page 86: ...he vehicle is inside an automatic or high pressure car wash The vehicle experiences impacts such as hail lightning strikes and other kinds of repeated impacts or vibrations NOTICE To ensure the intrusion sensor function correctly To ensure that the sensors operate properly do not touch or cover them Do not spray air fresheners or other products directly into the sensor holes Installing accessories...

Page 87: ...us information and indicators 2 1 Instrument cluster Warning lights and indicators 86 Gauges and meters 4 2 inch display 91 Gauges and meters 7 inch display 96 Multi information display 101 Head up display 109 Energy monitor consumption screen 113 COROLLA HYBRID_OM_General_OM12M44E ...

Page 88: ...minated 4 2 inch display 7 inch display when analog speedometer is displayed Warning lights and indicators The warning lights and indicators on the instrument cluster center panel and outside rear view mirrors inform the driver of the status of the vehicle s various systems Warning lights and indicators displayed on the instrument cluster COROLLA HYBRID_OM_General_OM12M44E ...

Page 89: ...light 2 P 409 Malfunction indicator lamp 1 P 409 SRS warning light 1 P 409 ABS warning light 1 P 410 Brake Override System warn ing light Drive Start Control warning light 2 P 410 Red Electric power steering sys tem warning light 1 P 410 Yellow Electric power steering sys tem warning light 1 P 410 Low fuel level warning light P 411 Driver s and front passen ger s seat belt reminder light P 411 Rea...

Page 90: ... system light such as the ABS and SRS warning light not come on when you start the hybrid system this could mean that these systems are not available to help pro tect you in an accident which could result in death or serious injury Have the vehicle inspected by your Toyota dealer immediately if this occurs Indicators Turn signal indicator P 177 Tail light indicator P 184 Headlight high beam indica...

Page 91: ...ear view mirror indi cators will turn off after a few seconds If the BSM outside rear view mirror indi cators do not illuminate or do not turn off there may be a malfunction in the system If this occurs have the vehicle inspected by by your Toyota dealer 5 Vehicles with RCTA function These lights come on when the power switch is turned to ON to indicate that a system check is being performed They ...

Page 92: ...e rear view mirrors 7 This light illuminates on the multi information display 8 When the outside temperature is approximately 3 C 37 F or lower this indicator will flash for approxi mately 10 seconds then stay on 9 This light illuminates on the center panel COROLLA HYBRID_OM_General_OM12M44E ...

Page 93: ...0 F to 50 C 122 F Clock P 93 Multi information display Presents the driver with a variety of vehicle data P 101 Displays warning messages if a malfunction occurs P 417 Odometer and trip meter display P 93 Shift position indicator if equipped P 174 Display change button P 93 Fuel gauge Displays the quantity of fuel remaining in the tank Engine coolant temperature gauge Displays the engine coolant t...

Page 94: ... efficiency and reduce exhaust emis sions etc There are times when the engine speed that is displayed may differ even when vehicle operation and driving conditions are the same Hybrid System Indicator will oper ate when The Hybrid System Indicator will operate in the following situations The READY indicator is illuminated The shift lever is in D or B Outside temperature display In the following si...

Page 95: ... button Adjusting the minute to 00 1 Press or to select of the multi information display 2 Press or to select Clock 00 Press the to set the clock to the beginning of the nearest hour e g 1 00 to 1 29 1 00 1 30 to 1 59 2 00 WARNING For example there is a lag between the driver s shifting and the new gear number appearing on the display This lag could cause the driver to downshift again causing rapi...

Page 96: ...4 Select Clock 5 Select Auto adjust by GPS to set to on Adjusting the clock manually 1 Press the MENU button 2 Select Setup on the Menu screen 3 Select General on the Setup screen 4 Select Clock 5 Select Auto adjust by GPS to set to off 6 Adjust the displayed time Hour Select or of Hours to adjust the hour Minute Select or of Min utes to adjust the minute 00 Select to set the clock to the beginnin...

Page 97: ...ress the MENU button 2 Select Setup on the Menu screen 3 Select General on the Setup screen 4 Select Clock 5 Select 24 Hour time format and then on off When set to off the clock is displayed in 12 hour time format Clock settings screen vehicles with navigation multimedia system If Clock 00 is displayed when is selected on the multi information dis play the system may be malfunctioning Have the veh...

Page 98: ...ant temperature gauge Displays the engine coolant temperature Display change button P 99 Odometer and trip meter display P 99 Multi information display Presents the driver with a variety of vehicle data P 101 Displays warning messages if a malfunction occurs P 417 Outside temperature Displays the outside temperature within the range of 40 C 40 F to 50 C 122 F Shift position indicator P 174 Gauges ...

Page 99: ...maining in the tank Engine coolant temperature gauge Displays the engine coolant temperature Display change button P 99 Odometer and trip meter display P 99 Multi information display Presents the driver with a variety of vehicle data P 101 Displays warning messages if a malfunction occurs P 417 Outside temperature Displays the outside temperature within the range of 40 C 40 F to 50 C 122 F Shift p...

Page 100: ... hybrid vehicles engine speed is pre cisely controlled in order to help improve fuel efficiency and reduce exhaust emis sions etc There are times when the engine speed that is displayed may differ even when vehicle operation and driving conditions are the same Hybrid System Indicator will oper ate when The Hybrid System Indicator will operate in the following situations The READY indicator is illu...

Page 101: ... multi information display WARNING The information display at low temperatures Allow the interior of the vehicle to warm up before using the liquid crys tal information display At extremely low temperatures the information dis play monitor may respond slowly and display changes may be delayed For example there is a lag between the driver s shifting and the new gear number appearing on the display ...

Page 102: ...ng the clock to be adjusted automatically by GPS 1 Press the MENU button 2 Select Setup on the Menu screen 3 Select General on the Setup screen 4 Select Clock 5 Select Auto adjust by GPS to set to on Adjusting the clock manually 1 Press the MENU button 2 Select Setup on the Menu screen 3 Select General on the Setup screen 4 Select Clock 5 Select Auto adjust by GPS to set to off 6 Adjust the displa...

Page 103: ... time format Clock settings screen vehicles with navigation multimedia system If Clock 00 is displayed when is selected on the multi information dis play the system may be malfunctioning Have the vehicle inspected by your Toyota dealer Display 4 2 inch display Driving support system status display area Displays an image when the following systems are operating and a menu icon other than is selecte...

Page 104: ...l be displayed by pressing the or meter control switch Liquid crystal display Small spots or light spots may appear on the display This phenomenon is characteristic of liquid crystal displays and there is no problem continuing to use the display The multi information display is operated using the meter control switches Driving information display P 103 Driving support system infor mation display P...

Page 105: ...splay Driving range Displays driving range with remaining fuel Use the displayed values as a ref erence only This distance is computed based on your average fuel consumption As a result the actual distance that can be driven may differ from that displayed When only a small amount of fuel is added to the tank the display may not be updated When refueling turn the power switch off If the vehicle is ...

Page 106: ... Indicates that the vehicle is being driven in an Eco friendly manner Power area Indicates that the Eco friendly driving range is being exceeded during full power driving etc Current accelerator pedal oper ation Displayed as a green bar when within the Eco area Eco friendly acceleration can be achieved by keeping the accelerator pedal operation display within the range indicated by the blue bar P ...

Page 107: ...not operate in the following sit uations The Hybrid System Indicator is not operating The vehicle is being driven using the cruise control if equipped or dynamic radar cruise control if equipped Driving support system infor mation Select to display the operational status of the following systems LTA Lane Tracing Assist if equipped P 212 LDA Lane Departure Alert with steering control if equipped P ...

Page 108: ...e distance driven since hybrid system start Elapsed time Displays the elapsed time since hybrid system start Average vehicle speed Displays the average vehicle speed since hybrid system start After reset Distance Displays the distance driven since the display was reset Elapsed time Displays the elapsed time since the display was reset Average vehicle speed Displays the average vehicle speed since ...

Page 109: ... information eco score The infor mation will be displayed temporarily when the hybrid system is stopped Pop up display Select to enable disable pop up dis plays for each relevant system Multi information display off Select to turn the multi information dis play off To turn the multi information display on again press any of the following meter control switches Default setting Select to reset the m...

Page 110: ... _GE 2 1 Instrument cluster NOTICE During setting up the display To prevent 12 volt battery discharge ensure that the hybrid system is oper ating while setting up the display fea tures COROLLA HYBRID_OM_General_OM12M44E ...

Page 111: ...re display area P 112 Head up display will operate when The power switch is in ON When using the head up display The head up display may seem dark or hard to see when viewed through sun glasses especially polarized sun glasses Adjust the brightness of the head up display or remove your sun glasses Street name display vehicles with navigation system Only street names which are included in the map d...

Page 112: ...status if equipped Display angle WARNING When using the head up display Check that the position and bright ness of the head up display image does not interfere with safe driving Incorrect adjustment of the image s position or brightness may obstruct the driver s view and lead to an accident resulting in death or seri ous injury Do not continuously look at the head up display while driving as you m...

Page 113: ...ayed on the multi information dis play For details refer to the explana tion of each system Navigation system linked dis play area if equipped Displays the following items which are linked to the navigation system Street name Route guidance to destination Compass heading up display Pop up displays for the following systems will be displayed when necessary WARNING Caution for changing settings of t...

Page 114: ...e multi information dis play Audio system operation status if equipped Displayed when an audio remote control switch on the steering wheel is operated Hands free system status if equipped Displayed when the hands free system is operated When a pop up display is displayed When a pop up display is displayed a current display may no longer be dis played In this case the display will return after the ...

Page 115: ...t low speeds less than 25 km h 16 mph When the outside temperature has changed suddenly at the entrance exit of a garage tunnel etc When or E is displayed the sys tem may be malfunctioning Take your vehicle to your Toyota dealer If equipped Audio system screen Multi information display Meter control switches Audio system screen 1 Press the MENU button 2 Select Info on the Menu screen If a screen o...

Page 116: ...c motor traction motor Audio system screen Multi information display Example 7 inch display When the vehicle is powered by both the gasoline engine and the electric motor traction motor Audio system screen Multi information display Example 7 inch display COROLLA HYBRID_OM_General_OM12M44E ...

Page 117: ...s When the vehicle is powered by the gasoline engine Audio system screen Multi information display Example 7 inch display When the vehicle is charging the hybrid battery traction battery Audio system screen Multi information display Example 7 inch display COROLLA HYBRID_OM_General_OM12M44E ...

Page 118: ...ay Low High These images are examples only and may vary slightly from actual condi tions Trip information 1 Press the MENU button 2 Select Info on the Menu screen If a screen other than Trip information is displayed select Trip information Resetting the consumption data When there is no energy flow Audio system screen Multi information display Example 7 inch display Consumption COROLLA HYBRID_OM_G...

Page 119: ...ory is dis played select History Best recorded fuel consumption Latest fuel consumption Previous fuel consumption record Resetting the history data Updating the latest fuel con sumption data The average fuel consumption his tory is divided by color into past averages and the average fuel con sumption since the last updated Use the displayed average fuel consumption as a reference The image is an e...

Page 120: ...118 COROLLA HV_ 国瑞 _GE 2 1 Instrument cluster COROLLA HYBRID_OM_General_OM12M44E ...

Page 121: ...Trunk 132 Smart entry start system 134 3 3 Adjusting the seats Front seats 141 Rear seats 142 Head restraints 144 3 4 Adjusting the steering wheel and mirrors Steering wheel 146 Inside rear view mirror 147 Outside rear view mirrors 148 3 5 Opening and closing the win dows Power windows 151 Moon roof 153 COROLLA HYBRID_OM_General_OM12M44E ...

Page 122: ...ith wireless remote control function onto an aircraft make sure you do not press any buttons on the key while inside the aircraft cabin If you are carrying the key in your bag etc ensure that the buttons are not likely to be pressed accidentally Press ing a button may cause the key to emit radio waves that could interfere with the operation of the aircraft Key battery depletion Vehicles without a ...

Page 123: ...stem is not oper ated the key battery may become depleted faster than normal Replacing the battery P 388 If New Key Registered Contact Your Dealer if You Did Not Register a New Key is shown on the multi information display vehicles with a smart entry start system This message will be displayed each time the driver s door is opened when the doors are unlocked from the outside for approximately 10 d...

Page 124: ...3 Sounds the alarm 2 P 122 1 This setting must be customized at your Toyota dealer 2 If equipped Panic mode if equipped Vehicles without a smart entry start system When is pressed for longer than NOTICE Carrying the electronic key on your person vehicles with a smart entry start system Carry the electronic key 10 cm 3 9 in or more away from electric appli ances that are turned on Radio waves emitt...

Page 125: ... the follow ing situations When the wireless key battery is depleted Near a TV tower electric power plant gas station radio station large dis play airport or other facility that gen erates strong radio waves or electrical noise When carrying a portable radio cellu lar phone or other wireless communi cation devices When the wireless key is in contact with or is covered by a metallic object When a w...

Page 126: ... using the mechanical key store it in the electronic key Carry the mechanical key together with the electronic key If the electronic key battery is depleted or the entry function does not operate properly you will need the mechanical key P 441 If you lose your mechanical keys P 440 Certification for the wireless remote control vehicles without a smart entry start system COROLLA HYBRID_OM_General_O...

Page 127: ...125 3 COROLLA HV_ 国瑞 _GE 3 1 Key information Before driving Certification for the wireless remote control vehicles with a smart entry start system P 139 COROLLA HYBRID_OM_General_OM12M44E ...

Page 128: ...r handle to lock all the doors Check that the door is securely locked Wireless remote control Vehicles without a smart entry start system 1 Locks all the doors Check that the door is securely locked Press and hold to close the windows 1 and moon roof 1 2 2 Unlocks all the doors Press and hold to open the windows 1 and moon roof 1 2 Vehicles with a smart entry start system 1 Locks all the doors Che...

Page 129: ...h off 2 Cancel the intrusion sensor of the alarm system to prevent unintended triggering of the alarm while chang ing the settings if equipped P 83 3 When the indicator light on the key surface is not on press and hold or for approximately 5 sec onds while pressing and holding The setting changes each time an oper ation is performed as shown below When changing the setting continu ously release th...

Page 130: ...try start system If a door is not opened within approxi mately 30 seconds after the vehicle is unlocked using the wireless remote con trol the security feature automatically locks the vehicle again Vehicles with a smart entry start system If a door is not opened within approxi mately 30 seconds after the vehicle is unlocked using the entry function or wireless remote control the security fea ture ...

Page 131: ... resulting in death or serious injury Ensure that all doors are properly closed and locked Do not pull the inside door handle while driving Be especially careful of the driver s door as the door may be opened even if the inside lock button is in the locked position Set the rear door child protector locks when children are seated in the rear seats When opening or closing a door Check the surroundin...

Page 132: ...ng buzzer If a door or the trunk is not fully closed a buzzer will sound when the vehicle speed reaches 5 km h 3 mph The open door s or trunk is indicated on the multi information display The door cannot be opened from inside the vehicle when lock is set 1 Unlock 2 Lock These locks can be set to prevent chil dren from opening the rear doors Push down on each rear door switch to lock both rear door...

Page 133: ...d function to be set are shown as follows Use the same procedure to cancel the function When the setting or canceling oper ation is complete all doors are locked and then unlocked Speed linked door locking function All doors are auto matically locked when vehicle speed is approximately 20 km h 12 mph or higher Driver s door linked door unlocking func tion All doors are auto matically unlocked when...

Page 134: ...ceptible to death or serious injury Using the trunk Observe the following precautions Failure to do so may cause parts of the body to be caught resulting in serious injury Remove any heavy loads such as snow and ice from the trunk lid before opening it Failure to do so may cause the trunk lid to suddenly shut again after it is opened When opening or closing the trunk lid thoroughly check to make s...

Page 135: ...control Door lock switches Automatic door unlocking system if equipped Mechanical key Wireless remote control Vehicles without a smart entry start system Press and hold the switch Vehicles with a smart entry start system Press and hold the switch Some models A buzzer sounds Trunk light The trunk light turns on when the trunk is opened If the trunk light is left on when the WARNING Do not attach an...

Page 136: ... conditions In this case the key confinement prevention function cannot be activated causing the doors to lock when the trunk is closed Make sure to check where the key is before closing the trunk The key confinement prevention func tion cannot be activated if any one of the doors is unlocked In this case open the trunk using the trunk opener If the smart entry start system if equipped or the wire...

Page 137: ...lease button Right hand drive vehicles When locking or unlocking the doors The system can be operated when the electronic key is within about 0 7 m 2 3 ft of outside door handle on the driver s side When starting the hybrid system or changing power switch modes The system can be operated when the electronic key is inside the vehicle When opening the trunk The system can be operated when the electr...

Page 138: ... To cancel the function press any of the electronic key buttons Conditions affecting operation The smart entry start system uses weak radio waves In the following situa tions the communication between the electronic key and the vehicle may be affected preventing the smart entry start system wireless remote control and immobilizer system from operating properly When the electronic key battery is de...

Page 139: ...ow or outside door handle near the ground or in a high place when the doors are locked or unlocked The electronic key is near the ground or in a high place or too close to the center of the rear bumper when the trunk is opened The electronic key is on the instru ment panel rear package tray or floor or in the door pockets or glove box when the hybrid system is started or power switch modes are cha...

Page 140: ...against the door during operation of the door han dle Be careful not to injure fingernails or damage the surface of the door When the vehicle is not driven for extended periods To prevent theft of the vehicle do not leave the electronic key within 2 m 6 ft of the vehicle The smart entry start system can be deactivated in advance P 462 Setting the electronic key to bat tery saving mode helps to red...

Page 141: ...139 3 COROLLA HV_ 国瑞 _GE 3 2 Opening closing and locking the doors Before driving Certification for the smart entry start system COROLLA HYBRID_OM_General_OM12M44E ...

Page 142: ...isa bled Ask your Toyota dealer for details such as the frequency of radio waves and timing of the emit ted radio waves Then consult your doctor to see if you should disable the entry function Users of any electrical medical device other than implantable car diac pacemakers cardiac resynchronization therapy pace makers or implantable cardioverter defibrillators should consult the manufacturer of t...

Page 143: ...ot put your hands under the seat or near the moving parts to avoid injury Fingers or hands may become jammed in the seat mechanism Make sure to leave enough space around the feet so they do not get stuck Seat adjustment Be careful that the seat does not hit passengers or luggage To reduce the risk of sliding under the lap belt during a collision do not recline the seat more than neces sary If the ...

Page 144: ...lock release button Each seatback may be folded sepa WARNING Manual seat only After adjusting the seat make sure that the seat is locked in position NOTICE When adjusting a front seat When adjusting a front seat make sure that the head restraint does not contact the headliner Otherwise the head restraint and headliner may be damaged Rear seats folding type The seatbacks of the rear seats can be fo...

Page 145: ...he rear seatbacks so that the front seats do not interfere with the rear seatbacks when folding down the rear seatbacks After returning the rear seatback to the upright position Make sure that the seatback is securely locked in position by lightly pushing it back and forth If the seatback is not securely locked the red marking will be visible on the seatback lock release button Make sure that the ...

Page 146: ...o the top of your ears Front seats Pull the head restraint up while pressing the lock release button Head restraints Head restraints are provided for all seats WARNING Head restraint precautions Observe the following precautions regarding the head restraints Failure to do so may result in death or serious injury Use the head restraints designed for each respective seat Adjust the head restraints t...

Page 147: ... with the installation holes and push it down to the lock position Press and hold the lock release button when lowering the head restraint Rear outside seats adjustable type Align the head restraint with the installation holes and push it down to the lock position Press and hold the lock release button when lowering the head restraint Installing the head restraints COROLLA HYBRID_OM_General_OM12M4...

Page 148: ... the mark Steering wheel Adjustment procedure WARNING Caution while driving Do not adjust the steering wheel while driving Doing so may cause the driver to mis handle the vehicle and cause an acci dent resulting in death or serious injury After adjusting the steering wheel Make sure that the steering wheel is securely locked Otherwise the steering wheel may move suddenly possibly causing an accide...

Page 149: ...d light is auto matically reduced Changing automatic anti glare function mode On off When the automatic anti glare function is in ON mode the indicator illumi nates The function will set to ON mode each time the power switch is turned to ON Pressing the button turns the function to off mode The indicator also turns off Inside rear view mirror The rear view mirror s position can be adjusted to enab...

Page 150: ...rror s position can be adjusted to enable suf ficient confirmation of the rear view WARNING Important points while driving Observe the following precautions while driving Failure to do so may result in loss of control of the vehicle and cause an accident resulting in death or serious injury Do not adjust the mirrors while driv ing Do not drive with the mirrors folded Both the driver and passenger ...

Page 151: ...ll be memorized and the mirror will automatically tilt to the memorized angle whenever the shift position is shifted to R from next time The memorized downward tilt position of the mirror is linked to the normal position angle adjusted with the shift position in other than R Therefore if the normal position is changed after adjustment the tilt position will also change When the normal position is ...

Page 152: ...nd automatic stowing and return may not be possible In this case remove any ice and snow from the door mirror then either operate the mirror using manual mode or move the mirror by hand Customization Some functions can be customized P 462 WARNING When a mirror is moving To avoid personal injury and mirror malfunction be careful not to get your hand caught by the moving mirror COROLLA HYBRID_OM_Gen...

Page 153: ...pened or closed perform the following operations with the power window switch of that door Stop the vehicle With the power switch in ON within 4 seconds of the jam protection function or catch pro tection function activating continu ously operate the power window switch in the one touch closing direc tion or one touch opening direction so that the door window can be opened and closed If the door w...

Page 154: ... children and other passengers to have body parts caught in the power window Also when riding with a child it is recom mended to use the window lock switch P 153 Check to make sure that all passen gers do not have any part of their body in a position where it could be caught when a window is being operated When using the wireless remote control key or mechanical key and operating the power windows...

Page 155: ...r reconnecting the 12 volt battery If equipped Opening and closing 1 Opens the moon roof The moon roof stops slightly before the fully open position to reduce wind noise Press the switch again to fully open the moon roof 2 Closes the moon roof Lightly press either side of the moon roof switch to stop the moon roof partway Tilting up and down 1 Tilts the moon roof up WARNING The catch protection fu...

Page 156: ...llowing procedure If the moon roof closes but then re opens slightly 1 Stop the vehicle 2 Press and hold the CLOSE switch 1 The moon roof will close reopen and pause for approximately 10 seconds 2 Then it will close again tilt up and pause for approximately 1 second Finally it will tilt down open and close 3 Check to make sure that the moon roof is completely closed and then release the switch If ...

Page 157: ...assengers to have body parts caught in the moon roof Check to make sure that all passen gers do not have any part of their body in a position where it could be caught when the moon roof is being operated When using the wireless remote control key or mechanical key and operating the moon roof operate the moon roof after checking to make sure that there is no possibil ity of any passenger having any...

Page 158: ...ion function may not work if something gets caught just before the moon roof is fully closed Also the jam protection function is not designed to operate while the moon roof switch is being pressed Take care so that your fingers etc do not get caught COROLLA HYBRID_OM_General_OM12M44E ...

Page 159: ...84 Automatic High Beam 188 Fog light switch 190 Windshield wipers and washer 192 4 4 Refueling Opening the fuel tank cap 196 4 5 Using the driving support systems Toyota Safety Sense 198 PCS Pre Collision System 204 LTA Lane Tracing Assist 212 LDA Lane Departure Alert with steering control 221 Dynamic radar cruise control with full speed range 229 Dynamic radar cruise control 239 Cruise control 24...

Page 160: ...system 4 Slowly release the brake pedal 5 Lock the door making sure that you have the electronic key on your person If parking on a hill block the wheels as needed Starting off on a steep uphill 1 Make sure that the parking brake is set and shift the shift lever to D Hill start assist control will operate P 268 2 Gently depress the accelerator pedal 3 Release the parking brake For fuel efficient d...

Page 161: ...ration is performed the hybrid system output may be restrained When the shift lever is shifted from R to D D to R N to R P to D or P to R D includes B with the accelerator pedal depressed a warning message appears on the multi information dis play If a warning message is shown on the multi information display read the message and follow the instruc tion When the accelerator pedal is depressed too ...

Page 162: ...is noisy Do not drive the vehicle over or stop the vehicle near flammable materials The exhaust system and exhaust gases can be extremely hot These hot parts may cause a fire if there is any flammable material nearby During normal driving do not turn off the hybrid system Turning the hybrid system off while driving will not cause loss of steering or brak ing control however power assist to the ste...

Page 163: ...the shift lever with the accelerator pedal depressed Shifting the shift lever to any positions other than P or N may lead to unexpected rapid accelera tion of the vehicle that may cause an accident and result in death or serious injury If you hear a squealing or scrap ing noise brake pad wear indica tors Have the brake pads checked and replaced by your Toyota dealer as soon as possible Rotor damag...

Page 164: ... the shift lever to P stop the hybrid system and lock the vehicle Do not leave the vehicle unat tended while the READY indicator is illuminated If the vehicle is parked with the shift lever in P but the parking brake is not set the vehicle may start to move possibly leading to an accident Do not touch the exhaust pipes while the READY indicator is illu minated or immediately after turn ing the hyb...

Page 165: ...ts Do not turn the steering wheel fully in either direction and hold it there for an extended period of time Doing so may damage the power steering motor When driving over bumps in the road drive as slowly as possible to avoid damaging the wheels under side of the vehicle etc If you get a flat tire while driving A flat or damaged tire may cause the following situations Hold the steering wheel firm...

Page 166: ...o not stack anything in the enlarged trunk Keep cargo and luggage low as close to the floor as possible Do not place cargo or luggage in or on the following locations At the feet of the driver On the front passenger or rear seats when stacking items On the package tray On the instrument panel On the dashboard Secure all items in the occupant compartment Vehicles with folding type rear seats When y...

Page 167: ...wing a trailer with your vehi cle Toyota also does not rec ommend the installation of a tow hitch or the use of a tow hitch carrier for a wheelchair scooter bicycle etc Your vehi cle is not designed for trailer towing or for the use of tow hitch mounted carriers COROLLA HYBRID_OM_General_OM12M44E ...

Page 168: ...rid system does not start The immobilizer system may not have been deactivated P 79 Contact your Toyota dealer When the ambient temperature is low such as during winter driving conditions When starting the hybrid system the flashing time of the READY indicator may be long Leave the vehicle as it is until the READY indicator is steady on as steady means the vehicle is able to move Sounds and vibrat...

Page 169: ... the hybrid system while sitting in the driver s seat Do not depress the accelerator pedal while starting the hybrid system under any circumstances Doing so may cause an accident resulting in death or seri ous injury NOTICE When starting the hybrid system If the hybrid system becomes difficult to start have your vehicle checked by your Toyota dealer immediately Changing the power switch positions ...

Page 170: ...r system may not have been deactivated P 79 Contact your Toyota dealer If a message related to start up is shown on the multi information dis play read the message and follow the instructions When the ambient temperature is low such as during winter driving conditions When starting the hybrid system the flashing time of the READY indicator may be long Leave the vehicle as it is until the READY ind...

Page 171: ...system is malfunction ing P 78 Electronic key battery P 388 Operation of the power switch If the switch is not pressed shortly and firmly the power switch mode may not change or the hybrid system may not start If attempting to restart the hybrid sys tem immediately after turning the power switch off the hybrid system may not start in some cases After turning the power switch off please wait a few ...

Page 172: ...ely Stopping the hybrid system WARNING Stopping the hybrid system in an emergency If you want to stop the hybrid sys tem in an emergency while driving the vehicle press and hold the power switch for more than 2 sec onds or press it briefly 3 times or more in succession P 400 However do not touch the power switch while driving except in an emergency Turning the hybrid sys tem off while driving will...

Page 173: ... with the power switch in ACC or ON for long periods of time when the hybrid system is not operating If the hybrid system is stopped with the shift lever in a position other than P the power switch will not be turned off but instead be turned to ACC Perform the following proce dure to turn the switch off 1 Check that the parking brake is set 2 Shift the shift lever to P 3 Check that ACCESSORY is d...

Page 174: ...ay NOTICE To prevent 12 volt battery dis charge Do not stop the hybrid system when the shift lever is in a position other than P If the hybrid system is stopped in another shift lever position the power switch will not be turned off but instead be turned to ACC mode If the vehicle is left in ACC 12 volt battery discharge may occur EV drive mode In EV drive mode electric power is supplied by the hy...

Page 175: ...n display The hybrid battery traction battery becomes low The remaining battery level indicated in the energy monitor display is low P 116 Vehicle speed is high The accelerator pedal is depressed firmly or the vehicle is on a hill etc Possible driving distance when driving in EV drive mode EV drive mode s possible driving dis tance ranges from a few hundred meters to approximately 1 km 0 6 mile Ho...

Page 176: ... there is no engine noise pedestrians people riding bicycles or other people and vehicles in the area may not be aware of the vehi cle starting off or approaching them Take extra care while driving even if the vehicle proximity notification system is active Hybrid transmission Select the shift position depending on your purpose and situation Shift position purpose and functions Shift posi tion Obj...

Page 177: ...lease button is pushed If the shift lever cannot be shifted from P First check whether the brake pedal is being depressed If the shift lever cannot be shifted with your foot on the brake pedal there may be a problem with the shift lock system Have the vehicle inspected by your Toyota dealer immediately The following steps may be used as an emergency measure to ensure that the shift lever can be sh...

Page 178: ...at of other vehicles The vehicle can be accelerated even when shift position B is selected If the vehicle is driven continuously in the B position fuel efficiency will become low Usually select the D posi tion P 267 WARNING To prevent an accident when releasing the shift lock Before pressing the shift lock override button make sure to set the parking brake and depress the brake pedal If the accele...

Page 179: ...n signal lights has not burned out If equipped To set the parking brake fully pull the parking brake lever while depressing the brake pedal To release the parking brake slightly raise the lever and lower it completely while pressing the button Parking the vehicle P 158 Parking brake engaged warning buzzer If the vehicle is driven at a speed of approximately 5 km h 3 mph or more with the parking br...

Page 180: ...the parking brake while driving NOTICE Before driving Fully release the parking brake Driv ing the vehicle with the parking brake set will lead to brake components overheating which may affect braking performance and increase brake wear Electric parking brake The parking brake can be set or released automatically or manually In automatic mode the parking brake can be set or released automatically ...

Page 181: ...the parking brake indi cator and parking brake light will turn on Operate the shift lever with the vehicle stopped and the brake pedal depressed The parking brake may not operate automatically if the shift lever is moved quickly In this case it is necessary to operate the parking brake switch P 178 Turning automatic mode off While the vehicle is stopped and depressing the brake pedal press and hol...

Page 182: ...e is released Not in ON Stays on for approximately 15 seconds When the power switch is turned off with the parking brake set the parking brake indicator and parking brake light will stay on for about 15 seconds This does not indicate a malfunction When the parking brake switch malfunctions Automatic mode automatic brake set ting and releasing will be turned on automatically Parking the vehicle P 1...

Page 183: ... brake hold system is NOTICE When the parking brake cannot be released due to a malfunction Driving the vehicle with the parking brake set will lead to brake compo nents overheating which may affect braking performance and increase brake wear Have the vehicle inspected by your Toyota dealer immediately if this occurs Brake Hold The brake hold system keeps the brake applied when the shift lever is ...

Page 184: ...press the accelerator pedal The parking brake will not be released automatically if the seat belt is not fas tened Operate the parking brake switch with the brake pedal depressed Make sure that the parking brake indica tor light goes off P 178 When an inspection at your Toyota dealer is necessary When the brake hold standby indicator green does not illuminate even when the brake hold switch is pre...

Page 185: ...r use when parking the vehicle for a long period of time Turn ing the power switch off while the sys tem is holding the brake may release the brake which would cause the vehicle to move When operating the power switch depress the brake pedal shift the shift lever to P and set the parking brake COROLLA HYBRID_OM_General_OM12M44E ...

Page 186: ...ove turn on Vehicles with daytime running light system the daytime running lights turn on P 185 Type B 1 The headlights daytime running lights P 185 and all the lights listed below turn on and off automatically 2 The front position tail license plate and instrument panel lights turn on 3 The headlights and all the lights listed above turn on Type C Headlight switch The headlights can be oper ated ...

Page 187: ... headlight sys tem to malfunction Automatic light off system if equipped For GCC countries and Taiwan If you open the driver s door with the power switch ACC or OFF all lights are turned off To turn the lights on again turn the power switch to ON or turn the light switch to the or position once and then back to or position Except for GCC countries and Taiwan When the light switch is in or The head...

Page 188: ...ing function will be disabled When any of the following are per formed the 12 volt battery saving func tion is canceled once and then reactivated All the lights will turn off automatically 20 minutes after the 12 volt battery saving function has been reactivated When the headlight switch is operated When a door or the trunk is opened or closed Saudi Arabia Sultanate of Oman Bahrain United Arab Emi...

Page 189: ...vel of the head lights Guide to dial settings 1 For ZWE211L GEXDBV and ZWE211L GEXNBV models 3 with bulb type headlights 2 Except for ZWE211L GEXDBV and ZWE211L GEXNBV models 3 with bulb type headlights 3 The model code is indicated on the manufacturer s label or the Certifica tion Regulation label P 452 Manual headlight leveling dial if equipped Occupancy and luggage load conditions Dial position...

Page 190: ...mately 25 km h 16 mph The area ahead of the vehicle is not dark Vehicles ahead have their headlights or tail lights turned on There are many streetlights on the road ahead Camera sensor detection informa tion The high beams may not be automati cally turned off in the following situa tions When a vehicle suddenly appears from around a curve Automatic High Beam The Automatic High Beam uses a camera ...

Page 191: ...o flash or daz zle pedestrians or vehicles ahead In such a case it is necessary to manu ally switch between the high and low beams When driving in inclement weather heavy rain snow fog sandstorms etc When the windshield is obscured by fog mist ice dirt etc When the windshield is cracked or damaged When the camera sensor is deformed or dirty When the temperature of the camera sensor is extremely hi...

Page 192: ...utomatic High Beam switch The Automatic High Beam indicator will turn off and the high beam indicator will turn on Press the switch to activate the Auto matic High Beam system again If equipped Front fog light switch 1 Turns the front fog lights off 2 Turns the front fog lights on Turning the high beams on off manually Fog light switch The fog lights secure excellent visibility in difficult drivin...

Page 193: ...and rear fog lights on Releasing the switch ring returns it to Operating the switch ring again turns only the rear fog light off Fog lights can be used when Vehicles with a front fog light switch The headlights or the front position lights are turned on Vehicles with a rear fog light switch The headlights are turned on Vehicles with a front and rear fog light switch Front fog lights The headlights...

Page 194: ...dshield wiper operation 4 Temporary operation 5 Washer wiper dual opera tion Wipers will automatically operate a cou ple of times after the washer squirts Intermittent windshield wipers with interval adjuster Windshield wipers and washer Operating the lever can use the windshield wipers or the washer NOTICE When the windshield is dry Do not use the wipers as they may damage the windshield Operatin...

Page 195: ...her wiper dual opera tion Wipers will automatically operate a cou ple of times after the washer squirts Rain sensing windshield wipers 1 Rain sensing windshield wiper operation 2 Low speed windshield wiper operation 3 High speed windshield wiper operation 4 Temporary operation When AUTO is selected the wipers will operate automatically when the sensor detects falling rain The system automatically ...

Page 196: ...de is activated If the temperature of the raindrop sen sor is 85 C 185 F or higher or 15 C 5 F or lower automatic operation may not occur In this case operate the wipers in any mode other than AUTO mode If no windshield washer fluid sprays Check that the washer nozzles are not blocked if there is washer fluid in the windshield washer fluid reservoir Front door opening linked wind shield wiper stop...

Page 197: ...p ers Caution regarding the use of washer fluid When it is cold do not use the washer fluid until the windshield becomes warm The fluid may freeze on the windshield and cause low visibility This may lead to an accident result ing in death or serious injury NOTICE When there is no washer fluid spray from the nozzle Damage to the washer fluid pump may be caused if the lever is pulled toward you and ...

Page 198: ...apors to ignite while refueling Always hold the grips on the fuel tank cap and turn it slowly to remove it A whooshing sound may be heard when the fuel tank cap is loosened Wait until the sound cannot be heard before fully removing the cap In hot weather pressurized fuel may spray out the filler neck and cause injury Do not allow anyone that has not discharged static electricity from their body to...

Page 199: ...ection NOTICE Refueling Do not spill fuel during refueling Doing so may damage the vehicle such as causing the emission control system to operate abnormally or dam aging fuel system components or the vehicle s painted surface Opening the fuel tank cap Closing the fuel tank cap WARNING When replacing the fuel tank cap Do not use anything but a genuine Toyota fuel tank cap designed for your vehicle ...

Page 200: ...a Toyota Safety Sense The Toyota Safety Sense con sists of the following drive assist systems and contrib utes to a safe and comfortable driving experience Driving assist system WARNING Toyota Safety Sense The Toyota Safety Sense is designed to operate under the assumption that the driver will drive safely and is designed to help reduce the impact to the occupants and the vehicle in the case of a ...

Page 201: ...ront grille or front bumper has been subjected to a strong impact have the vehicle inspected by your Toyota dealer Do not disassemble the radar sen sor Do not modify or paint the radar sensor or grille cover If the radar sensor front grille or front bumper needs to be removed and installed or replaced contact your Toyota dealer To avoid malfunction of the front camera Observe the following precaut...

Page 202: ...o the windshield Replace the windshield if it is dam aged or cracked If the windshield needs to be replaced contact your Toyota dealer Do not allow liquids to contact the front camera Do not allow bright lights to shine into the front camera Do not dirty or damage the front camera When cleaning the inside of the windshield do not allow glass cleaner to contact the lens of the front camera Also do ...

Page 203: ...201 4 COROLLA HV_ 国瑞 _GE 4 5 Using the driving support systems Driving Certification COROLLA HYBRID_OM_General_OM12M44E ...

Page 204: ...l operating conditions are detected the message will disappear and the system will become operational If the message does not disappear contact your Toyota dealer Situation Actions When the area around a sensor is cov ered with dirt moisture fogged up cov ered with condensation ice etc or other foreign matter To clean the part of the windshield in front of the front camera use the wind shield wipe...

Page 205: ...de of the operational range such as when the vehicle is in the sun or in an extremely cold environment If the front camera is hot such as after the vehicle had been parked in the sun use the air conditioning system to decrease the temperature around the front camera If a sunshade was used when the vehicle was parked depending on its type the sunlight reflected from the surface of the sunshade may ...

Page 206: ...s P 204 in front of the vehicle When the system determines that the possibility of a frontal collision with an object is high a warn ing operates to urge the driver to take evasive action and the potential brake pressure is increased to help the driver avoid the collision If the sys tem determines that the possi bility of a frontal collision with an object is extremely high the brakes are automati...

Page 207: ...onditions therefore the system may not always be able to achieve the same level of perfor mance Read the following conditions care fully Do not overly rely on this sys tem and always drive carefully Conditions under which the system may operate even if there is no pos sibility of a collision P 208 Conditions under which the system may not operate properly P 210 Do not attempt to test the operation...

Page 208: ... leading to an accident resulting in death or serious injury When the vehicle is being towed When your vehicle is towing another vehicle When transporting the vehicle via truck boat train or similar means of transportation When the vehicle is raised on a lift with the hybrid system on and the tires are allowed to rotate freely When inspecting the vehicle using a drum tester such as a chassis dynam...

Page 209: ... that the possibility of a frontal collision with a detected object is high Each function is operational at the following speed Pre collision warning Pre collision brake assist Pre collision braking Detectable objects Vehicle speed Relative speed between your vehicle and object Vehicles Approx 10 to 180 km h 7 to 110 mph Approx 10 to 180 km h 7 to 110 mph Bicyclists and pedestrians Approx 10 to 80...

Page 210: ...ting properly P 210 The illustration shows an image of detectable objects Region A Region B Region C Cancelation of the pre collision braking If either of the following occur while the pre collision braking function is operat ing it will be canceled The accelerator pedal is depressed strongly The steering wheel is turned sharply or abruptly Conditions under which the system may operate even if the...

Page 211: ...t turn When passing a detectable object in an oncoming lane that is stopped to make a right left turn When a detectable object approaches very close and then stops before entering the path of your vehicle If the front of your vehicle is raised or lowered such as when on an uneven or undulating road surface When driving on a road surrounded by a structure such as in a tunnel or on an iron bridge Wh...

Page 212: ...er light is shining directly on a detectable object When a detectable object is a shade of white and looks extremely bright When a detectable object appears to be nearly the same color or brightness as its surroundings If a detectable object cuts or suddenly emerges in front of your vehicle When the front of your vehicle is hit by water snow dust etc When a very bright light ahead such as the sun ...

Page 213: ...ve If your vehicle is skidding If the front of the vehicle is raised or lowered If the wheels are misaligned If a wiper blade is blocking the front camera The vehicle is being driven at extremely high speeds When driving on a hill If the radar sensor or front camera is misaligned In some situations such as the follow ing sufficient braking force may not be obtained preventing the system from perfo...

Page 214: ...a in front of the vehicle The driver must always assume full responsibility for driving safely by paying careful attention to the surrounding conditions and operating the steering wheel to cor rect the path of the vehicle Also the driver must take adequate breaks when fatigued such as from driving for a long period of time Failure to perform appropriate driv ing operations and pay careful attentio...

Page 215: ...rom its lane Drive safely by always paying careful attention to your surroundings and operate the steering wheel to correct the path of the vehicle without relying solely on the functions When the follow up cruising dis play is displayed P 217 and the preceding vehicle changes lanes Your vehicle may follow the preceding vehicle and also change lanes When the follow up cruising dis play is displaye...

Page 216: ...white The white yellow lines cross over a curb etc The vehicle is driven on a bright surface such as concrete If the edge of the road is not clear or straight The vehicle is driven on a surface that is bright due to reflected light etc The vehicle is driven in an area where the brightness changes sud denly such as at the entrances and exits of tunnels etc Light from the headlights of an oncoming v...

Page 217: ...vides assistance as necessary by operating the steering wheel in small amounts for a short period of time to keep the vehicle in its lane If the system detects that the steering wheel has not been operated for a fixed amount of time or the steering wheel is not being firmly gripped a warning is displayed on the multi information dis play and the function is temporarily canceled Vehicle with BSM Wh...

Page 218: ...des the required assistance by operating the steer ing wheel to keep the vehicle in its current lane When dynamic radar cruise control with full speed range is not operating the lane centering function does not oper ate In situations where the white yellow lane lines are difficult to see or are not visible such as when in a traffic jam this function will operate to help follow a preceding vehicle ...

Page 219: ...on condition of the indica tor informs the driver of the system operation status Illuminated in white LTA system is operating Illuminated in green Steering wheel assistance of the steering assist func tion or lane centering function is operat ing Flashing in orange Lane departure alert function is operating Operation display of steering wheel operation support Displayed when the multi information ...

Page 220: ...e side the vehicle departs from flashes orange Inside of displayed lines is black Indicates that the system is not able to recognize white yellow lines or a course or is temporarily canceled Boundary between asphalt and the side of the road such as grass soil or a curb Follow up cruising display Displayed when the multi information display is switched to the driving sup port system information dis...

Page 221: ...erates when all of the following conditions are met Setting for Sway Warning in of the multi information display is set to ON P 101 Vehicle speed is approximately 50 km h 32 mph or more Width of traffic lane is approximately 3 m 9 8 ft or more No system malfunctions are detected P 221 Lane centering function This function operates when all of the following conditions are met LTA is turned on Setti...

Page 222: ...rning stops when the sys tem determines that the driver holds the steering wheel Always keep your hands on the steering wheel when using this system regardless of warnings When the system determines that the driver is driving without holding the steering wheel while the system is operating If the driver continues to keep their hands off of the steering wheel the buzzer sounds the driver is warned ...

Page 223: ...nsor other than the front camera Turn the LTA system off wait for a little while and then turn the LTA system back on LTA Unavailable at Current Speed The function cannot be used as the vehicle speed exceeds the LTA opera tion range Drive slower Customization Function settings can be changed P 462 If equipped LDA Lane Departure Alert with steering con trol When driving on highways and freeways wit...

Page 224: ... freezing etc Vehicle is driven on a snow cov ered road White yellow lines are difficult to see due to rain snow fog dust etc A spare tire tire chains etc are equipped When the tires have been exces sively worn or when the tire infla tion pressure is low When tires of a size other than specified are installed Vehicle is driven in traffic lanes other than that highways and free ways During emergenc...

Page 225: ...are difficult to see due to sand etc The vehicle is driven on a road sur face that is wet due to rain pud dles etc The traffic lines are yellow which may be more difficult to recognize than lines that are white The white yellow lines cross over a curb etc The vehicle is driven on a bright surface such as concrete If the edge of the road is not clear or straight The vehicle is driven on a surface t...

Page 226: ...se the system pro vides assistance as necessary by operating the steering wheel in small amounts for a short period of time to keep the vehicle in its lane If the system detects that the steering wheel has not been operated for a fixed amount of time or the steering wheel is not being firmly gripped a warning is displayed on the multi information dis play and the function is temporarily canceled W...

Page 227: ...ss soil or a curb Vehicle sway warning function When the vehicle is swaying within a lane the warning buzzer will sound and a message will be dis played on the multi information dis play to alert the driver Press the LDA switch to turn the LDA system on The LDA indicator illuminates and a message is displayed on the multi infor mation display Press the LDA switch again to turn the LDA system off W...

Page 228: ...rating Lane departure alert function display Displayed when the multi information display is switched to the driving sup port system information display Inside of displayed lines is white Indicates that the system is recog nizing white yellow lines or a course When the vehicle departs from its lane the white line dis played on the side the vehicle departs from flashes orange Inside of displayed li...

Page 229: ...N P 462 Vehicle speed is approximately 50 km h 32 mph or more Width of traffic lane is approximately 3 m 9 8 ft or more No system malfunctions are detected P 228 Temporary cancelation of functions When operation conditions are no longer met a function may be temporar ily canceled However when the opera tion conditions are met again operation of the function is automatically restored P 226 Steering...

Page 230: ...on tinuing time of the buzzer becomes longer Vehicle sway warning function When the system determines that the vehicle is swaying while the vehicle sway warning function is operating a buzzer sounds and a warning message urging the driver to rest and the symbol shown in the illustration are simultane ously displayed on the multi information display Depending on the vehicle and road con ditions the...

Page 231: ...tance control mode the vehicle auto matically accelerates deceler ates and stops to match the speed changes of the preced ing vehicle even if the acceler ator pedal is not depressed In constant speed control mode the vehicle runs at a fixed speed Use the dynamic radar cruise control with full speed range on freeways and highways Vehicle to vehicle distance control mode P 232 Constant speed control...

Page 232: ...le distance control mode may not function correctly P 238 Set the speed appropriately depending on the speed limit traffic flow road conditions weather con ditions etc The driver is responsi ble for checking the set speed Even when the system is function ing normally the condition of the preceding vehicle as detected by the system may differ from the con dition observed by the driver Therefore the...

Page 233: ...t include functions which will prevent or avoid collisions with vehicles ahead of your vehicle Therefore if there is ever any possibility of danger the driver must take immediate and direct control of the vehicle and act appropriately in order to ensure the safety of all involved Situations unsuitable for dynamic radar cruise control with full speed range Do not use dynamic radar cruise con trol w...

Page 234: ...of you the system automatically deceler ates your vehicle When a greater reduction in vehicle speed is necessary the sys tem applies the brakes the stop lights will come on at this time The system will respond to changes in the speed of the vehicle ahead in order to maintain the vehi cle to vehicle distance set by the driver Approach warning warns you when the sys tem cannot decelerate sufficientl...

Page 235: ...te the cruise control If the cruise control main switch is pressed and held for 1 5 seconds or more the system turns on in constant speed control mode P 236 2 Accelerate or decelerate with accelerator pedal operation to the desired vehicle speed at or above approximately 30 km h 20 mph and press the SET switch to set the speed Cruise control SET indicator will come on The vehicle speed at the mome...

Page 236: ...con tinue to change while the switch is held 1 When the set speed is shown in km h 2 When the set speed is shown in MPH Pressing the switch changes the vehicle to vehicle distance as fol lows 1 Long 2 Medium 3 Short The vehicle to vehicle distance is set automatically to long mode when the power switch is turned to ON If a vehicle is running ahead of you the preceding vehicle mark will also be dis...

Page 237: ...et speed When your vehicle is too close to a vehicle ahead and sufficient auto matic deceleration via the cruise control is not possible the display will flash and the buzzer will sound to alert the driver An example of this would be if another driver cuts in front of you while you are follow ing a vehicle Depress the brake pedal to ensure an appropriate vehicle to vehicle distance Distance option...

Page 238: ...the cruise control off press and hold the cruise control main switch for 1 5 seconds or more Immediately after the switch is pressed the dynamic radar cruise control indica tor will come on Afterwards it switches to the cruise control indicator Switching to constant speed control mode is only possible when operating the switch with the cruise control off 2 Accelerate or decelerate with accelerator...

Page 239: ... system con trol on a steep incline The following are detected when the vehicle has been stopped by system control The driver is not wearing a seat belt The driver s door is opened The vehicle has been stopped for about 3 minutes If vehicle to vehicle distance control mode is automatically canceled for any reasons other than the above there may be a malfunction in the system Contact your Toyota de...

Page 240: ...hicle is pointing upwards caused by a heavy load in the luggage compartment etc Preceding vehicle has an extremely high ground clearance Conditions under which the vehi cle to vehicle distance control mode may not function correctly In the case of the following conditions operate the brake pedal or accelerator pedal depending on the situation as necessary As the sensor may not be able to cor rectl...

Page 241: ...l mode the vehicle auto matically accelerates and decelerates to match the speed changes of the preceding vehi cle even if the accelerator pedal is not depressed In con stant speed control mode the vehicle runs at a fixed speed Use the dynamic radar cruise control on freeways and high ways Vehicle to vehicle distance control mode P 242 Constant speed control mode P 245 System Components COROLLA HY...

Page 242: ...ction ing normally the condition of the preceding vehicle as detected by the system may differ from the con dition observed by the driver Therefore the driver must always remain alert assess the danger of each situation and drive safely Relying solely on this system or assuming the system ensures safety while driving can lead to an accident resulting in death or seri ous injury Switch the dynamic ...

Page 243: ...er to ensure the safety of all involved Situations unsuitable for dynamic radar cruise control Do not use dynamic radar cruise con trol in any of the following situations Doing so may result in inappropriate speed control and could cause an accident resulting in death or serious injury Roads where there are pedestrians cyclists etc In heavy traffic On roads with sharp bends On winding roads On sli...

Page 244: ...er than the set speed appears When a vehicle is detected running ahead of you the system automatically deceler ates your vehicle When a greater reduction in vehicle speed is necessary the sys tem applies the brakes the stop lights will come on at this time The system will respond to changes in the speed of the vehicle ahead in order to maintain the vehi cle to vehicle distance set by the driver Ap...

Page 245: ...celerator pedal operation to the desired vehicle speed at or above approximately 30 km h 20 mph and press the SET switch to set the speed Cruise control SET indicator will come on The vehicle speed at the moment the switch is released becomes the set speed To change the set speed press the RES or SET switch until the desired set speed is displayed 1 Increases the speed 2 Decreases the speed Fine a...

Page 246: ...es the vehicle to vehicle distance as fol lows 1 Long 2 Medium 3 Short The vehicle to vehicle distance is set automatically to long mode when the power switch is turned to ON If a vehicle is running ahead of you the preceding vehicle mark will also be displayed Select a distance from the table below Note that the distances shown correspond to a vehicle speed of 80 km h 50 mph Vehi cle to vehicle d...

Page 247: ...ropriate vehicle to vehicle distance Warnings may not occur when In the following instances warnings may not occur even when the vehi cle to vehicle distance is small When the speed of the preceding vehicle matches or exceeds your vehicle speed When the preceding vehicle is traveling at an extremely slow speed Immediately after the cruise con trol speed was set When depressing the accelerator peda...

Page 248: ...ore Accelerating after setting the vehi cle speed The vehicle can accelerate by operating the accelerator pedal After accelerat ing the set speed resumes However during vehicle to vehicle distance con trol mode the vehicle speed may decrease below the set speed in order to maintain the distance to the preceding vehicle Automatic cancelation of vehi cle to vehicle distance control mode Vehicle to v...

Page 249: ...wing and depend ing on the conditions operate the brake pedal when deceleration of the system is insufficient or operate the accelerator pedal when acceleration is required As the sensor may not be able to cor rectly detect these types of vehicles the approach warning P 245 may not be activated Vehicles that cut in suddenly Vehicles traveling at low speeds Vehicles that are not moving in the same ...

Page 250: ... as in a tunnel or on a bridge While the vehicle speed is decreasing to the set speed after the vehicle accelerates by depressing the accel erator pedal If equipped Meter display Set speed Indicators Operation switches RES switch Cruise control main switch Cancel switch SET switch Cruise control Use the cruise control to main tain a set speed without depressing the accelerator pedal System compone...

Page 251: ...h is released becomes the set speed To change the set speed press the RES or SET switch until the desired set speed is obtained 1 Increases the speed 2 Decreases the speed Fine adjustment Press the switch in the desired direction Large adjustment Press and hold switch The set speed will be increased or decreased as follows Fine adjustment By 1 km h 0 6 mph 1 or 1 mph 1 6 km h 2 each time the switc...

Page 252: ...memorized set speed is not retained Actual vehicle speed is below approxi mately 30 km h 20 mph VSC is activated TRC is activated for a period of time When the VSC or TRC system is turned off by pressing the VSC off switch If the warning message for the cruise control is shown on the multi information display Press the cruise control main switch once to deactivate the system and then press the swi...

Page 253: ...f the system The driver is solely responsible for safe driving Always drive safely tak ing care to observe your surroundings The Blind Spot Monitor is a supple mentary function which alerts the driver that a vehicle is in a blind spot of the outside rear view mirrors or is approaching rapidly from behind into a blind spot Do not overly rely on the Blind Spot Monitor As the function cannot judge if...

Page 254: ...tor visibility In strong sunlight the outside rear view mirror indicator may be difficult to see When Blind Spot Monitor Unavail able is shown on the multi infor mation display Ice snow mud etc may be attached to the rear bumper around the sensors P 253 The system should return to normal operation after removing the ice snow mud etc from the rear bumper Additionally the sensors may not oper ate no...

Page 255: ...appear have the vehicle inspected by your Toyota dealer Do not attach accessories stickers including transparent stickers alu minum tape etc to a sensor or its surrounding area on the rear bumper Do not subject a sensor or its sur rounding area on the rear bumper to a strong impact If a sensor is moved even slightly off position the system may mal function and vehicles may not be detected correctl...

Page 256: ...utside rear view mirrors Vehicles that are traveling in areas that are not visible using the outside rear view mirrors the blind spots Vehicles that are approaching rapidly from behind in areas that are not visible using the outside rear view mirrors the blind spots The Blind Spot Monitor detection areas The areas that vehicles can be detected in are outlined below The range of each detection area...

Page 257: ...ed to detect the following types of vehicles and or objects Small motorcycles bicycles pedestri ans etc Vehicles traveling in the opposite direction Guardrails walls signs parked vehi cles and similar stationary objects Following vehicles that are in the same lane Vehicles traveling 2 lanes away from your vehicle Vehicles which are being overtaken rapidly by your vehicle Depending on the condition...

Page 258: ... enters the detection area is short When driving up and down consecu tive steep inclines such as hills dips in the road etc When vehicle lanes are narrow or when driving on the edge of a lane and a vehicle traveling in a lane other than the adjacent lanes enters the detection area When driving on roads with sharp bends consecutive curves or uneven surfaces When the tires are slipping or spinning W...

Page 259: ...t sensor Observe the following precautions Failing to do so may result in the vehi cle being unable to be driven safely and possibly cause an accident Do not use the sensor at speeds in excess of 10 km h 6 mph The sensor s detection areas and reaction times are limited When moving forward or reversing check the areas surrounding the vehicle especially the sides of the vehicle for safety and drive ...

Page 260: ...and the warning beep sounds It might be difficult to hear the buzzer due to the volume of the audio system or air flow noise of the air conditioning system It may be difficult to hear the buzzer if buzzers for other systems are sound ing WARNING When using Toyota parking assist sensor In the following situations the system may not function correctly due to a sensor malfunction etc Have the vehicle...

Page 261: ...sensor is coated with a sheet of spray or heavy rain If a sensor is hit by a large amount of water such as when driving on a flooded road If the vehicle is significantly tilted The vehicle is approaching a tall or curved curb If objects draw too close to the sensor Objects which may not be properly detected The shape of the object may prevent the sensor from detecting it Pay particular attention t...

Page 262: ...imate distance to object 60 cm 2 0 ft to 45 cm 1 5 ft Automatic buzzer mute function is enabled P 261 Approximate distance to object 45 cm 1 5 ft to 35 cm 1 1 ft Automatic buzzer mute function is enabled P 261 Approximate distance to object 35 cm 1 1 ft to 30 cm 1 0 ft Multi information display Example 7 inch display Head up display Multi information display Example 7 inch display Head up display ...

Page 263: ...st beeps Automatic buzzer mute function After a buzzer begins sounding if the distance between the vehi cle and the detected object does not become shorter the buzzer will be muted automatically However if the distance between the vehicle and object is 30 cm 1 0 ft or less this func tion will not operate Adjusting the buzzer volume The buzzer volume can be adjusted on the multi information display...

Page 264: ...If equipped Meter control switches Turning the RCTA function on off When the RCTA function is disabled the RCTA OFF indicator illuminates Outside rear view mirror indica tors When a vehicle approaching from the right or left at the rear of the vehicle is detected both outside rear view mirror indicators will flash Audio system display If a vehicle approaching from the right RCTA Rear Cross Traffic...

Page 265: ...be difficult to see Hearing the RCTA buzzer The RCTA buzzer may be difficult to hear over loud noises such as if the audio system volume is high When Rear Cross Traffic Alert Unavailable is shown on the multi information display Water snow mud etc may be attached to the rear bumper around the sensors P 253 Removing the water snow mud etc from the attached to the rear bumper around the sensors to n...

Page 266: ...ar view mirror indicators and sounding a buzzer Approaching vehicles Detection areas of approaching vehicles RCTA icon display When a vehicle approaching from the right or left at the rear of the vehicle is detected the following will be displayed on the audio sys tem display Toyota parking assist monitor Vehicles are approaching from both sides of the vehicle RCTA function detection areas The are...

Page 267: ...A mute button will be displayed on the multi information display when an object is detected To mute the buzzer press The buzzers for the Toyota parking assist sensor and RCTA function will be muted simultaneously Mute will be canceled automatically in the following situations When the shift lever is changed When the vehicle speed exceeds a certain speed When the operating function is tempo rarily ...

Page 268: ...roaching the rear of your vehicle rapidly When a towing eyelet is installed to the rear of the vehicle When backing up on a slope with a sharp change in grade When backing out of a shallow angle parking spot Immediately after the RCTA function is turned on Immediately after the hybrid system is started with the RCTA function on When the sensors cannot detect a vehicle due to obstructions Instances...

Page 269: ...ough moderate throttle characteristics and by controlling the operation of the air conditioning system heating cooling When the Eco drive mode is selected Eco drive mode indicator comes on Operation of the air conditioning system in Eco drive mode Eco drive mode controls the heat ing cooling operations and fan speed of the air conditioning system to enhance fuel efficiency To improve air condition...

Page 270: ... roads Active Cornering Assist ACA Helps to prevent the vehicle from drifting to the outer side by perform ing inner wheel brake control when attempting to accelerate while turn ing Hill start assist control Helps to reduce the backward movement of the vehicle when starting on an uphill EPS Electric Power Steering Employs an electric motor to reduce the amount of effort needed to turn the steering...

Page 271: ...n vehicles with PCS Pre Collision System PCS will also be disabled only Pre Collision warning is availa ble The PCS warning light will come on and a message will be displayed on the multi information display P 211 When the message is displayed on the multi information display show ing that TRC has been disabled even if the switch has not been pressed TRC is temporary deactivated If the information...

Page 272: ...PS operation sound When the steering wheel is operated a motor sound whirring sound may be heard This does not indicate a malfunc tion Automatic reactivation of TRC and VSC systems After turning the TRC and VSC systems off the systems will be automatically re enabled in the following situations When the power switch is turned off If only the TRC system is turned off the TRC will turn on when vehic...

Page 273: ...or slick roads Stopping distance when the ABS is operating may exceed that of normal conditions The ABS is not designed to shorten the vehicle s stopping distance Always maintain a safe distance from the vehicle in front of you especially in the following situations When driving on dirt gravel or snow covered roads When driving with tire chains When driving over bumps in the road When driving over...

Page 274: ...unless necessary Replacing tires Make sure that all tires are of the specified size brand tread pattern and total load capacity In addition make sure that the tires are inflated to the recommended tire inflation pres sure level The ABS TRC and VSC systems will not function correctly if different tires are installed on the vehicle Contact your Toyota dealer for further information when replacing ti...

Page 275: ...ur vehicle smoothly Avoid abrupt acceleration and deceleration Gradual accelera tion and deceleration will make more effective use of the electric motor traction motor without having to use gasoline engine power Avoid repeated acceleration Repeated acceleration con sumes hybrid battery traction battery power resulting in poor fuel consumption Battery power can be restored by driving with the accel...

Page 276: ...he gasoline engine will not automatically cut out until it and the interior of the vehicle are warm it will consume fuel Also fuel consumption can be improved by avoiding overuse of the heater Make sure to check the tire inflation pressure frequently Improper tire inflation pressure can cause poor fuel economy Also as snow tires can cause large amounts of friction their use on dry roads can lead t...

Page 277: ...ed limit or the speed limit specified for the snow tires being used Use snow tires on all not just some wheels Driving with tire chains Observe the following precautions to reduce the risk of accidents Failure to do so may result in the vehi cle being unable to be driven safely and may cause death or serious injury Do not drive in excess of the speed limit specified for the tire chains being used ...

Page 278: ...the shift lever to P without setting the parking brake The parking brake may freeze up preventing it from being released If the vehicle is parked without setting the park ing brake make sure to block the wheels Failure to do so may be danger ous because it may cause the vehicle to move unexpectedly possibly leading to an accident If the vehicle is parked without setting the parking brake con firm ...

Page 279: ...ling and removing chains Install and remove tire chains in a safe location Install tire chains on the front tires only Do not install tire chains on the rear tires Install tire chains on the front tires as tightly as possible Retighten chains after driving 0 5 1 0 km 1 4 1 2 mile Install tire chains following the instruc tions provided with the tire chains Regulations on the use of tire chains NOT...

Page 280: ...278 COROLLA HV_ 国瑞 _GE 4 6 Driving tips COROLLA HYBRID_OM_General_OM12M44E ...

Page 281: ...xternal device Listening to an iPod 293 Listening to USB memory device 298 Using the AUX port 302 5 6 Using Bluetooth devices Bluetooth audio phone 303 Using the steering wheel switches 308 Register a Bluetooth device 308 5 7 SETUP menu Using the SETUP menu Bluetooth menu 310 Using the SETUP menu PHONE menu 312 5 8 Bluetooth Audio Operating a Bluetooth ena bled portable player 316 5 9 Bluetooth Ph...

Page 282: ... multimedia system CD player with AM FM radio Using cellular phones Interference may be heard through the audio system s speakers if a cellular phone is being used inside or close to the vehicle while the audio system is operating Audio system types Overview NOTICE To prevent 12 volt battery discharge Do not leave the audio system on longer than necessary with the hybrid system is stopped To avoid...

Page 283: ... and hold until you hear a beep Select a folder or album MP3 WMA AAC disc USB or Bluetooth audio Changing the audio source Press the MODE switch when the audio system is turned on The audio source changes as follows each time the button is pressed If a mode cannot be used it will be skipped AM FM CD or MP3 WMA AAC iPod or USB mem ory Bluetooth audio AUX Using the steering wheel audio switches Some...

Page 284: ...nnect the portable audio player Turn on the power of the portable audio player if it is not turned on AUX port The AUX port only supports audio input AUX port USB port Connect an iPod USB memory device or portable audio player to the AUX port USB port as indicated below Press the MODE button to select iPod USB or AUX Type A Type B Connecting using the AUX port USB port WARNING While driving Do not...

Page 285: ... is selected again Changing sound quality modes 1 Press the TUNE SELECT knob 2 Turn the knob to select Sound setting 3 Press the knob 4 Turn the knob as corresponds to the desired mode BASS TREBLE FADER BAL ANCE or ASL can be selected 5 Press the knob Adjusting sound quality Turning the TUNE SELECT knob adjusts the level Optimal use of the audio system The sound quality volume bal ance and ASL set...

Page 286: ...nob to change the amount of ASL LOW MID HIGH or OFF can be selected ASL automatically adjusts the volume and tone quality according to vehicle speed Press the knob or BACK to return to the sound setting menu Front rear vol ume balance FADER R7 to F7 Shifts to rear Shifts to front Left right vol ume balance BALANCE L7 to R7 Shifts to left Shifts to right Sound quality mode Mode displayed Level Turn...

Page 287: ... the desired stations by turning the TUNE SELECT knob or pressing the SEEK or TRACK button 2 Press and hold one of the sta tion selectors to be set until you hear a beep Reception sensitivity Maintaining perfect radio reception at all times is difficult due to the continu ally changing position of the antenna differences in signal strength and sur Radio operation Press the MODE button until AM or ...

Page 288: ...286 COROLLA HV_ 国瑞 _GE 5 3 Using the radio rounding objects such as trains transmitters etc The radio antenna is mounted on the roof COROLLA HYBRID_OM_General_OM12M44E ...

Page 289: ...e volume Displaying text message Changing the audio source playback Displaying track folder list Selecting a folder MP3 WMA AAC discs only Repeat play Random play or back button TUNE SELECT knob Selecting a track file Pause playback Selecting a track fast forwarding or rewinding CD player operation Insert a disc press the MODE button to begin listening to a CD Control panel COROLLA HYBRID_OM_Gener...

Page 290: ... Repeat play Press RPT To cancel press RPT again Switching the display Press TEXT to display or hide the CD title If there are continuing texts is dis played Press and hold TEXT until you hear a beep to display the remaining texts Selecting folders one at a time Press FOLDER or FOLDER to select the desired folder Selecting a folder and file from folder list 1 Press TUNE SELECT knob or LIST The fol...

Page 291: ...r may not be displayed at all Error messages If an error message is displayed refer to the following table and take the appro priate measures If the problem is not rectified take the vehicle to your Toyota dealer Discs that can be used Discs with the marks shown below can be used Playback may not be possible depend ing on recording format or disc features or due to scratches dirt or deterioration ...

Page 292: ...dia for mats recorded by them that can be used MP3 file compatibility Compatible standards MP3 MPEG1 LAYER3 MPEG2 LSF LAYER3 Compatible sampling frequencies MPEG1 LAYER3 32 44 1 48 kHz MPEG2 LSF LAYER3 16 22 05 24 kHz Compatible bit rates compatible with VBR MPEG1 LAYER3 32 320 kbps MPEG2 LSF LAYER3 8 160 kbps Compatible channel modes stereo joint stereo dual channel and monau ral WMA file compati...

Page 293: ...dded to AAC files making it possible to record the track title and artist name in the same way as with ID3 tags MP3 WMA and AAC playback When a disc containing MP3 WMA or AAC files is inserted all files on the disc are first checked Once the file check is finished the first MP3 WMA or AAC file is played To make the file check finish more quickly we recommend you do not write in any files other tha...

Page 294: ...isc insert eject function Discs that have a diameter that is not 12 cm 4 7 in Low quality and deformed discs Discs with a transparent or translu cent recording area Discs that have tape stickers or CD R labels attached to them or that have had the label peeled off Player precautions Failure to follow the precautions below may result in serious damage to the discs or the player itself Do not insert...

Page 295: ...nging the audio source playback Displaying a song list Displaying play mode Repeat play Random play or back button TUNE SELECT knob Press Displaying list of the current folder Turn Selecting an iPod menu song Listening to an iPod Connecting an iPod enables you to enjoy music from the vehicle speakers Press the MODE button until iPod is displayed Connecting an iPod Control panel COROLLA HYBRID_OM_G...

Page 296: ...t the same procedure to select the desired item To return to the previous selection list press BACK Press PLAY to play the desired selection Turn the TUNE SELECT knob or press the SEEK or TRACK button to select the desired song Selecting a play mode Play mode First selection Second selection Third selection Fourth selection Playlists Playlists select Songs select Artists Artists select Albums sele...

Page 297: ...ct s identified in the badge and has been certified by the developer to meet Apple performance standards Apple is not responsible for the operation of this device or its com pliance with safety and regulatory standards Please note that the use of this accessory with an Apple product may affect wireless performance iTunes U iPod iPod touch iPod nano and iPhone are trademarks of Apple Inc registered...

Page 298: ...uch 6th generation iPod touch 5th generation iPod nano 7th generation This system only supports audio play back Depending on differences between models or software versions etc some models might be incompatible with this system Message Cause Correction procedures iPod ERROR This indicates that the data in the iPod cannot be read ERROR 3 This indicates that the iPod may be malfunctioning ERROR 4 Th...

Page 299: ...y NOTICE To prevent damage to iPod Do not leave iPod in the vehicle The temperature inside the vehicle may become high resulting in dam age to the iPod Do not push down on or apply unnecessary pressure to the iPod while it is connected as this may damage the iPod or its terminal Do not insert foreign objects into the port as this may damage the iPod or its terminal COROLLA HYBRID_OM_General_OM12M4...

Page 300: ...e audio source playback Displaying folder list Selecting a folder Repeat play Random play or back button TUNE SELECT knob Selecting a file Pause playback Listening to USB memory device Connecting a USB memory enables you to enjoy music from the vehicle speakers Press the MODE button until USB is dis played Connecting a USB memory Control panel COROLLA HYBRID_OM_General_OM12M44E ...

Page 301: ...es modes in the following order File repeat Folder repeat Off Available except when RDM ran dom play is selected Switching the display Press TEXT to display or hide the album title If there are continuing texts is dis played Press and hold TEXT until you hear a beep to display the remaining texts USB memory functions Depending on the USB memory that is connected to the system the device itself may...

Page 302: ... a Microsoft audio compression format This format compresses audio data to a size smaller than that of the MP3 format AAC is short for Advanced Audio Cod ing and refers to an audio compression technology standard used with MPEG2 and MPEG4 There is a limit to the MP3 WMA and AAC file standards and to the media for mats recorded by them that can be used MP3 file compatibility Compatible standards MP...

Page 303: ...ing MP3 WMA or AAC files is connected all files in the USB memory device are checked Once the file check is finished the first MP3 WMA or AAC file is played To make the file check finish more quickly we recommend that you do not include any files other than MP3 WMA or AAC files or create any unnecessary folders When the USB device is connected and the audio source is changed to USB memory mode the...

Page 304: ...prevent damage to USB mem ory Do not leave USB memory in the vehicle The temperature inside the vehicle may become high resulting in damage to the USB memory Do not push down on or apply unnecessary pressure to the USB memory while it is connected as this may damage the USB memory or its terminal Do not insert foreign objects into the port as this may damage the USB memory or its terminal Using th...

Page 305: ... the Bluetooth device to be used with audio system P 308 2 Select the Bluetooth device to be used P 310 312 3 Set automatic connection of the device P 311 4 Check Bluetooth connection condition P 303 To be used for audio P 316 To be used for hands free phone P 318 Off hook button Turns the hands free system on starts a call On hook button Turns the hands free system off ends a call refuses a call ...

Page 306: ...ion If BT is not displayed the Bluetooth audio phone cannot be used Display A message name number etc is dis played Microphone To enter a menu press the TUNE SELECT knob and navigate menus by using the knob Menu list of the Bluetooth audio phone COROLLA HYBRID_OM_General_OM12M44E ...

Page 307: ...List audio Listing the regis tered portable play ers P 310 Passkey Changing the passkey P 311 BT power ON BT power OFF Setting automatic connection of the device on or off P 311 Bluetooth info Device name Device address Displaying the device status P 311 Display setting ON Display setting OFF Setting the auto matic connection confirmation display to on or off P 311 Initialize Initializing the set ...

Page 308: ...e contacts Deleting a contact stored in the phonebook P 313 Sort contacts Sorting contacts by the first name or last name field P 313 Transfer history Transferring the call histories P 313 Delete call history Deleting a number stored in the call history P 313 Favorites Add favorites Adding a new con tact to the favorite list P 314 Delete favorites Deleting a contact from the favorite list P 314 HF...

Page 309: ... COROLLA HV_ 国瑞 _GE 5 6 Using Bluetooth devices Audio system Bluetooth audio phone system functions Depending on the Bluetooth device certain functions may not be available COROLLA HYBRID_OM_General_OM12M44E ...

Page 310: ...e 3 SSP Secure Simple Pairing compatible Bluetooth devices Select Yes to register the device Depending on the type of device it may register auto matically If a Bluetooth device has both music player and cellular phone functions both functions will be registered at the same time When deleting the device both functions will be deleted at the same time If the off hook button is pressed and the PHONE...

Page 311: ...309 5 COROLLA HV_ 国瑞 _GE 5 6 Using Bluetooth devices Audio system when no phones have been regis tered the registration screen will be automatically displayed COROLLA HYBRID_OM_General_OM12M44E ...

Page 312: ... to be disconnected using the TUNE SELECT knob 2 Select Disconnect using the knob 3 Press YES Select List audio using the TUNE SELECT knob The list of registered portable players will be displayed Connecting the registered porta ble player to the audio system 1 Select the name of the portable player to be connected using the TUNE SELECT knob 2 Select Select using the knob Deleting the registered p...

Page 313: ... to be registered has 8 digits pressing ENTER is not nec essary If BT power OFF is set to on the registered device will be connected automatically when the power switch is turned to ACC or OFF Select BT power ON or BT power OFF using the TUNE SELECT knob Select Bluetooth info using the TUNE SELECT knob Displaying the device name Select Device name using the TUNE SELECT knob Displaying the device a...

Page 314: ...s YES The automatic transfer function is available for PBAP compatible Bluetooth phones only 1 Select Phonebook using the TUNE SELECT knob 2 Select Auto transfer ON or Auto transfer OFF using the knob When set to on the phone s contact data and history are automatically transferred 1 Select Phonebook using the TUNE SELECT knob 2 Select Add contacts using the knob Transferring all contacts from the...

Page 315: ...s only 1 Select Phonebook using the TUNE SELECT knob 2 Select Transfer history using the knob and press YES 1 Select Phonebook using the TUNE SELECT knob 2 Select Delete call history using the knob Deleting outgoing call history 3 Select Outgoing calls using the TUNE SELECT knob 4 Select the desired phone num ber using the knob and press YES To delete all outgoing call history data press ALL and t...

Page 316: ...the regis tered names in alphabetical order of the initial 5 Select desired contact using the knob Registering the contacts from the PHONE mode 1 Press the off hook button 2 Select Phonebook All calls Missed calls Incoming calls or Outgoing calls using the TUNE SELECT knob 3 Select a desired number using the knob 4 Press Add favorites When 15 contacts have already been registered to the favorites ...

Page 317: ...tting using the TUNE SELECT knob 2 Select Ringtone volume using the knob 3 Change the ring tone volume To decrease the volume Turn the knob counterclockwise To increase the volume Turn the knob clockwise To set the volume press BACK 1 Select HF sound setting using the TUNE SELECT knob 2 Select Ringtone using the knob 3 Using the knob select a ring tone 1 3 or From phone To set the selected ring to...

Page 318: ...ce playback Displaying play mode Selecting an album Repeat play Random play or back button TUNE SELECT knob Press Displaying list of the current folder Turn Selecting an item Pause playback Selecting a track fast forwarding or rewinding Press FOLDER or FOLDER to select desired album Operating a Bluetooth enabled portable player Control panel Selecting an album COROLLA HYBRID_OM_General_OM12M44E ...

Page 319: ...UNE SELECT knob to display the folder file list 3 Press the knob to select the desired item 4 Repeat the same procedure to select the desired file To return to the previous display press BACK Press TEXT to display or hide the album title If there are continuing texts is dis played Press and hold TEXT until you hear a beep to display the remaining texts Bluetooth audio system functions Depending on...

Page 320: ...r using the TUNE SELECT knob 2 Enter the phone number and press the off hook switch 1 Select All calls Missed calls Incoming calls or Outgoing calls using the TUNE SELECT knob 2 Select a desired number using the knob and press the off hook button The following operations can be performed Registering a number as a Favorite P 314 Deleting the selected number Press DELETE and press YES Making a phone...

Page 321: ...ate the cellular phone Refer to the manual that comes with the cellular phone for the operation of the phone b Press PHONE This operation can be performed only when transferring a call from the cel lular phone to the system during a call Press MUTE Press UNMUTE to cancel the mute This operation cannot be performed while driving 1 Press 0 9 2 Turn the TUNE SELECT knob to select the desired number 3...

Page 322: ...lume Turn the POWER VOLUME knob counterclockwise To increase the volume Turn the POWER VOLUME knob clock wise When talking on the phone Do not talk simultaneously with the other party Keep the volume of the received voice down Otherwise voice echo will increase Automatic volume adjustment When vehicle speed is 80 km h 50 mph or more the volume automatically increases The volume returns to the prev...

Page 323: ...e with all Bluetooth devices When transferring ownership of the vehicle Be sure to initialize the system to prevent personal data from being improperly accessed P 311 About Bluetooth Bluetooth is a registered trademark of Bluetooth SIG Inc Compatible models The Bluetooth audio system sup ports portable audio players with the following specifications Bluetooth specifications Ver 1 1 or higher Recom...

Page 324: ...th Bluetooth antennas People with implantable cardiac pacemakers cardiac resynchronization ther apy pacemakers or implantable cardioverter defibrillators should maintain a reasonable distance between themselves and the Bluetooth antennas The radio waves may affect the operation of such devices Before using Bluetooth devices users of any electrical medical device other than implantable car diac pac...

Page 325: ...oning system and defogger Automatic air conditioning sys tem 324 6 2 Using the interior lights Interior lights list 331 6 3 Using the storage features List of storage features 334 Trunk features 337 6 4 Other interior features Other interior features 338 COROLLA HYBRID_OM_General_OM12M44E ...

Page 326: ...speed control switch A C switch S FLOW mode switch Outside recirculated air mode switch Eco air conditioning mode switch Airflow mode control switch Rear window defogger switch Windshield defogger switch Off switch Automatic mode switch Automatic air conditioning system Air outlets are automatically selected and fan speed is automatically adjusted according to the set temperature setting Also the ...

Page 327: ...low mode control switch S FLOW mode switch Outside recirculated air mode switch A C switch DUAL switch Adjusting the temperature set ting To adjust the temperature setting turn the temperature control switch clockwise warm or counterclockwise cool If A C switch is not pressed the sys tem will blow ambient temperature air or heated air Setting the fan speed Vehicles without DUAL mode air conditioni...

Page 328: ...humidifica tion function Press the A C switch When the function is on the indicator illuminates on the A C switch Defogging the windshield Defoggers are used to defog the windshield and front side windows Press the windshield defogger switch Change the air mode to outside air mode if it is currently set to recirculated air mode The mode may change auto matically To defog the windshield and the sid...

Page 329: ...ated air mode will also cool the vehi cle interior effectively Outside recirculated air mode may automatically switch depending on the temperature setting or the inside tem perature Eco air conditioning mode When Eco drive mode is selected using the driving mode select switch eco air conditioning mode turns on When a drive mode other than Eco drive mode is selected eco air conditioning mode may tu...

Page 330: ...onditions Therefore the fan may stop for a while until warm or cool air is ready to flow immediately after the automatic mode switch pressed To turn on the DUAL mode per form any of the following proce dures Press the DUAL switch Adjust the front passenger s side temperature setting The indicator on the DUAL switch comes on when the DUAL mode is on Pressing the DUAL switch when in DUAL mode will d...

Page 331: ...d opening and closing the air outlets Front center Direct air flow to the left or right up or down Front right hand side 1 Direct air flow to the left or right up or down 2 Open the vent 3 Close the vent Front left hand side 1 Direct air flow to the left or right up or down 2 Close the vent 3 Open the vent Rear center 1 Direct air flow to the left or right Air outlet layout and opera tions COROLLA...

Page 332: ...b to open or close the vents WARNING To prevent the windshield defog ger from operating improperly Do not place anything on the instru ment panel which may cover the air outlets Otherwise air flow may be obstructed preventing the windshield defoggers from defogging COROLLA HYBRID_OM_General_OM12M44E ...

Page 333: ...ped Front personal lights front interior lights vehicles with a moon roof Center tray light if equipped Cup holder lights if equipped Door courtesy lights if equipped Front vehicles with a moon roof 1 Turns the door position on off Interior lights list Location of the interior lights Operating the interior lights COROLLA HYBRID_OM_General_OM12M44E ...

Page 334: ...ed To prevent the 12 volt battery from being discharged If the interior lights remain on when the power switch is turned off the lights will go off automatically after 20 minutes The interior lights may turn on automatically when If any of the SRS airbags deploy inflate or in the event of a strong rear impact the interior lights will turn on automati cally The interior lights will turn off automat...

Page 335: ...V_ 国瑞 _GE 6 2 Using the interior lights Interior features NOTICE To prevent 12 volt battery dis charge Do not leave the lights on longer than necessary when the hybrid system is off COROLLA HYBRID_OM_General_OM12M44E ...

Page 336: ...NING Items that should not be left in the storage spaces Do not leave glasses lighters or spray cans in the storage spaces as this may cause the following when cabin temperature becomes high Glasses may be deformed by heat or cracked if they come into contact with other stored items Lighters or spray cans may explode If they come into contact with other stored items the lighter may catch fire or t...

Page 337: ... box closed In the event of sudden braking or sudden swerving an accident may occur due to an occupant being struck by the open glove box or the items stored inside Cup holders WARNING Items unsuitable for the cup holder Do not place anything other than cups or beverage cans in the cup holders Other items may be thrown out of the holders in the event of an accident or sudden braking and cause inju...

Page 338: ...rs The contents may spill and glasses may break Console box WARNING Caution while driving Keep the console box closed Injuries may result in the event of an accident or sudden braking Open tray vehicles without a wireless charger WARNING Caution while driving Observe the following precautions when putting items in the open tray Failure to do so may cause items to be thrown out of the tray in the e...

Page 339: ...337 6 COROLLA HV_ 国瑞 _GE 6 3 Using the storage features Interior features Lift the deck mat Type A Type B Trunk features Auxiliary box if equipped COROLLA HYBRID_OM_General_OM12M44E ...

Page 340: ...the vehicle has been parked in the sun About connected external device Depending on the connected external device charging may occasionally be suspended and then start again This is not a malfunction The power outlet can be used for 12 V accessories that run on less than 10 A Open the console box lid and open the lid Other interior features USB charging port if equipped NOTICE To prevent damage to...

Page 341: ...le device that is larger than the charging area Addi tionally depending on the portable device the wireless charger may not operate properly Refer to the operation manual of the portable device The Qi symbol The Qi symbol is a trademark of the Wireless Power Consortium Name for all parts Power supply switch Operation indicator light Charge area NOTICE To prevent the fuse from being blown Do not us...

Page 342: ...Recharging function If a certain amount of time has elapsed since charging com pleted and the portable device has not been moved the wire less charger will restart charging If the portable device is moved within the charging area charg ing will stop temporarily then restart Operation indicator light status Depending on the portable device the operation indicator light may stay illumi nated orange ...

Page 343: ... reduced When the frequency is changed the operation indicator light will blink orange 2 times Charging precautions If the electronic key cannot be detected in the cabin charging cannot be performed When a door is opened and closed charging may be tempo rarily suspended While charging the wireless charger and the portable device will become warm This is not a malfunction If a portable device becom...

Page 344: ...hile charging Do not attempt to charge portable devices which are not compatible with the Qi wireless charging stand ard Do not disassemble modify or remove the wireless charger Do not apply force or impact to the wireless charger NOTICE Conditions in which the wireless charger may not operate cor rectly In the following situations the wire less charger may not operate cor rectly When a portable d...

Page 345: ... malfunctioning Contact your Toyota dealer To prevent failure or damage to data Do not bring magnetic cards such as a credit card or magnetic recording media close to the wire less charger while charging Other wise data may be erased due to the influence of magnetism Additionally do not bring precision instruments such as wrist watches close to the wireless charger as such objects may malfunction ...

Page 346: ...ith the rear assist grips NOTICE To prevent damage to the arm rest Do not apply too much load on the armrest Rear sunshade if equipped NOTICE To ensure normal operation of the sunshade Do not place anything where it may hinder the opening closing of the shade Do not place anything on the shade Assist grips WARNING Assist grip Do not use the assist grip when get ting in or out of the vehicle or ris...

Page 347: ...hat cannot be hung on the coat hook vehicles with SRS curtain shield airbags Do not hang coat hangers or other hard or sharp objects on the hook If the SRS curtain shield airbags deploy these items may become projectiles causing death or serious injury COROLLA HYBRID_OM_General_OM12M44E ...

Page 348: ...346 COROLLA HV_ 国瑞 _GE 6 4 Other interior features COROLLA HYBRID_OM_General_OM12M44E ...

Page 349: ...duled maintenance 356 7 3 Do it yourself maintenance Do it yourself service precau tions 361 Hood 363 Positioning a floor jack 364 Engine compartment 365 Tires 372 Tire inflation pressure 379 Wheels 381 Air conditioning filter 383 Cleaning the hybrid battery traction battery air intake vent and filter 384 Wireless remote control elec tronic key battery 388 Checking and replacing fuses 391 Light bu...

Page 350: ... the door handle becomes wet while the electronic key is within the effective range the door may lock and unlock repeatedly In that case follow the fol lowing correction procedures to wash the vehicle Place the key in a position 2 m 6 ft or more separate from the vehicle while the vehicle is being washed Take care to ensure that the key is not stolen Set the electronic key to battery sav ing mode ...

Page 351: ...ciently as touching a hot exhaust pipe can cause burns Precaution regarding the rear bumper with Blind Spot Monitor if equipped If the paint of the rear bumper is chipped or scratched the system may malfunction If this occurs consult your Toyota dealer NOTICE To prevent paint deterioration and corrosion on the body and components aluminum wheels etc Wash the vehicle immediately in the following ca...

Page 352: ...ear view monitor sys tem When washing the vehicle do not spray the camera or its sur rounding area directly with a high pressure washer Shock applied from high pressure water may cause the device to not operate normally Do not bring the nozzle tip close to boots rubber or resin manufac tured cover connectors or the fol lowing parts The parts may be damaged if they come into contact with high press...

Page 353: ... Do not splash or spill liquid in the vehicle such as on the floor in the hybrid battery traction battery air intake vent and in the trunk P 351 Doing so may cause the hybrid bat tery electrical components etc to malfunction or catch fire Do not get any of the SRS compo nents or wiring in the vehicle interior wet P 37 An electrical malfunction may cause the airbags to deploy or not function proper...

Page 354: ...move any dust or dirt from leather surfaces immediately Do not expose the vehicle to direct sunlight for extended periods of time Park the vehicle in the shade especially during summer Do not place items made of vinyl plastic or containing wax on the upholstery as they may stick to the leather surface if the vehicle interior heats up significantly Water on the floor Do not wash the vehicle floor w...

Page 355: ...a Caring for leather areas Toyota recommends cleaning the inte rior of the vehicle at least twice a year to maintain the quality of the vehicle s inte rior Remove dirt and dust using a vacuum cleaner Wipe it off with a soft cloth damp ened with neutral detergent diluted to approximately 1 Wring out any excess water from the cloth and thoroughly wipe off remaining traces of detergent and water Clea...

Page 356: ...es for cooling and heater system brake system and fuel system should be inspected by a qualified tech nician according to the Toyota mainte nance schedule Rubber hoses are particularly important maintenance items Have any deterio rated or damaged hoses replaced immediately Note that rubber hoses will deteriorate with age resulting in swelling chafing or cracking What about do it yourself mainte na...

Page 357: ...How ever water dripping from the air con ditioning system after use is normal Change in exhaust sound This may indicate a dangerous carbon monox ide leak Drive with the windows open and have the exhaust system checked immediately Flat looking tires excessive tire squeal when cornering uneven tire wear Vehicle pulls to one side when driven straight on a level road Strange noises related to suspensi...

Page 358: ...hedule See Maintenance schedule A Road Conditions 1 Operating on rough or muddy roads or roads with melted snow 2 Operating on dusty roads Roads in areas where their pavement rate is low or a cloud of dust often arises and the air is dry B Driving Conditions 1 Heavily loaded vehicle For example using a car top carrier and so forth 2 Repeated short trips less than 8 km 5 miles and outside temperatu...

Page 359: ...erter coolant See note3 I I 6 Exhaust pipes and mountings I I I I 12 IGNITION SYSTEM 7 Spark plugs Replace every 100000 km 60000 miles 8 12 volt battery I I I I I I I I 12 FUEL AND EMISSION CONTROL SYSTEMS 9 Fuel filter See note 4 R 96 10 Air cleaner filter I R I R I 24 R 48 11 Fuel tank cap fuel lines con nections and fuel vapor control valve See note 1 I I 24 12 Charcoal canister I I 24 CHASSIS ...

Page 360: ...out line see Maintenance schedule requirements 17 Steering wheel linkage and steering gear box I I I I 12 18 Drive shaft boots I I I I 24 19 Suspension ball joints and dust covers I I I I 12 20 Hybrid transmission fluid including front differential I I 24 21 Front and rear suspension I I I I 12 22 Tires and inflation pressure I I I I I I I I 6 23 Lights horns wipers and wash ers I I I I I I I I 6 ...

Page 361: ...ent rate is low or a cloud of dust often arises and the air is dry Replacement of engine oil Every 5000 km 3000 miles or 6 months Replacement of engine oil filter Every 5000 km 3000 miles or 6 months Inspection or replacement of air cleaner filter I Every 2500 km 1500 miles or 3 months R Every 40000 km 24000 miles or 48 months Inspection of brake pads and discs Every 5000 km 3000 miles or 3 months...

Page 362: ... or 6 months Replacement of engine oil filter Every 5000 km 3000 miles or 6 months B 3 Extensive idling and or low speed driving for a long distance such as police professional private use like taxi or door to door delivery use Replacement of engine oil Every 5000 km 3000 miles or 6 months Replacement of engine oil filter Every 5000 km 3000 miles or 6 months Cleaning of hybrid battery traction bat...

Page 363: ...nuine Motor Oil or equivalent Rag or paper towel Funnel used only for adding engine oil Fuses P 391 Fuse with same amperage rating as original Hybrid bat tery traction battery air intake vent P 384 Vacuum cleaner etc Phillips screwdriver Light bulbs P 393 Bulb with same num ber and wattage rating as original Flathead screwdriver Wrench Radiator and condenser P 368 Tire inflation pressure P 379 Tir...

Page 364: ...ands or in your eyes flush the affected area with clean water immediately If you still experience discomfort consult a doctor When working near the electric cooling fans or radiator grille Be sure the power switch is OFF With the power switch in ON the electric cooling fans may automati cally start to run if the air conditioning is on and or the coolant temperature is high P 368 Safety glasses Wea...

Page 365: ...ood is fully closed and locked If the hood is not locked properly it may open while the vehicle is in motion and cause an accident which may result in death or serious injury After installing the support rod into the slot Make sure the rod supports the hood securely preventing it from falling down onto your head or body NOTICE When closing the hood Be sure to return the support rod to its clip bef...

Page 366: ... a floor jack follow the instructions in the manual provided with the jack and per form the operation safely When raising your vehicle with a floor jack position the jack correctly Improper placement may damage your vehicle or cause injury Location of the jack point COROLLA HYBRID_OM_General_OM12M44E ...

Page 367: ...pstick P 366 Engine oil filler cap P 366 Air cleaner P 371 Power control unit coolant reservoir P 367 12 volt battery P 368 Radiator P 368 Condenser P 368 Electric cooling fans With the engine at operating tem perature and turned off check the oil level on the dipstick Engine compartment Components Checking and adding the engine oil COROLLA HYBRID_OM_General_OM12M44E ...

Page 368: ...or engine 6 Wipe the dipstick and reinsert it fully Checking the oil type and pre paring the item needed Make sure to check the oil type and prepare the items needed before adding oil Engine oil selection P 454 Oil quantity Low Full 1 5 L 1 6 qt 1 3 Imp qt Item Clean funnel Adding engine oil If the oil level is below or near the low level mark add engine oil of the same type as that already in the...

Page 369: ...e FULL and LOW lines on the reservoir when the hybrid system is cold WARNING Used engine oil Used engine oil contains poten tially harmful contaminants which may cause skin disorders such as inflammation and skin cancer so care should be taken to avoid pro longed and repeated contact To remove used engine oil from your skin wash thoroughly with soap and water Dispose of used oil and filters only i...

Page 370: ... radiator and condenser and clear away any foreign objects If either of the above parts is extremely dirty or you are not sure of their condition have your vehicle inspected by your Toyota dealer Check the 12 volt battery as fol WARNING When the hybrid system is hot Do not remove the engine power con trol unit coolant reservoir caps The cooling system may be under pressure and may spray hot coolan...

Page 371: ...necting the charger cables to the 12 volt battery After recharging reconnecting the 12 volt battery vehicles with a smart entry start system Unlocking the doors using the smart entry start system may not be possi ble immediately after reconnecting the 12 volt battery If this happens use the wireless remote control or the mechanical key to lock unlock the doors Start the hybrid system with the powe...

Page 372: ...rotective safety glasses when working near the 12 volt bat tery Keep children away from the 12 volt battery Where to safely charge the 12 volt battery Always charge the 12 volt battery in an open area Do not charge the 12 volt battery in a garage or closed room where there is insufficient venti lation Emergency measures regarding electrolyte If electrolyte gets in your eyes Flush your eyes with cl...

Page 373: ...e turned off Adding the washer fluid WARNING When adding washer fluid Do not add washer fluid when the hybrid system is hot or operating as washer fluid contains alcohol and may catch fire if spilled on the engine etc NOTICE Do not use any fluid other than washer fluid Do not use soapy water or engine antifreeze instead of washer fluid Doing so may cause streaking on the vehicle s painted surfaces...

Page 374: ...ve wear on one side of the tread Check the spare tire condition and pressure if not rotated New tread Worn tread Treadwear indicator The location of treadwear indicators is shown by a TWI or mark etc molded into the sidewall of each tire WARNING To prevent inhaling dust Wear a respirator when using com pressed air to clean the air cleaner fil ter NOTICE To prevent damaging the engine Do not drive ...

Page 375: ...tires as snow tires is lost Checking the tire valves When replacing the tires check the tire valves for deformation cracks and other damage WARNING When inspecting or replacing tires Observe the following precautions to prevent accidents Failure to do so may cause damage to parts of the drive train as well as dangerous handling characteristics which may lead to an accident result ing in death or s...

Page 376: ...flation pressure checks The tire pressure warning system does not replace routine tire inflation pressure checks Make sure to check tire inflation pressure as part of your routine of daily vehicle checks Situations in which the tire pres sure warning system may not oper ate properly In the following cases the tire pres sure warning system may not operate properly If non genuine Toyota wheels are u...

Page 377: ...ons Near a TV tower electric power plant gas station radio station large dis play airport or other facility that gen erates strong radio waves or electrical noise When carrying a portable radio cellu lar phone cordless phone or other wireless communication device When the vehicle is parked the time taken for the warning to start or go off could be extended When tire inflation pressure declines rap...

Page 378: ...stem must be initialized Have tire pressure warning valves and transmitter ID codes regis tered by your Toyota dealer P 378 Replacing tires and wheels If the ID code of the tire pressure warn ing valve and transmitter is not regis tered the tire pressure warning system will not work properly After driving for about 10 minutes the tire pressure warning light blinks for 1 minute and stays on to indi...

Page 379: ...tch until the NOTICE Repairing or replacing tires wheels tire pressure warning valves transmitters and tire valve caps When removing or fitting the wheels tires or the tire pressure warning valves and transmitters contact your Toyota dealer as the tire pressure warning valves and transmitters may be damaged if not handled correctly Make sure to install the tire valve caps If the tire valve caps ar...

Page 380: ...roperly If repeated attempts to record tire inflation pressure settings are unsuccessful have the vehicle inspected by your Toyota dealer When operating the tire pressure warning reset switch the tire pressure warning light does not blink 3 times After driving for a certain period of time since the initialization has been completed the warning light comes on after blinking for 1 minute The tire pr...

Page 381: ...r Tire inflation pressure is specified on the label on the driver s side pil lar as shown Left hand drive vehicles Right hand drive vehicles Tire inflation pressure Make sure to maintain proper tire inflation pressure Tire inflation pressure should be checked at least once per month However Toyota rec ommends that tire inflation pressure be checked once every two weeks P 458 Tire loading informati...

Page 382: ...or the tire inflation pres sure to be higher after driving as heat is generated in the tire Do not reduce tire inflation pressure after driving Passengers and luggage weight should be placed so that the vehicle is balanced WARNING Proper inflation is critical to save tire performance Keep your tires properly inflated If the tires are not properly inflated the following conditions may occur which c...

Page 383: ...rate from the wheel or cause a loss of handling control Wheel selection WARNING When replacing wheels Do not use wheels that are a differ ent size from those recommended in the Owner s Manual as this may result in a loss of handling control Never use an inner tube in a leak ing wheel which is designed for a tubeless tire Doing so may result in an accident causing death or serious injury When insta...

Page 384: ...d wheels Doing so could cause the tire to leak air during driving possibly causing an accident NOTICE Replacing tire pressure warning valves and transmitters vehicles with a tire pressure warning sys tem Because tire repair or replacement may affect the tire pressure warning valves and transmitters make sure to have tires serviced by your Toyota dealer or other qualified ser vice shop In addition ...

Page 385: ...pointing up Checking interval Replace the air conditioning filter according to the maintenance sched ule P 356 In dusty areas or areas with heavy traffic flow early replacement may be required If air flow from the vents decreases dramatically The filter may be clogged Check the fil ter and replace if necessary Air conditioning filter with deodor izing function if equipped When fragrances are place...

Page 386: ...mage to the system To prevent damage to the filter cover When moving the filter cover in the direction of arrow to release the fit ting pay attention not to apply exces sive force to the claws Otherwise the claws may be damaged Cleaning the hybrid bat tery traction battery air intake vent and filter To prevent the fuel economy from being affected visually inspect the hybrid battery traction batter...

Page 387: ...o disengage the 3 claws starting from the claw in the upper right corner Pull the cover toward the front of the vehicle to remove it 4 Remove the air intake vent filter Disengage the claw as shown in the illustration Remove the filter from the cover 5 Remove the dust and clogs from the filter using a vacuum cleaner etc Make sure to also remove the dust and clogs from the inside of the air intake v...

Page 388: ... the air intake vent periodically Improper handling of the air intake vent cover and filter may result in damage to them If you have any con cerns about cleaning the filter contact your Toyota dealer If Maintenance Required for Trac tion Battery Cooling Parts See Owner s Manual is displayed on the multi information display If this warning message is displayed on the multi information display remov...

Page 389: ...n the cover is removed Carefully handle the removed filter so that it will not be damaged If the filter is damaged have it replaced with a new filter by your Toyota dealer Make sure to reinstall the filter and cover to their original positions after cleaning Do not install anything to the air intake vent other than the exclusive filter for this vehicle or use the vehi cle without the filter instal...

Page 390: ...ispose of used batteries according to local laws Vehicles without a smart entry start system 1 Remove the key cover To prevent damage to the key cover the tip of the flathead screwdriver with a rag 2 Remove the battery cover If the battery cover is difficult to remove lift the edge to remove it 3 Remove the depleted battery using a small flathead screw driver Insert a new battery with the termi Wi...

Page 391: ...ith the key and then press it straight into the key Make sure that the key cover is securely installed without any gaps between it and the key 6 Operate the or switch and check that the doors can be locked unlocked Vehicles with a smart entry start system 1 Release the lock and remove the mechanical key 2 Remove the key cover To prevent damage to the key cover the tip of the flathead screwdriver w...

Page 392: ...ren Failure to do so could result in death or serious injury Lithium battery precautions CAUTION RISK OF EXPLOSION IF BATTERY IS REPLACED BY AN INCORRECT TYPE DISPOSE OF USED BATTERIES ACCORDING TO THE INSTRUC TIONS NOTICE When replacing the battery Use a flathead screwdriver of appro priate size Applying excessive force may deform or damage the cover For normal operation after replacing the batte...

Page 393: ... ment panel left hand drive vehi cles Remove the lid Make sure to push the claw when removing installing the lid Under the passenger s side instrument panel right hand drive vehicles Remove the cover and then remove the lid Make sure to push the claw when removing installing the lid Checking and replacing fuses If any of the electrical compo nents do not operate a fuse may have blown If this hap p...

Page 394: ... Blown fuse Type B Normal fuse Blown fuse Type C Normal fuse Blown fuse Type D Normal fuse Blown fuse After a fuse is replaced When installing the lid make sure that the tab is installed securely If the lights do not turn on even after the fuse has been replaced a bulb may need replacement P 393 If the replaced fuse blows again have the vehicle inspected by your Toyota dealer If there is an overlo...

Page 395: ... damage to the vehicle and possibly a fire or injury Never use a fuse of a higher amperage rating than that indi cated or use any other object in place of a fuse Always use a genuine Toyota fuse or equivalent Never replace a fuse with a wire even as a temporary fix Do not modify the fuses or fuse boxes NOTICE Before replacing fuses Have the cause of electrical overload determined and repaired by y...

Page 396: ...ts bulb type tail lights bulb type rear turn sig nal lights bulb type and license plate lights consist of a number of LEDs If any of the LEDs burn out take your vehicle to your Toyota dealer to have the light replaced Condensation build up on the inside of the lens Temporary condensation build up on the inside of the headlight lens does not indicate a malfunction Contact your Toyota dealer for mor...

Page 397: ...y confirm that no light is leaking through the mounting Front turn signal lights bulb type 1 Turn the bulb base counterclockwise 2 Remove the light bulb 3 When installing reverse the steps listed Rear turn signal lights bulb type 1 Open the trunk lid 2 Insert a flathead screwdriver between the cover and the light assembly and pry up the cover to disengage the claws indi cated by a dotted line To p...

Page 398: ...pulling it straight back 5 Turn the bulb base counterclockwise 6 Remove the light bulb 7 When installing the light bulb install it by conducting steps 6 and 5 with the directions reversed 8 Install the light assembly and then install the 2 screws Align the guide and pin on the light assembly with the mounting when installing it 9 Install the cover COROLLA HYBRID_OM_General_OM12M44E ...

Page 399: ... the cover 2 Turn the bulb base counterclockwise and remove it 3 Remove the light bulb 4 When installing reverse the steps listed License plate lights 1 Open the trunk lid remove the clips and pull back the cover 2 Turn the bulb base counterclockwise 3 Remove the light bulb 4 When installing reverse the steps listed COROLLA HYBRID_OM_General_OM12M44E ...

Page 400: ...navoidable to hold the glass portion use and hold with a clean dry cloth to avoid getting moisture and oils on the bulb Also if the bulb is scratched or dropped it may blow out or crack Fully install light bulbs and any parts used to secure them Failure to do so may result in heat damage fire or water entering the light unit This may damage the lights or cause condensation to build up on the lens ...

Page 401: ... think something is wrong 406 If a warning light turns on or a warning buzzer sounds 408 If a warning message is dis played 417 If you have a flat tire vehicles without spare tire 419 If you have a flat tire vehicles with a spare tire 430 If the hybrid system will not start 439 If you lose your keys 440 If the electronic key does not operate properly 441 If the 12 volt battery is dis charged 443 I...

Page 402: ...tions of the collision 1 Steadily step on the brake pedal with both feet and firmly depress it Do not pump the brake pedal repeat edly as this will increase the effort required to slow the vehicle 2 Shift the shift lever to N If the shift lever is shifted to N 3 After slowing down stop the vehicle in a safe place by the road 4 Stop the hybrid system If the shift lever cannot be shifted to N 3 Keep...

Page 403: ... briefly 3 times or more in suc cession 5 Stop the vehicle in a safe place by the road WARNING If the hybrid system has to be turned off while driving Power assist for the steering wheel will be lost making the steering wheel heavier to turn Decelerate as much as possible before turning off the hybrid system Vehicles without a smart entry start system Never attempt to remove the key as doing so wi...

Page 404: ...merged in water remain calm and perform the following WARNING Using an emergency hammer for emergency escape The front side windows and rear side windows as well as the rear window can be shattered with an emergency hammer used for emergency escape However an emergency hammer can not shatter the wind shield as it is laminated glass Contact your Toyota dealer or aftermarket accessory manufac turer ...

Page 405: ... place excessive stress on the towing eyelets cables or chains The towing eyelets cables or chains may become damaged bro ken debris may hit people and cause serious damage Do not turn the power switch off There is a possibility that the steer ing wheel is locked and cannot be operated Installing towing eyelets to the vehicle Make sure that towing eyelets are installed securely If not securely ins...

Page 406: ...The vehicle makes an abnormal sound Do not tow with a sling type truck to prevent body damage From the front Release the parking brake From the rear Use a towing dolly under the front wheels If your vehicle is transported by a flatbed truck it should be tied down at the locations shown in the illus tration Situations when it is neces sary to contact dealers before towing Towing with a sling type t...

Page 407: ...uld only be attempted on hard surfaced roads for a short distance at under 30 km h 18 mph A driver must be in the vehicle to steer and operate the brakes The vehicle s wheels drive train axles steering and brakes must be in good condition 1 Take out the towing eyelet P 421 430 2 Remove the eyelet cover using a flathead screwdriver To protect the bodywork place a rag between the screwdriver and the...

Page 408: ...heel nut wrench Wheel nut wrench is installed in trunk P 421 430 Fluid leaks under the vehicle Water dripping from the air con ditioning after use is normal Flat looking tires or uneven tire wear Engine coolant temperature gauge needle continually points higher than normal Changes in exhaust sound Excessive tire squeal when cor nering Strange noises related to the suspension system Pinging or othe...

Page 409: ... 8 2 Steps to take in an emergency When trouble arises Vehicle pulls heavily to one side when driving on a level road Loss of brake effectiveness spongy feeling pedal almost touches the floor COROLLA HYBRID_OM_General_OM12M44E ...

Page 410: ...pected by your Toyota dealer Actions to the warning lights or warning buzzers Warning light Details Actions Red Indicates that The brake fluid level is low or The brake system is malfunctioning Immediately stop the vehicle in a safe place and contact your Toyota dealer Continuing to drive the vehicle may be dangerous Warning light Details Actions Yellow Indicates a malfunction in The regenerative ...

Page 411: ...Indicates a malfunction in the vehicle s charging system Immediately stop the vehicle in a safe place and contact your Toyota dealer Warning light Details Actions Indicates that the engine oil pressure is excessively low Immediately stop the vehicle in a safe place and contact your Toyota dealer Warning light Details Actions Indicates a malfunction in The hybrid system The electronic engine contro...

Page 412: ...n in The Brake Override System or The Drive Start Control Have the vehicle inspected by your Toyota dealer immedi ately Indicates that the shift position was changed and Drive Start Con trol was operated while depressing the accelerator pedal Momentarily release the accelerator pedal When a buzzer does not sound Indicates that the accelerator and brake pedals are being depressed simultaneously and...

Page 413: ...nfastened after 24 seconds the buzzer will sound inter mittently for 6 seconds Then if the seat belt is still unfastened the buzzer will sound in a different tone for 90 more seconds The front passenger s seat belt warning buzzer sounds to alert the front passenger that his or her seat belt is not fastened The buzzer sounds once if the vehicle reaches a speed of 20 km h 12 mph If the seat belt is ...

Page 414: ...ore seconds Tire pressure warning light LTA indicator LDA indicator warning buzzer Warning light Details Actions if equipped Warns the rear passengers to fasten their seat belts Fasten the seat belt Warning light Details Actions if equipped When the light comes on after blinking for approximately 1 minute Malfunction in the tire pressure warning system Have the system checked by your Toyota dealer...

Page 415: ... Cross Traffic Alert function Have the vehicle inspected by your Toyota dealer immedi ately Indicates that the rear bumper around the radar sensor is covered with dirt etc P 253 Follow the instructions displayed on the multi information display P 263 Warning light Details Actions Flashes or illu minates if equipped When a buzzer sounds simultaneously Indicates a malfunction has occurred in the PCS...

Page 416: ...tor lamp will go off after several trips If the malfunction indicator lamp does not go off contact your Toyota dealer as soon as possible Electric power steering system warning light warning buzzer When the 12 volt battery charge becomes insufficient or the voltage tem porarily drops the electric power steer ing system warning light may come on and the warning buzzer may sound Warning light Detail...

Page 417: ...h a tire pressure warning valve and trans mitter If a tire goes flat the tire pressure warning light will not turn off even though the flat tire has been replaced with the spare tire Replace the spare tire with the repaired tire and adjust the tire inflation pressure The tire pressure warning light will go off after a few min utes Vehicles with a full size spare tire The spare tire is also equippe...

Page 418: ...he nearest Toyota dealer Vehicles with emergency tire punc ture repair kit If the tire pressure warning light comes on even after tire inflation pressure adjustment it is probable that you have a flat tire Check the tires If a tire is flat repair the flat tire by using emergency tire puncture repair kit Avoid abrupt maneuvering and braking If the vehicle tires deteriorate you could lose control of...

Page 419: ...rotected Refrain from the Use of N Position is displayed This message may be displayed when the shift lever is in N As the hybrid battery traction battery cannot be charged when the shift lever is in N shift the shift lever to P when the vehicle is stopped If Traction Battery Needs to be Protected Shift into P to Restart is displayed Message is displayed when the remain ing charge for the hybrid b...

Page 420: ...rol if equipped If Radar Cruise Control Temporar ily Unavailable See Owner s Man ual is displayed if equipped The dynamic radar cruise control with full speed range system or dynamic radar cruise control system is sus pended temporarily or until the problem shown in the message is resolved causes and coping methods P 202 If Radar Cruise Control Unavaila ble is displayed if equipped The dynamic rad...

Page 421: ...ed by your Toyota dealer Stop the vehicle in a safe place on a hard flat surface Set the parking brake Shift the shift lever to P Stop the hybrid system Turn on the emergency flashers NOTICE If High Power Consumption Par tial Limit on AC Heater Opera tion is displayed frequently There is a possible malfunction relat ing to the charging system or the 12 volt battery may be deteriorating Have the ve...

Page 422: ...that cannot be repaired with the emergency tire puncture repair kit In the following cases the tire cannot be repaired with the emergency tire punc ture repair kit Contact your Toyota dealer When the tire is damaged due to driv ing without sufficient air pressure When there are any cracks or damage at any location on the tire such as on the side wall except the tread When the tire is visibly separ...

Page 423: ... arises Emergency tire puncture repair kit Towing eyelet Bottle Sticker Compressor Air pressure gauge Compressor switch Power plug Location of the emergency tire puncture repair kit and tools Emergency tire puncture repair kit components COROLLA HYBRID_OM_General_OM12M44E ...

Page 424: ...icle Do not use it for tires that a different size than the original ones or for any other purposes If the sealant gets on your clothes it may stain If the sealant adheres to a wheel or the surface of the vehicle body the stain may not be removable if it is not cleaned at once Immediately wipe away the sealant with a wet cloth During operation of the repair kit a loud operation noise is produced T...

Page 425: ...ed locations See step 10 2 Pull out the hose and power plug from the bottom side of the compressor 3 Connect the bottle to the com pressor Make sure to press the bottle until its claws are securely engaged to the compressor and no longer visible 4 Connect the hose to the bottle Make sure to insert the hose until its claw is securely engaged to the bottle Taking out the emergency tire puncture repa...

Page 426: ...ct the hose to the valve Screw the end of the hose clockwise as far as possible 8 Make sure that the compressor switch is off 9 Connect the power plug to the power outlet socket P 338 10Attach the sticker provided with the tire puncture repair kit to a position easily seen from the driver s seat 11Check the specified tire inflation pressure Tire inflation pressure is specified on the label on the ...

Page 427: ...lly decrease The air pressure gauge will dis play the actual tire inflation pres sure about 1 to 5 minutes after the switch is turned on Turn the compressor switch off and then check the tire inflation pressure Being careful not to over inflate check and repeat the inflation procedure until the specified tire inflation pressure is reached The tire can be inflated for about 5 to 20 minutes dependin...

Page 428: ...e bottle in the trunk while it is connected to the compressor 19To spread the liquid sealant evenly within the tire immedi ately drive safely for about 5 km 3 miles below 80 km h 50 mph 20After driving stop your vehicle in a safe place on a hard flat sur face and reconnect the repair kit Remove the air release cap from the hose before reconnecting the hose 21Turn the compressor switch on and wait ...

Page 429: ... push the protrusion on the air release cap into the tire valve to let some air out 3 Disconnect the hose from the valve remove the air release cap from the hose and then reconnect the hose 4 Turn the compressor switch on and wait for several seconds and then turn it off Check that the air pressure indicator shows the specified air pressure P 458 If the air pressure is under the desig nated pressu...

Page 430: ...opera tion is being performed If you notice any cracks or deformation of the tire turn off the compressor switch and stop the repair operation immediately The repair kit may overheat if oper ated for a long period of time Do not operate the repair kit continu ously for more than 40 minutes Parts of the repair kit become hot during operation Be careful han dling the repair kit during and after oper...

Page 431: ...ns for the emergency tire puncture repair kit The repair kit power source should be 12 V DC suitable for vehicle use Do not connect the repair kit to any other source If fuel splatters on the repair kit the repair kit may deteriorate Take care not to allow fuel to contact it Place the repair kit in a storage to prevent it from being exposed to dirt or water Store the repair kit in the trunk out of...

Page 432: ...u have a flat tire vehicles with a spare tire Your vehicle is equipped with a spare tire The flat tire can be replaced with the spare tire For details about tires P 372 WARNING If you have a flat tire Do not continue driving with a flat tire Driving even a short distance with a flat tire can damage the tire and the wheel beyond repair which could result in an accident Before jacking up the vehi cl...

Page 433: ...trouble arises Screw driver Pliers Wheel nut wrench Jack Spare tire Towing eyelet If equipped Vehicles with a full size spare tire Jack handle Spanners Screw driver Pliers Wheel nut wrench Jack Spare tire Towing eyelet If equipped COROLLA HYBRID_OM_General_OM12M44E ...

Page 434: ... not use it on other vehicles and do not use other tire jacks for replacing tires on this vehicle Put the jack properly in its jack point Do not put any part of your body under the vehicle while it is sup ported by the jack Do not start the hybrid system or drive the vehicle while the vehicle is supported by the jack Do not raise the vehicle while someone is inside When raising the vehicle do not ...

Page 435: ...nto the notch on the wheel cap To protect the wheel ornament place a rag between the wrench and the wheel Taking out the spare tire WARNING When storing the spare tire Be careful not to catch fingers or other body parts between the spare tire and the body of the vehicle Replacing a flat tire Flat tire Wheel chock posi tions Front left hand side Behind the rear right hand side tire Front right hand...

Page 436: ...sed portion of the jack is in contact with the center of the jack point 5 Assemble the jack handle extension 6 Raise the vehicle until the tire is slightly raised off the ground 7 Remove all the wheel nuts and the tire When resting the tire on the ground place the tire so that the wheel design faces up to avoid scratching the wheel surface COROLLA HYBRID_OM_General_OM12M44E ...

Page 437: ...feet or other body parts while changing a tire etc may result in burns Failure to follow these precautions could cause the wheel nuts to loosen and the tire to fall off result ing in death or serious injury Never use oil or grease on the wheel bolts or wheel nuts Oil and grease may cause the wheel nuts to be excessively tight ened leading to bolt or disc wheel damage In addition the oil or grease ...

Page 438: ...re tire and a steel wheel Reinstall the wheel ornament Align the cutout of the wheel ornament with the valve stem as shown in the illustration 6 Stow the flat tire tire jack and all tools The full size spare tire Make sure to check the tire inflation pressure of the full size spare tire P 458 The compact spare tire The compact spare tire is identified by the label TEMPORARY USE ONLY on the tire si...

Page 439: ...ar of the vehicle 3 Fit tire chains to the front tires WARNING When using the full size spare tire Replace the full size spare tire with a standard tire as soon as possible Avoid sudden acceleration abrupt steering sudden braking and shift ing operations that cause sudden engine braking When using the compact spare tire Remember that the compact spare tire provided is specifically designed for use...

Page 440: ...with the compact spare tire compared to when driving with stand ard tires Be careful when driving over uneven road surfaces Driving with tire chains and the compact spare tire Do not fit tire chains to the compact spare tire Tire chains may damage the vehicle body and adversely affect driving performance When replacing the tires vehi cles with a tire pressure warning system When removing or fittin...

Page 441: ...tery terminal con nections may be loose or cor roded P 368 One of the following may be the cause of the problem The 12 volt battery may be dis charged P 443 One or both of the 12 volt battery terminals may be disconnected P 368 Contact your Toyota dealer if the prob lem cannot be repaired or if repair pro cedures are unknown When the hybrid system does not start the following steps can be used as ...

Page 442: ...e inspected by your Toyota dealer If you lose your keys New genuine keys can be made by your Toyota dealer using the other key vehicles without a smart entry start system or mechanical key vehicles with a smart entry start system and the key num ber stamped on your key num ber plate Keep the plate in a safe place such as your wallet not in the vehicle NOTICE When an electronic key is lost vehicles...

Page 443: ...ws and moon roof 1 turn and hold 2 1 If equipped 2 This setting must be customized at your Toyota dealer If the electronic key does not operate prop erly vehicles with a smart entry start sys tem If communication between the electronic key and vehicle is interrupted P 136 or the electronic key cannot be used because the battery is depleted the smart entry start system and wireless remote control c...

Page 444: ... normally do when stopping the hybrid system Electronic key battery As the above procedure is a temporary measure it is recommended that the electronic key battery be replaced immediately when the battery is depleted P 388 Changing power switch modes Release the brake pedal and press the power switch in step 3 above The hybrid system does not start and modes will be changed each time the switch is...

Page 445: ...en connecting the jumper or booster cables depending on the situ ation the alarm may activate and doors locked P 82 2 Open the hood P 363 3 Connect a positive jumper cable clamp to on your vehicle and con nect the clamp on the other end of the positive cable to on the sec ond vehicle Then connect a negative cable clamp to on the second If the 12 volt battery is discharged The following procedures ...

Page 446: ...try start system Open and close any of the doors of your vehicle with the power switch OFF 6 Maintain the engine speed of the second vehicle and start the hybrid system of your vehicle by turning the power switch to ON 7 Make sure the READY indica tor comes on If the indicator does not come on contact your Toyota dealer 8 Once the hybrid system has started remove the jumper cables in the exact rev...

Page 447: ...e doors The hybrid system may not start on the first attempt after the 12 volt bat tery has recharged but will start nor mally after the second attempt This is not a malfunction The power switch mode is memorized by the vehicle When the 12 volt bat tery is reconnected the system will return to the mode it was in before the 12 volt battery was discharged Before disconnecting the 12 volt bat tery tu...

Page 448: ...ted parts contain lead and lead compounds Observe the follow ing precautions when handling the 12 volt battery When working with the 12 volt bat tery always wear safety glasses and take care not to allow any bat tery fluids acid to come into con tact with skin clothing or the vehicle body Do not lean over the 12 volt battery In the event that battery fluid comes into contact with the skin or eyes ...

Page 449: ... leaks Radiator Cooling fans If a large amount of coolant leaks immediately contact your Toyota dealer 4 The coolant level is satisfactory if it is between the FULL and LOW lines on the reservoir Reservoir FULL line LOW line 5 Add coolant if necessary Water can be used in an emergency if If your vehicle overheats The following may indicate that your vehicle is overheating The engine coolant temper...

Page 450: ...e fans are not operating Stop the hybrid system immedi ately and contact your Toyota dealer If the fans are operating Have the vehicle inspected at the nearest Toyota dealer If Hybrid System Overheated Output Power Reduced is shown on the multi information display 1 Stop the vehicle in a safe place 2 Stop the hybrid system and carefully lift the hood 3 After the hybrid system has cooled down inspe...

Page 451: ... very hot After the hybrid system has been turned off check that the READY indicator is off When the hybrid system is operating the gasoline engine may automatically start or the cooling fans may suddenly operate even if the gasoline engine stops Do not touch or approach rotating parts such as the fan which may lead to fingers or cloth ing especially a tie a scarf or a muffler getting caught resul...

Page 452: ...vering procedure WARNING When attempting to free a stuck vehicle If you choose to push the vehicle back and forth to free it make sure the surrounding area is clear to avoid striking other vehicles objects or peo ple The vehicle may also lunge for ward or lunge back suddenly as it becomes free Use extreme caution When shifting the shift lever Be careful not to shift the shift lever with the accele...

Page 453: ...pecifications Vehicle specifications 9 1 Specifications Maintenance data fuel oil level etc 452 Fuel information 461 9 2 Customization Customizable features 462 9 3 Initialization Items to initialize 471 COROLLA HYBRID_OM_General_OM12M44E ...

Page 454: ...ed under the right hand front seat For some models this number is also stamped on the top left of the instrument panel This number is also on the manu facturer s label except for GCC countries or the Certification Reg ulation label for GCC countries Maintenance data fuel oil level etc Dimensions Overall length 4630 mm 182 3 in 4635 mm 182 5 in 2 Overall width 1780 mm 70 1 in Overall height 1 1435 ...

Page 455: ...he engine block as shown 1 For vehicles with model code 2 that has V as the last letter 2 The model code is indicated on the manufacturer s label or the Certification Reg ulation label P 452 Engine Model 2ZR FXE Type 4 cylinder in line 4 cycle gasoline Bore and stroke 80 5 88 3 mm 3 17 3 48 in Displacement 1798 cm3 109 7 cu in Valve clearance Automatic adjustment Maximum vehicle speed 1 160 km h 9...

Page 456: ...Energy Conserving SM Energy Conserving SN Resource Conserving or SN PLUS Resource Conserving or ILSAC multigrade engine oil 15W 40 API grade SL SM SN or SN PLUS multigrade engine oil Recommended viscosity SAE Research Octane Number 91 or higher Fuel tank capacity Reference 43 0 L 11 4 gal 9 5 Imp gal Electric motor traction motor Type Permanent magnet synchronous motor Maximum output 53 kW Maximum...

Page 457: ...n the oil is at high tempera ture An oil with a higher viscos ity one with a higher value may be better suited if the vehicle is operated at high speeds or under extreme load conditions How to read oil container labels Either or both API registered marks are added to some oil containers to help you select the oil you should use API Service Symbol Top portion API SERVICE SN means the oil quality de...

Page 458: ... Super Long Life Coolant Similar high quality ethylene glycol based non sili cate non amine non nitrite and non borate coolant with long life hybrid organic acid technology Do not use plain water alone Ignition system spark plug Make DENSO FC16HR CY9 Gap 0 9 mm 0 035 in NOTICE Iridium tipped spark plugs Use only iridium tipped spark plugs Do not adjust the spark plug gap Electrical system 12 volt ...

Page 459: ...nate If the brake warning light illuminates refer to P 408 Hybrid transmission Fluid capacity 3 6 L 3 8 qt 3 2 Imp qt Fluid type Toyota Genuine ATF WS NOTICE Hybrid transmission fluid type Using transmission fluid other than Toyota Genuine ATF WS may ultimately damage to the vehicle s transmission Brakes Pedal clearance 1 Except for GCC countries 2 and Taiwan 114 mm 4 5 in Min For GCC countries 2 ...

Page 460: ...ld tire inflation pressure Front wheel kPa kgf cm2 or bar psi Rear wheel kPa kgf cm2 or bar psi Type A 250 2 5 36 Type B 220 2 2 32 Type A 240 2 4 35 Type B 220 2 2 32 Wheel size 15 6 1 2J Wheel nut torque 103 N m 10 5 kgf m 76 ft lbf Tire size 205 55R16 91V Tire inflation pressure Recommended cold tire inflation pressure Front wheel kPa kgf cm2 or bar psi Rear wheel kPa kgf cm2 or bar psi Type A ...

Page 461: ...e inflation pressure 420 kPa 4 2 kgf cm2 or bar 60 psi Wheel size 17 4T Wheel nut torque 103 N m 10 5 kgf m 76 ft lbf Light bulbs Light bulbs W Type Exterior Headlights bulb type 55 A Front turn signal lights bulb type 21 B Rear turn signal lights bulb type 21 B Front position lights bulb type 5 C Tail lights bulb type 5 C License plate lights 5 C Interior Front personal lights vehicles without a ...

Page 462: ...460 COROLLA HV_ 国瑞 _GE 9 1 Specifications A HIR2 halogen bulbs clear B Wedge base bulbs amber C Wedge base bulbs clear D Double end bulbs COROLLA HYBRID_OM_General_OM12M44E ...

Page 463: ... occasionally notice light knocking for a short time while accel erating or driving uphill This is normal and there is no need for concern Fuel information You must only use unleaded gasoline Select unleaded gasoline with a Research Octane Number of 91 or higher for optimum engine performance NOTICE Notice on fuel quality Do not use improper fuels If improper fuels are used the engine will be dama...

Page 464: ...ettings that can be changed using the navigation or multimedia system screen vehicles with navigation multimedia system Settings that can be changed using the meter control switches Customizable features Your vehicle includes a variety of electronic features that can be personalized to suit your preferences The settings of these features can be changed using the multi information display the navig...

Page 465: ...guage 2 English 3 4 O Units L 100 km km L O Speedometer display 5 Analog Digital O EV indicator On Off O Eco Accelerator Guidance On Off O Fuel economy display Total average Average fuel consumption after reset Trip average Aver age fuel consump tion after start O Tank average Aver age fuel consump tion after refuel Audio system linked dis play 6 On Off O Energy monitor On Off O Drive information ...

Page 466: ...O Compass On Off O Audio system operation status On Off O Function Default setting Customized setting Unlocking using a mechan ical key All doors unlocked in one step Driver s door unlocked in one step all doors unlocked in two step O Speed linked door locking function On Off O O Shift position linked door locking function Off On O O Shift position linked door unlocking function Off On O O Driver ...

Page 467: ... O Time elapsed before auto matic door lock function is activated if door is not opened after being unlocked 30 seconds 60 seconds O 120 seconds Open door warning buzzer 1 On Off O Function Default setting Customized setting Smart entry start system On Off O O Smart door unlocking All the doors Driver s door O O Time elapsed before unlocking all the door when gripping and holding the driver s door...

Page 468: ...n two step O O Trunk unlocking operation Press and hold short One short press O Push twice Press and hold long Off Theft deterrent panic mode On Off O Function Default setting Customized setting Automatic mirror folding and extending operation Linked to the locking unlock ing of the doors Off O Linked to operation of the power switch Function Default setting Customized setting Mechanical key linke...

Page 469: ...rol is used Slide only Tilt only O Function Default setting Customized setting Light sensor sensitivity Standard 2 to 2 O O Time elapsed before head lights automatically turn on 2 Standard Long O Follow me home 2 Time elapsed before headlights automatically turn off 30 seconds 60 seconds O 90 seconds 120 seconds Automatic light off system 2 Linked to open ing of the driver s side door Linked to op...

Page 470: ...sensitivity High Standard O Vehicle sway warning func tion On Off O Vehicle sway warning sen sitivity Standard High O Low Function Default setting Customized setting BSM Blind Spot Monitor On Off O Outside rear view mirror indicator brightness Bright Dim O Alert timing for presence of approaching vehicle sensi tivity Intermediate Early O Late Only when vehicle detected in blind spot Function Defau...

Page 471: ...ing between outside air and recirculated air mode linked to automatic mode switch operation On Off O O A C auto switch operation On Off O O Function Default setting Customized setting Time elapsed before the interior lights turn off 15 seconds Off O O 7 5 seconds 30 seconds Operation after the power switch is turned off On Off O Operation when the doors are unlocked On Off O Operation when you app...

Page 472: ... generated in accordance with the operation signal buzzer and the operation signal emergency flashers settings In the following situations custom ize mode in which the settings can be changed through the multi infor mation display will automatically be turned off A warning message appears after the customize mode screen is displayed The power switch is turned off The vehicle begins to move while t...

Page 473: ...peration after such cases as the 12 volt battery being reconnected or mainte nance being performed on the vehicle List of item to initialize Item When to initialize Reference Tire pressure warning system if equipped When rotating front and rear tires which have different tire inflation pressures When changing the tire size P 377 COROLLA HYBRID_OM_General_OM12M44E ...

Page 474: ...472 COROLLA HV_ 国瑞 _GE 9 3 Initialization COROLLA HYBRID_OM_General_OM12M44E ...

Page 475: ...473 COROLLA HV_ 国瑞 _GE Index What to do if Troubleshoot ing 474 Alphabetical Index 477 COROLLA HYBRID_OM_General_OM12M44E ...

Page 476: ...dition of the radio wave P 123 136 Is the child protector lock set The rear door cannot be opened from inside the vehicle when the lock is set Open the rear door from outside and then unlock the child protector lock P 130 The function to prevent the elec tronic key from being left inside the trunk will operate and you can open the trunk as usual Take the key out from the trunk P 133 Is the shift l...

Page 477: ...indow lock switch pressed The power window except for the one at the driver s seat cannot be operated if the window lock switch is pressed P 153 The auto power off function will be operated if the vehicle is left in ACC or ON the hybrid system is not operating for a period of time P 171 The seat belt reminder light is flashing Are the driver and the front passenger wearing the seat belts P 411 The...

Page 478: ... is displayed refer to P 408 417 Vehicles with an emergency tire puncture repair kit Stop the vehi cle in a safe place and repair the flat tire temporarily with the emergency tire puncture repair kit P 419 Vehicles with spare tire Stop the vehicle in a safe place and replace the flat tire with the spare tire P 430 Try the procedure for when the vehicle becomes stuck in mud dirt or snow P 450 An al...

Page 479: ...ons 42 SRS airbags 37 SRS warning light 409 Alarm Alarm 81 Warning buzzer 408 Antennas smart entry start sys tem 134 Anti lock Brake System ABS 268 Warning light 410 Approach warning 235 245 Armrest 343 Assist grips 344 Audio input 302 Audio system Audio input 302 AUX port USB port 282 Bluetooth audio 303 CD player 287 iPod 293 MP3 WMA disc 287 Optimal use 283 Portable music player 302 Steering wh...

Page 480: ...Coat hooks 344 Condenser 368 Console box 336 Cooling system 367 Engine overheating 447 Hybrid system overheating 448 Cruise control Dynamic radar cruise control 239 Dynamic radar cruise control with full speed range 229 Warning message 250 Cup holders 335 Current fuel consumption 103 Curtain shield airbags 37 Customizable features 462 D Daytime running light system 185 Daytime running front positi...

Page 481: ...e battery 388 Electronically Controlled Brake Sys tem ECB 268 Emergency brake signal 268 Emergency flashers Emergency brake signal 268 Emergency tire puncture 419 Emergency in case of If a warning buzzer sounds 408 If a warning light turns on 408 If a warning message is displayed 417 If the 12 volt battery is discharged 443 If the electronic key does not operate properly 441 If the hybrid system w...

Page 482: ... Front seats Adjustment 141 Cleaning 351 Correct driving posture 31 Head restraints 144 Front turn signal lights Replacing light bulbs 394 395 Turn signal lever 177 Wattage 459 Fuel Capacity 453 Fuel gauge 91 96 Information 461 Refueling 196 Type 453 Warning light 411 Fuel consumption Average fuel economy 103 Current fuel consumption 103 Fuel economy 103 Fuel filler door Refueling 196 Fuel gauge 9...

Page 483: ...n 174 If the shift lever cannot be shifted from P 175 Hybrid vehicle driving tips 273 I Identification Engine 453 Vehicle 452 Ignition switch power switch 166 168 Auto power off function 171 Changing the power switch modes 170 If your vehicle has to be stopped in an emergency 400 Illuminated entry system 332 Immobilizer system 79 Indicators 88 Initialization Items to initialize 471 Power windows 1...

Page 484: ...ghts list 331 Personal lights 332 Rear interior lights 331 Replacing light bulbs 394 Trunk light 133 Turn signal lever 177 Vanity lights 343 Wattage 459 Lock steering column 166 169 LTA Lane Tracing Assist Operation 212 Warning messages 221 LTA Lane Tracing Assist switch217 M Maintenance Do it yourself maintenance 361 Maintenance data 452 Maintenance requirements 354 Scheduled maintenance 356 Malf...

Page 485: ...tment 148 BSM Blind Spot Monitor 251 Folding 149 Linked mirror function when revers ing 149 RCTA function 262 Outside temperature 91 96 Overheating 447 P Panic mode 122 Parking assist sensors Toyota park ing assist sensor 256 Parking brake Operation 177 178 Parking brake engaged warning buzzer 177 180 Warning light 414 Warning message 177 180 Parking lights Light switch 184 PCS Pre Collision Syste...

Page 486: ...tery 388 S Seat belt reminder light 411 412 Seat belts 33 Child restraint system installation 49 Cleaning and maintaining the seat belt 351 Emergency Locking Retractor 34 How to wear your seat belt 34 How your child should wear the seat belt 34 Pregnant women proper seat belt use 33 Reminder light and buzzer 411 412 Seat belt pretensioners 35 SRS warning light 409 Seats Adjustment 141 Adjustment p...

Page 487: ...88 Brake Hold switch 181 Cruise control switch 248 Display change button 93 99 Door lock switches 129 Driving mode select switch 267 Dynamic radar cruise control switch 240 Dynamic radar cruise control with full speed range switch 230 Emergency flashers switch 400 EV drive mode switch 172 Ignition switch 166 168 LDA Lane Departure Alert with steering control switch 225 Light switches 184 LTA Lane ...

Page 488: ...radar cruise control 239 Dynamic radar cruise control with full speed range 229 LDA Lane Departure Alert with steering control 221 LTA Lane Tracing Assist 212 PCS Pre Collision System 204 Traction battery hybrid battery Hybrid battery traction battery air vents 77 Location 75 Specification 454 Warning message 78 Traction Control TRC 268 Traction motor electric motor 72 Trailer towing 165 Transmiss...

Page 489: ...ng system 409 Drive Start Control 410 Electric power steering 410 High coolant temperature 408 Hybrid system overheat 409 LDA indicator 412 Low engine oil pressure 409 Low fuel level 411 LTA indicator 412 Malfunction indicator lamp 409 Parking brake indicator 414 Pre collision system 413 RCTA OFF indicator 413 Seat belt reminder light 411 412 Slip indicator 414 SRS 409 Tire pressure 412 Toyota par...

Page 490: ...pener P 133 Fuel filler door opener P 197 Tire inflation pressure P 458 Fuel tank capacity Reference 43 0 L 11 4 gal 9 5 Imp gal Fuel type P 453 P 461 Cold tire inflation pres sure P 458 Engine oil capacity Drain and refill ref erence P 454 Engine oil type Toyota Genuine Motor Oil or equivalent P 454 COROLLA HYBRID_OM_General_OM12M44E ...

Page 491: ......

Reviews: