background image

Controlling Audio

52

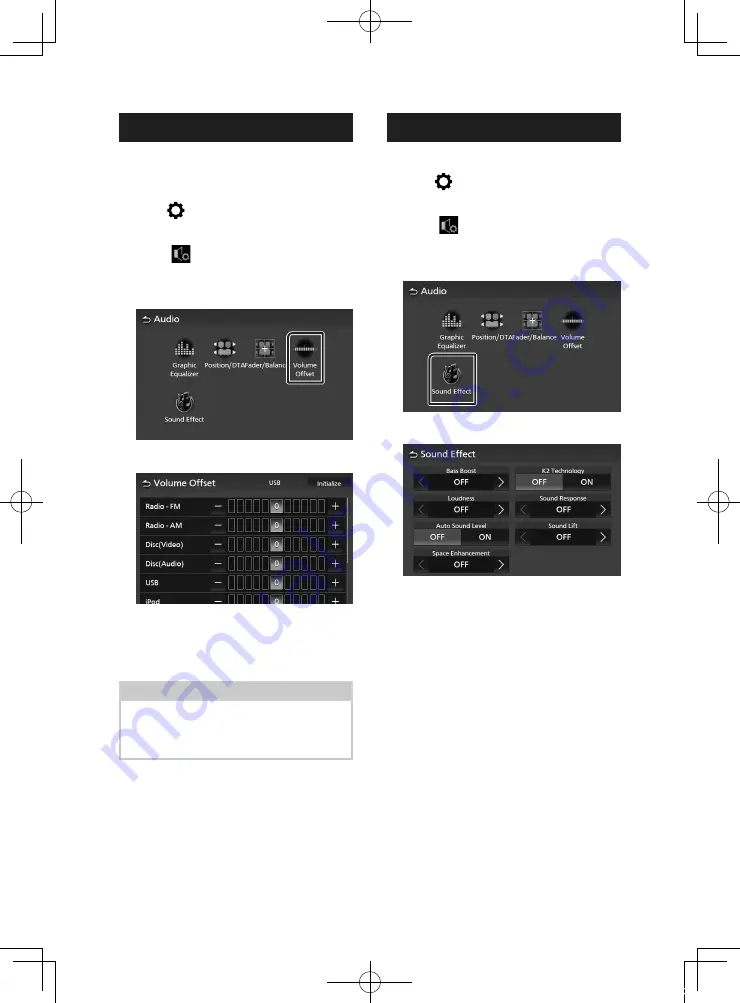
Volume Offset

Finely adjust the volume of the current source 

to minimize the difference in volume between 

different sources.

Press 

[

]

 button.

h

h

Popup menu appears.

Touch 

[

]

.

h

h

Audio screen appears.

Touch 

[

Volume Offset

]

.

Touch 

[

+

]

 or 

[

-

]

 to adjust the level. 


[

Initialize

]

Returns to the initial settings.
Touch 

[

Initialize

]

 and then touch 

[

Yes

]

 on 

the confirmation screen.

NOTE

•  If you have increased the volume first, then 

reduce the volume using “Volume Offset”. 
Switching the current source to another source 
suddenly may output extremely loud sound.

Sound Effect

You can set sound effects.

Press 

[

]

 button.

h

h

Popup menu appears.

Touch 

[

]

.

h

h

Audio screen appears.

Touch 

[

Sound Effect

]

.

Set each parameter as follows.


[

Bass Boost

]

Set the amount of bass boost. 
“OFF”/ “1”/ “2”/ “3”


[

Loudness

]

Set the amount of boost of low and high 
tones.
“OFF”, “Low”, “High”


[

Auto Sound Level

]

AVX automatically adjust EQ setting based of 
volume level or vehicle speed.
The function is varied depends on vehicle or 
vehicle grade.
“OFF”, “ON”


[

Space Enhancement

]

Select the feeling of sound space 
enhancement.
“OFF”/ “Small”/ “Medium”/ “Large”.
This setting is not available for the Radio 
source.

!KL19_TAM_En.indb   52

2019/01/16   15:35

Summary of Contents for Basic AVX

Page 1: ... Car Multimedia System Please note that this manual explains all functions and equipment including options Therefore you may find some explanations on features or equipment not included in your Car Multimedia System TOYOTA DAIHATSU ENGINEERING MANUFACTURING CO LTD KL19_TAM_En indb 1 2019 01 16 15 35 ...

Page 2: ...etup 17 Playing the Bluetooth Audio Device 19 Using the Hands Free Unit 21 Phone Setup 25 T Link 26 Preparation 26 Connecting a smartphone 26 Mirroring Operation 26 Disc 28 Playing a disc 28 DVD Video CD Basic Operation 28 Music CD Disc media Basic Operation 30 Search Operation 31 DVD Disc Menu Operation 31 DVD Setup 32 USB 34 Connecting a USB device 34 USB Basic Operation 34 Search Operation 35 i...

Page 3: ... a warning against anything which may cause death or serious injury to people if the warning is ignored You are informed about what you must or must not do in order to reduce the risk of death or serious injury to yourself and others CAUTION This is a warning against anything which may cause injury to people if the warning is ignored You are informed about what you must or must not do in order to ...

Page 4: ... Station Do not use this product in this condition because doing so may result to fire electric shock or other failure Ñ Ñ To ensure safe driving Any video won t be played while driving to prevent driver s eyes from fixing on the unit s display Stop the vehicle in a safe place and apply the parking brake before performing such function There are some functions you cannot perform while driving beca...

Page 5: ...c type accessories Clean the disc from the center toward the outside rim When removing a disc from this unit pull it out horizontally If the disc center hole or outside rim has burrs use the disc only after removing the burrs with a ballpoint pen etc Discs that are not round cannot be used 8 cm 3 inch discs cannot be used Discs with coloring on the recording surface or discs that are dirty cannot ...

Page 6: ...ading slot A slot to insert a disc media 2 Disc eject Ejects the disc Press and hold to forcibly eject the disc 3 Home Displays the HOME screen 4 Setting Displays the popup menu 5 Mute Mutes restores the sound 6 Remote Sensor Receives the remote control signal 7 Power Press and Hold Turns on off the unit P 7 Short Press Turns on off simple display mode P 9 8 Volume Adjusts the volume The volume wi...

Page 7: ...s turned on 2 Read the caution message and touch Agree Touching Language changes the display language To turn off on the unit manually 1 Press and hold button h h The unit is turned off on Regional Setup 1 Press button h h Popup menu appears 2 Touch h h System screen appears 3 Touch Regional h h Regional screen appears 4 Set each item as follows Language Select the desired language Time Zone Selec...

Page 8: ...e on the Regional screen 2 Select the time zone 3 Touch Clock Adjust on the Regional screen 4 Adjust the date then adjust the time 5 Touch Set Adjusting the volume You can adjust the volume 0 to 40 Press to increase and press to decrease Holding increases the volume continuously to level 15 Volume level 16 to 40 can be adjusted one step each KL19_TAM_En indb 8 2019 01 16 15 35 ...

Page 9: ...ntrol screen P 44 Displays the picture control screen P 44 Displays the System screen P 45 Displays the Audio screen P 50 Displays the T Link Setup screen 1 P 27 Displays the T Link screen 1 2 P 26 Displays the Hands Free screen P 21 Displays the control screen of the current source 3 1 Premium AVX only 2 This menu is not available when a T Link source screen is displayed If you select this menu w...

Page 10: ...HOME screen 1 2 3 1 Displays the source selection screen P 11 2 Current source information Touch to display the control screen of the current source 3 Short cut playback source icons P 12 Display the HOME screen 1 Press button h h HOME screen appears KL19_TAM_En indb 10 2019 01 16 15 35 ...

Page 11: ... sources and functions Displays the Hands Free screen P 21 Switches to the T Link screen from the connected iPhone Android device 1 P 26 Plays a Bluetooth audio player P 15 Switches to the Radio broadcast P 39 Plays a disc P 28 Switches to an external component connected to the AUX input terminal P 42 Plays files on a USB device P 34 Plays an iPod iPhone P 37 Switches to the camera image screen P ...

Page 12: ...zing the source selection screen P 12 To turn off the AV source 1 Press button h h HOME screen appears 2 Touch 3 Touch AV Off Customize Short cut buttons on HOME screen You can arrange the positions of the source icons as you like 1 Press button h h HOME screen appears 2 Touch 3 Touch and hold the icon which you want to move in the customizing mode 4 Drag the icon to the desired position KL19_TAM_...

Page 13: ...rmation 5 Text scroll Scrolls the displayed text List screen There are some common function keys in the list screens of most sources 1 3 4 2 5 1 Return Returns to the previous screen 2 Displays the list type selection window 3 etc Keys with various functions are displayed here Moves to the upper hierarchy level Plays all tracks in the folder containing the current track Jumps to the letter you ent...

Page 14: ...arately Ñ Ñ Connecting an Android smartphone Micro USB to USB cable 1 Android smartphone 1 1 Sold separately Ñ Ñ Connecting an external component You can connect an external component to the AUX input terminal Audio player 1 ø3 5 mm jack 1 1 Sold separately WARNING Install the USB device iPod iPhone Android smartphone and Audio player in the place where it will not affect safe driving NOTE Do not ...

Page 15: ...the Bluetooth version of the device This unit may not work for some Bluetooth devices Connecting conditions may vary depending on your environment Some Bluetooth devices are disconnected when this unit is turned off Ñ Ñ About the mobile phone and Bluetooth audio player This unit conforms to the following Bluetooth specifications Version Bluetooth Ver 4 1 Profiles Mobile phone HFP V1 7 Hands Free P...

Page 16: ...Complete steps 1 to 4 within 30 seconds 2 Operate your smartphone mobile phone according to the displayed messages Confirm the request both on the smartphone mobile phone 3 Select the function you want to use Phone1 Phone2 Select the hands free number to connect Bluetooth Audio Put checkmark to use Bluetooth Audio T Link Premium AVX only Put checkmark check to use T Link 4 Touch Yes When data tran...

Page 17: ...ion OFF Turns off the Apple Auto Pairing function Device Name Change the device name P 18 PIN Code Change the PIN Code P 18 Device Address Displays the media access control address Ñ Ñ Connect the Bluetooth device 1 Touch Device Select on the Connectivity screen 2 Touch the name of the device you want to connect h h Profile select screen appears NOTE If the icon is lighted it means that the unit w...

Page 18: ...te h h Confirmation message appears 4 Touch Yes Ñ Ñ Change the device name 1 Touch Device Name on the Connectivity screen h h Change Device Name screen appears 2 Touch and hold 3 Input the device name 4 Touch Enter Ñ Ñ Change the PIN Code 1 Touch PIN Code on the Connectivity screen h h Change PIN Code screen appears 2 Touch and hold 3 Input the PIN Code 4 Touch Set KL19_TAM_En indb 18 2019 01 16 1...

Page 19: ...ongs repeat Repeat off Randomly plays all tracks in the current folder Each time you touch the key random modes are switched in the following sequence All random Random off These items appear only when the audio player which supports AVRCP profile is connected 3 Playing time For confirmation of current playing position 4 Bluetooth audio devices can be switched easily to play music See Bluetooth Au...

Page 20: ...d starts playback Gray Not connected White Connected Blue During playback 4 Touch NOTE If a connected Bluetooth audio device is operated to play music connections are switched When a Bluetooth source is switched to another one its settings are deleted and the connection is restored to the connection before source switching Ñ Ñ File search 1 Touch 2 Touch the desired file or folder When you touch a...

Page 21: ... connect two mobile phones 1 Touch to select the phone you want to use Phone Setup 1 Touch Phone Setup screen appears P 25 NOTE Bluetooth hands free sound quality and performance also depend on mobile phones and carrier conditions Status icons such as battery and antenna icons may differ from those displayed on the mobile phone Setting the mobile phone in the private visibility off mode can disabl...

Page 22: ...e phone numbers in the list by last name or first name For details see Phone Setup P 25 Call by entering a phone number 1 Touch 2 Enter a phone number with number keys 3 Touch Ñ Ñ Voice Recognition You can access the voice recognition function of the mobile phone connected to this unit You can search the mobile phone phonebook by voice The functionality depends on the mobile phone 1 Press button h...

Page 23: ...tone input screen You can send tones by touching desired keys on the screen Switching between speaking voice output destinations Touching each time switches speaking voice output destinations between the mobile phone and the speaker Call waiting When you receive a new call while talking on the phone you can answer the newly received call by touching The current call is put on hold Each time you to...

Page 24: ...The phonebook data of up to 10 Bluetooth devices can be stored When you connect the mobile phone of which the phonebook data is downloaded before the downloaded data will be displayed If you download the phonebook data from the same device again the data will be overwritten Phonebook deletion 1 Touch 2 Touch the name to check Checks all boxes Clears all check marks 3 Touch h h Confirmation message...

Page 25: ...30 Sets the ringing time second Sort Order Set how to sort the data in the mobile phone phonebook First Name Last Name Sorts data by the first name Last Name First Name Default Sorts data by the last name Echo Cancel Adjust the level of echo cancellation Default is 0 Noise Reduction Reduce the noise generated in the surrounding environment without changing the microphone volume Use this function w...

Page 26: ...rtphone Ñ Ñ Connecting an iPhone 1 On your iPhone launch Settings Touch Control Center and then Customize Controls 2 Touch Screen Recording and add to INCLUDE list 3 Launch Control Center of your iPhone touch and hold Screen Recording icon and then touch T Link and start broadcast 4 Connect your iPhone with AVX via Lightning to USB cable P 14 Ñ Ñ Connecting an Android device 1 Connect your Android...

Page 27: ... one application can be open at a time When using any navigation application please refrain from using other applications as this will interfere with T Link operations For example if you use Waze together with Spotify AVX will stop displaying Waze Navigation screen and only Spotify sound comes from AVX This occurs due to iOS system limitations Ñ Ñ T Link Setup 1 Press button h h Popup menu appears...

Page 28: ...utton When removing a disc pull it horizontally NOTE To forcibly eject the disc press and hold for 2 seconds DVD Video CD Basic Operation Most functions can be controlled from the source control screen and playback screen NOTE The screen shot below is for DVD It may be different from the one for Video CD 1 When the operation buttons are not displayed on the screen touch the display Control screen ...

Page 29: ...he left side of the screen to display the function panel Touch again to close the panel Fast forwards or fast backward the disc Each time you touch the key the speed changes 2 times 10 times DVD only Plays in slow motion forward or backward PBC Video CD only Touch to turn Playback control PBC on or off Audio Video CD only Touch to change audio output channels 1chLL 2chLL Identifies the left audio ...

Page 30: ...ils on search operation see Search Operation P 31 E F Searches for the previous next content Touch and hold to fast forward or fast backward the disc DH Plays or pauses Repeats the current track folder Each time you touch the key repeat mode switches in the following sequence Track File repeat Folder repeat Disc media only Repeat all Randomly plays all tracks in current folder disc Each time you t...

Page 31: ...can set up some functions using the DVD VIDEO disc menu 1 Touch the display during playback 2 Touch Menu h h Menu Control screen appears 3 Perform your desired operation as follows To display the top menu Touch Top To display the menu Touch Menu To display the previous menu Touch Return To enter selected item Touch Enter To enable direct operation Touch Highlight to enter the highlight control mod...

Page 32: ...control function is cancelled automatically if you do not operate for a predetermined period of time DVD Setup You can set up the DVD playback functions 1 Touch the display during playback 2 Touch h h DVD Setup screen appears 3 Set each function as follows Menu Language Subtitle Language Audio Language See Language setting P 33 Dynamic Range Control Sets the dynamic range Wide The dynamic range is...

Page 33: ...e setting This setting is for the languages used for the menu subtitle and voice 1 Touch the desired item Menu Language Subtitle Language Audio Language h h Language Set screen appears 2 Select a language For language codes refer to DVD Language Codes P 64 Touch Close to set the entered language and return to the DVD Setup screen NOTE To set the DVD s original language as the audio language touch ...

Page 34: ...d be the one of the following FAT16 FAT32 exFAT NTFS NOTICE Install the USB device in the place where it will not affect safe driving You cannot connect a USB device via a USB hub and Multi Card Reader Take backups of the audio files used with this unit The files can be erased depending on the operating conditions of the USB device We shall have no compensation for any damage arising from any eras...

Page 35: ... previous next folder 5 Playing time For confirmation of current playing position You can drag the circle left or right to change the playing position 6 Hide Video file only Hides the control screen Video screen 7 7 Key display area Video file only Touch to display the control screen Search Operation You can search music or video files by the following operations 1 Touch on the USB control screen ...

Page 36: ...ccording to hierarchy 1 Touch Folder List 2 Touch the desired folder When you touch a folder its contents are displayed 3 Touch to select your desired item in the list Repeat this step until you find the desired file KL19_TAM_En indb 36 2019 01 16 15 35 ...

Page 37: ...ve the iPod in direct sunlight for extended amounts of time Extended exposure to direct sunlight can result in iPod malfunction due to the resulting high temperature Do not leave the iPod in any location with high temperatures NOTE When you turn on this unit the iPod iPhone is charged through the unit If you restart playback after connecting the iPod the music that has been played by the iPod is p...

Page 38: ...eat off Randomly plays all tracks in the current album Each time you touch the key random modes are switched in the following sequence Song random Random off 3 Playing time For confirmation of current playing position You can drag the circle left or right to change the playing position Search Operation You can search music files by the following operation NOTE For operations on the list screen see...

Page 39: ... good reception automatically BAND Switches the band FM1 FM2 AM MONO FM only Switches the FM stereo broadcast to in monaural reception This is effective to reduce the noise AUTO P Presets stations automatically For details see Auto preset memory P 39 LOCAL S FM only Receives only the stations with good reception Memory Operation Ñ Ñ Auto preset memory You can store stations in memory automatically...

Page 40: ...Radio 40 Selecting Operation Ñ Ñ Preset select You can select memorized station 1 Touch desired preset station KL19_TAM_En indb 40 2019 01 16 15 35 ...

Page 41: ...s displayed on the back camera view may differ from the actual vehicle width and distance The actual distance from bumper to bumper may be less than the distance indicated by the guidelines If the bumper of another vehicle is displayed on the screen while backing up the vehicle check the distance with your own eyes The guidelines may not be parallel with the dividing lines of the parking space eve...

Page 42: ...tion Set whether to use the rear view camera Guideline You can display parking guidelines to enable easier parking when you shift the gear to the reverse R position Default is ON External audio players AUX 1 Connect an external component to the AUX input terminal P 14 2 Select AUX as the source P 11 3 Turn on the connected component and start playing the source KL19_TAM_En indb 42 2019 01 16 15 35...

Page 43: ...your mobile phone as a Bluetooth device beforehand See Register the Bluetooth device P 16 and Connect the Bluetooth device P 17 1 Touch Emergency Call on the M Toyota screen h h Emergency Call list appears 2 Touch the desired contact information Toyota Dealer Search You can search a Toyota dealer list and confirm the dealer information 1 Touch Toyota Dealer on the M Toyota screen 2 Touch to select...

Page 44: ...nu screen etc 1 Press button h h Popup menu appears 2 Touch h h Picture control screen appears 3 Adjust each setting as follows Adjust each setting Camera only Adjust the tint 4 to 4 Video file only Select a screen mode Full Displays video at the ratio of 16 9 Normal Displays video at the ratio of 4 3 Auto DVD and Video CD 16 9 video is displayed in the Full mode and 4 3 video is displayed in the ...

Page 45: ...utton h h Popup menu appears 2 Touch h h System screen appears 3 Touch General h h General screen appears 4 Set each parameter as follows Software Information Confirm the software version of this unit P 45 Open Source Licenses Display the open source licenses Restore Factory Default Touch Restore Factory Default and then touch Yes to set all the settings to the initial default settings Ñ Ñ Softwar...

Page 46: ...nation Color You can change the key color P 47 Ñ Ñ Change the background image 1 Touch Background on the User Interface screen 2 Select an image 1 1 Register an original image in advance To register an original image You can load an image from the connected USB device and set it as the background image Before starting this procedure it is necessary to connect the device which has the image to load...

Page 47: ...rotates the image clockwise Picture files JPEG jpg jpeg PNG png BMP bmp Ñ Ñ Change the key color 1 Touch Key Color on the User Interface screen 2 Select a key color 3 Touch To register an original color You can register your original color 1 Touch User on the Key Color screen 2 Touch Adjust 3 Use and to adjust each color value 4 Touch KL19_TAM_En indb 47 2019 01 16 15 35 ...

Page 48: ...rce Select a source for each Rear Source OFF Disc USB AUX Rear Volume Adjust the rear source volume NOTE When you select the source which does not include a video as Rear Source the rear monitor won t display any image When the Zone Select is set to Dual Zone the following functions are not available Fader P 50 Equalizer Control Sound Effect Listening Position DTA P 51 52 53 High resolution Sound ...

Page 49: ...button h h Popup menu appears 2 Touch h h System screen appears 3 Touch Advanced Features h h Advanced Features screen appears 4 Set each parameter as follows Door Lock Volume Adjust the volume for door lock alarm Door Lock Sound Select the sound for door lock alarm Auto Folding Mirror Turn the auto folding mirror function on or off KL19_TAM_En indb 49 2019 01 16 15 35 ...

Page 50: ...ing general audio Fader Balance P 50 Set volume offset P 52 Set sound effect P 52 Controlling General Audio 1 Press button h h Popup menu appears 2 Touch h h Audio screen appears 3 Touch Fader Balance 4 Set each parameter as follows Fader Balance Adjust the volume balance around the touched area and adjust the right and left volume balance and adjust the front and rear volume balance Center Clear ...

Page 51: ...reset Memory Saves the adjusted equalizer curve as User Initialize flatten the current EQ curve All Sources Apply the adjusted equalizer curve to all sources Touch All Sources and then touch OK on the confirmation screen ON OFF Bass Extend Settings When turned on the frequencies lower than 62 5 Hz is set to the same gain level 62 5 Hz Ñ Ñ Recall the EQ curve 1 Touch Preset Select 2 Select an EQ cu...

Page 52: ...nt source to another source suddenly may output extremely loud sound Sound Effect You can set sound effects 1 Press button h h Popup menu appears 2 Touch h h Audio screen appears 3 Touch Sound Effect 4 Set each parameter as follows Bass Boost Set the amount of bass boost OFF 1 2 3 Loudness Set the amount of boost of low and high tones OFF Low High Auto Sound Level AVX automatically adjust EQ setti...

Page 53: ...ng Position DTA allows you to set Listening Position and Front Focus You cannot set both at the same time 1 Press button h h Popup menu appears 2 Touch h h Audio screen appears 3 Touch Position DTA Set up Listening Position P 53 Set up Front Focus P 54 Ñ Ñ Listening Position Adjust the sound delay time so that the sounds from different speakers arrive at the listener sitting on the selected seat a...

Page 54: ...inary sound image Front Focus fine adjustment 1 Touch Adjust 2 Touch Delay 3 Set each parameter as follows Sound Image LR Front Focus the sound image on the front of front seats Sound Image LR Rear Focus the sound image on the front of rear seats Size of the Virtual Sound Field Adjust the size of sound image to meet your taste If the sound image is shifted from the front move it back by Sound Imag...

Page 55: ...ume down continuously MODE Switch sources Mute ON OFF Select preset radio stations Select next track file chapter Seek radio stations Forward Search Select preset radio stations Select previous track file chapter Seek radio stations Reverse Search Receive an incoming call Make a phone call Decline refuse an incoming call End a phone call Decline refuse an incoming call End a phone call VOICE Start...

Page 56: ...ons may cause the battery to leak fluid If spilled fluid comes in contact with your eyes or on clothing immediately rinse with water and consult a physician Danger of explosion if Lithium battery is incorrectly replaced Replace only with the same or equivalent type Remove the battery if the remote control is not used for a month or longer When disposing of used batteries comply with governmental r...

Page 57: ... For the Radio source switches to broadcast stations received by the unit For the DVD Video CD source selects the chapter scene track to be played ENT L Starts pauses playback Performs the selected function DIRECT Switches to the direct search mode For details on the direct search mode see Direct search mode P 58 VOICE Activates the voice control AM FM Selects FM AM band to be received Numeric Key...

Page 58: ...DIRECT button to select the content The available contents are different depending on the source type DVD Title number Chapter number Video CD 1 X and 2 X PBC OFF Track number Video CD 2 X PBC ON Scene number Track number Music CD Track number Radio Frequency value 3 Enter the number of the content you want to play using the numeric keypad 4 For DVD or Video CD music CD press the ENT button For Ra...

Page 59: ...ord the file again or use another disc T Link does not sound Verify that the T Link installed device is selected in Bluetooth connection setup Raise the volume on your smartphone Try another music application Some application does not support T Link playback Apple Music App does not support to playback during T Link iPod or Bluetooth source does not sound If you used T Link source before verify th...

Page 60: ...dio player is selected as a source although no iPod Bluetooth audio player is connected Change the source to any source other than iPod Bluetooth Audio Connect an iPod Bluetooth audio player and change the source to iPod Bluetooth again No Media file The connected USB device contains no playable audio file Media was played that doesn t have data recorded that the unit can play See Playable Media a...

Page 61: ...D VCD v Super video CD Photo CD CD EXTRA r Only music CD session can be played HDCD r Normal music CD sound quality CCCD Others Dualdisc Super audio CD r Only CD layer can be played v Playback is possible r Playback is partly possible Playback is impossible 1 Incompatible with 8 cm 3 inch discs Use of DualDisc When playing a DualDisc on this unit the surface of the disc that is not played may be s...

Page 62: ...ts playback of High Resolution Audio files It is recommended that a car audio system should be configured with all High Resolution Audio compatible products from player to speaker to enjoy its high quality sound DSD is available for Premium AVX only Acceptable Video files Profile Max Picture size Max bit rate Audio format MPEG 1 mpg mpeg 352 240 352 288 1 5 Mbps MPEG Audio Layer 2 MPEG 2 mpg mpeg ...

Page 63: ... angles you can select a favorite angle 16 9 LB Indicates the type of screen for the image The left mark indicates that a wide image picture 16 9 is displayed on a standard TV set screen 4 3 with a black band at both the top and bottom of the screen letter box Operation regulatory marks With this DVD some functions of this unit such as the play function may be restricted depending on the location ...

Page 64: ...ks Kashmiri ku Kurdish ky Kirghiz la Latin lb Luxembourgish ln Lingala lo Laotian lt Lithuanian lv Latvian Lettish mg Malagasy mi Maori mk Macedonian ml Malayalam mn Mongolian mo Moldavian mr Marathi ms Malay mt Maltese my Burmese na Nauru ne Nepali nl Dutch no Norwegian oc Occitan om Afan Oromo or Oriya pa Punjabi pl Polish ps Pashto Pushto pt Portuguese qu Quechua rm Rhaeto Romance Code Language...

Page 65: ...Standard USB 2 0 High Speed File System FAT 16 32 exFAT NTFS Maximum Power Supply Current DC 5 V 1 0 A 1 D A Converter 24 32 bit Audio Decoder MP3 WMA AAC WAV FLAC Vorbis DSD DSD is available for Premium AVX only Video Decoder MPEG1 MPEG2 MPEG4 WMV H 264 MKV Bluetooth section Technology Bluetooth Ver 4 1 Frequency 2 402 2 480 GHz Output Power 4dBm MAX 0dBm AVE Power Class2 Maximum Communication ra...

Page 66: ...frequency band 20 88 000 Hz Speaker Impedance 4 8 Ω Graphics equalizer Band 13 Band Frequency BAND1 13 62 5 100 160 250 400 630 1k 1 6k 2 5k 4k 6 3k 10k 16k Hz Gain 9 8 7 6 5 4 3 2 1 0 1 2 3 4 5 6 7 8 9 dB General Operating Voltage 14 4 V 10 5 16 V allowable Maximum Current Consumption 15 A Dimensions W H D 205 104 163 6 mm Weight 2 1 kg NOTE Although the effective pixels for the liquid crystal pa...

Page 67: ...uitous QuickBoot TM is a trademark of Ubiquitous Corp Copyright 2017 Ubiquitous Corp All rights reserved THIS PRODUCT IS LICENSED UNDER THE AVC PATENT PORTFOLIO LICENSE FOR THE PERSONAL USE OF A CONSUMER OR OTHER USES IN WHICH IT DOES NOT RECEIVE REMUNERATION TO ENCODE VIDEO IN COMPLIANCE WITH THE AVC STANDARD AVC VIDEO AND OR DECODE AVC VIDEO THAT WAS ENCODED BY A CONSUMER ENGAGED IN A PERSONAL A...

Page 68: ...IES OF MERCHANTABILITY AND FITNESS FOR A PARTICULAR PURPOSE ARE DISCLAIMED IN NO EVENT SHALL THE FOUNDATION OR CONTRIBUTORS BE LIABLE FOR ANY DIRECT INDIRECT INCIDENTAL SPECIAL EXEMPLARY OR CONSEQUENTIAL DAMAGES INCLUDING BUT NOT LIMITED TO PROCUREMENT OF SUBSTITUTE GOODS OR SERVICES LOSS OF USE DATA OR PROFITS OR BUSINESS INTERRUPTION HOWEVER CAUSED AND ON ANY THEORY OF LIABILITY WHETHER IN CONTR...

Page 69: ... outlet on a circuit different from that to which the receiver is connected Consult the dealer or an experienced radio TV technician for help Declaration of Conformity with regard to the RE Directive 2014 53 EU Declaration of Conformity with regard to the RoHS Directive 2011 65 EU Manufacturer JVC KENWOOD Corporation 3 12 Moriyacho Kanagawa ku Yokohama shi Kanagawa 221 0022 JAPAN EU Representative...

Page 70: ... How to confirm the serial number of this unit 1 Press button 2 Touch 3 Touch General 4 Touch Software Information 5 Confirm the Serial Number Serial Number Manufacturer Model Name Premium AVX DDXGT700R Basic AVX DDXGT500R For further information Please check the below special website for further information https 19cy jvckenwood com KL19_TAM_En indb 70 2019 01 16 15 35 ...

Page 71: ...ark of Linus Torvalds in the U S and other countries Wi Fi is a registered trademark of Wi Fi Alliance 中文 著作權聲明 Apple iPhone iPod iPod touch iTunes Apple Music 和 Lightning 是 Apple Inc 在美國或其他國家冊的商標 App Store 是 Apple Inc 在美國及其他國家 或地區註冊的服務商標 Waze 是 Google LLC 的商標 IOS is a trademark or registered trademark of Cisco in the U S and other countries and is used under license SPOTIFY and the Spotify logo a...

Reviews: