background image

12

Installation

Important Installation Notes

Before proceeding with the connection of your lighting system, please take a few moments to 
read these important notes which will assist you in ensuring a successful installation.

1. Use good cable routing practices.

• In order to prevent noise or electro-magnetic interference which may adversely affect the 

signals transmitted over your DMX communication cables, avoid running the cables close to 
AC wiring, line-level cables, or speaker wires.

• Cross any existing electrical cables at 90-degree angles to avoid electrical interference. 

Never run them side by side unless there’s at least a 2-in. separation.

• Gently pull cables when fishing. Don’t jerk or yank on the wires or pull them around sharp 

corners.

2. Use appropriate fasteners.

• Never crush CAT-5e cables with staples or other fasteners like bent-over nails. Instead, 

bundle them or strap them to framing with loose loops of Velcro and then use special cable 
straps after all the cables are run. Alternatively, secure the cables to framing using 
inexpensive plastic retainer clips such as those used for securing telephone wires or coaxial 
TV cable in place.

• If you find it absolutely necessary to use staples to secure a cable in place, use those with 

insulators to prevent placing undue pressure on the cable jacket.

3. Tie up loose ends.

• Tie up all your cable runs. Network and audio line levels are small electrical signals compared 

with those in AC power lines and noise emitted by fluorescent ballasts and starters.

• Secure the DMX communication cable away from all sources of electrical interference such 

as compressors, neon transformers, and air purification systems (or 

smoke eaters

).

• Make sweeping, gradual bends of no less than a 2-in. radius, not sharp bends.

Summary of Contents for Allegro

Page 1: ......

Page 2: ...publication may be reproduced stored in any retrieval system or transmitted in any form or by any means electronic mechanical recording or otherwise without prior written consent of TouchTunes Interactive Networks Changes are periodically made to the information herein these changes will be incorporated into new editions of this publication TouchTunes may make improvements and or changes in the pr...

Page 3: ...Introduction 5 About This Guide 5 Disclaimer and Important Safety Information 6 2 Installation 9 DMX Software Protocol 9 Hardware Connection Methods 10 Important Installation Notes 12 Connecting the DMX System to TouchTunes Digital Jukeboxes 13 ...

Page 4: ...iv ...

Page 5: ...digital interface called DMX512 This document is intended as a reference for Operators of TouchTunes Digital Jukeboxes and their technicians when implementing such a connection It is also intended as a reference for TouchTunes technical support and field service personnel Note This document is not intended to educate the reader about the DMX512 digital interface For more information about the prot...

Page 6: ... including amplifiers that produce heat CAUTION Do not defeat the safety purposes of the polarized or grounding type plug A polarized plug has two blades with one blade wider than the other A grounding type plug has two blades and a third grounding prong The wider blade or the third grounding prong are provided for your safety If the provided plug does not fit in your outlet consult an electrician...

Page 7: ... that could result in a fire or electric shock Use only attachments and accessories specified by the manufacturer Refer all services to qualified service personnel Services is required when the apparatus has been damaged in any way such as power supply cord or plug is damaged liquid has been spilled or objects have fallen into the apparatus the apparatus has been exposed to rain or moisture does n...

Page 8: ...8 DMX512 Light Show Introduction ...

Page 9: ...unes Jukebox An installer may choose to use these 18 DMX channels in sets of 3 or as 18 individual channels Use the DMX512 protocol to stream data from the controller to the fixtures Each light uses three sequentially numbered DMX channels one each for the colors red green and blue Therefore you can assign 18 light numbers to a DMX512 universe Refer to the table below for all light numbers and the...

Page 10: ...urations available TouchTunes does not supply cables for connecting your DMX system You can either purchase these cables from an electronics store or wire them yourself using the pinout information provided in this section TouchTunes implementation of DMX512 interconnection is based on communication over UTP Cat5e cable DMX systems may use several physical interconnection methods Most common metho...

Page 11: ...Hardware Connection Methods 11 2 RJ45 to XLR 5 pin typical 3 RJ45 to XLR 3 pin To lighting console To jukebox To lighting console To jukebox ...

Page 12: ...ever crush CAT 5e cables with staples or other fasteners like bent over nails Instead bundle them or strap them to framing with loose loops of Velcro and then use special cable straps after all the cables are run Alternatively secure the cables to framing using inexpensive plastic retainer clips such as those used for securing telephone wires or coaxial TV cable in place If you find it absolutely ...

Page 13: ... Model The Allegro is designed with a cable channel that allows you to route outside cables to internal jukebox components A wire strain relief bracket provides slack for cables inside the jukebox and also covers the opening to the cable channel to keep dust out In the following procedure adjust this bracket to access the opening to the cable channel Note Only route cables in to and out of the juk...

Page 14: ...hannel opening 4 Tighten the screws for the wire strain relief bracket to keep open the cable channel opening Once the cable channel is open and the wire strain relief bracket is loose you are ready to connect the jukebox to the lighting console 5 Locate the Allegro s control board The control board is usually mounted on or near the rear of the Allegro s touchscreen 6 Locate the RJ45 cable for the...

Page 15: ... to internal jukebox components A wire strain relief bracket provides slack for cables inside the jukebox and also covers the opening to the cable channel to keep dust out In the following procedure adjust this bracket to access the opening to the cable channel Note Only route cables into and out of the jukebox through the provided cable channel opening Do not route cables through any other openin...

Page 16: ...ef bracket to keep open the cable channel opening Once the cable channel is open and the wire strain relief bracket is loose you are ready to connect the jukebox to the lighting console 5 Locate the Ovation s control board The control board is usually mounted on or near the rear of the Ovation s touchscreen 6 Locate the RJ45 cable for the DMX connection 7 Connect the RJ45 end of the cable to the D...

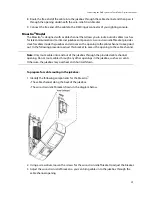
Page 17: ... to the cable channel to keep dust out In the following procedure adjust this bracket to access the opening to the cable channel Note Only route cables into and out of the jukebox through the provided cable channel opening Do not route cables through any other openings in the jukebox such as air vents Otherwise the jukebox may overheat and shut itself down To prepare for cable routing in the jukeb...

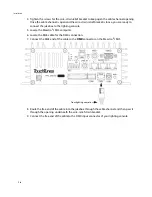
Page 18: ... console 5 Locate the MaestroII s MJS computer 6 Locate the RJ45 cable for the DMX connection 7 Connect the RJ45 end of the cable to the DMX connector on the MaestroII s MJS 8 Route the free end of the cable into the jukebox through the cable channel and then pass it through the opening underneath the wire relief strain bracket 9 Connect the free end of the cable to the DMX input connector of your...

Page 19: ...ouchTunes Interactive Networks Inc 400 Sainte Croix Avenue Suite 200 E Montreal Quebec Canada H4N 3L4 TouchTunes Interactive Networks Inc 3455 Salt Creek Lane Suite 100 Arlington Heights IL 60005 USA Technical Support 847 353 1954 www touchtunes com ...

Page 20: ......

Reviews:

Related manuals for Allegro