

ANIMATED WINDOW DISPLAY KIT
INSTRUCTION MANUAL
Please read the Instruction Manual carefully before operation.
Image System
TFT LCD
Color
24-bit RGB
Contrast Ratio
500:1
Keystone Correction
±15°
Native Resolution
1920x1080
Power Supply
12V
Lamp
30W LED
Power Consumption
35W
Lens
F=125
Media Input
USB/HDMI
Projection
Distance
1M-4.8M
Sound Output
3.5mm earphone
Aspect Ratio
16:9/4:3
Menu Languages
English, Spanish, French,
additional
Projection Size
25”~130”
Projector Components
Projector Keys on
Projector
Remote Information
Remarks
1. The Total Home FX kit is for indoor use only. Always operate in a dry environment.
2. For proper protection, please do not look directly into the lens during set up or operation.
3. During operation, please keep the lens at least 3 feet from fabrics, such as window
curtains, furniture, or other flammable items.
4. Always operate in a ventilated area and do not block or cover the vents in the main
housing.
5. Please only use the provided adapter and power cord with the projector. Failure to use
these may create a fire hazard and may void any warranty.
6. For additional protection, please turn off the projector and remove the power supply when
not in use.
7. Please use original supplied box and packing material when transporting.
8. Never open the projector housing. Only authorized personnel should be allowed access
to the projector electronics.
9. For Adult use only. Not intended for the use by children under the age of 15.
10. Use only new, button cell battery (size CR2025) for the remote control.
11. To remove wrinkles in the projection material, use a low heat iron (on delicate or silk
setting) and lay a cotton towel or cloth between the iron and the projection material. Do not
make direct contact with the iron to the projection material. Never put the projection material
in the dryer.
12. Warning: Changes or modifications to this unit not expressly approved by the party
responsible for compliance could void the user’s authority to operate the equipment.
13. If you find any operational defects, please do not attempt to repair. Unplug the projector
immediately and call the Customer Service phone #: 1-888-476-7100
NOTE: This equipment has been tested and found to comply with the limits for a Class B digital
device, pursuant to Part 15 of the FCC Rules. These limits are designed to provide reasonable
protection against harmful interference in a residential installation. This equipment generates,
uses, and can radiate radio frequency energy and, if not installed and used in accordance with
the instructions, may cause harmful interference to radio communications.
However, there is no guarantee that interference will not occur in a particular installation. If this
equipment does cause harmful interference to radio or television reception, which can be
determined by turning the equipment off and on, the user is encouraged to try to correct the
interference by one or more of the following measures:
a. Reorient or relocate the receiving antenna.
b. Increase the separation between the equipment and receiver.
c.
Connect the equipment into an outlet on a circuit different from that to which the
receiver is connected.
Consult the dealer or an experienced radio/TV technician for help.
Supported File Formats
Multimedia Type
File Formats Supported
Video
AVI/FLV/MOV/MP4/MKV/RMVB
Setting up the Projector
The Total Home FX Projector is designed to project from the inside of your home onto windows for
outside viewing or on a wall for inside viewing. Based on your viewing selection, either window or wall,
arrange your setup accordingly.
For Window Projection
: the projector should be placed within 4 to 8 feet from the window you will be
using. Use the included projection screen material with the two-sided tape to attach to your window or
window frame.
For Wall Projection
: the projector should be placed within 4 to 8 feet of the wall you will be using. You
may hang the included projection screen to your wall for increased image quality of the projection.
Projector Operation
1. Begin by connecting the power adapter to the projector. Connect the power adapter to the AC power
outlet.
2. Power on the projector by pressing the power button on the projector. The projector is now ON in
active mode.
3. Adjust the focus of the projection by rotating the lens barrel.
4. If a slight trapezoid distortion is visible, move the Keystone wheel to adjust and square the projected
image.
5. Select Multimedia Icon (Image 1), then press OK on your remote or projector.
6. Select Preload Icon (Image 2), then press OK on your remote or projector.
7. On the next menu, select the orientation of the video to be projected, either horizontal or vertical.
Select the orientation by highlighting the folder and pressing the OK button. If the desired orientation is
vertical, the projector must be turned on its side (see images below).
8. On the next menu, select the season (Image 3) that you would like to play by highlighting the desired
folder and pressing the OK button. The Pre-loaded files will appear (Image 4).
9. To play all videos, press play on your remote or projector; to select specific videos, highlight the
videos and press OK on your remote or projector and a small checkmark will appear. After a few
seconds of non-activity, a small preview video will appear. To exit out of preview mode, simply move
using the arrow keys or press play and the videos will enter full screen format.
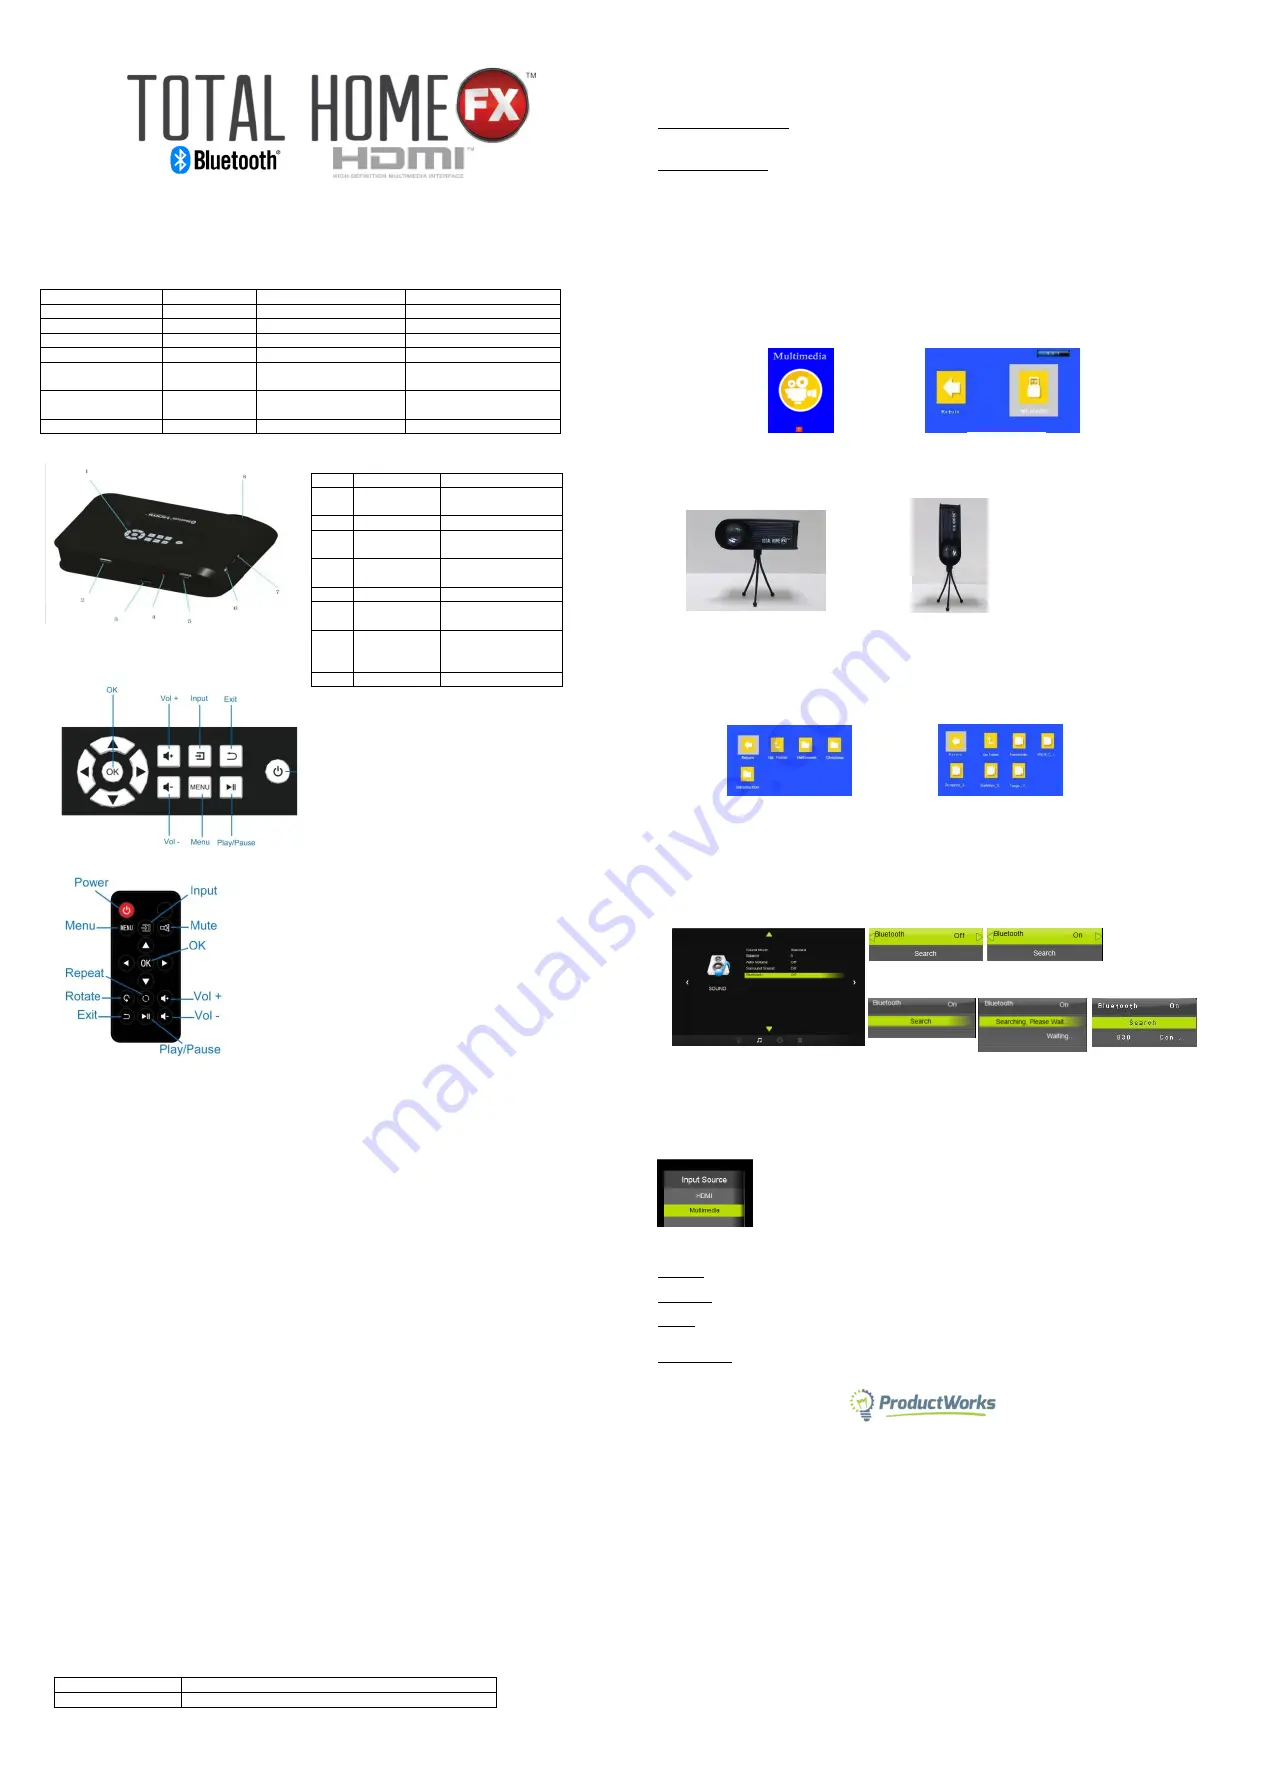
Bluetooth Setup
Set Bluetooth pairing on the Sound sub-menu. Defaulted setting is Bluetooth off.
Click “right” button,
turn it ON. Then press “search” and find nearby device, max 5 devices. Select device for pairing, it will
show “Connected” once paired successfully.
(See Images below)
Before connecting your own speaker or headphone device to projector for Bluetooth function, please make sure these
devices were clear up any hook up from other device, such as smart phone and audio equipment. Otherwise projector
will not “Search” them successfully. Our Bluetooth module is suitable for connecting general speaker equipment, but
no guarantee for all market unit, preferred external speaker model you may visit our website-www.totalhomefx.com
.
HDMI Setup
1
.
Press the Input/Source button on remote or projector and select HDMI. HDMI cable not included.
Additional Operation Options
REPEAT:
To repeat a video or all videos playing, press the repeat button on the remote. There are 3 possible options
for repeating: None, one video, or all videos.
REVERSE:
Some videos have text which will need to be reversed when projecting onto a window to be viewed
outside the window. Press the rotate button on the remote to find the desired orientation.
TIMER:
After selecting the videos to be played, press the MENU button on the remote or the projector. Use the left or
right arrow keys to cycle to the TIME menu. Select the number of minutes that the projector will play and then turn off.
There is no Auto On function.
QUICK MENU:
While the video is playing, press the OK button to access the Quick Menu. The Quick Menu includes
further operational functions, such as Fast Forward, Rewind. There are also features to skip to the next video or to
return to the previous video.
1-888-476-7100
610 Academy Drive
Northbrook, IL 60062
Visit our website for more information, to purchase additional downloadable videos, and to submit a customer service request.
NO.
Definition
Purpose
1
Function
Keys
Operating keys
2
HDMI Slot
Insert HDMI Source
3
Keystone
Wheel
Adjust angle
distortion
4
IR Receiver
Remote control
signal receiver
5
USB Port
Insert USB
6
Power Input
Port
Insert power supply
adapter
7
3.5mm
Earphone
Port
Insert earphone or
speaker
8
Lens Barrel
Adjust focus
HORIZONTAL ORIENTATION
VERTICAL ORIENTATION
Note
: Please remove batteries
from remote for extended
periods of inactivity.
Image 1
Image 2
Image 3
Image 4
1 2 3
4 5 6


