background image

23

22

Preparations

p.59

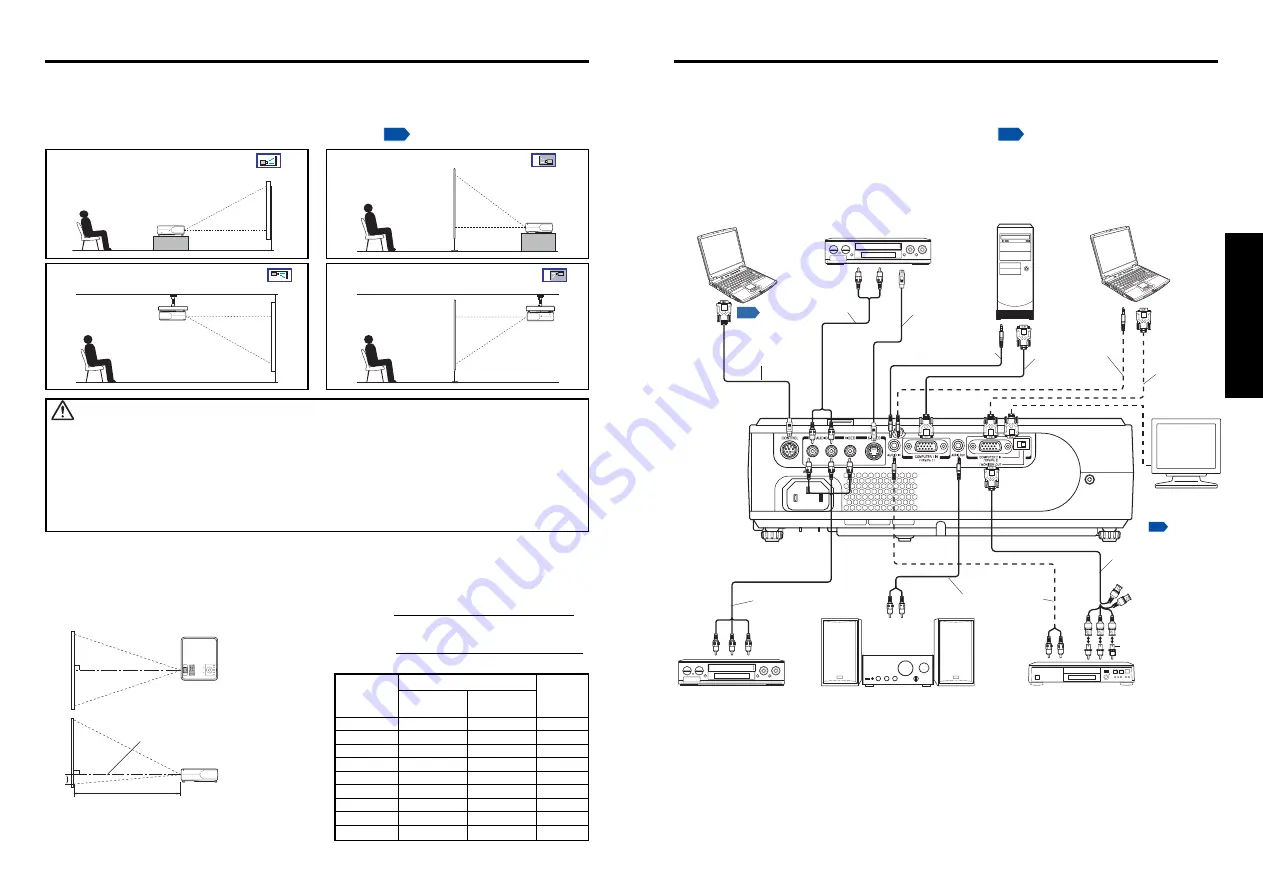
Video recorder,

DVD player, etc.

To audio output
White (L)/Red (R)

S-video cable
(not supplied)

To S-video output

Before connection

• Read the owner’s manual of the device you are connecting to the projector.
• Some types of computer cannot be used or connected to this projector.

Check for an RGB output terminal, supported signal 

p.57

, etc.

• Turn off the power of both devices before connecting.
• The figure is a sample connection. This does not mean that all of these devices can or

must be connected simultaneously. (Dotted lines mean items can be exchanged.)

Connection

Computer

(for control)

Computer

To
RS-232C
terminal

Audio cable
(not supplied)

To audio output

Control cable

RGB cable
(supplied)

To RGB
output

Computer

Audio cable
(not supplied)

To audio
output

Audio cable
(not supplied)

RGB cable
(not supplied)

To RGB
output

Placement Styles

As shown in the figures below, this device can be placed in 4 different styles.
The factory setting is “floor-mounted front projection.” Set the [

Projection mode

]


in the

Default setting 2 

menu, in accordance with your needs. 

p.43

Placement

 WARNING

• Always obey the instructions listed in IMPORTANT SAFETY INSTRUCTIONS when placing the unit.

Attempting to clean/replace the lamp at a high site by yourself may cause you to drop down, thus
resulting in injury.

• If you wish to mount the projector on the ceiling, be sure to ask your dealer to do so. Mounting the

projector on a ceiling requires special ceiling brackets (sold separately) and specialized knowledge.
Improper mounting could cause the projector to fall, resulting in an accident.

• If the projector is ceiling-mounted, install the breaker for turning off the power in case of anomaly. Let

everyone involved with the use of the projector know that fact.

Floor-mounted front projection 

Floor-mounted rear projection 

Ceiling-mounted front projection 

Ceiling-mounted rear projection 

Projection Distance and Size

Use the figures, tables, and formulas below to determine the projection size and projection
distance. (Projection sizes are approximate values for full-size picture with no keystone
adjustment.)

Screen

As seen from above

As seen from the side


90

°

90

°

a

H

Lens center

a

 is the distance (

ft

) between the lens and the screen, and

corresponds to a range of 

4

.

7

ft

 to 

37

.

0


ft

H

 is the

height from the image bottom to the center of the lens.

Audio amplifier, etc.

DVD video recorder, etc.

Video recorder, etc.

Conversion
adapter BNC-pin
(not supplied)

Monitor cable Mini
D-sub 15P-BNC
(not supplied)

To audio input
White (L)/Red (R)

AV cable
(not supplied)

To video
output

Audio cable
(not supplied)

Audio cable
(not supplied)

To audio
output

To Y/C

B

/C

R

 output

Green (Y)/Blue
(C

B

)/Red (C

R

)

To audio
output
White (L)/
Red (R)

It is necessary to
switch to MONITOR
OUT by the switch.

Monitor

p.18

projection

projection distance a (

ft

)

height (H)

min length

max length

size (

in

)

(zooming max) (zooming min)

(

in

)


33 

                 4

.

71            1

.

6


40

     4

.

77              5

.7

6            2

.0


60

     7

.2

5              8

.

73           2

.

9


80

     9

.

73            11

.

70           3

.9


100

   12

.

22            14

.

68            4

.

9


150

   18

.

42            22

.

11            7

.

3


200

   24

.

63            29

.

55            9

.

8


250

             30

.

83            36

.

98          

1

2.2


300

             37

.

03               –              14

.

7

a (min length) =

 projection size (inches) – 1.547

8

.

0589

a (max length) =

 projection size (inches) – 1.2907

6

.

7256

Summary of Contents for TLP-X3000

Page 1: ...trusted dependable name in projector lamp sales http www myprojectorlamps com http www myprojectorlamps ca http www myprojectorlamps eu The following projector manual has not been modified or altered in any way ...

Page 2: ...Others Maintenance Operations Preparations Before Using OWNER S MANUAL 3LCD DATA PROJECTOR TLP X3000 TLP XC3000 With Document Camera TLP X3000 ...

Page 3: ...cause harmful interference to radio or television reception which can be determined by turning the equipment off and on the user is encouraged to try to correct the interference by one or more of the following measures TRADE NAME DATA PROJECTOR MODEL NAME TLP X3000 Tested To Comply With FCC Standards FOR HOME OR OFFICE USE Reorient or relocate the receiving antenna Increase the separation between ...

Page 4: ...RVE ALL WARNINGS AND INSTRUCTIONS GIVEN IN THIS OWNER S MANUAL AND THOSE MARKED ON THE UNIT RETAIN THIS BOOKLET FOR FUTURE REFERENCE This unit is fully transistorized and does not contain any parts that can be repaired by the user DO NOT REMOVE THE CABINET COVER OR YOU MAY BE EXPOSED TO DANGEROUS VOLTAGE REFER SERVICING TO QUALIFIED SERVICE PERSONNEL ONLY 1 Read Owner s Manual After unpacking this...

Page 5: ...uld break please handle with care to avoid injury and contact your dealer for repair service The broken pieces of glass may cause to injury In the unlikely event of the lamp rupturing thoroughly clean the area around the projector and discard any edible items placed in that area 18 Servicing Do not attempt to service this product yourself as opening or removing covers may expose you to dangerous v...

Page 6: ...o wait until the condensation naturally disappears In a high altitude location where air is thin cooling efficiency is reduced so use the projector with Fan mode set to High p 43 POWER SUPPLY CORD SELECTION 19 Replacement Parts When replacement parts are required be sure the service technician has used replacement parts specified by the manufacturer or have the same characteristics as the original...

Page 7: ...ans and the environment The lamp contains mercury Please dispose of this product or used lamps in accordance with local regulations Following information is only for EU member states The use of the symbol indicates that this product may not be treated as household waste By ensuring this product is disposed of correctly you will help prevent potential negative consequences for the environment and h...

Page 8: ...Cutting off the picture and sound temporarily Mute 31 Changing picture mode 31 Changing screen size 32 Freezing the image Freeze 32 Setting the password 33 Using the menus 36 How to use the menus 36 The image adjustment menu 37 The display setting menu 39 The default setting menu 42 Displaying Information Status display 44 Using the document camera 45 Preparation of the document camera 45 Image pr...

Page 9: ...rt on the main unit Back Front 3 2 16 1 15 14 12 11 13 12 4 8 5 6 10 9 7 Name Function 1 Infrared remote sensor Senses commands from the remote control p 20 2 Foot adjuster release button Press to set up or stow the foot adjuster p 28 3 Air intake Draws in air from outside the projector 4 Control panel Operates the projector p 16 5 Zooming lever Adjusts screen size p 28 6 Focusing ring Adjusts scr...

Page 10: ...to dangerous exposure to laser Name Main Function 13 AUTO SET button Sets up input from computer p 29 14 Laser indicator Lights when laser is on 15 Mouse control button Controls a mouse pointer p 21 16 PAGE button Proceeds PowerPoint slides p 21 17 MUTE button Cuts off the picture and sound temporarily p 31 18 FREEZE button Pauses image p 32 19 Ten Key button Use when entering password 20 Remote c...

Page 11: ...o and locking of white balance p 48 11 LED LIGHT button Switches on off the LED illumination p 46 1 2 3 4 6 5 7 8 9 10 11 8 Name Main Function 1 CONTROL terminal When operating the projector via a computer connect this to the controlling computer s RS 232C port p 59 2 AUDIO L R terminal Input audio signals from video equipment 3 VIDEO terminal Input video signals from video equipment 4 S VIDEO ter...

Page 12: ...perating the remote control Turn on the ON OFF switch of the remote control Point toward the projector s infrared remote sensor and press a button on the remote control Operating the projector from the front Approx 15 Approx 5m Loading dry cell batteries into the remote control q Remove the battery cover w Insert the dry cell batteries Be sure to align the plus and minus ends of the batteries prop...

Page 13: ...ld separately and specialized knowledge Improper mounting could cause the projector to fall resulting in an accident If the projector is ceiling mounted install the breaker for turning off the power in case of anomaly Let everyone involved with the use of the projector know that fact Floor mounted front projection Floor mounted rear projection Ceiling mounted front projection Ceiling mounted rear ...

Page 14: ...Doing so could cause burns deform break the object Power cord connector Supplied Start up screen Control panel Remote Control Notes When COMPUTER 2 IN terminal also used for MONITOR OUT terminal is used as MONITOR OUT terminal the signal which is input to COMPUTER 1 IN terminal is output Signals are output from MONITOR OUT terminal even in standby mode However from AUDIO OUT terminal no audio sign...

Page 15: ...ional Korean Notes The start up screen will disappear after a moment You can dismiss the start up screen before this by performing any operation You can also configure the start up screen not to appear via the Display setting menu p 39 The first time you use the projector after purchase after the start up screen disappears the start menu is displayed p 27 Beep sound can be set not to beep in the D...

Page 16: ...use the right and left tilt adjusters To stow the foot adjuster hold up the projec tor while pressing the foot adjuster release button then slowly lower the projector 6 Adjusting the screen size and focus q Use the zooming lever to adjust the screen size w Use the focusing ring to adjust the focus 7 Adjusting the volume with the buttons The speaker volume can be adjusted when an audio signal is be...

Page 17: ...NCE mode of the Image adjustment menu has the same function p 37 Remote Control Using handy features Continued Adjusting Keystone distortion Auto 2 Press the button The keystone distortion is automatically corrected The icon appears during this correction When adjustment is finished the Keystone menu appears again For fine adjust ment select V keystone by the button and adjust image manually by th...

Page 18: ...button Pressing the button switches Full Thru Wide in turn Notes Thru display is available for computer input images Screen size of the Display setting menu has the same function p 39 If you use this function on commercial video software broadcast or cable broadcasting except for the purpose of your private viewing and listening it may infringe the copyright protected by the copyright laws Freezin...

Page 19: ...ord entry screen is displayed If you enter a wrong password for more than 5 times the projector will automatically power off and enter standby mode Note Even if you have forgot the password setting the password setting can be forcibly set to On by detaching the control panel from the projector first when the power is turned back on after the power cord has been unplugged If you can not change the ...

Page 20: ...y fine vertical lines appear on the screen H position Yes No No No No Adjust the horizontal position of the image You can call up on screen menus and conduct a number of adjustments and settings using the operation buttons p 16 on the control panel main unit side and remote control How to use the menus The menu shown below is for operation instructions purposes and might differ from the actual dis...

Page 21: ...en power is turned on On Off Display a logo customized by the user for the start up screen or when there is no input signal or Enter setting mode Selection Logo registration Press to display the registration menu Display style Background Black Blue White Logo confirmation Press Reset logo Yes No Description Item Screen size Detailed description Screen size If Thru is selected for Screen size porti...

Page 22: ...to display images with the varying aspect ratio except for the purpose of your private viewing and listening it may infringe the copyright protected by the copyright laws Up down shift Shifts the projected image vertically when Screen size is Wide Blackboard mode Projects the image in colors more like projecting on a screen Precaution The projected image may differ depending on the type color and ...

Page 23: ...jectors are used and controlled by the remote control respectively this menu sets the code for the projector and the remote control or Enter setting mode Select from 1 2 3 4 Confirm Select OK to end Press Cancel to return Lock the control panel buttons or Enter setting mode Select On Off Confirm Select OK to end Press Cancel to return Press The password and user logo are not reset Resets all adjus...

Page 24: ...s projector is used Yes Yes Yes Yes Yes Version Firmware version Note 4 Yes Yes Yes Yes Yes Notes 1 The mode of supported RGB signals p 57 is shown 2 Sync signal polarity shown as P positive or N negative for H V 3 Displays Lamp time as a measure of when the lamp should be replaced Cannot be used as a counter of guaranteed lamp time Please replace the lamp after 2000 hours of use if Lamp power is ...

Page 25: ... to about 43 cm Notes You can use the RESIZE function of the remote controller to change the size of an image p 30 In the camera input mode the image may disappear for a moment This is not a problem 6 Adjust the focus with the focusing ring of the camera head Adjust by rotating the focusing ring of the camera head until the projected image becomes clear 7 If the screen is too dark or too bright us...

Page 26: ...s with care to avoid injury and contact your dealer for repair service In the event of lamp burst unplug the product from the wall outlet leave and completely ventilate the room Then thoroughly clean the area around the projector and discard any edible items placed in that area When the lamp bursts consult a doctor if glass dust or mercury gas gets into your eyes or you breathe it About lamp Maint...

Page 27: ...as shown to remove the lamp cover Use care to avoid any damage to nails and or tip of your finger s If you have any difficulty in removal you can use a screwdriver or any other smaller tool for your convenience 4 Pull out the lamp Loosen the three lamp locking screws pull up the handle and remove the lamp Lamp cover 2 1 1 2 3 4 A lamp is consumable supplies If used for extended periods images will...

Page 28: ...message Check the air filter for dirt is displayed every 100 hours If the usage time exceeds 100 hours this message is displayed for about 30 seconds when the image is displayed for the first time after power is turned on This display will be dismissed with any operation Check out the filter and any debris is found use the following procedure for cleaning WARNING Request cleaning and maintenance o...

Page 29: ...there any obstructions between the remote control and projector Are there any fluorescent or other bright lights shining at the projector s infrared remote sensor The indicator lights to inform you of internal abnormalities No power Problem with projector Unplug the power cord and contact your dealer Lamp went out during use or won t come on Lamp temperature is high so that it is difficult to turn...

Page 30: ... general specifications Item Specification Consumption Power TLP X3000 320 W TLP XC3000 320 W Weight TLP X3000 2 8 kg TLP XC3000 4 0 kg External Dimensions TLP X3000 288 92 247 mm W H D including protruding parts TLP XC3000 370 5 92 249 mm W H D Cabinet material PC resin and PC ABS resin Conditions for usage environment Temp 5 C to 35 C relative humidity 30 to 70 Display method 3 panel transmissio...

Page 31: ...mmands Separately sold product Replacement Lamp Model TLPLW12 List of supported signals Y PB PR signals Signal format fh kHz fv Hz 480i 525i 60Hz 15 73 59 94 480p 525p 60Hz 31 47 59 94 576i 625i 50Hz 15 63 50 00 576p 625p 50Hz 31 25 50 00 720p 750p 60Hz 45 00 60 00 720p 750p 50Hz 37 50 50 00 1080i 1125i 60Hz 33 75 60 00 1080i 1125i 50Hz 28 13 50 00 List of supported signals Video S Video signals V...

Page 32: ......

Reviews: