background image

40

41

Operations

<Logo registration>

  How to register user logo

1

 Project a picture to register.

2

 Select [User logo] in the Display setting menu, and press the   or 

 button.

3

 Select <Logo registration> from the displayed menu list and press 

the   button.

4

 The registration area is displayed for confirmation. Select [OK] 

and press the   button.

If the picture does not fall within the display area, use the computer to scroll 
the screen.

5

 Registration starts.

To stop the registration, press the 

RETURN

 button.

 Notes

You can register a logo when the input is set to Computer.
If you register a logo after keystone distortion or digital zoom has been adjusted, 
those adjustments will be reset to their factory settings. However, once the logo 
registration is complete, they will return to the adjustments that you made.
The area that can be registered is 51 × 84 dots at the center of the screen. To 
register a company logo, arrange the image within that space.
Only one logo can be registered. When a new image is registered, the old one is 
deleted.
The time needed to register or display the image varies depending on the data size.
Using this function on commercial video software, broadcast or cable-broadcasting 
except for the purpose of your private viewing and listening may infringe the 
copyright protected by the copyright laws.

<Display style>

Select the size of the registered logo.

: Displays the registered image in the original size at center of the screen.

:  Displays the registered image by enlarging it fully within the screen. 

(As processed digitally, the image quality is degraded.)

<Logo confirmation>

You can preview the registered logo.

<Reset logo>

You can reset the registered logo and display style to the factory setting. (The logo 
set for the start-up screen and background is reset.)


Using the menus (Continued)

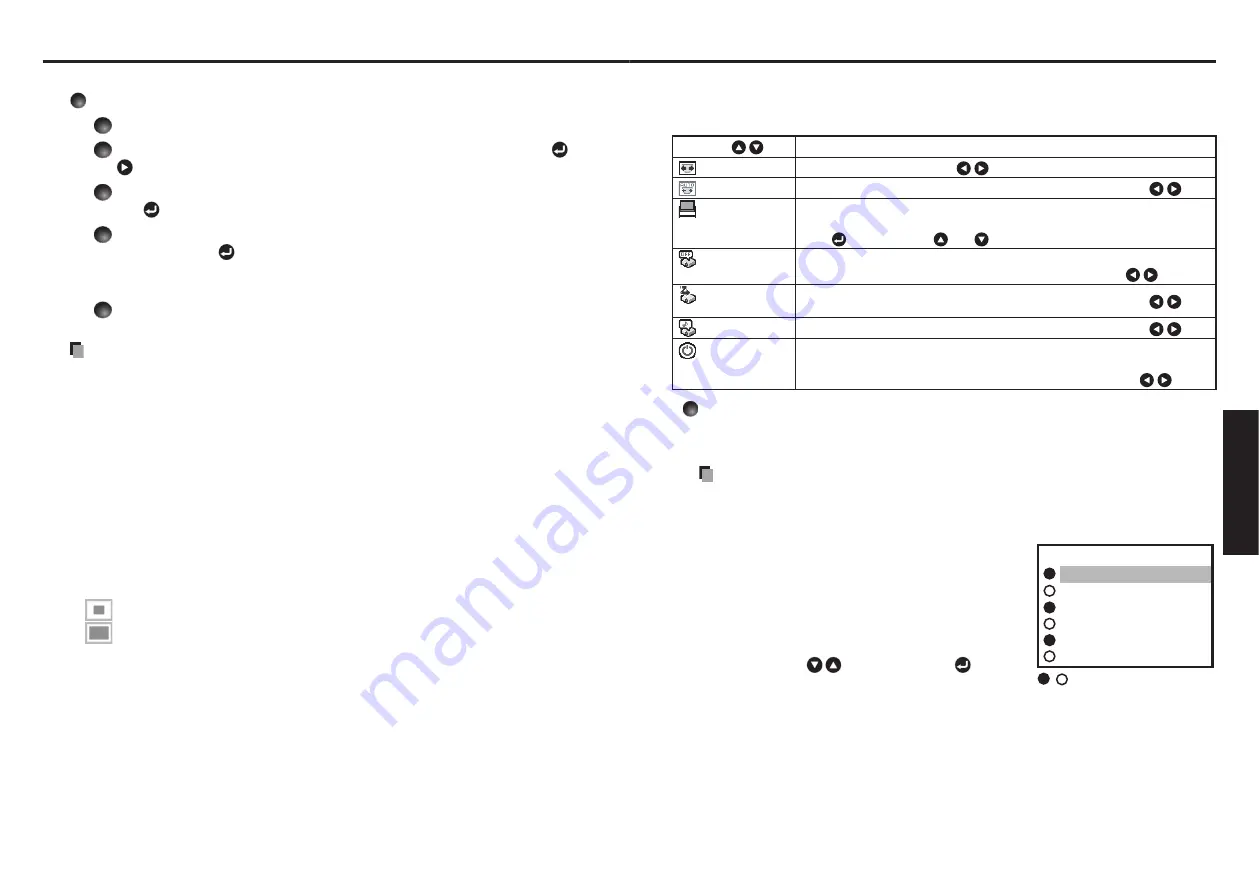
The Default setting menu

This menu shows placement status and other settings.

Default setting 1 menu

Item 


Description

Keystone

Screen shrinking at bottom


Screen shrinking at top

Auto keystone

Always corrects keystone distortion automatically. 

On


 Off

Blackboard 
mode

When projecting on a non-screen surface, select a color in accordance with 
the projecting surface.
Press 

 and switch with 

 and 

Off/Green/Black/Brown/Blue/Beige

No signal 
power off

Sets the time to wait for the power to be turned off after the last operation is 
made with no input signal. 

Off 

(not turned off)


 30 min.

Auto input 
search

Sets whether the input with signals is only selected or not. 

On


 Off

Beep

Beeps when operation is made. 

On


 Off

Power on

Sets whether to turn on the power when the 

ON/STANDBY

 button is pressed 

(Manual), or when the main power switch is turned on (Auto).
 

Manual


 Auto

 Detailed description

[Blackboard mode]

Projects the image in colors more like projecting on a screen.

 Precaution

The projected image may differ depending on the type, color, and material of the 
blackboard and wall even if the selected color is the same as the projected screen.

[Auto input search]

[

On

]:  Automatically searches the signals that can 

be projected, and switches input from the 
connected device that outputs the video 
signals each time the 

INPUT

 button is pressed. 

Input from a connected device that outputs no 
video signals is skipped.

[

Off

]:  Displays the 

Input select

 menu.


Toggle with 


buttons and press 


button. 

(The input without signals can be selected.)

[Power on]

If [

Power on

] is set to [

Auto

] and there is a power outage, the projector will come on 

once power is restored.

Computer 1
Y/P

B

/P

1

Computer 2
Y/P

B

/P

2

Video
S-video

Input select 


/

shows whether signal is 

 input or not.

Input select menu

Summary of Contents for TDP-EX21

Page 1: ...erations Maintenance Others In the spaces provided below record the Model and Serial No located at the bottom of your projector Model No Serial No Retain this information for future reference TDP EX21 DATA PROJECTOR OWNER S MANUAL ...

Page 2: ...s device may not cause harmful interference and 2 this device must accept any interference received including interference that may cause undesired operation This equipment has been tested and found to comply with the limits for a Class B digital device pursuant to part 15 of the FCC Rules These limits are designed to provide reasonable protection against harmful interference in a residential inst...

Page 3: ...duct on a bed sofa rug or other similar surface Do not place it in a built in installation such as a bookcase or rack unless proper ventilation is provided 5 Heat The product should be situated away from heat sources such as radiators heat registers stoves or other products including amplifiers that produce heat 6 Water and Moisture Do not use this product near water for example near a bath tub wa...

Page 4: ...ct on an unstable cart stand tripod bracket or table The product may fall causing serious injury to a child or adult and serious damage to the product A product and cart combination should be moved with care Quick stops excessive force and uneven surfaces may cause the product and cart combination to overturn S 1 5A 19 Damage Requiring Service Unplug this product from the wall outlet and take the ...

Page 5: ...n temperature to prevent the unit from possible damage Place and Manner of Installation Do not place in hot locations such as near heating equipment Doing so could cause a malfuntion and shorten the life of the projector Avoid locations with oil or cigarette smoke These environments will dirty the optical parts shortening their lives and darkening the screen Do not use this product in the upright ...

Page 6: ...registered trademark of Texas Instruments Inc Macintosh is a registered trademark of Apple Computer Inc Microsoft Windows and Windows Vista are registered trademarks or trademarks of Microsoft Corporation in the U S and other countries Adobe and Acrobat Reader are registered trademarks of Adobe Systems Incorporated All other brand and product names are trademarks or registered trademarks of their ...

Page 7: ...the power on and off 24 Basic operations 26 Using handy features 29 Using auto setting For computer input only 29 Correcting the keystone distortion 29 Zooming out the images 30 Resizing image 31 Cutting off the picture and sound temporarily Mute 32 Changing picture mode 32 Changing screen size 32 Freezing the image Freeze 33 Setting the password 33 Using the menus 35 Setup using the Setting displ...

Page 8: ... 4 7 2 5 3 6 1 Remote control 2 R03 SIZE AAA batteries for remote control 2 3 CD ROM 4 Owner s Manual 5 RGB cable 3 m Note 1 6 Power cord Note 1 2 7 Carrying bag Notes 1 To maintain original performance always use the supplied cables 2 The shape and number of supplied power cords vary depending on the product destination Save Original Packing Materials The original shipping carton and packing mate...

Page 9: ...nternal temperature is too high p 49 14 ZOOM button Adjusts the screen size Name Main Function Remote control 1 ENTER button Accepts the selected mode 2 MENU button Displays menus p 35 3 KEYSTONE button Adjusts keystone distortion p 29 4 ON STANDBY button Turns the power on off standby p 24 5 INPUT button Selects input p 26 6 RETURN button Goes back one screen 7 Selection button Menu selections an...

Page 10: ...properly Two batteries R03 SIZE AAA are used 3 Replace the battery cover Operating the remote control Point toward the projector s infrared remote sensor and press any button on the remote control Operating the projector from the front Approx 15 Approx 5m Note When operating the remote control from behind the projector the infrared signal is reflected on the projecting surface The operating range ...

Page 11: ...tor to fall resulting in possible injury and unit damage If the projector is ceiling mounted install the breaker for turning off the power in case of anomaly Let everyone involved with the use of the projector know that fact Placement a is the distance mm feet between the lens and the screen and corresponds to a range of 580 mm 1 90 ft to 1501 mm 4 93 ft H is the height from the image bottom to th...

Page 12: ...ven in standby mode However from AUDIO OUT terminal no audio signal is output A computer monitor cannot accept Y PB PR signals correctly The AUDIO IN terminal doubles for devices connected to COMPUTER terminals 1 and 2 When an AUDIO OUT terminal is connected sound is not output from the projector speaker Output volume of AUDIO OUT terminal can be adjusted by the VOL button Audio amplifier etc DVD ...

Page 13: ... entry screen disappears p 34 Do not touch the lens directly with your hand If fingerprints or stains are left on the projection lens surface they may interfere with the projector s ability to project images on the screen If the lens cover is closed while in use after a moment the power will turn off then the projector goes into standby mode Turning the power off 1 Press the ON STANDBY button When...

Page 14: ...3 Activate the connected device Turn on and start the connected device such as a computer 4 Press the INPUT button An image of the connected equipment is projected Each time you press the INPUT button it switches to the input of the connected equipment that is outputting video signals Notes When Auto input search is set to Off in the Default setting 1 menu p 41 the Input select menu appears if you...

Page 15: ... the keystone adjustment that you set Some adjustments using both digital zoom and keystone correction while displaying an input image with a 16 9 aspect ratio may affect displaying the menu properly In such a case reset either digital zoom or keystone correction to use the menu Precautions Lamp characteristics may rarely cause the brightness to fluctuate slightly DLP chip is manufactured using hi...

Page 16: ...hile resizing Operating a function other than Mute will release resizing As zooming is processed digitally the image quality is degraded in larger zoom ratio During resizing or moving the zooming area the image may be distorted Zooming out the images This projector is provided with the digital zoom electric zoom 100 62 Note that the display if digitally zoomed out may suffer from some degradation ...

Page 17: ...mmercial video software broadcast or cable broadcasting except for the purpose of your private viewing and listening may infringe the copyright protected by the copyright laws Freezing the image Freeze This function is used to pause or freeze a video during a presentation Press the remote control s FREEZE button The picture will pause To release the freeze function press the FREEZE button again No...

Page 18: ... press the button Using handy features Continued Using the menus You can call up on screen menus and conduct a number of adjustments and settings using the operation buttons p 16 on the control panel of the main unit side and remote control Setup using the Setting display The menu shown below is for operation instructions purposes and might differ from the actual display Toggle items with Select i...

Page 19: ...green of the image color Less green More green Yes Yes Yes Yes B level Adjust blue of the image color Less blue More blue Yes Yes Yes Yes NTSC mode 3 Set the black level with US NTSC US mode JAPAN NTSC JAPAN mode No No Yes Yes 1 Tint can be displayed and adjusted only when the video signal is set to NTSC or NTSC4 43 2 Noise reduction may not work depending on signal type 3 NTSC mode can be display...

Page 20: ... it to fill the entire screen Thru Displays an input image in the native resolution of the video signals Thru display is not available for Y PB PR Video and S Video input images The larger image than the screen size will be displayed over the screen The input image may appear vertically long with some frequencies of video signals Wide Displays an input image in the center of the screen with a 16 9...

Page 21: ...isplay style to the factory setting The logo set for the start up screen and background is reset Using the menus Continued The Default setting menu This menu shows placement status and other settings Default setting 1 menu Item Description Keystone Screen shrinking at bottom Screen shrinking at top Auto keystone Always corrects keystone distortion automatically On Off Blackboard mode When projecti...

Page 22: ... by pressing the RETURN button on the projector for 10 seconds When operating the main unit the LAMP and TEMP indicators will glow orange for 3 seconds and the projector will beep Lamp power When Lamp power is set to Low the screen becomes a little darker but the cooling fan noise gets quieter Displaying Information Status display This displays information about the input signal lamp use time etc ...

Page 23: ...nt of lamp burst unplug the product from the wall outlet leave and completely ventilate the room Then thoroughly clean the area around the projector and discard any edible items placed in that area as they may be contaminated If the lamp bursts consult a doctor if glass dust or mercury gas gets into your eyes or is inhaled Lamp replacement A lamp is a consumable item If used for extended periods i...

Page 24: ...ng the lamp time Notes and Precautions The Lamp time item in the Status display menu indicates the time of lamp use Use it as a rough estimate or guide for lamp life p 43 Please replace the lamp after 2000 hours of use if Lamp power in the Default setting 2 menu is set to Standard or after 3000 hours of use if Lamp power in the Default setting 2 menu is set to Low p 42 There may be cases where the...

Page 25: ...ult to turn on the lifetime of the lamp has ended or the projector is malfunctioning Unplug the power cord and wait for a short while then turn the power back on If a lamp burns out replace it with a new one Power went out during use Internal overheating or the outside temperature is too high Make sure the projector is placed so that the air intake and exhaust are not blocked Unplug the power cord...

Page 26: ...ng generating an abnormal video signal for instance the video tape Picture blurred Part of picture out of focus Is the lens dirty p 48 Is the lens focus adjusted optimally p 27 Is the projection distance within the projector s supported range p 21 Is the projector s screen placement angle tilted too far p 27 Are the sharpness or sampling phase adjustments off p 36 p 37 Image is dark Are the bright...

Page 27: ...y be added in the future Separately sold product Replacement Lamp Model TLPLW15 List of supported signals RGB signals This projector supports the following RGB signals Note however that depending on the computer model the screen may show flicker or streaking Please adjust the projector if this happens Resolution Mode Refresh rate Hz H frequency kHz Clock MHz 720 x 400 720x400_85 85 039 37 927 35 5...

Page 28: ...orizontal sync signal TTL level Pos neg polarity Vertical sync signal TTL level Pos neg polarity Y PB PR input Y signal 1 0V p p 75 Ω PB PR signals 0 7V p p 75 Ω Mini D sub 15 Pin connector 5 1 10 15 11 6 CONTROL terminal Pin assignment Pin No Signal Name Description D sub 9 pin connector 1 DCD Data carrier detect 2 TXD Sending data 3 RXD Receiving data 4 DTR Data terminal ready 5 GND Signal groun...

Page 29: ......

Reviews: