background image

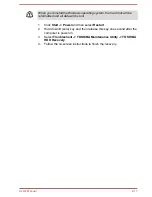
Sleep Mode

If you have to interrupt your work, you are able to turn off the power without
exiting from your software by placing the computer into Sleep Mode. In this
mode, data is maintained in the main memory of the computer. When you
turn on the power again, you can continue working right where you left off.

When you have to turn off your computer aboard an aircraft or in places
where electronic devices are regulated or controlled, always shut down the
computer. This includes turning off any wireless communication
functionalities, and canceling settings that reactivate the computer
automatically, such as a timer recording function. Failure to shut down the
computer in this way could allow the operating system to reactivate and run
pre-programmed tasks or preserve unsaved data, which could interfere
with aviation or other systems, possibly causing serious injury.

Before entering Sleep Mode, be sure to save your data.
To prevent data loss, do not switch to Sleep Mode while transferring
data to external media, such as USB devices, memory media, or other
external memory devices.

When the AC adaptor is connected, the computer will go into Sleep
Mode according to the settings in the Power Options (to access it,
click Control Panel -> System and Security -> Power Options
under Windows System group in All apps).
To restore the operation of the computer from Sleep Mode, press and
hold the power button or any key on the keyboard for a short amount
of time. Note that keyboard keys can only be used if the Wake-up on
Keyboard option is enabled within the TOSHIBA System Settings.
If the computer enters Sleep Mode while a network application is
active, the application might not be restored when the computer is
next turned on and the system returns from Sleep Mode.
To prevent the computer from automatically entering Sleep Mode,
disable Sleep Mode within the Power Options.
To use the Hybrid Sleep function, configure it in the Power Options.

Benefits of Sleep Mode

The Sleep Mode feature provides the following benefits:

Restores the previous working environment more rapidly than the
Hibernation Mode feature.
Saves power by shutting down the system when the computer
receives no input or hardware access for the time period set by the
System Sleep Mode feature.
Allows the use of the panel power off feature.

User's Manual

2-11

Summary of Contents for Satellite Radius 14 L40DW-C

Page 1: ...User s Manual Satellite Radius 14 L40W C Satellite Radius 14 L40DW C ...

Page 2: ... the first time 2 2 Getting to know Windows 2 8 Turning off the power 2 10 System Recovery 2 13 Chapter 3 The Grand Tour Front with the display closed 3 1 Left side 3 2 Right side 3 3 Back 3 4 Underside 3 5 Front with the display open 3 5 Magnets location 3 8 Internal Hardware Components 3 9 Power Condition Descriptions 3 12 Chapter 4 Operating Basics Operating in Tablet Mode 4 1 Using the Touch S...

Page 3: ...HIBA Product Improvement Program 5 13 TOSHIBA Setup Utility 5 14 Chapter 6 Troubleshooting Problem solving process 6 1 Hardware and system checklist 6 4 TOSHIBA support 6 13 Chapter 7 Appendix Specifications 7 1 AC Power Cord and Connectors 7 2 Information for Wireless Devices 7 3 Legal Footnotes 7 13 VCCI Class B Information Japan Only 7 16 OpenSSL Toolkit License Issues 7 16 FreeType License Iss...

Page 4: ...bove including conversion to digital format alteration transfer of copied material and distribution on a network without the permission of the copyright owner is a violation of copyright or author s rights and is subject to civil damages or criminal action Comply with copyright laws in making any reproduction from this manual Disclaimer This manual has been validated and reviewed for accuracy The ...

Page 5: ...esidential installation This equipment generates uses and can radiate radio frequency energy and if not installed and used in accordance with the instructions may cause harmful interference to radio communications However there is no guarantee that interference will not occur in a particular installation If this equipment does cause harmful interference to radio or television reception which can b...

Page 6: ...d European Directives Responsible for CE Marking is TOSHIBA EUROPE GMBH Hammfelddamm 8 41460 Neuss Germany The complete and official EU Declaration of Conformity can be found on TOSHIBA s web site http epps toshiba teg com on the Internet CE compliance This product is labeled with the CE Mark in accordance with the applicable European Directives notably RoHS Directive 2011 65 EU Radio Equipment an...

Page 7: ...proved working environments may be Interference with other devices or machines in the near surrounding area Malfunction of or data loss from this product caused by disturbances generated by other devices or machines in the near surrounding area Therefore TOSHIBA strongly recommend that the electromagnetic compatibility of this product should be suitably tested in all non approved working environme...

Page 8: ...separated at the recycling centres The black bar indicates that the product was placed on the market after August 13 2005 By participating in the separate collection of products and batteries you will help to assure the proper disposal of products and batteries and thus help to prevent potential negative consequences for the environment and human health For more detailed information about the coll...

Page 9: ...ly friendly disposal ensuring that the terminal contacts are covered by non conductive tape For more detailed information about the collection and recycling programmes available in your country please visit our website www toshiba eu recycling or contact your local council office or the retail outlet where you purchased the product These symbols might not stick depending on the country and region ...

Page 10: ...ne getirmektedir The number of possible pixel failures of your display is defined according to ISO 9241 307 standards If the number of pixel failures is less than this standard they will not be counted as defect or failure Battery is a consumption product since the battery time depends on the usage of your computer If the battery can not be charged at all then it is a defect or failure The changes...

Page 11: ...I DECODING AVC VC 1 AND MPEG 4 VIDEO THAT WAS ENCODED BY A CONSUMER ENGAGED IN A PERSONAL AND NONCOMMERCIAL ACTIVITY AND OR WAS OBTAINED FROM A VIDEO PROVIDER LICENSED BY MPEG LA TO PROVIDE SUCH VIDEO NO LICENSE IS GRANTED OR SHALL BE IMPLIED FOR ANY OTHER USE ADDITIONAL INFORMATION INCLUDING THAT RELATING TO PROMOTIONAL INTERNAL AND COMMERCIAL USES AND LICENSING MAY BE OBTAINED FROM MPEG LA L L C...

Page 12: ...computer from Sleep Mode by pressing the power button Your ENERGY STAR certified computer should be set by default to enter a low power sleep mode after a period of inactivity Simply touching the mouse or keyboard wakes the computer in seconds These sleep features can save you up to 23 per year 200 kWh per year in electricity and prevent up to 300 pounds of greenhouse gas emissions annually To lea...

Page 13: ...e system failure computer or AC adaptor damage or a fire possibly resulting in serious injury Creating a computer friendly environment Place the computer on a flat surface that is large enough for the computer and any other items you are using such as a printer Leave enough space around the computer and other equipment to provide adequate ventilation Otherwise they might overheat To keep your comp...

Page 14: ...o any form of strong impact as this can damage the computer s components or otherwise cause it to malfunction Cleaning the computer To help ensure long trouble free operation keep the computer free of dust and dirt and use care with all liquids around it Be careful not to spill liquids into the computer If the computer does get wet turn the power off immediately and let the computer dry completely...

Page 15: ...puter and or the card resulting in computer failure Always use a suitable carry case when transporting the computer When carrying your computer be sure to hold it securely so that it does not fall or hit anything Do not carry your computer by holding any of its protruding elements Mobile phones Be aware that the use of mobile phones can interfere with the audio system The operation of the computer...

Page 16: ...use of equipment or failure to follow instructions might cause data loss equipment damage or might result in minor or moderate injury Please read A note is a hint or advice that helps you make best use of your equipment User s Manual 1 13 ...

Page 17: ...owing items TOSHIBA Portable Personal Computer AC adaptor and power cord 2 pin plug or 3 pin plug Documentation Quickstart Instruction Manual for Safety and Comfort Warranty Information If any of the items are missing or damaged contact your dealer immediately Conventions This manual uses the following formats to describe identify and highlight terms and operating procedures Click Tap the Touch Pa...

Page 18: ...or neck This section provides basic information to start using your computer It covers the following topics Opening the display Connecting the AC adaptor Turning on the power Initial setup Use a virus check program and make sure that it is updated regularly Never format storage media without checking its content formatting destroys all stored data It is a good idea to back up the internal Hard Dis...

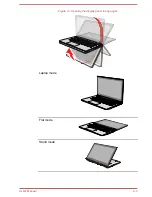
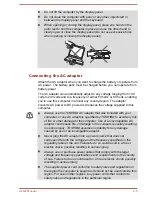
Page 19: ...Figure 2 1 Opening the display panel to any angel Laptop mode Flat mode Stand mode User s Manual 2 3 ...

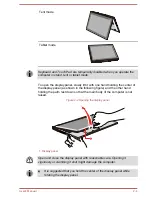
Page 20: ...el as shown in the following figure and the other hand holding the palm rest down so that the main body of the computer is not raised Figure 2 2 Opening the display panel 1 1 Display panel Open and close the display panel with reasonable care Opening it vigorously or slamming it shut might damage the computer It is suggested that you hold the center of the display panel while rotating the display ...

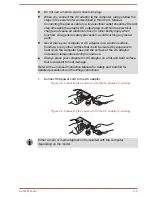
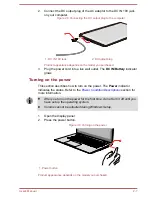
Page 21: ...adaptor that was included with your computer or use AC adaptors specified by TOSHIBA to avoid any risk of fire or other damage to the computer Use of an incompatible AC adaptor could cause fire or damage to the computer possibly resulting in serious injury TOSHIBA assumes no liability for any damage caused by use of an incompatible adaptor Never plug the AC adaptor into a power source that does no...

Page 22: ...n a wooden surface furniture or any other surface that could be marred by exposure to heat since the computer base and the surface of the AC adaptor increase in temperature during normal use Always place your computer or AC adaptor on a flat and hard surface that is resistant to heat damage Refer to the enclosed Instruction Manual for Safety and Comfort for detailed precautions and handling instru...

Page 23: ...lows Turning on the power This section describes how to turn on the power The Power indicator indicates the status Refer to the Power Condition Descriptions section for more information After you turn on the power for the first time do not turn it off until you have set up the operating system Volume cannot be adjusted during Windows Setup 1 Open the display panel 2 Press the power button Figure 2...

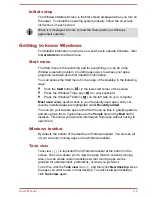
Page 24: ...dows button on the left side on your computer Most used allows quick access to your frequently used apps and your recently installed apps are highlighted under Recently added You can pin your favorite apps to the Start menu as tiles in grid like pattern and also group them Typical tiles are the People tile and the Mail tile for instance Tiles show you dynamic information from apps without having t...

Page 25: ...des system settings including advanced settings in the Control Panel They are divided in categories so that you can configure optimize or personalize Windows You can also type in the keyword and use Search to find any setting To open Settings click Start All apps Settings You can pin it to the Start menu as a tile by right clicking on Settings and selecting Pin to Start Windows Store Although many...

Page 26: ...rn off the power while a disk disc is being accessed you might lose data or damage the disk Never turn off the power while an application is running Failure to do so can cause data loss Never turn off the power disconnect an external storage device or remove storage media during data read write Failure to do so can cause data loss 3 Click Start Power and then select Shut down 4 Turn off any periph...

Page 27: ...xternal memory devices When the AC adaptor is connected the computer will go into Sleep Mode according to the settings in the Power Options to access it click Control Panel System and Security Power Options under Windows System group in All apps To restore the operation of the computer from Sleep Mode press and hold the power button or any key on the keyboard for a short amount of time Note that k...

Page 28: ...oise Hibernation Mode The Hibernation Mode feature saves the contents of memory to the Hard Disk Drive when the computer is turned off so that the next time it is turned on the previous state is restored Note that the Hibernation Mode feature does not save the status of any peripheral devices connected to the computer Save your data While entering Hibernation Mode the computer saves the contents o...

Page 29: ...matically when you press the power button or close the lid To define these settings do the following 1 Click Power Options and then click Choose what the power button does or Choose what closing the lid does 2 Enable the desired Hibernation Mode settings for When I press the power button and When I close the lid 3 Click the Save changes button Data save in Hibernation Mode When you turn off the po...

Page 30: ...lose all other software programs except the Recovery Media Creator Do not run software such as screen savers which can put a heavy load on the CPU Operate the computer at full power Do not use power saving features Do not write to the media when the virus check software is running Wait for it to finish then disable virus detection programs including any software that checks files automatically in ...

Page 31: ... sure that you create recovery media by using Recovery Media Creator instead of the recovery drive creating option in Windows system Otherwise Recovery Media Creator will not work and TOSHIBA HDD Recovery option in TOSHIBA Maintenance Utility will not exist if you restore the computer from the recovery media you created by options in Windows system Restoring the pre installed software from your cr...

Page 32: ...ssage apppears The Recovery Media Creator can not be launched because there is no recovery partition When there is no recovery partition the Recovery Media Creator cannot make Recovery Media However if you have already created a Recovery Media you can use it to restore the recovery partition If you have not created Recovery Media contact TOSHIBA support for assistance Restoring the pre installed s...

Page 33: ...will be lost 1 Click Start Power and then select Restart 2 Hold down 0 zero key and then release this key one second after the computer is power on 3 Select Troubleshoot TOSHIBA Maintenance Utility TOSHIBA HDD Recovery 4 Follow the on screen instructions to finish the recovery User s Manual 2 17 ...

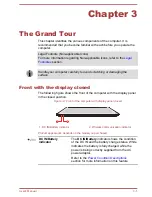
Page 34: ... following figure shows the front of the computer with the display panel in the closed position Figure 3 1 Front of the computer with display panel closed 1 2 1 DC IN Battery indicator 2 Wireless communication indicator Product appearance depends on the model you purchased DC IN Battery indicator The DC IN Battery indicator shows the condition of the DC IN and the battery charge status White indic...

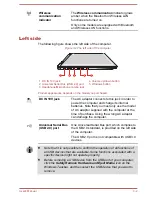
Page 35: ...ter and charge its internal batteries Note that you must only use the model of AC adaptor supplied with the computer at the time of purchase Using the wrong AC adaptor can damage the computer Universal Serial Bus USB 2 0 port One Universal Serial Bus port which complies to the USB 2 0 standard is provided on the left side of the computer The USB 2 0 port is not compatible with USB 3 0 devices Note...

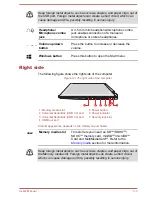
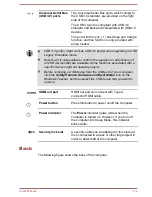
Page 36: ...re shows the right side of the computer Figure 3 3 The right side of the computer 1 5 4 3 2 7 6 1 Memory media slot 5 Power button 2 Universal Serial Bus USB 3 0 port 6 Power indicator 3 Universal Serial Bus USB 3 0 port 7 Security lock slot 4 HDMI out port Product appearance depends on the model you purchased Memory media slot This slot lets you insert an SD SDHC SDXC memory card miniSD microSD C...

Page 37: ...ted with a specific device might not operate properly Before removing a USB device from the USB port of your computer click the Safely Remove Hardware and Eject Media icon on the Windows Taskbar and then select the USB device that you want to remove HDMI out port HDMI out port can connect with Type A connector HDMI cable Power button Press this button to power on off the computer Power indicator T...

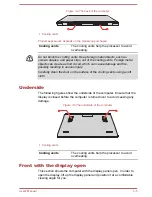
Page 38: ... serious injury Carefully clean the dust on the surface of the cooling vents using a soft cloth Underside The following figures show the underside of the computer Ensure that the display is closed before the computer is turned over to avoid causing any damage Figure 3 5 The underside of the computer 1 1 1 Cooling vents Cooling vents The cooling vents help the processor to avoid overheating Front w...

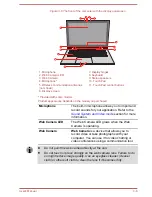
Page 39: ...ort and record sounds for your application Refer to the Sound System and Video mode section for more information Web Camera LED The Web Camera LED glows when the Web Camera is operating Web Camera Web Camera is a device that allows you to record video or take photographs with your computer You can use it for video chatting or video conferences using a communication tool Do not point the web camera...

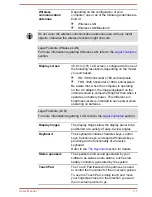
Page 40: ...ghter than when it operates on battery power This difference in brightness levels is intended to save power when operating on batteries Legal Footnote LCD For more information regarding LCD refer to the Legal Footnotes section Display hinges The display hinges allow the display panel to be positioned at a variety of easy to view angles Keyboard The keyboard contains character keys control keys fun...

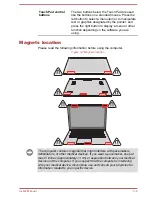
Page 41: ...nets location Please read the following information before using the computer Figure 3 7 Magnets location The computer contains magnets that might interfere with pacemakers defibrillators or other medical devices If you wear a pacemaker keep at least 5 inches approximately 13 cm of separation between your medical device and the computer If you suspect that the computer is interfering with your med...

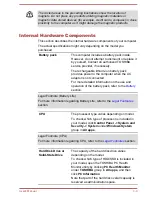
Page 42: ...aptor is not connected For more detailed information on the use and operation of the battery pack refer to the Battery section Legal Footnote Battery Life For more information regarding Battery Life refer to the Legal Footnotes section CPU The processor type varies depending on model To check which type of processor is included in your model click Control Panel System and Security System under Win...

Page 43: ...p display The amount of Video RAM available depends on the system memory of the computer Click Control Panel Appearance and Personalization Display Adjust resolution under Windows System group in All apps The amount of Video RAM can be verified by clicking the Advanced settings button in the Screen Resolution window Memory module The memory module is installed in the computer Legal Footnote Memory...

Page 44: ... in the upper left corner 3 Click Disable under Display Power Saving Technology 4 Click Apply If you want to enable this feature click Enable under Display Power Saving Technology AMD Vari Bright AMD GPU models might include the AMD Vari Bright feature that can save the computer s power consumption by optimizing picture contrast on the internal LCD This feature can be used if the computer is runni...

Page 45: ...e battery is fully charged No light Under any other conditions the indicator does not light If the battery pack becomes too hot while it is being charged the charge stops and the DC IN Battery indicator goes out When the temperature of the battery pack falls to a normal range charging will resume This process occurs regardless of whether the computer s power is on or off Power indicator Check the ...

Page 46: ...carrying Hold the computer firmly on your forearm Remove the AC adaptor from the computer when using it held in your forearm Do not use the computer while walking or driving a car Do not drop the computer or apply excessive impact to it Do not leave the computer in a car or similar environment where it is exposed to direct sunlight Changing the screen orientation When operating the computer in ten...

Page 47: ...o satisfy RF exposure compliance In the Portrait mode some drivers utilities might not perform install and uninstall operation If it occurs switch to the Landscape mode to proceed Using the Touch Screen You can use your finger to manipulate icons buttons menu items the onscreen keyboard and other items on the touch screen Tap Simply tap your finger once on the touch screen to activate an item such...

Page 48: ...th Windows operating system refer to the Get Started Do not press or push with excess force on the touch screen Do not apply excess force when cleaning the touch screen Never touch the screen with a sharp object such as a ball point pen which might scratch or damage the surface Do not use a protecting sheet for the touch screen as it might decrease its sensitivity to gestures Do not touch the scre...

Page 49: ...Pad surface to prevent abnormal action Some of the Touch Pad operations described in this section are only supported in certain applications The Keyboard The number of keys available on your keyboard depends on which country region your computer is configured for with keyboards being available for numerous languages There are different types of keys specifically typewriter keys function keys Windo...

Page 50: ...ps Special function mode allows you to use special functions without pressing the FN key Special function mode Standard F1 F12 mode Function F1 FN F1 Allows you to search your computer the web or within an app or activates Cortana dependent on country F2 FN F2 Decreases the brightness of the display panel in individual steps F3 FN F3 Increases the brightness of the display panel in individual step...

Page 51: ...ges the display resolution FN FN Turns the keyboard backlight on or off This function is supported with some models Some functions show the toast notification at the edges of the screen Those toast notifications are enabled by default You can disable them in the Function Key settings To access it click System Settings Function Key under TOSHIBA group in All apps Windows special keys The keyboard p...

Page 52: ...precautions in order to handle your battery pack properly Refer to the enclosed Instruction Manual for Safety and Comfort for detailed precautions and handling instructions Charge the battery pack only in an ambient temperature from 5 through 35 degrees Celsius Otherwise the electrolyte solution might leak battery pack performance might deteriorate and the battery life might be shortened Charging ...

Page 53: ...ed In this instance leave the AC adaptor connected for a few minutes and the battery should begin charging The DC IN Battery indicator might show a rapid decrease in battery operating time when you try to charge a battery under the following conditions The battery has not been used for a long time The battery has completely discharged and been left in the computer for a long time In such cases do ...

Page 54: ...System Hibernation Mode Display power off period How often and for how long you use the Hard Disk Drive and external disk drives for example optical disc How much charge the battery contained to begin with How you use optional devices such as a USB device to which the battery supplies power Whether you enable Sleep Mode which can conserve battery power if you are frequently turning the computer of...

Page 55: ...ns for the AC adaptor and the power cord 5 Charge the battery pack until the DC IN Battery indicator glows white Memory media The computer is equipped with a memory media slot that can accommodate some kinds of memory media with various memory capacities so that you can easily transfer data from devices such as digital cameras and Personal Digital Assistants Keep foreign objects out of the memory ...

Page 56: ...y cards is 32 GB The maximum capacity of SDXC memory cards is 128 GB Memory media format New media cards are formatted according to specific standards If you wish to reformat a media card be sure to do so with a device that uses media cards Formatting a memory media card Memory media cards are sold already formatted in conformity to specific standards If you reformat a memory card be sure to refor...

Page 57: ... in progress For more details on using memory cards see manuals accompanying the cards About the write protect feature Memory media cards have a write protect function SD Card SD memory card SDHC memory card and SDXC memory card Set the write protect switch to the lock position if you do not want to record data Inserting memory media The following instructions apply to all types of supported media...

Page 58: ... do so might cause data loss Removing memory media The following instructions apply to all types of supported media devices To remove memory media do the following 1 Click the Safely Remove Hardware and Eject Media icon on the Windows Taskbar 2 Select memory media 3 Push the memory media until you hear a click to partially release it 4 Grasp the media and pull it out of the slot If you remove the ...

Page 59: ...deo and audio data without reducing the quality HDMI compatible external display devices including televisions can be connected via the HDMI port Some models can support ultra high definition 3840 x 2160 pixels display on compatible external display devices via HDMI output port To use this function you must purchase an HDMI cable corresponding to 3840x2160 pixels or higher To connect an HDMI compa...

Page 60: ...lay output device please adjust the playback device manually by the following steps 1 Click Control Panel Hardware and Sound Sound under Windows System group in All apps 2 In the Playback tab select the playback device which you want to switch to 3 To use the internal speakers on your computer select Speakers To use the television or the external monitor that you have connected to the computer sel...

Page 61: ...eless display adaptor The Wireless display adaptor is a device that connects to the external display via HDMI port and can receive Wi Fi signals from your computer To connect to an external display wirelessly do the following 1 Go to Settings and click Devices Connected devices 2 Click Add a device Your computer starts searching for the Wireless display device 3 After the Wireless display device i...

Page 62: ...r to connect a security cable to the computer do the following 1 Turn the computer so its right side faces you 2 Align the security cable with the lock slot and secure it in place Figure 4 7 Security lock 1 2 1 Security lock slot 2 Security lock Product appearance depends on the model you purchased Optional TOSHIBA Accessories To make your computer even more powerful and convenient to use you can ...

Page 63: ...ophone slider to increase or decrease the microphone volume level If you feel the microphone volume level is inadequate move the Microphone Boost slider to a higher level Audio Enhancements To apply the sound effects for your current speaker do the following 1 Right click on the Speakers icon on the Windows Taskbar and then select Playback devices from the sub menu 2 Select Speakers and click Prop...

Page 64: ...r microphone do the following 1 Plug a headphone or microphone into the headphone microphone combo jack 2 Double click on the circle button in the right side of the Realtek HD Audio Manager main screen 3 Select one from the device list for the device you plugged into DTS Sound DTS Sound utilizes advanced patented techniques to retrieve audio cues buried in the original source material and deliver ...

Page 65: ...solution dialog click Control Panel Appearance and Personalization Display Change display settings under Windows System group in All apps If you are running some applications for example a 3D application or video playback you might see some disturbance flickering or frame dropping on your screen If that occurs adjust the resolution of display lowering it until the screen is displayed properly User...

Page 66: ...ity is only provided with some models To access this utility click Display Utility under TOSHIBA group in All apps For details on this utility see the help file TOSHIBA Password Utility This utility allows you to set a password in order to restrict access to the computer To access this utility click Password Utility under TOSHIBA group in All apps TOSHIBA System Settings This utility allows you to...

Page 67: ...ycle of the battery It is recommended using the computer with AC adaptor connected as the battery operating time is comparatively short in this mode Depending on the usage situation the life cycle of battery might not be extended properly To access this utility click eco Utility under TOSHIBA group in All apps For details on TOSHIBA eco utility see the help file TOSHIBA Service Station This applic...

Page 68: ... or disable the monitoring operation by clicking Product Improvement Program under TOSHIBA group in All apps This utility is only provided with some models TOSHIBA Audio Enhancement TOSHIBA Audio Enhancement provides you the function of audio source filtering earphone audio enhancement or speaker audio enhancement To change the settings click Audio Enhancement under TOSHIBA group in All apps Bluet...

Page 69: ...t from your computer To access this utility 1 Go to Settings and click Update security Recovery 2 Click Restart now under Advanced startup 3 Click Troubleshoot TOSHIBA Maintenance Utility If you select the deletion method and continue with the operation you will lose all data including the operating system and recovery image on the hard disk drive Make sure that you have already created recovery m...

Page 70: ...t power supply detects the battery charge automatically calculates the remaining battery capacity and protects electronic components from abnormal conditions such as a voltage overload from the AC adaptor This can be specified in the Power Options Battery save mode 1 This feature lets you configure the computer in order to save battery power This can be specified in the Power Options Panel power o...

Page 71: ...equipped with an internal temperature sensor which lowers the processing speed if the computer s internal temperature rises to a certain level When the processor s temperature falls within normal range the processor operation returns to its standard speed If the processor s temperature reaches an unacceptably high level with either setting the computer automatically shuts down to prevent any damag...

Page 72: ... change a password you must first enter the current password correctly Owner String text box You can use this box to associate text with the password After you enter text click Apply or OK When the computer is started this text is displayed together with the prompt asking you to enter a password For models equipped with HDD you can use BIOS Setup to set change or delete the HDD Password or HDD Mas...

Page 73: ...Started section The following message appears in the screen Enter Password At this point the function keys do not work They will function after you enter the password 2 Enter the Password 3 Press ENTER If you enter the password incorrectly three times in a row or if you do not enter the password within 1 minute the computer shuts off In this case some features that can power on the computer automa...

Page 74: ... USB SATA Allows you to set conditions for SATA LAN Allows you to set conditions for LAN The settings or options explained here might vary depending on the model you purchased After you changed the settings a dialog box might appear to prompt you that the changes will take effect after the computer is restarted Make sure to restart your computer immediately to apply these changes USB Charge Your c...

Page 75: ...al devices connected to the USB bus power DC5V function that interfaces with the power ON OFF of the computer might always be in an operational state When there is a current overflow of the external devices connected to the compatible ports USB bus power DC5V supply might be stopped for safety reasons When Sleep and Charge function is enabled the USB Wakeup function might not work for compatible p...

Page 76: ...ttery life by moving the slider bar If the remaining battery life falls below the setting the Sleep and Charge function is stopped This setting is only available when the Function under Battery Mode is enabled System ON CDP Charge This function enable disable CDP Charging Downstream Port to use rapid USB charge while the computer is powered on When System ON CDP Charge Mode is enabled your compute...

Page 77: ...sion settings user profile number error information BSoD application error device operation time and number of actuations or status changes that is number of power button and FN key combination uses AC adaptor battery for models with battery LCD fan for models with fan HDD SSD sound volume wireless communication functionalities and USB information usage of TOSHIBA provided features applications th...

Page 78: ...led the TOSHIBA PC Health Monitor screen is displayed and the program begins monitoring system functions and collecting information A message is displayed if any changes which might interfere with the operation of the program are detected Follow the instructions displayed on screen in the message TOSHIBA Product Improvement Program The TOSHIBA Product Improvement Program recognizes the system and ...

Page 79: ...application by using the Uninstall a program utility in the Control Panel Uninstalling the Product Improvement Program will automatically delete all of the data previously collected and stored by the application The TOSHIBA Product Improvement Program or it s use does not in any way expand or modify TOSHIBA obligations under its standard limited warranty TOSHIBA standard limited warranty terms and...

Page 80: ...k box from Shutdown settings 5 Click the Save changes button Navigating the utility TOSHIBA Setup Utility can be navigated through the touch screen Some buttons on the computer are also designated to execute the corresponding key function on the keyboard Details are described as follows Button Key Function Windows Enter key Proceed or confirm operation Volume up Up arrow key Select the previous it...

Page 81: ...n this chapter are meant only as a guide they are not definitive problem solving techniques In reality many problems can be solved simply but a few might require help from TOSHIBA Support If you find you need to consult others be prepared to describe the problem in as much detail as possible Preliminary checklist You should always consider the simplest solution first The items detailed in this che...

Page 82: ... characters Make a screenshot of the current display and if possible look up the messages in the documentation included with the computer software or operating system Check that all connecting cables are correctly and firmly attached as loose cables can cause erroneous or intermittent signals Do any indicators light if so which ones what color are they and do they stay on or blink Write down what ...

Page 83: ...15 seconds before turning on the power again by pressing the power button Your program stops responding If you are working with a program that suddenly freezes all operations chances are the program has stopped responding You can exit the failed program without shutting down the operating system or closing other programs To close a program that has stopped responding 1 Press CTRL ALT and DEL simul...

Page 84: ...puter starts to load the Operating System instead of desired advanced options do the following Make sure that fast startup is disabled in the Power Options by the following steps 1 Click Control Panel System and Security Power Options under Windows System group in All apps 2 Click Choose what the power button does or Choose what closing the lid does 3 Click Change settings that are currently unava...

Page 85: ...automatically Leave the computer off until it reaches room temperature If the computer has reached room temperature and it still does not start or if it starts but shuts down quickly contact TOSHIBA Support AC power If you have trouble turning on the computer with the AC adaptor connected check the status of the DC IN Battery indicator Refer to the Power Condition Descriptions section for further ...

Page 86: ...a partially charged battery the battery might not charge to its full potential In these instances you should fully discharge the battery and then attempt to charge it again Check the Power saver option under Choose or customize a power plan in the Power Options Real Time Clock Problem Procedure The BIOS setting and system date time are lost The lasting time of the Real Time Clock RTC has run out Y...

Page 87: ...ings appear on the computer s display panel These marks might have come from contact with the keyboard and Touch Pad while the display panel has been closed Try to remove the marks by gently wiping the display panel with a clean dry cloth or if this fails with a good quality LCD screen cleaner In this latter instance you should always follow the instructions with the screen cleaner and always ensu...

Page 88: ...ing Basics Problem Procedure Memory media card error occurs Remove the memory media card from the computer and then reinsert it in order to ensure that it is firmly connected If the problem persists then you should refer to the documentation supplied with your memory media card for further information You cannot write to a memory media card Remove the memory media card from the computer and check ...

Page 89: ...n All apps 2 Within the Mouse Properties window click the Buttons tab 3 Set the double click speed as required and click OK The on screen pointer moves too fast or too slow In this instance you should initially try changing the speed setting within the Mouse Control utility 1 To access this utility click Control Panel Hardware and Sound Mouse under Windows System group in All apps 2 Within the Mou...

Page 90: ...ble click speed as required and click OK The on screen pointer moves too fast or too slow In this instance you should initially try changing the speed setting within the Mouse Control utility 1 To access this utility click Control Panel Hardware and Sound Mouse under Windows System group in All apps 2 Within the Mouse Properties window click the Pointer Options tab 3 Set the pointer speed as requi...

Page 91: ...he software volume settings Check to see if Mute is turned to Off Check to make sure that the headphone connection is secure Check within the Windows Device Manager application to ensure that the sound device is enabled and that the device is properly working Annoying sound is heard In this instance you might be experiencing feedback from either the internal microphone or an external microphone co...

Page 92: ... while in Sleep Mode To keep this from happening do not disconnect the external monitor while the computer is in Sleep or Hibernation Mode Remember to turn off the computer before disconnecting the external monitor When the display panel and an external monitor are set to clone mode and they are turned off by the timer the display panel or the external monitor might not display when turned on agai...

Page 93: ...ore you call Some problems you experience might be related to software or the operating system so it is important that you investigate other sources of assistance first Before contacting TOSHIBA try the following Review troubleshooting sections in the documentation supplied with your software and or peripheral devices If a problem occurs when you are running software applications consult the softw...

Page 94: ...5 0 d x 21 05 h millimeters not including parts that extend beyond the main body Environmental Requirements Conditions Ambient temperature Relative humidity Operating 5 C to 35 C 20 to 80 noncondensing Non operating 20 C 4 F to 60 C 140 F 10 to 90 noncondensing Wet bulb temperature 29 C maximum Conditions Altitude from sea level Operating 60 to 3 000 meters Non operating 60 to 10 000 meters maximu...

Page 95: ...elgium CEBEC The Netherlands KEMA Denmark DEMKO Norway NEMKO Finland FIMKO Sweden SEMKO France LCIE Switzerland SEV Germany VDE United Kingdom BSI In Europe two conductors power cord must be VDE type H05VVH2 F or H03VVH2 F and for three conductors power cord must be VDE type H05VV F For the United States and Canada two pin plug configuration must be a 2 15P 250 V or 1 15P 125 V and three pin plug ...

Page 96: ...teroperable with any product with Bluetooth wireless technology that is based on Frequency Hopping Spread Spectrum FHSS radio technology and is compliant to Bluetooth Specification depending on the model you purchased as defined and approved by the Bluetooth Special Interest Group Logo certification with Bluetooth wireless technology as defined by the Bluetooth Special interest Group This Bluetoot...

Page 97: ... use by consumers These standards and recommendations reflect the consensus of the scientific community and result from deliberations of panels and committees of scientists who continually review and interpret the extensive research literature In some situations or environments the use of Wireless products may be restricted by the proprietor of the building or responsible representatives of the or...

Page 98: ...s to be configured for all computers connected to the same network in order to re enable network connections Make sure to use new network name Security TOSHIBA strongly recommends that you enable encryption functionality otherwise your computer is open to illegal access by an outsider using a wireless connection If this occurs the outsider might illegally access your system eavesdrop or cause the ...

Page 99: ...65 to 5 85GHz and that these radars could cause interference and or damage to LE LAN devices Bluetooth wireless technology Some computers in this series have Bluetooth wireless communication function which eliminates the need for cables between electronic devices such as computers printers and mobile phones When it is enabled Bluetooth provides the wireless personal area network environment which ...

Page 100: ... use Refarming of the 2 4GHz band has been ongoing in recent years to allow current relaxed regulation Full implementation planned 2012 Italy For private use a general authorization is required if WAS RLAN s are used outside own premises For public use a general authorization is required Luxembourg Implemented General authorization required for network and service supply Norway Implemented This su...

Page 101: ...e used outside own premises Luxembourg Implemented General authorization required for network and service supply Russian Federation Limited e i r p 100mW Permitted to use only for indoor applications closed industrial and warehouse areas and on board aircraft 1 Permitted to use for local networks of aircraft crew service communications on board aircraft in area of the airport and at all stages of ...

Page 102: ... systèmes de satellites mobiles utilisant les mêmes canaux Les utilisateurs devraient aussi être avisés que les utilisateurs de radars de haute puissance sont désignés utilisateurs principaux c à d qu ils ont la priorité pour les bandes 5 25 5 35GHz et 5 65 5 85GHz et que ces radars pourraient causer du brouillage et ou des dommages aux dispositifs LAN EL The term IC before the equipment certifica...

Page 103: ...o communications is operated in compliance with the Telecommunications Act The low power radio frequency devices must be susceptible with the interference from legal communications or ISM radio wave radiated devices Using this equipment in Japan In Japan the frequency bandwidth of 2 400MHz to 2 483 5MHz for second generation low power data communication systems such as this equipment overlaps that...

Page 104: ...ent uses OFDM modulation 4 4 The interference range of this equipment is less than 40m 5 This equipment uses a frequency bandwidth from 2 400MHz to 2 483 5MHz It is possible to avoid the band of mobile object identification systems 3 Indication for Bluetooth The indication shown below appears on this equipment 4 1 2 3 1 1 2 4 This equipment uses a frequency of 2 4 GHz 2 FH This equipment uses FH S...

Page 105: ...Name of the radio equipment 3165NGW DSP Research Inc Approval Number D150008003 Realtek RTL8821AE 802 11ac Wireless LAN and bluetooth The Name of the radio equipment RTL8821AE Telefication B V Ltd Approval Number D135068201 Broadcom BCM43142 Wireless Network Adapter b g n and Bluetooth The Name of the radio equipment BCM943142Y Telefication B V Ltd Approval Number D135106201 Realtek RTL8723BE 802 ...

Page 106: ...e be aware that your selected model might not have all the features and specifications corresponding to all of the icons or switches shown on the computer chassis CPU Central Processing Unit CPU Performance Legal Footnotes CPU performance in your computer product might vary from specifications under the following conditions use of certain external peripheral products use of battery power instead o...

Page 107: ...f the main system memory might be used by the graphics system for graphics performance and therefore reduce the amount of main system memory available for other computing activities The amount of main system memory allocated to support graphics might vary depending on the graphics system applications utilized system memory size and other factors If your computer is configured with more than 3 GB m...

Page 108: ...ss if the product includes one or more pre installed operating systems such as Microsoft Operating System and or pre installed software applications or media content Actual formatted capacity might vary LCD Over a period of time and depending on the usage of the computer the brightness of the LCD screen will deteriorate This is an intrinsic characteristic of LCD technology Maximum brightness is on...

Page 109: ...tually both licenses are BSD style Open Source licenses In case of any license issues related to OpenSSL please contact openssl core openssl org OpenSSL License Copyright c 1998 2011 The OpenSSL Project All rights reserved Redistribution and use in source and binary forms with or without modification are permitted provided that the following conditions are met 1 Redistributions of source code must...

Page 110: ...ING BUT NOT LIMITED TO PROCUREMENT OF SUBSTITUTE GOODS OR SERVICES LOSS OF USE DATA OR PROFITS OR BUSINESS INTERRUPTION HOWEVER CAUSED AND ON ANY THEORY OF LIABILITY WHETHER IN CONTRACT STRICT LIABILITY OR TORT INCLUDING NEGLIGENCE OR OTHERWISE ARISING IN ANY WAY OUT OF THE USE OF THIS SOFTWARE EVEN IF ADVISED OF THE POSSIBILITY OF SUCH DAMAGE This product includes cryptographic software written b...

Page 111: ...e left out if the rouines from the library being used are not cryptographic related 4 If you include any Windows specific code or a derivative thereof from the apps directory application code you must include an acknowledgement This product includes software written by Tim Hudson tjh cryptsoft com THIS SOFTWARE IS PROVIDED BY ERIC YOUNG AS IS AND ANY EXPRESS OR IMPLIED WARRANTIES INCLUDING BUT NOT...

Page 112: ...romise that this software works However we will be interested in any kind of bug reports as is distribution You can use this software for whatever you want in parts or full form without having to pay us royalty free usage You may not pretend that you wrote this software If you use it or only parts of it in a program you must acknowledge somewhere in your documentation that you have used the FreeTy...

Page 113: ...helm and Werner Lemberg All rights reserved except as specified below 1 No Warranty THE FREETYPE PROJECT IS PROVIDED AS IS WITHOUT WARRANTY OF ANY KIND EITHER EXPRESS OR IMPLIED INCLUDING BUT NOT LIMITED TO WARRANTIES OF MERCHANTABILITY AND FITNESS FOR A PARTICULAR PURPOSE IN NO EVENT WILL ANY OF THE AUTHORS OR COPYRIGHT HOLDERS BE LIABLE FOR ANY DAMAGES CAUSED BY THE USE OR THE INABILITY TO USE O...

Page 114: ...mentation or advertising materials FreeType Project FreeType Engine FreeType library or FreeType Distribution As you have not signed this license you are not required to accept it However as the FreeType Project is copyrighted material only this license or another one contracted with the authors grants you the right to use distribute and modify it Therefore by using distributing or modifying the F...

Page 115: ... off 5 5 hinges 3 7 screen 3 7 Documentation list 2 1 Dual Pointing Device Touch Pad 6 9 E Equipment checklist 2 1 External monitor problems 6 12 G Graphics Processing Unit 3 10 H Hard disk drive automatic power off 5 5 HDMI out port 3 4 K Keyboard function keys 4 5 Function keys F1 F12 4 5 problems 6 6 Windows special keys 4 6 M Media care Card care 4 11 Memory card care 4 12 memory media card in...

Page 116: ... 6 8 External monitor 6 11 Hardware and system checklist 6 4 HDD 6 7 6 8 Internal display panel 6 7 Keyboard 6 6 Memory Media Card 6 8 Overheating power down 6 5 Power 6 5 Real Time Clock 6 6 Sound system 6 11 TOSHIBA support 6 13 Touch Pad 6 9 USB device 6 10 USB mouse 6 10 R Recovery Media 2 15 Restarting the computer 2 10 S SD SDHC SDXC Card formatting 4 11 note 4 11 Security lock 4 17 Sleep Mo...

Page 117: ...Wireless communication 7 4 User s Manual Index 3 ...

Reviews: