background image

28

Setting up your computer and getting started

5.375 x 8.375 ver 3.1

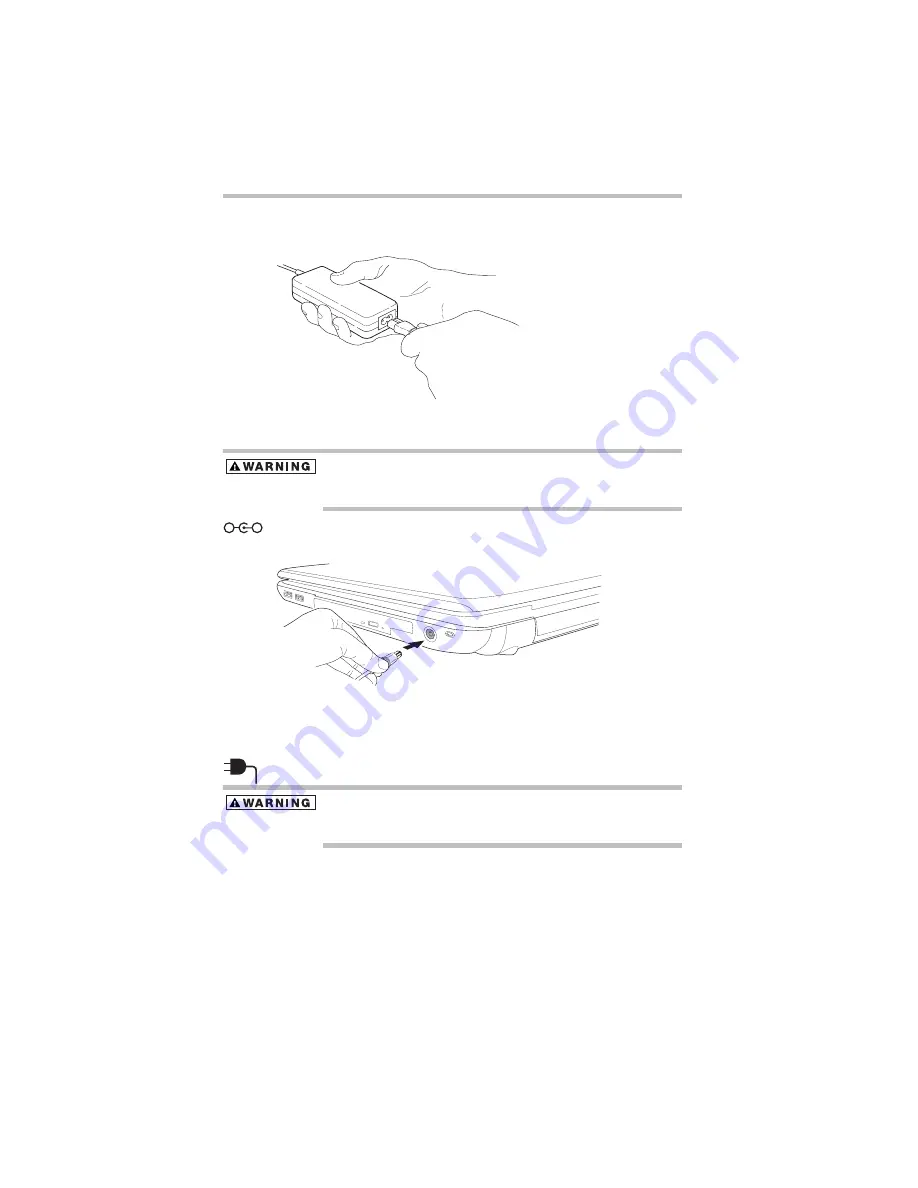
To connect AC power to the computer:

1

Connect the power cord/cable to the AC adaptor.

(Sample Illustration) Connecting the power cord/cable to the AC 
adaptor

Handling the cord on this product will expose you to lead, a 
chemical known to the State of California to cause birth defects or 
other reproductive harm.


Wash hands after handling.

2

Plug the AC adaptor cord into the DC-IN on the side of the 
computer.

(Sample Illustration) Connecting the AC adaptor cord to the 
computer

3

Connect the power cord/cable to a live electrical outlet.

The AC power light on the indicator panel glows green.

Never attempt to connect or disconnect a power plug with wet hands. 
Failure to follow this instruction could result in an electric shock, 
possibly resulting in serious injury.

_

+

Summary of Contents for Satellite L455-S5976

Page 1: ...e Toshiba s Support Web site pcsupport toshiba com Toshiba Customer Support Center Calling within the United States 800 457 7777 Calling from outside the United States 949 859 4273 Please fill in for your reference and future use Model name______________________________________ Part number______________________________________ Serial number____________________________________ ...

Page 2: ...ptional 29 Your computer s TFT display 36 Learning the basics 37 Using the TouchPad 37 Using the optical drive 40 Moving the computer 43 Mobile computing 43 Taking care of your battery 47 If something goes wrong 49 If you need further assistance 52 Power cord cable connectors 53 Features and specifications 53 Index 54 ...

Page 3: ...RRANT THAT OPERATION OF THE PRODUCT WILL BE UNINTERRUPTED OR ERROR FREE YOU AGREE THAT TOSHIBA ITS AFFILIATES AND SUPPLIERS SHALL HAVE NO RESPONSIBILITY FOR DAMAGE TO OR LOSS OF ANY BUSINESS PROFITS PROGRAMS DATA NETWORK SYSTEMS OR REMOVABLE STORAGE MEDIA ARISING OUT OF OR RESULTING FROM THE USE OF THE PRODUCT EVEN IF ADVISED OF THE POSSIBILITY THEREOF Protection of Stored Data For your important ...

Page 4: ...IBA Europe GmbH Hammfelddamm 8 41460 Neuss Germany The European Union WEEE Waste from Electrical and Electronic Equipment Directive Information The European Union WEEE Waste from Electrical and Electronic Equipment Directive is intended to protect the quality of the environment and human health through the responsible use of natural resources and the adoption of waste management strategies that fo...

Page 5: ... connection to the Public Switched Telephone Network PSTN However due to differences between the individual PSTNs provided in different countries regions the approval does not of itself give an unconditional assurance of successful operation on every PSTN network termination point In the event of problems you should contact your equipment supplier in the first instance Taiwan The legal communicati...

Page 6: ...es OFDM modulation 3 The interference range of this equipment is less than 40m 4 This equipment uses a frequency bandwidth from 2 400 MHz to 2 483 5 MHz It is possible to avoid the band of mobile object identification systems The frequency bandwidth of this equipment may operate within the same range as industrial devices scientific devices medical devices microwave ovens licensed radio stations a...

Page 7: ...hnical Regulation Conformity Certification and the Technical Conditions Compliance Approval and it belongs to the device class of radio equipment of low power data communication system radio station stipulated in the Radio Law and the Telecommunications Business Law of Japan The name of the radio equipment refer to the equipment label provided on the computer Approved by both the JAPAN APPROVALS I...

Page 8: ... 6366 512AN_HMW CNC C 6373 512AN_MMW CNC C 6374 Australia Austria Azerbaijan Bahrain Belgium Bermuda Bosnia Brazil Bulgaria Caicos Islands Cambodia Canada Cayman Islands Chile China Colombia Costa Rica Croatia Curacao Netherlands Antilles Cyprus Czech Republic Denmark Dominican Republic Ecuador El Salvador Egypt Estonia Falkland Islands Finland France French Guinea French Polynesia Germany Ghana G...

Page 9: ...vakia Slovenia South Africa South Korea Spain Sri Lanka Sweden Switzerland Tahiti Taiwan Turkey Turk Islands Ukraine UAE United Arab Emirates United Kingdom Uruguay USA Vatican Venezuela Vietnam Virgin Islands Zimbabwe Albania Argentina CNC 693 GI 2007 3655 GI 2007 Australia Austria Azerbaijan Bahrain Bangladesh Belgium Bolivia Bosnia Brazil Brunei Bulgaria Cambodia Canada Chile China Colombia Cro...

Page 10: ...ds over more than 300m For registration and license please contact IBPT BIPT Voor privé gebruik buiten gebouw over publieke groud over afstand kleiner dan 300m geen registratie bij BIPT IBPT nodig voor gebruik over afstand groter dan 300m is wel registratie bij BIPT IBPT nodig Voor registratie of licentie kunt u contact opnemen met BIPT Dans le cas d une utilisation privée à l extérieur d un bâtim...

Page 11: ...d for European Community operation in the 5 GHz bands This device will operate under the control of the Access Point in order to avoid operating on a channel Bande de fréquence restreinte seuls les canaux 1 7 2400 et 2454 MHz respectivement doivent être utilisés endroits extérieur en France Vous pouvez contacter l Autorité de Régulation des Télécommunications http www art telecom fr pour la procéd...

Page 12: ... in the following table Albania Argentina Australia Austria Azerbaijan Bahrain Bangladesh Belgium Bolivia Bosnia Brazil Bulgaria Cambodia Canada Chile China Colombia Costa Rica Croatia Cyprus Czech Republic Denmark Dominican Republic Ecuador Egypt El Salvador Estonia Finland France Germany Ghana Greece Herzegovina Honduras Hong Kong Hungary Iceland India Indonesia Ireland Israel Italy Japan Jordan...

Page 13: ...prus Czech Republic Denmark Dominican Republic Ecuador Egypt El Salvador Estonia Finland France Ghana Germany Greece Herzegovina Hong Kong Hungary Iceland India Indonesia Ireland Israel Italy Jamaica Japan Jordan Kazakhstan Kenya Kuwait Kyrgyzstan Latvia Lebanon Liechtenstein Lithuania Luxembourg Macedonia Malaysia Malta Mexico Monaco Morocco Mozambique Netherlands Antilles Netherlands New Zealand...

Page 14: ...rus Czech Republic Denmark Dominican Republic Ecuador Egypt El Salvador Estonia Finland France Germany Ghana Greece Guatemala Herzegovina Honduras Hong Kong Hungary Iceland India Indonesia Ireland Israel Italy Japan Jate Japan Teleco Jordan Kazakhstan Kenya Kyrgyzstan Kuwait Latvia Lebanon Lesotho Liechtenstein Lithuania Luxembourg Macedonia Malaysia Malta Mexico Monaco Morocco Mozambique Netherla...

Page 15: ... Infrastructure mode is available in Ch1 Ch11 802 11b g Ch36 40 44 48 52 56 60 64 149 153 157 161 165 802 11a Wake up on wireless lan function is not available in battery mode 802 11b g 2 4 GHz 802 11a 5 GHz UAE United Arab Emirates United Kingdom Uruguay USA Venezuela Vietnam Yemen Zimbabwe Australia Brunei Canada Chile Hong Kong India Indonesia Malaysia Mexico New Zealand Saudi Arabia Taiwan USA...

Page 16: ...ss LAN Adapters are based on the Draft Release Version 1 0 of the IEEE 802 11n specification An adapter with 11a b 11a b g or 11a b g n can communicate on any of its supported formats the actual connection will be based on the access point to which it connects Connection compatibility with the wireless equipment in Draft 11n mode is not guaranteed The Draft 11n function cannot be used with WEP TKI...

Page 17: ...United States for more information When you use Bluetooth cards from TOSHIBA close to 2 4 GHz Wireless LAN devices Bluetooth transmissions might slow down or cause errors If you detect certain interference while you use Bluetooth cards from TOSHIBA always change the frequency move your computer to the area outside of the interference range of 2 4 GHz Wireless LAN devices 40 meters 43 74 yards or m...

Page 18: ...ts with Bluetooth wireless technology operate within the guidelines found in radio frequency safety standards and recommendations TOSHIBA believes Bluetooth wireless technology is safe for use by consumers These standards and recommendations reflect the consensus of the scientific community and result from deliberations of panels and committees of scientists who continually review and interpret th...

Page 19: ...ring normal operation is minimized Regulatory statements This product complies with any mandatory product specification in any country region where the product is sold In addition the product complies with the following European Union EU and EFTA This equipment complies with the R TTE directive 1999 5 EC and has been provided with the CE mark accordingly Canada Industry Canada IC This device compl...

Page 20: ...age the drive You would also be exposed to laser light or other safety hazards resulting in serious injury Always contact an authorized Toshiba service provider if any repair or adjustment is required Location of the Required Label Sample shown below Location of the label and manufacturing information may vary Copyright This guide is copyrighted by Toshiba America Information Systems Inc with all ...

Page 21: ... AMERICA INFORMATION SYSTEMS INC TOSHIBA PROVIDES NO WARRANTY WITH REGARD TO THIS MANUAL OR ANY OTHER INFORMATION CONTAINED HEREIN AND HEREBY EXPRESSLY DISCLAIMS ANY IMPLIED WARRANTIES OF MERCHANTABILITY OR FITNESS FOR ANY PARTICULAR PURPOSE WITH REGARD TO ANY OF THE FOREGOING TOSHIBA ASSUMES NO LIABILITY FOR ANY DAMAGES INCURRED DIRECTLY OR INDIRECTLY FROM ANY TECHNICAL OR TYPOGRAPHICAL ERRORS OR...

Page 22: ...demarks or registered trademarks of Intel Corporation or its subsidiaries in the United States and other countries Microsoft Outlook and Windows are either registered trademarks or trademarks of Microsoft Corporation in the United States and or other countries TouchPad is a trademark of Synaptics Inc Wi Fi is a registered trademark of the Wi Fi Alliance All other brand and product names are tradem...

Page 23: ...hat your computer will operate at its maximum energy efficiency You can wake the computer from Sleep mode by pressing the power button See the Mobile Computing section of the Toshiba User s Guide for more information on using power management settings to conserve computer energy According to the EPA a computer meeting the new ENERGY STAR specifications will use between 20 and 50 less energy depend...

Page 24: ...tensive troubleshooting guidelines see the electronic user s guide preinstalled on your system It is also available on the Web at pcsupport toshiba com Safety icons This guide contains safety instructions that must be observed to avoid potential hazards that could result in personal injuries damage to your equipment or loss of data These safety cautions have been classified according to the seriou...

Page 25: ...ms that may come with your system For accessory information visit Toshiba s Web site at accessories toshiba com Setting up your computer and getting started The Toshiba Instruction Manual for Safety and Comfort included with your computer contains helpful information for setting up your work environment and tips for working comfortably throughout the day Please handle your computer carefully to av...

Page 26: ...e computer Computer base and palm rest can become hot Avoid prolonged contact to prevent heat injury to skin Read the Avoid extended contact between computer base palm rest and skin section in the Instruction Manual for Safety and Comfort that is shipped with your computer Never place a heavy object on the computer and be careful not to drop a heavy object onto the computer It could damage the com...

Page 27: ... connection Failure to do so may result in a fire or electric shock possibly resulting in serious injury Be careful if you use a multiple connector An overload on one socket could cause a fire or electric shock possibly resulting in serious injury Always use the TOSHIBA AC adaptor that was provided with your computer and the TOSHIBA Battery Charger that may have been provided with your computer or...

Page 28: ...of California to cause birth defects or other reproductive harm Wash hands after handling 2 Plug the AC adaptor cord into the DC IN on the side of the computer Sample Illustration Connecting the AC adaptor cord to the computer 3 Connect the power cord cable to a live electrical outlet The AC power light on the indicator panel glows green Never attempt to connect or disconnect a power plug with wet...

Page 29: ...utomatically recognize the printer the printer is then ready for use Refer to your printer documentation for further instructions TECHNICAL NOTE To determine if your printer supports Plug and Play check its documentation If your printer does not support Plug and Play you can set up the printer as described in Setting up a printer in the electronic user s guide To connect a printer to your computer...

Page 30: ...good condition Installing a memory module with the computer s power on may damage the computer the module or both The computer has two memory slots Slot A and Slot B You can install one or two memory modules Before you install or remove a memory module turn off the computer using the Start menu If you install or remove a memory module while the computer is in Sleep or Hibernation mode data will be...

Page 31: ...ttery For information on removing the main battery see Removing the battery from the computer on page 45 Sample Illustration Locating the memory module slot cover 6 Using a small Phillips screwdriver loosen the screw that secures the memory module slot cover Sample Illustration Removing the memory module slot cover 7 Remove the memory module slot cover 8 Place the screw and the cover in a safe pla...

Page 32: ...of the computer If no memory slot is available you must remove a module by performing steps 2 3 of Removing a memory module on page 34 If your system has the memory modules stacked on top of one another you must remove the top module first before removing installing the bottom module For this model Slot A is the bottom slot Slot B is the top slot If only one memory module is to be installed it mus...

Page 33: ...of the module to seat the module into the latches at the sides of the socket These latches should snap into place securely with the corresponding cutouts in the side of the module If the latches and cutouts do not line up correctly repeat steps 12 13 Sample Illustration Pressing down on the memory module Do not force the memory module into position The memory module should be completely inserted i...

Page 34: ...leep mode In this condition observe the following Never cover your computer or AC adaptor with any object Never place your computer or AC adaptor near a heat source such as an electric blanket or heater Never cover or block the air vents including those located at the base of the computer Always operate your computer on a hard flat surface Using your computer on a carpet or other soft material can...

Page 35: ...r to go into Safe Mode then shut down and restart the system at which time Windows should boot back up normally When Safe Mode is suggested this could be a sign that you may need to scan your internal storage drive for errors or defragment the drive If so consult Windows Help and Support 2 Pull the latches away from the memory module The memory module pops up slightly If your system has the memory...

Page 36: ...located at the base of the computer Overheating your computer or AC adaptor could cause system failure computer or AC adaptor damage or a fire possibly resulting in serious injury 7 Reconnect the cables 8 Restart the computer TECHNICAL NOTE You must have at least one memory module installed for the computer to work Your computer s TFT display Small bright dots may appear on your screen display whe...

Page 37: ... media on a regular basis Label the backup copies clearly and store them in a safe place Scan all new files for viruses Do not turn off the computer if a drive indicator light indicates a drive is active The Windows operating system records information such as your desktop setup during its shutdown procedure If you do not let the Windows operating system shut down normally details such as new icon...

Page 38: ... right Select an item 1 Move the pointer to the item you want to select 2 Do one of the following Tap the TouchPad once OR Press and release the primary left hand control button Sample Illustration Tap once to select Open or activate an item 1 Move the pointer to the item you want to open activate 2 Do one of the following Tap the TouchPad twice in rapid succession OR Press and release the primary...

Page 39: ... or enabling the TouchPad on page 40 Disable the tapping feature If you disable tapping only you can still use the TouchPad s control buttons and move the pointer by sliding your finger on the TouchPad Adjust the sensitivity of the TouchPad so that it is less responsive to accidental light taps and lighter finger pressure TouchPad setting options vary by computer model The TouchPad settings are ac...

Page 40: ...de screen movies multiple language tracks digital surround sound multiple camera angles and interactive menus TECHNICAL NOTE Your optical drive is set to play region 1 North America DVD ROMs If you play a DVD disc from another region the drive will automatically change to play in the format of the other region The drive will allow you to change regions four times On the fourth change the region wi...

Page 41: ...encil lead can break off inside the computer and damage it Inserting an optical disc Before putting on headphones to listen turn the volume down Do not set the volume too high when using the headphones Continuous exposure to loud sound can harm your hearing To insert an optical disc into the drive 1 Make sure the computer is turned on The drive will not open if the computer s power is off 2 Make s...

Page 42: ...h the computer turned on 1 Press the eject button on the drive Do not press the eject button while the drive in use indicator light is glowing Doing so could damage the disc or the drive Also if the disc is still spinning when you open the disc tray wait for it to stop spinning before you remove it 2 Pull the tray out until it is fully open remove the disc and place it in its protective cover 3 Ge...

Page 43: ...ffortlessly and quickly EasyGuard Optimize to enable users to customize system settings to be more productive Toshiba EasyGuard technology comprises a number of features some of which may or may not be available on a particular Toshiba computer depending on the model selected See easyguard toshiba com for detailed information Running the computer on battery power Battery life may vary considerably...

Page 44: ...ystem configuration settings and the current time and date information It maintains this information for up to a month while the computer is turned off TECHNICAL NOTE Depending on your system the RTC battery may only charge while the computer is turned on Monitoring main battery power The computer s main battery light gives you an indication of the main battery s current charge Glows amber while t...

Page 45: ... intentionally bringing the battery terminals in contact with another conductive object This could cause serious injury or fire and could also damage the battery pack and computer Never expose a battery pack to abnormal shock vibration or pressure The battery pack s internal protective device could fail causing it to overheat or ignite resulting in caustic liquid leakage or explosion or fire possi...

Page 46: ...ard it immediately Always dispose of used battery packs in compliance with all applicable laws and regulations Put insulating tape such as cellophane tape on the electrode during transportation to avoid a possible short circuit fire or electric shock Failure to do so could possibly result in serious injury Inserting a charged battery To insert a battery 1 Wipe the terminals of the charged battery ...

Page 47: ...e a battery pack Do not overcharge or reverse charge a battery Overcharging will shorten its life and reverse charging could damage it Avoid touching the metal terminals of the battery with another metal object Short circuiting the battery can cause it to overheat and may cause damage to the battery or the computer Do not incinerate a spent battery as this could cause it to explode and release cau...

Page 48: ...tery go to step 4 4 Connect the AC adaptor to the computer and the power cord cable to a power outlet The DC IN or AC power light should glow green and the battery light should glow amber to indicate that the battery pack is being charged If the DC IN or AC power light indicator does not glow power is not being supplied Check the connections for the AC adaptor and power cord cable 5 Charge the bat...

Page 49: ...to replace them Under certain applicable laws and regulations it may be illegal to dispose of old batteries by placing them in the trash Please be kind to our shared environment Check with your local government authority for details regarding where to recycle old batteries or how to dispose of them properly If you cannot find the information you need elsewhere call Toshiba at 800 457 7777 In addit...

Page 50: ...me then End Task To power off your computer 1 Click Start Sample Image Shut down button 2 Click the Shut down button in the lower right corner of the Start menu The computer shuts down completely Problems when you turn on the computer These problems may occur when you turn on the power The computer will not start Make sure you attached the AC adaptor and power cord cable properly or installed a ch...

Page 51: ...ess Fn F10 to turn off the cursor control overlay light or Fn F11 to turn off the numlock light If the problem occurs when both the keypad overlays are off make sure the software you are using is not remapping the keyboard Refer to the software documentation and check that the program does not assign different meanings to any of the keys Display problems Here are some typical display problems and ...

Page 52: ...acturing technology Over a period of time and depending on the usage of the computer the brightness of the screen will deteriorate This is also an intrinsic characteristic of the screen technology When the computer is operated on battery power the screen will dim and you may not be able to increase the brightness of the screen while on battery power If you need further assistance If you have follo...

Page 53: ...ware on your choice of media Name and version of the program involved in the problem along with its installation media Information about what you were doing when the problem occurred Exact error messages and when they occurred For technical support call the Toshiba Customer Support Center Within the United States at 800 457 7777 Outside the United States at 949 859 4273 Powercord cableconnectors Y...

Page 54: ...uter moving 43 setting up 30 computing tips 37 connecting AC adaptor 27 power cord cable 28 printer 29 D display problems screen is blank 51 disposing of used batteries 48 DVD using 40 E EasyGuard 43 eject button optical drive 40 eject optical drive 41 ENERGY STAR 23 F files backing up 37 saving 37 I installation memory module 30 installing main battery 45 46 memory module 29 K keyboard not workin...

Page 55: ... will not power up 50 contacting Toshiba 52 53 display is blank 51 external monitor 52 keyboard not responding 51 keyboard produces unexpected characters 51 program not responding 49 R real time clock RTC battery 44 removing DVD with computer off 42 with computer on 42 main battery 45 memory module 34 S safety disposing of batteries 48 precautions 25 safety precautions main battery 47 saving files...

Page 56: ...GMA500772010 09 09 Printed on recycled paper ...

Reviews: