Toshiba RAV-GM901CTP-E Installation Manual Download Page 19

– 18 – 


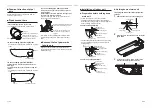
Installing indoor unit on high 
ceiling 

When the height of the ceiling to be installed exceeds 
3.5 m, adjustment of air volume is necessary.
Set up the high ceiling. 
•  Set according to the basic operation procedure 

(

1


2


3


4


5


6

). 

•  CODE No. in Procedure speci

fi

es [5d]. 

•  Select [SET DATA] in Procedure from “List of 

installable ceiling height” in this Manual. 

•  For the CODE No. in Procedure 

3

, specify [5d]. 

•  For the CODE No. in Procedure 

4

, select the SET 

DATA of ceiling height to be set up from the table on 
the below. 

Model

GM90

SET DATA

Standard
(Factory default)

Up to 3.5 m

0000

High ceiling (1)

Up to 4.3 m

0003


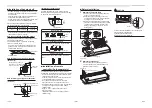
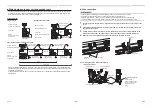
Remote controller-less setting 

Change the high-ceiling setting with the DIP switch on 
the indoor unit P.C. board. 
* Once the setting is changed, setting to 0001 is 

possible, however setting to 0000 requires a 
setting data change to 0000 using the wired remote 
controller (separately sold) with the normal switch 
setting (factory default).

SET DATA

SW501-1

SW501-2

0000

(Factory default)

OFF

OFF

0003

OFF

ON

To restore the factory defaults 

To return the DIP switch settings to the factory 
defaults, set SW501-1 and SW501-2 to OFF, connect 
a separately sold wired remote controller, and then set 
the data of CODE No. [5d] to “

0000

”. 

2

Each time 

 button is pushed, indoor 

unit numbers in the control group change 
cyclically. Select the indoor unit to change 
settings for.

The fan of the selected unit runs and the louvers 
start swinging. The indoor unit for change settings 
can be con

fi

rmed.

3

Specify CODE No. [

] with “TEMP.” 

 / 

 buttons.

4

Select SET DATA [

] with “TIME” 

 / 

 buttons.

5

Push 

 button. When the display changes 

from 

fl

ashing to lit, the setup is completed.

•  To change settings of another indoor unit, repeat 

from Procedure 

2

•  To change other settings of the selected indoor 

unit, repeat from Procedure 

3

Use 

 button to clear the settings. To make 

settings after 

 button was pushed, repeat from 

Procedure 

2

.

6

When settings have been completed, push 


button to determine the settings.

When 

 button is pushed, 


fl

ashes and 

then the display content disappears and the air 
conditioner enters the normal stop mode. 
(While 

 is 

fl

ashing, no operation of the 

remote controller is accepted.)

SW501-2
SW501-1

MCU(IC501)


Filter sign setting

According to the installation condition, the 

fi

lter sign 

term (Noti

fi

cation of 

fi

lter cleaning) can be changed. 

Follow to the basic operation procedure 
(

1


2


3


4


5


6

).

•  For the CODE No. in Procedure 

3

, specify [01].

•  For the [SET DATA] in Procedure 

4

, select the SET 

DATA of 

fi

lter sign term from the following table. 

SET DATA

Filter sign term

0000

None

0001

150H

0002

2500H

(Factory default)

0003

5000H

0004

10000H


To secure better effect of 
heating

When it is dif

fi

cult to obtain satisfactory heating due to 

installation place of the indoor unit or structure of the 
room, the detection temperature of heating can be 
raised. Also use a circulator or other device to circulate 
heat air near the ceiling. 
Follow to the basic operation procedure 
(

1


2


3


4


5


6

). 

•  For the CODE No. in Procedure 

3

, specify [06]. 

•  For the set data in Procedure 

4

, select the SET 

DATA of shift value of detection temperature to be set 
up from the following table. 

SET DATA

Detection temperature shift value

0000

No shift

0001

+1 °C

0002

+2 °C

(Factory default)

0003

+3 °C

0004

+4 °C

0005

+5 °C

0006

+6 °C


Power saving mode

Performing settings of the power saving 
mode

*  When a multiple-unit system is con

fi

gured for group 

control, each outdoor unit must be set up.

*  When an outdoor unit RAV-SP***2AT / SM***3AT 

type or earlier is used, the power level is 

fi

xed to 

75% regardless of the value on the display.

1

Push 

 button for 4 seconds or more when 

the air conditioner is not working.


fl

ashes. 

Indicates CODE No. “C2.”
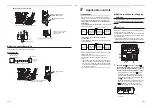
2

Select an indoor unit to be set by pushing 

 (left side of the button). 

Each time the button is pushed, unit numbers 
change as follows:

UNIT No.
1-1

UNIT No.
1-2

UNIT No.
1-3

UNIT No.
1-4

The fan of the selected unit runs.

3

Adjust the power save setting by pushing 
TIME 


 buttons. 

Each push of the button changes the power level 
by 1% within the range from 100% to 50%. 
*  The factory default is 75%. 
*  The power level might not drop to the setpoint, 

depending on the operating conditions. 

*  All indoor units with the same group address 

must be set with the same power level.

Setting of power level in 
power saving mode

4

Determine the setting by pushing 

 button.

5

Push 

 button to complete the setting.

35-EN

36-EN

Summary of Contents for RAV-GM901CTP-E

Page 1: ...AIR CONDITIONER SPLIT TYPE Installation Manual For commercial use Indoor Unit Model name Ceiling Type RAV GM901CTP E R32 English ...

Page 2: ...his Manual describes the installation method of the indoor unit For installation of the outdoor unit follow the Installation Manual attached to the outdoor unit For precaution for safety follow the Installation Manual attached to the outdoor unit ADOPTION OF R32 REFRIGERANT This Air Conditioner has adopted a refrigerant HFC R32 which does not destroy the ozone layer Be sure to check the refrigeran...

Page 3: ...idual or individuals who have been trained and is thus thoroughly acquainted with the knowledge related to this work Qualified service person The qualified service person is a person who installs repairs maintains relocates and removes the air conditioners made by Toshiba Carrier Corporation He or she has been trained to install repair maintain relocate and remove the air conditioners made by Tosh...

Page 4: ... the air conditioner read through the Installation Manual carefully and follow its instructions to install the air conditioner Only a qualified installer 1 or qualified service person 1 is allowed to do installation work Inappropriate installation may result in water leakage electric shock or fire Do not use any refrigerant different from the one specified for complement or replacement Otherwise a...

Page 5: ...rotection from falling objects Do not use the refrigerant other than R32 For the refrigerant type check the outdoor unit to be combined The refrigerant used by this air conditioner follow to the outdoor unit The air conditioner must be transported in stable condition If any part of the product is broken contact the dealer When the air conditioner must be transported by hand carry it by two or more...

Page 6: ...gas leaks into the room and flows near a fire source such as a cooking range noxious gas may be generated When the air conditioner has been installed or relocated follow the instructions in the Installation Manual and purge the air completely so that no gases other than the refrigerant will be mixed in the refrigerating cycle Failure to purge the air completely may cause the air conditioner to mal...

Page 7: ...ot be turned on by marking out of service near the circuit breaker for instance until qualified service person 1 arrives Continuing to use the air conditioner in the trouble status may cause mechanical problems to escalate or result in electric shocks or other trouble After the work has finished use an insulation tester set 500V Megger to check the resistance is 1 MΩ or more between the charge sec...

Page 8: ...ossibly resulting in rupture injury or other trouble CAUTION This Air Conditioner has adopted a refrigerant HFC R32 which does not destroy the ozone layer As the R32 refrigerant is easily affected by impurities such as moisture oxidized film oil etc due to the high pressure be careful not to allow the moisture dirt existing refrigerant refrigerating machine oil etc to get mixed up in the refrigera...

Page 9: ...be generated the plastic parts to be damaged the heat insulators to peel off and other such problems to result Locations where vapors from food oils are formed such as kitchens where food oils are used Blocked filters may cause the air conditioner s performance to deteriorate condensation to form the plastic parts to be damaged and other such problems to result Locations near obstructions such as ...

Page 10: ...ion and varies a little according to capacity of the battery To prevent malfunction select a place where is not affected by a fluorescent lamp or direct sunlight Two wireless type indoor units can be set in a room Model Possible installed ceiling height GM90 Up to 4 3 m Model GM90 SET DATA Standard Factory default Up to 3 5 m 0000 High ceiling 1 Up to 4 3 m 0003 Unit mm Left drain pipe connecting ...

Page 11: ...mote controller Pull out the remote controller cord together with the refrigerant pipe or drain pipe Pass the remote controller cord through upper side of the refrigerant pipe and drain pipe Do not leave the remote controller at a place exposed to the direct sunlight and near a stove Operate the remote controller confirm that the indoor unit receives a signal surely and then install it Wireless ty...

Page 12: ...ttached heat insulator of the top plate to pipe shape and then seal the knockout hole Knockout hole of power wire take in port Open the power wire take in port Knockout hole shown in the External dimensions and then mount the attached bushing Indoor unit Hanging bolt locally procured Ceiling surface Hanging metal Washer Accessory Double nut locally procured Nut locally procured Indoor unit Hanging...

Page 13: ...rain piping CAUTION Following the Installation Manual perform the drain piping work so that water is properly drained Apply a heat insulation so as not to cause a dew condensation Inappropriate piping work may result in water leakage in the room and wet furniture Provide the indoor drain piping with proper heat insulation Provide the area where the pipe connects to the indoor unit with proper heat...

Page 14: ...case of taking pipe from the left side exchange the plug from left to right Push in the plug of which end is not sharp up to the end Drain up When a down gradient cannot be secured for the drain pipe drain up piping is possible The height of the drain pipe must be 600 mm or less from the underside of the indoor unit When Drain Pump Kit sold separately is installed drain pipe and refrigerant pipe c...

Page 15: ...d stepped or flattened and that there are no chips adhered or other problems after flare processing Do not apply refrigerating machine oil to the flare surface In case of flaring with the conventional flare tool pull it out approx 0 5 mm more than that for R22 to adjust to the specified flare size The copper pipe gauge is useful for adjusting projection margin size The sealed gas was sealed at the...

Page 16: ...onnect earth wires to gas pipes water pipes lightning conductor or telephone earth wires Appliance shall be installed in accordance with national wiring regulations Capacity shortage of power circuit or incomplete installation may cause an electric shock or a fire CAUTION Do not connect 220 240 V power to the terminal blocks A B for control wiring Otherwise the system will fail Do not damage or sc...

Page 17: ...ds of the shield wire to earth leads Connect earth wires for each indoor unit in the simultaneous twin simultaneous triple and simultaneous double twin systems Remote controller inter unit wiring Indoor side Indoor power inter unit wiring Electrical control box cover P C board Terminal block System interconnection wires Run the system interconnection wire here through the clamp base and fix it wit...

Page 18: ...or at least 4 seconds After a while the display flashes as shown in the figure Confirm that the CODE No is 01 If the CODE No is not 01 push button to clear the display content and repeat the procedure from the beginning No operation of the remote controller is accepted for a while after button is pushed While air conditioners are operated under the group control ALL is displayed first When is push...

Page 19: ... stop mode While is flashing no operation of the remote controller is accepted SW501 2 SW501 1 MCU IC501 Filter sign setting According to the installation condition the filter sign term Notification of filter cleaning can be changed Follow to the basic operation procedure 1 2 3 4 5 6 For the CODE No in Procedure 3 specify 01 For the SET DATA in Procedure 4 select the SET DATA of filter sign term f...

Page 20: ...coil temperature TE 61 Outside air temperature TO 62 Compressor discharge temperature TD 63 Compressor suction temperature TS 64 65 Heatsink temperature THS 6A Operating current x1 10 F1 Compressor cumulative operating hours x100 h Group control Simultaneous twin triple or double twin system A combination with an outdoor unit allows simultaneous ON OFF operation of the indoor units The following s...

Page 21: ...ress 1 2 2 Address 3 3 2 Outdoor unit Indoor unit Indoor unit Outdoor unit Indoor unit Indoor unit Indoor unit Procedure example 1 After setup of automatic address After setup change of manual address Example of random setup Example of address setup change The above address is set by the automatic addressing when the power is turned on However line addresses and indoor addresses are set randomly F...

Page 22: ...fter pushing button operation of the remote controller is not accepted for approx 1 minute Display changes according to the model No of indoor unit 2 Every time button is pushed the indoor unit No in the group control is displayed in order Select the indoor unit of which setup is changed In this time the position of the indoor unit of which setup is changed can be confirmed because fan of the sele...

Page 23: ...sh button to stop a test run Display part is same as procedure 1 5 Push button to cancel release from the test run mode TEST disappears on the display and the status returns to a normal TEMPORARY button Wireless remote controller NOTE Be sure to operate the unit following the instruction manual Do not run the air conditioner in forced cooling mode for a long time since it overloads the air conditi...

Page 24: ...emove them or apply rustproof treatment if necessary As a general rule when an indoor unit is operated for 8 hours or more daily clean the indoor unit and outdoor unit at least once every 3 months Ask a professional for this cleaning maintenance work Such maintenance can extend the life of the product though it involves the owner s expense Failure to clean the indoor and outdoor units regularly wi...

Page 25: ...nd outdoor unit Auto reset IPDU CDB communication error E08 Duplicated indoor addresses Indoor Indoor address setting error The same address as the self address was detected Auto reset E09 Duplicated header remote controllers Remote controller Remote controller address setting error Two remote controllers are set as header in the double remote controller control The header indoor unit stops raisin...

Page 26: ...nce outdoor unit P C board Abnormal phase sequence of the 3 phase power supply Operation continued thermostatOFF P03 ALT Outdoor unit discharge temp error Outdoor An error was detected in the discharge temp releasing control Entire stop P04 ALT Outdoor unit high pressure system error Outdoor High pressure switch The IOL was activated or an error was detected in the high pressure releasing control ...

Page 27: ... shiny metal dust or other wear residue or mixture of foreign matter is observed trouble will occur 8 When temporary installation and removal of the air conditioner are repeated such as when leased etc 9 If the type of refrigerator oil of the existing air conditioner is other than the following oil Mineral oil Suniso Freol S MS Synthetic oil alkyl benzene HAB Barrel freeze ester series PVE only of...

Page 28: ...144 9 Moo 5 Bangkadi Industrial Park Tivanon Road Tambol Bangkadi Amphur Muang Pathumthani 12000 Thailand 1115652997 ...

Reviews: