


– 44 –
1
2
3
4
5
6
7
Switch cover
8
AUTO
COOL
DRY
HEAT
FAN ONLY
AUTO
LOW
MED
HIGH
OPERATION
PREHEAT
DEFROST
MAL FUNCTION CHECK
MODE
SELECT
:
CHECK
MODE
OFF
ON/OFF
CYCLE
CYCLE
ON TIME
OFF TIME
ON
˚C
TIMER
TIME
TEMP.
FAN
FAN
SELECT
TIMER
SELECT
TIME
ADJUST
TIME
COMTROL
TEMP.
COMTROL
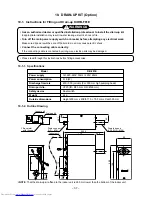
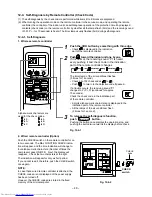
11-2-2. Control Area
The switches are pushed to select the desired operation.
1
MODE SELECT switch
This is used to select the desired operating
mode. Each time it is pushed, the displays light
up in the following sequence : AUTO
→
COOL
→
DRY
→
HEAT
→
FAN ONLY.
• This remote controller is used commonly for
either Cooling only model or Heat pump
model. Therefore, when controller is con-
nected to a Cooling only model and “Heat”
model is selected, the air conditioner operates
as a circulator.
2
TIME ADJUST switches
This is used to set the time for the CLOCK.
ON TIME and OFF TIME mode. Each time it is
pushed, the displays light up in the following
sequence : CLOCK
→
ON TIME
→
OFF TIME.
The time is set using the – + switches.
3
CHECK switch
4
ON/OFF lamp
This lights while the air conditioner is operating.
It flashes when the power supply is turned ON
or when power is restored after a power failure,
and it changes to the “lighted” status when
operation begins.
5
FAN SELECT switch
This is used to select the speed at which the
cool or warm air is to be blown out. Each time it
is pushed, the displays light up in the following
sequence : AUTO
→
LOW
→
MED
→
HIGH.
6
TEMP. CONTROL switch
These are used to adjust the room temperature.
Push the – + switches to set the desired
temperature.
The indicated figure (17 to 30°C) serves as a
guideline for the temperature settings.
7
TIMER SELECT switch
This is used to select either continuous opera-
tion or timer operation.
The following modes can be set with timer
operation : ON, OFF, ON
→
OFF, OFF
→
ON
and CYCLE.
8
ON/OFF button
The air conditioner starts operating after a short
pause when this button is pushed.
It stops operating after a short pause when this
button is pushed again.
BACK-UP BATTERIES
• Three “MR9” 1.35V equivalent batteries are used to back-up.
They are also required when to use Auto Restart function.
• To install the batteries, first insert an ordinary screwdriver into the bottom cut, remove the remote controller
cover and insert the batteries.
• Do not use old batteries or different types of batteries together. This may result in malfunctioning.
• Under normal conditions of use, the service life of the batteries are approximately 1 year.
• Check of dead battery
If batteries are expired or batteries are not used, LC display of the indication on the wired remote controller
disappears when the power supply is turned off.
Summary of Contents for RAS-M10YDCV-E
Page 62: ......