


2
WARNING
• Installation work must be requested from the supplying retail dealership. Self-installation may cause water leakage, electrical shock, or
fi
re as a result
of improper installation.
• Speci
fi
ed tools and pipe parts for model R410A are required, and installation work must be done in accordance with the manual. HFC type refrigerant
R410A has 1.6 times more pressure than that of conventional refrigerant (R22). Use the speci
fi
ed pipe parts, and ensure correct installation, otherwise
damage and/or injury may be caused. At the same time, water leakage, electrical shock, and
fi
re may occur.
• Be sure to install the unit in a place which can suf
fi
ciently bear its weight. If the load bearing of the unit is not enough, or installation of the unit is
improper, the unit may fall and result in injury.
• Electrical work must be performed by a quali
fi
ed supplying retail dealership in accordance with the code governing such installation work, internal
wiring regulations, and the manual. A dedicated circuit and the rated voltage must be used. Insuf
fi
cient power supply or improper installation may
cause electrical shock or
fi
re.
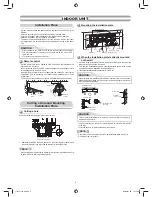
• Use a cabtyre cable to connect wires in the indoor/outdoor units. Midway connection, stranded wire, and single-wire connections are not allowed.
Improper connection or
fi
xing may cause a
fi
re.
• Wiring between the indoor unit and outdoor units must be well shaped so that the cover can be
fi
rmly placed. Improper cover installation may cause
increased heat,
fi
re, or electrical shock at the terminal area.
• Be sure to use only approved accessories or the speci
fi
ed parts. Failure to do so may cause the unit to fall, water leakage,
fi
re or electrical shock.
• After the installation work, ensure that there is no leakage of refrigerant gas. If the refrigerant gas leaks out of the pipe into the room and is heated by
fi
re or something else from a fan heater, stove or gas range, it causes generation of poisonous gas.
• Make sure the equipment is properly earthed. Do not connect the earth wire to a gas pipe, water pipe, lightning conductor, or telephone earth wire.
Improper earth work may be the cause of electrical shock.
• Do not install the unit where
fl
ammable gas may leak. If there is any gas leakage or accumulation around the unit, it can cause a
fi
re.
• Do not select a location for installation where there may be excessive water or humidity, such as a bathroom. Deterioration of insulation may cause
electrical shock or
fi
re.
• Installation work must be performed following the instructions in this installation manual. Improper installation may cause water leakage, electrical
shock or
fi
re. Check the following items before operating the unit.
- Be sure that the pipe connection is well placed and there are no leaks.
- Check that the service valve is open. If the service valve is closed, it may cause overpressure and result in compressor damage. At the same time, if
there is a leak in the connection part, it may cause air suction and overpressure, resulting burst or injury.
• In pump down operations, ensure to perform the following procedures.
- Do not inject air into the refrigeration cycle.
- Be sure to close both service valves and stop the compressor before removing the refrigerant pipe. If removing the refrigerant pipe while the
compressor is operating with the service valves opened, it may cause to air absorbed and abnormal high pressure inside the refrigeration cycle and
resulting burst or injury.
• Do not modify the power cable, connect the cable midway, or use a multiple outlet extension cable. Doing so may cause contact failure, insulation
failure, or excess current, resulting in
fi
re or electrical shock.
• Do not use any refrigerant different from the one speci
fi
ed for complement or replacement. Otherwise, abnormally high pressure may be generated in
the refrigeration cycle, which may result in a failure or explosion of the product or an injury to your body.
• Be sure to comply with local regulations/codes when running the wire from the outdoor unit to the indoor unit. (Size of wire and wiring method etc.)
• Places where iron or other metal dust is present. If iron or other metal dust adheres to or collects on the interior of the air conditioner, it may
spontaneously combust and start a
fi
re.
• If you detect any damage, do not install the unit. Contact your supplying dealer immediately.
• Never modify this unit by removing any of the safety guards.
• Do not install in a place which cannot bear the weight of the unit. Personal injury and property damage can result if the unit falls.
CAUTION
• Please read this installation manual carefully before installing the unit. It contains further important instructions for proper installation.
• Exposure of unit to water or other moisture before installation could result in electric shock. Do not store it in a wet basement or expose to rain or water.
• After unpacking the unit, examine it carefully for possible damage.
• Do not install in a place that can increase the vibration of the unit. Do not install in a place that can amplify the noise level of the unit or where noise and
discharged air might disturb neighbors.
• This appliance must be connected to the main power supply by means of a circuit breaker depending on the place where the unit is installed. Failure to do
so may cause electrical shock.
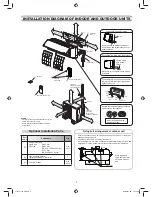
• Follow the instructions in this installation manual to arrange the drain pipe for proper drainage from the unit. Ensure that drained water is discharged.
Improper drainage can result in water leakage, causing water damage to furniture.
• Tighten the
fl
are nut with a torque wrench using the prescribed method. Do not apply excess torque. Otherwise, the nut may crack after a long period of
usage and it may cause the leakage of refrigerant.
• Wear gloves (heavy gloves such as cotton gloves) for installation work. Failure to do so may cause personal injury when handling parts with sharp edges.
• Do not touch the air intake section or the aluminum
fi
ns of the outdoor unit. It may cause injury.
• Do not install the outdoor unit in a place which can be a nest for small animals. Small animals could enter and contact internal electrical parts, causing a
failure or
fi
re.
• Request the user to keep the place around the unit tidy and clean.
• Make sure to conduct a trial operation after the installation work, and explain how to use and maintain the unit to the customer in accordance with the
manual. Ask the customer to keep the operation manual along with the installation manual.
REQUIREMENT OF REPORT TO THE LOCAL POWER SUPPLIER
Please make absolutely sure that the installation of this appliance is reported to the local power supplier before installation. If you experience any problems
or if the installation is not accepted by the supplier, the service agency will take adequate countermeasures.
1115751104-EN.indd 2
1115751104-EN.indd 2
5/26/2557 BE 10:45 AM
5/26/2557 BE 10:45 AM