


13
14
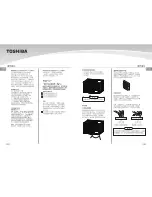
Installation of the unit into the Housing
1. Fit the drain pan to the housing and attach a drain tube to a
suitable location if required.
2. Slide the unit into the housing until it is firmly against the rear
of the housing. Care is required to ensure the foam sealing
strips on the housing remain in position.
(QJDJHWKHFKDVVLVIL[LQJEUDFNHWVLQWRWKHERWWRPKRXVLQJ
rail and secure to the base with the screw provided.
4. Install the front panel as per the Installation lnstruction.
&RQQHFWWKHDLUFRQGLWLRQHUWRWKHSRZHUDQGSRVLWLRQH[FHVV
cord length beneath the air conditioner base.
6. Switch unit on. Check for operation of the unit and check for
vibration in the installation.
Dimensions
02'(/
%2'<',0(16,21PP
:['[+
+%+&5+%+&5
[
585
[
346
+%+&5
[
560
[
380
660
[
680
[
428
+%+&5
Minimum norminal cross-sectional area of conductors:
+%+&5
0.75
1
1.5
+%+&5
+%+&5+%+&5
Model name
Nominal cross-sectional area
(mm
2
)
Suggest minimum wire size
(
AWG, American wire gage
)
+%+&5
18
16
14
+%+&5
+%+&5+%+&5
Model name
$:*ZLUHVL]H
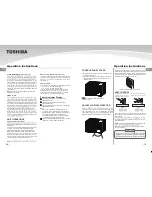
)ODVKRUVHDODURXQGH[WHUQDO
wall frame or architrave
(QVXUHORXYUHV
are entirely
outside the wall
Steadying bracket
(one per side)
Solid timber support
Timber framed
wall or partition
Sturdy timber frame
$OWHUQDWLYHPHWKRGRILQVWDOODWLRQLIH[WHUQDO
support cannot be provided.
Drain pan
$,5,1
$,5,1
$,5287
237,21$
100mm minimum
$,5,1
237,21%
45
o
%5,&.&87$:$<
72&/($5/2895(6
45
o
%5,&.&87$:$<
72&/($5/2895(6
)5217
$,5,1
100mm
100mm
TOP
VIEW
BRICK
WALL
BRICK
WALL
$,5,1
/2895(
$,5287
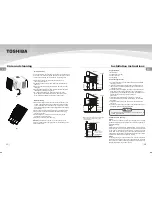
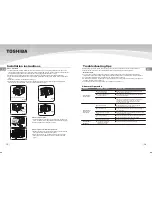
5HPRYHWKHUXEEHUSOXJIURPWKHERWWRPRIWKHFDELQHW
2. Take out the drain tray and screws (which provided with your
air conditioner accessory).
3. Install the drain tray at the bottom of the unit and secure with
screws provided.
4. Connect the drain hose to the outlet located at one side of the
GUDLQWUD\<RXFDQSXUFKDVHWKHGUDLQKRVHRUWXELQJORFDOO\
to satisfy your particular needs (Drain hose is not supplied).
Condensed water treatment
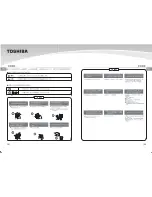
+ROGWKHVORWXQGHUWKHIURQWSDQHOWKHQXSOLIWLWRXWZDUGVDQG
UHPRYHWKHIURQWSDQHOWKHDLUILOWHULVDWWDFKHGRQWKHEDFNRI
the front panel (See Fig.1).
Installation Steps
Step 1. Remove the front panel and the air filter
5HPRYHWKHWZRIL[LQJVFUHZVIURPWKHIUDPH6HH)LJ
*UDVSWKHOHIWFRUQHURIWKHIUDPHVXQGHUVLGHUHOHDVHWKH
FRXSOHUSOXJVWKHQORRVHQWKHIUDPH6HH)LJ
NOTE:
)RU+%DQG+&5WKHSDQHODQGIUDPHDUHSDFNHG
ZLWKWKHXQLWZLWKRXWLQVWDOODWLRQ,QWKLVFDVHRQO\VWHSDQG
may be performed.
Step 2. Remove the frame.
'5$,1
287/(7
'5$,175$< 6&5(: 58%%(5
3/8*
Fig.1
Fig.2
Fig.3
Installation instructions
Installation instructions
(1
(1
Summary of Contents for RAC-H07B
Page 10: ......
Page 11: ......
Page 12: ...H18CR H18B ...
Page 14: ...17 30ᓖRAC H CR ࡇ C B C B C B C B H07 H09 H12 H18 2 1 2 設定溫度范圍 選擇該功能ᖼ 16 31ᓖRAC H B ࡇ 攝氏 攝氏 ...
Page 15: ......
Page 17: ...H07B H07CR H09B H09CR H12B H12CR H18B H18CR H07B H07CR H09B H09CR H12B H12CR H18B H18CR ...
Page 18: ......