background image

IP4000-series UG  November, 2011

TOSHIBA

1

Getting Started

1

This chapter covers the basic overview of the IP4000-series telephone.

Charging the 
Battery

1.

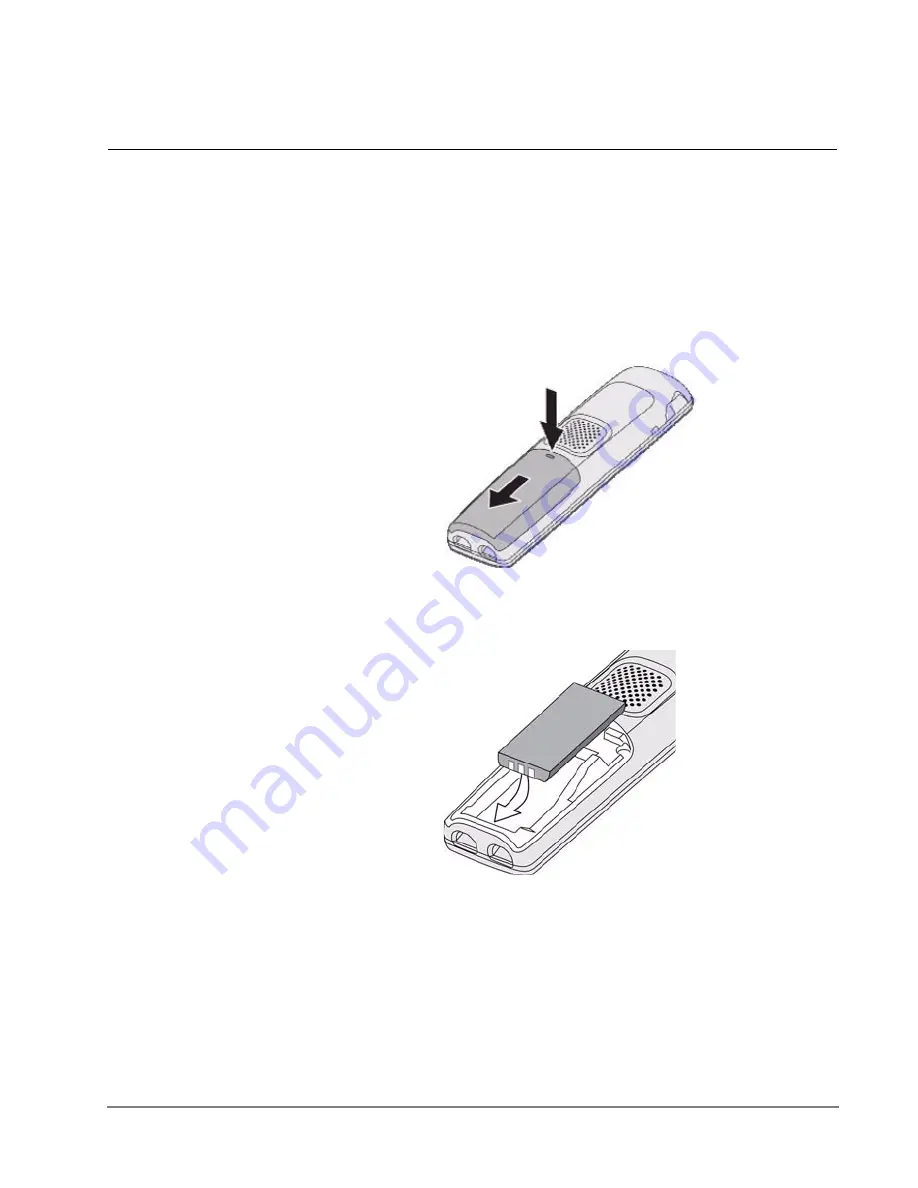
Unpack the handset, battery, and battery cover. If the battery cover is already 
on the handset, press in on the notch and slide the cover down and off.

2.

Align the battery so the contacts face the bottom of the handset and the flat 
side faces up.

3.

Insert the bottom of the battery first, then lay the battery down and push it 
gently until it snaps into place. 

Summary of Contents for IP4100 Series

Page 1: ...TOSHIBA Telecommunication Systems Division IP4100 DECT User Guide Title Page November 2011 ...

Page 2: ...s loss of revenues or profits loss of goodwill inconvenience or exemplary special incidental indirect or consequential damages whatsoever or claims of third parties regardless of the form of any claim that may result from the use of this document THE SPECIFICATIONS AND INFORMATION PROVIDED HEREIN ARE FOR INFORMATIONAL PURPOSES ONLY AND ARE NOT A WARRANTY OF ACTUAL PERFORMANCE WHETHER EXPRESSED OR ...

Page 3: ...plaint with the FCC Service or Repair For service or repair contact your local Toshiba telecommunications distributor To obtain the nearest Toshiba telecommunications distributor in your area log onto www toshiba com taistsd pages support_dealerlocator html or call 800 222 5805 and ask for a Toshiba Telecom Dealer Radio Frequency Interference Warning This equipment generates uses and can radiate r...

Page 4: ...Y RIGHTS THE WARRANTY OF YEAR 2000 COMPLIANCE AND THE IMPLIED WARRANTIES OF MERCHANTABILITY AND FITNESS FOR A PARTICULAR PURPOSE THE ENTIRE RISK AS TO THE QUALITY AND PERFORMANCE OF THE SOFTWARE IS WITH YOU NEITHER TAIS NOR ITS SUPPLIERS WARRANT THAT THE FUNCTIONS CONTAINED IN THE SOFTWARE WILL MEET YOUR REQUIREMENTS OR THAT THE OPERATION OF THE SOFTWARE WILL BE UNINTERRUPTED OR ERROR FREE HOWEVER...

Page 5: ...g the malfunc tion by TAIS or its authorized dealer with new or refurbished parts at their option If TAIS or one of its autho rized dealers does not replace or repair such parts the retail customer s sole remedy will be a refund of the price charged by TAIS to its dealers for such parts as are proven to be defective and which are returned to TAIS through one of its authorized dealers within the wa...

Page 6: ...ed by the warranties provided through the original manufacturer and passed on intact to the purchaser by Toshiba Customers should consult their product documentation for third party warranty information specific to third party products More information may also be available in some cases from the manufacturer s public website While Toshiba offers a wide selection of software hardware and periphera...

Page 7: ...tatus LEDs 7 Display icons and what they mean 7 LED States 8 Using the Menus 9 Main Menu Screen 9 Contacts Screen Local Contacts 10 Central Directory Screen Global Contacts 10 Calls Screen 11 Connectivity Screen 11 Settings Screen 11 Audio Screen 12 Alarms Screen 13 Chapter 2 Using Common Features Making and Receiving Calls 15 Transferring Calls 15 Do Not Disturb 15 Changing the Audio Volume 15 Us...

Page 8: ...Indicator 19 Using the Security Menu 19 Locking the Keypad 19 Changing the PIN 19 Using Alarms 19 Setting the Alarm 19 Appendix Important Information AC Adapter and Battery Information 21 AC adapter 21 Battery pack 21 Rechargeable Battery Information 21 Problem Solving 22 Handset 22 Weak or Hard to Hear Audio 22 Noise or Static on the Line 22 Resetting Handsets 23 Compliance Information 23 RF Expo...

Page 9: ...ries in a fire They may explode Check with local codes for possible special disposal instructions Do not place the handset in any charging device cradle without the battery installed and the battery cover securely in place CAUTION Risk of explosion if battery is replaced by an incorrect type Dispose of used batteries according to the instructions Do not open or mutilate the battery Disconnect the ...

Page 10: ...ring 10 1 first then 10 2 10 3 and 10 4 A station is considered busy when all extensions are being used Note The naming convention for DKT assignments within Toshiba is Directory Numbers For clarity and ease of understanding the terms Extension Number and Phantom Extension Number will be used in this document in lieu of PDN and PhDN Arial bold Represents telephone buttons Courier Shows a computer ...

Page 11: ...ar in different versions on the Toshiba FYI site or in print To find the most current version check the version date in the Publication Information on the back of the document s title page The following are related documents for the IP4100 Telephones IP4100 SIP DECT Installation Guide IP4100 SIP DECT Network Planning Guide ...

Page 12: ...This page is intentionally left blank ...

Page 13: ... Unpack the handset battery and battery cover If the battery cover is already on the handset press in on the notch and slide the cover down and off 2 Align the battery so the contacts face the bottom of the handset and the flat side faces up 3 Insert the bottom of the battery first then lay the battery down and push it gently until it snaps into place ...

Page 14: ...r into a different outlet 8 Place the spare battery in the back section of the charger Pull the battery latch back to insert the battery Note Charge each battery completely about 10 hours before using it Powering on the Handset To power on the handset press End The handset searches for a base and connects to the unit with the strongest signal To power off the handset press and hold End for about 4...

Page 15: ...IPedge Strata CIX Getting Started IP4000 series UG November 2011 TOSHIBA 3 Basic Operation Keys and Their Functions ...

Page 16: ...item Menu Open or close the menu Soft keys The soft keys automatically change their func tion based on what you are doing See Using soft keys on page 8 Function keys 1 through 4 F1 through F4 Dials the contact assigned to the key see page Assigning Contacts to a Speed Dial Number on page 18 Four way key Up Down Right Left Move the cursor up one line Move the cursor down one line Move the cursor to...

Page 17: ...Using soft keys Soft keys are controlled by the software they will automatically change their function depending on what you re currently doing The description of the soft key s current function appears in the bottom of the display directly above the corresponding key If the description for a soft key is blank that key doesn t currently have a function Sometimes the current function of a soft key ...

Page 18: ...ay so you can see what letter you are about to enter The handset uses capital letters as the first character and lower case letters after that To switch between upper case letter lower case letters and numbers press To enter a symbol press 1 to cycle through the available symbols or press Symbol and select the symbol you want to enter If two letters in a row use the same number key enter the first...

Page 19: ...You have a new voice message The ringer is turned off this handset will not ring when a call comes in The keys are locked see page 24 The handset is currently on a call The microphone is muted and the caller can t hear you Battery Status The battery is fully charged The battery is more than half charged The battery is about half charged The battery is getting low The battery is very low change the...

Page 20: ... Table 2 LED States Charger LEDs Meaning HANDSET STATUS On the handset is properly seated in the char ger Off the handset is not in the charger or is not properly seated BATTERY STATUS On the spare battery is charging Off the spare battery is completely charged Table 3 Handset LEDs Meaning STATUS Configurable by the user see Configuring the STATUS LED on the handset on page 9 F1 in function key 1 ...

Page 21: ...ection with the Green LED and Yellow LED 5 For future reference record your settings in the table on the following page For example if you set the LED to turn yellow when you miss a call place an X under Missed call on the YELLOW LED row Using the Menus To open the menu press Menu The handset displays the main menu screen below Use the four way key to move the cursor and highlight items When you h...

Page 22: ...showing on the display Press Right to scroll through each phone number saved for this contact Edit Edit the selected contact s information More See more options for the contact list Add contact Add a contact to the list You can enter the following information Name Up to four phone numbers Work Mobile Home and Other you must enter at least one phone num ber Ringtone If the contact list is empty thi...

Page 23: ...andset prompts you to select a contact and phone number slot Edit before call Edit the selected phone number before you dial it Delete item Delete the selected call record Delete all items Erase all records from call list Register Register the handset to a base This option only func tions if the handset is not currently registered and dis plays a Deregistered message Deregister Clear the handset s...

Page 24: ...ormally and displays the incoming call screen Disconnected The handset does not respond to incoming calls at all Silent The handset does not ring but it does display the incoming call screen Do not disturb Turn on the Do Not Disturb feature See page 19 for more information Ring Volume Set the ringer volume Press Up to raise the volume and Down to lower the volume Press Select or OK when you re sat...

Page 25: ... On if you want the handset to sound a warning when you approach the edge of the base s range Press Off to disable this tone Charger Warning Press On if you want the handset to sound a warning when the battery is get ting low Press Off to disable this tone Alarm Set a one time alarm on this handset Enter the time you want the alarm to sound and press Save Recurrent alarm Set an alarm to sound on s...

Page 26: ...This page is intentionally left blank ...

Page 27: ...ansfer This automatically places the call on hold 2 Enter the extension you want to transfer the call to 3 Press Transfer For a supervised transfer wait until the other extension answers you can speak to the person you re transferring the call to the caller remains on hold To complete the transfer press Transfer again Do Not Disturb While do not disturb is on the handset turns off the ringer and i...

Page 28: ... the list from newest to oldest Press Up to scroll from oldest to newest To see details on a call Highlight the call record in the list and press View To dial a number Highlight the call record you want to dial and press Talk or Call To add a number to the contact list 1 Highlight the call record and press More 2 Select Append to a contact to add this phone number to an existing contact OR select ...

Page 29: ...hone number you want to use for this contact You must enter at least one phone number but it doesn t matter which of the slots you use 5 To set a special ringtone for this contact select Ringtone and choose the ringtone you want the handset to use when this contact calls To hear a sample of the ringtone press Play Deleting contacts 1 Open the main menu screen and select the Contacts icon 2 Highlig...

Page 30: ...o assign this contact to and press Add If the number you select is already assigned press Delete to erase the existing assignment or press Replace to overwrite the assignment with the new contact Making a call from a speed dial number Press the function key F1 through F4 or press and hold the number key that you assigned the contact to The handset automatically dials the first phone number on that...

Page 31: ...set is idle for the amount of time you selected it locks the keys To unlock the keypad press Select followed by The keypad will remain unlocked until it remains inactive for the amount time selected above Changing the PIN You must enter the PIN to deregister the handset or reset it to factory default settings Do not change the PIN without notifying your system administrator 1 From the main menu sc...

Page 32: ...n alarm Choose from 1 minute through 10 minutes in one minute increments The default is 10 minutes When the alarm rings press Dismiss to silence the alarm press Snooze if you want the alarm to ring again after 10 minutes To change the length of time the handset waits select Snooze time and choose from 1 minute through 10 minutes in one minute increments One time alarms automatically turn themselve...

Page 33: ...ays of standby time For best results return the handset to the charger after each call to keep it fully charged When the battery gets too low the handset shows a low battery alert If you hear a strange beep during a call check the display if you see the low battery alert finish your conversation as quickly as possible and return the handset to the charger If the handset is in standby none of the k...

Page 34: ...t your local waste management officials for information and regulations on the proper collection recycling and disposal of batteries Important Rechargeable batteries must be recycled or disposed of properly Problem Solving Handset If you have any trouble with your handset try these simple steps first If a handset can t make or receive calls try moving the handset closer to the base If a handset ca...

Page 35: ...ed settings language ring tones volume etc will be lost Resetting a handset will not deregister the handset from its base 1 On the handset press Menu 2 From the main menu screen select the Settings icon 3 On the Settings screen select Reset settings 4 When the handset asks you to confirm press Yes to continue the reset press No or End to cancel 5 When the handset asks you to enter the PIN enter th...

Page 36: ...e Information This product complies with FCC radiation exposure limits under the following conditions The base must be placed to allow a minimum of 20 cm 8 inches between the antenna and all persons during normal operation The base must not be co located or operated in conjunction with any other antenna or transmitter The handset is designed for body worn operation and meets FCC RF exposure guidel...

Reviews: