


1.PREPARATION
Components 11
1 PREPARATION
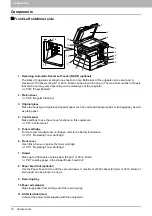
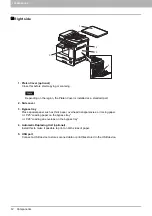
12.Power switch
Turns the power ON or OFF.
P.17 “Preparation 1 - Turning Power ON”
13.Network interface connector
Use this connector when connecting this equipment to a network.
14.USB terminal (4-pin)
Connect to your PC using a commercially available USB cable.
Use a USB2.0 Hi-Speed certified cable: USB cable supporting the USB2.0 Hi-Speed mode (480
Mbps of transfer speed) certified by the USB Implementers Forum.
Connect the equipment with a PC directly by the USB cable. When it is connected with a PC via a
USB hub, the equipment may not be recognized.
15.Scanning area
The data of originals transported from RADF are scanned here.
16.Original scale
Confirm the size of an original placed on the original glass.
Summary of Contents for e-STUDIO2303AM
Page 1: ...MULTIFUNCTIONAL DIGITAL SYSTEMS User s Guide ...
Page 6: ......
Page 10: ...8 CONTENTS ...
Page 34: ......
Page 72: ......
Page 138: ......
Page 160: ......
Page 179: ...7 MAINTENANCE AND INSPECTION Regular Cleaning 178 Cleaning Charger 179 ...
Page 182: ......
Page 192: ...190 INDEX ...
Page 193: ...e STUDIO2303AM 2803AM ...


