background image

42

Operations

MENU

ON/STANDBY

INPUT

ENTER

KEYSTONE

AUTO

SET

EXIT

PIP

FREEZE

MUTE

CALL

RESIZE

VOLUME/ADJUST

LASER

MENU

ON/STANDBY

INPUT

L-CLICK

R-CLICK

ENTER

KEYSTONE

AUTO

SET

EXIT

PIP

FREEZE

MUTE

CALL

RESIZE

VOLUME/ADJUST

LASER

USB

COMPUTER IN 1

COMPUTER IN 2

S-VIDEO

VIDEO

VIDEO IN

R - AUDIO - L

AUDIO

IN

( Y/P

B

/P

R

 )

MONITOR

OUT

CONTROL

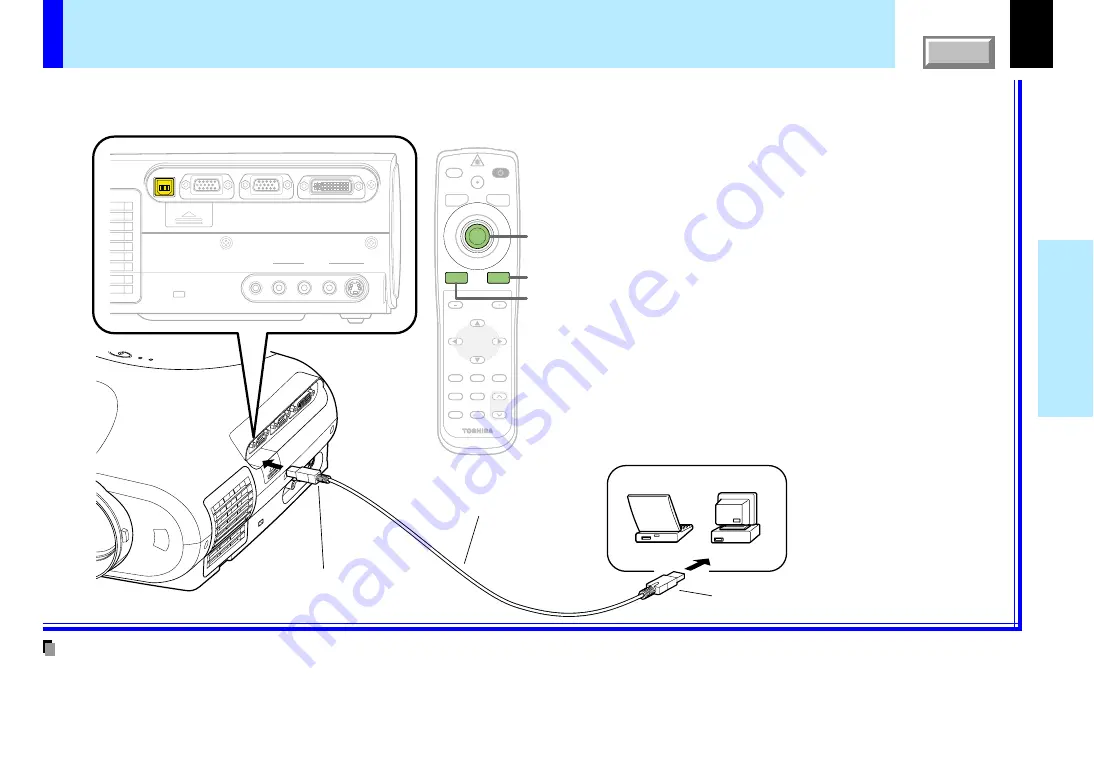
Operating a computer by the remote control

You can control a computer by the remote control when the projector and computer are connected with the supplied USB cable.
In this manual, this function is explained as "mouse remote control".

To USB connector
Be sure to connect in the
proper direction.

USB cable (supplied)

To USB port

Remote control

Pointer control

R-CLICK

L-CLICK

Point the remote control at the remote control
sensor on the projector when operating with its
buttons.

To move the pointer Press the outer side of the
pointer control button in the direction in which
you want to move the pointer.  (The speed at
which the pointer moves depends on how
strongly the button is pressed.)

To click
Press 

L-CLICK

 or the center of the pointer

control.

To right-click
Press 

R-CLICK

.

To drag and drop
While holding down the center of the pointer
control, press the rim side to move the pointer to
the desired spot, then release the center part.

Computer

• This function is available with Windows98 and Mac OS9 computers equipped with a USB port as standard.
• When connecting the computer's USB port for the first time, a message asking you to insert the Windows98 CD-ROM may appear on the computer's

monitor screen, depending on whether or not the device driver is installed.  If so, do as the message says.

• When using a USB cable other than the supplied one, be sure to use a shielded type.

Notes

CONTENTS

Summary of Contents for 780U - TLP XGA LCD Projector

Page 1: ...TLP780U 3LCD DATA PROJECTOR TLP780U TLP781U WITH DOCUMENT IMAGING CAMERA OWNER S MANUAL CONTENTS ...

Page 2: ...e with the instruction manual may cause harmful interference to radio communications Operation of this equipment in a residential area is likely to cause harmful interference in which case the user will be required to correct the interference at his own expense TO REDUCE THE RISK OF FIRE OR ELECTRIC SHOCK DO NOT EXPOSE THIS APPLIANCE TO RAIN OR MOISTURE DANGEROUS HIGH VOLTAGES ARE PRESENT INSIDE T...

Page 3: ...r plastic products touching the unit for a long time They will mar the finish Never operate this unit immediately after moving it from a cold location to a warm location When the unit is exposed to such a change in temperature moisture may condense on the crucial internal parts To prevent the unit from possible damage do not use the unit for at least 2 hours when there is an extreme or sudden chan...

Page 4: ...l the operating and other instructions 2 Power Sources This product should be operated only from the type of power source indicated on the marking label If you are not sure of the type of power supply to your home consult your product dealer or local power company For products intended to operate from battery power or other sources refer to the operating instructions 3 Source of Light Do not look ...

Page 5: ...cleaners Use a damp cloth for cleaning 8 Power Cord Protection Power supply cords should be routed so that they are not likely to be walked on or pinched by items placed upon or against them paying particular attention to cords at plugs convenience receptacles and the point where they exit from the product 9 Overloading Do not overload wall outlets extension cords or integral convenience receptacl...

Page 6: ...t Top and bottom plates of this product develops heat and may give some undesirable damage to other unit 14 Attachments Do not use attachments not recommended by the product manufacturer as they may cause hazards 15 Accessories Do not place this product on an unstable cart stand tripod bracket or table The product may fall causing serious injury to a child or adult and serious damage to the produc...

Page 7: ...ontact your dealer for repair service This product incorporates glass components including a lens and a lamp If such parts should break please handle with care to avoid injury and contact your dealer for repair service The broken pieces of glass may cause to injury In the unlikely event of the lamp rupturing thoroughly clean the area around the projector and discard any edible items placed in that...

Page 8: ... projector by the camera arm Doing so can result in damage or injury 25 Do not look into the arm light while it is lit The strong light may cause damage to your eyes or sight 23 Do not leave documents on the unit for long periods of time while using the document imaging function Do not leave texts papers or other documents for projection on the unit for long periods of time The heat could erase th...

Page 9: ...e one of the following types of cable Plug configuration Plug type EURO 240V 10 15A UK 240V 6A Australian 240V 10A North American 240V 15A Switzerland 240V 6A Line voltage 220 240V 200 240V 200 240V 200 240V 200 240V Power supply cord selection CONTENTS ...

Page 10: ...ing the picture size 39 Displaying PIP Sub pictures 40 Displaying Information 41 Operating a computer by the remote control 42 Adjustments Settings Operating the menu screen 43 GUIDE MENU adjustments and settings 45 FULL MENU adjustments and settings Picture 46 FULL MENU adjustments Position 47 FULL MENU adjustments Color 48 FULL MENU adjustments and settings Audio 49 FULL MENU adjustments and set...

Page 11: ...igh temperature air Do not put something around the air exhaust otherwise it may be deformed by the high temperature air Names of each part on the main unit CAUTION Openings in the cabinet are provided for ventilation and to ensure reliable operation of the product and to protect it from overheating and these openings must not be blocked or covered Continued The explanation here is only for the mo...

Page 12: ... displayed ENTER button Selection button EXIT button MENU button ON STANDBY button To turn the projector on or off standby INPUT button To select the input source To display the menu screen and or select the operation on the menu screen Use the selection button and EXIT button to enlarge the image To indicate the status of the projector FAN indicator ON indicator LAMP indicator TEMP indicator Name...

Page 13: ...video equipment etc AUDIO IN jack Audio input φ3 5mm stereo mini jack To enter audio signal from a computer or a video equipment with component video output Y PB PR signal output supported CONTROL connector RS 232C connector To connect a computer to control the projector Remove the cover when using the connector MONITOR OUT connector To connect a monitor etc COMPUTER IN 2 connector To enter RGB si...

Page 14: ...AMERICA CONSUMER PRODUCTS INC 82 TOTOWA RD WAYNE NJ 07470 U S A MANUFACTURED SEPTEMBER 2000 PLACE OF MANUFACTURE A IEC60825 1 A1 1997 REMOTE CONTROL MODEL CT 90057 CAUTION AVOID RADIATION IS EMITTED FROM THIS APERTURE MADE IN JAPAN Remote control transmission part ON STANDBY button To turn the projector on or off standby AUTO SET button To adjust the image of the Computer input automatically RESIZ...

Page 15: ...en you will not be using the remote control for a prolonged period take the batteries out of the remote control When the remote control stops working or only works from very close distance replace all the batteries with new ones When replacing the batteries use a more longer life alkaline batteries If a battery leaks carefully wipe off any residue inside the battery case before loading new batteri...

Page 16: ...perate when there is sunlight or other strong light such as a fluorescent lamp shining on the remote sensor Operate the remote control from a position where the remote sensor is visible Do not drop the remote control or otherwise jolt it Keep the remote control out of locations with excessively high temperature or humidity Do not get water on the remote control or place wet objects on it Do not di...

Page 17: ... menu screen for the projection method For the ceiling mounted projector placement refer to the page Floor mounted front projection Viewing a picture projected on the front of the screen from a floor installation Floor mounted rear projection Viewing a picture projected through the back of the screen from a floor installation Translucent screen Viewer Viewer 51 21 CONTENTS ...

Page 18: ...ide view Screen Point the lens straight at the center of the screen as above Place the projector horizontally so that the projecting light hits the screen squarely Determine the screen size projected on the screen The projection size depends on the distance between the lens and the screen Adjust the projection size by changing the distances as shown below Screen a Distance between the lens and the...

Page 19: ...ed from a cold location to a warm location or when the ambient temperature in the projection room has risen suddenly moisture may condense on the lens or the internal optical section to blur the projected pictures In such a case leave the projector for an adequate time 1 to 2 hours depending on the room s condition before using it so it adjusts to the ambient temperature If the screen is exposed t...

Page 20: ...oot adjuster to make fine adjustment of the height Turn clockwise to lift up Turn counterclockwise to lower Foot adjuster release button Foot adjuster Lift up Lower To put the foot adjuster back hold down the foot adjuster release button and lower the front slowly Be sure to hold the projector when putting the foot adjuster back so as not to let the front fall on your fingers Do not tilt the proje...

Page 21: ...he screen is the same as that of the floor mounted projection mode CAUTION When a ceiling mount is required please consult with the dealer Ceiling mounted front projection Viewing a picture projected on the front of the screen from a ceiling installation Ceiling mounted rear projection Viewing a picture projected through the back of the screen from a ceiling installation Translucent screen 51 18 N...

Page 22: ...es which are not compatible with this projector Check the compatibility of the connectors signal levels timing resolutions etc You can project the picture from the computer Check that the power for the projector and computer is off before connecting the cables COMPUTER IN 1 Connector For use as both Analog RGB 1 and Y PB PR input At shipping from factory it is set for use as Analog RGB 1 input AUD...

Page 23: ...ge 22 DVI digital cable should be purchased separately when you input a digital RGB signal Although infrequent noise might be generated on the screen depending on the type of computer and the connection cables Should this occur reduce the refresh rate of the computer signal or lower the resolution Use of connection cables that are 2 m or shorter is recommended The input signal specifications of th...

Page 24: ...onnecting the cables To S VIDEO connector Be sure to connect in the proper direction To S video output S video cable Not supplied Red To AUDIO R jack White To AUDIO L jack Yellow To VIDEO jack AV cable Supplied Pin plug red To audio output R Pin plug white To audio output L Pin plug yellow To video output The S VIDEO connector and VIDEO jack can be used independently but the audio input jacks are ...

Page 25: ... is set for use as Analog RGB 1 input Change the setting on the menu screen when using as Y PB PR input AUDIO IN jack For use as both audio signals for RGB input analog RGB 1 analog RGB 2 digital RGB and Y PB PR input Adapter BNC pin Not supplied Monitor cable Mini D sub 15P BNC Not supplied To AUDIO IN jack Audio cable Not supplied To COMPUTER IN 1 Connector Be sure to connect in the proper direc...

Page 26: ... by a computer You can control the projector by a computer connected with the control cable supplied Check that the power for the projector and computer is off before connecting the cables To CONTROL connector Be sure to connect in the proper direction Control cable Supplied Computer To RS 232C port Do not connect a cable other than the exclusive one supplied To remove the cover slide it up while ...

Page 27: ... of these input sources is selected the signal of the COMPUTER IN 1 connector is output Digital RGB signals are not output Signals are output from the MONITOR OUT connector even when in the standby mode A general computer monitor may not display a normal picture with Y PB PR signals You can output video signal to a computer monitor etc Check that the power for the projector and the equipments is o...

Page 28: ...u screen When a projector is used for the first time language selection menu is displayed after the startup screen disappears Set it up with procedures 2 and 3 of the next page Projection on the screen CAUTION Do not look into the projection lens while operating the projector Preparation Install and connect the projector properly Take off the lens cover Press ON STANDBY The projector turns on and ...

Page 29: ...lection button and press ENTER A menu confirming the selection result is displayed with the selected language Press ENTER to decide Press EXIT to return to step 2 when you want to re select a language The language selection menu will not be displayed on and after the second time you turn on the power However if Reset all is executed the language selection menu will be displayed when the power is t...

Page 30: ...ou can select Camera when using the model with a document imaging camera The icon and the name of the selected input source appear on the screen The types of input sources selected when the INPUT button is pressed repeatedly can be set from the menu screen Press INPUT and hold for two seconds The input source selection menu appears Select the input source to project with the selection button Regar...

Page 31: ...ter used The projector projects an image by XGA signal 1024 x 768 in full screen The image quality of a computer signal except XGA may deteriorate It is recommended to set the external monitor connected to the computer to XGA mode 1024 x 768 The projector can be also applied to DDC2B Display Data Channel 2B If your computer is applied to the DDC start up your computer after turning on the projecto...

Page 32: ...on Due to the lamp characteristic flickers may occasionally occur in a picture This is not malfunction of the unit The lamp may rarely burst with a big sound The projector s liquid crystal panel is made using extremely advanced technology but there may be black spots pixels that do not light or bright spots pixels that are constantly lit on the panel Please note that these are not malfunctions Whe...

Page 33: ...wer cannot be turned back on during this time Unplugging the power cord at this time will shorten the lamp s duration life The cooling fan continues to run for a while to expel the heat remaining inside If you are in a hurry however you may unplug the power cord at this time The standby mode is set The projector consumes about 20W of power in the standby mode We recommend you to unplug the power c...

Page 34: ...is compatible The horizontal position vertical position sampling phase and sampling frequency can also be adjusted from the menu screen Sampling frequency Analog RGB signals input from the computer are converted into digital signals inside the projector The sampling frequency is the number of times per second the analog signals are converted into digital signals In order to capture sample each ind...

Page 35: ...the picture projected is automatically corrected The icon appears while the keystone correction is executing When the correction is finished the menu for selecting V keystone or H keystone by manual adjustment appears with the former being selected Confirm the keystone distortion When no more adjustment is needed press the EXIT button repeatedly until the menu disappears When the keystone distorti...

Page 36: ...ne does not operate properly even with the screen installed vertically execute H reference reset Adjust the distortion of the both sides right and left ofthepicturewiththeselectionbutton When screen is not installed vertically Auto V keystone is not corrected properly When the projector is not installed with the angle of 90 to the screen viewing from the top the upper and lower sides of the projec...

Page 37: ...of this projector can be turned off if you wish to temporarily project the image of another projector or a OHP etc on the screen Press MUTE The sound and picture are cut off temporarily To cancel the mute mode press MUTE again The image and sound will be output The icon appears in the mute mode The mute mode is cancelled if another operation is performed during the mute mode Remote control Note CO...

Page 38: ...ons The frozen image can be enlarged with the RESIZE button The freeze mode is cancelled if any operation other than RESIZE is performed The freeze mode cannot be set when there is no input when no signals are being supplied from a signal source The input source s image continues to play even when the projector is set to the freeze mode Press FREEZE The picture freezes To release the picture press...

Page 39: ...jector uses electrical digital resizing so the picture quality degrades when images are enlarged In rare cases the picture may be disturbed while the magnification section is being moved With some signals the image cannot be enlarged This function does not work in no input status no signal is supplied from the signal source The enlarged section is moved when the selection buttons are pressed The s...

Page 40: ...nual Press PIP A sub picture is displayed Press the PIP button again to turn off the sub picture The PIP function cannot be used when a source other than an RGB input source is selected The PIP function cannot be used with no signals supplied from an RGB signal source The sub picture turns off if any other operation is performed The signal source size display position and audio input source to dis...

Page 41: ...er the shutter speed of the document imaging camera at document imaging camera input Displaying Information Information on the input signal source etc can be displayed Press CALL The information described below is displayed The information display turns off when the CALL button is pressed again The information displayed is not refreshed even if it changes To refresh the information turn off the in...

Page 42: ... on the projector when operating with its buttons To move the pointer Press the outer side of the pointer control button in the direction in which you want to move the pointer The speed at which the pointer moves depends on how strongly the button is pressed To click Press L CLICK or the center of the pointer control To right click Press R CLICK To drag and drop While holding down the center of th...

Page 43: ...edly until GUIDE MENU appears When you want to quit press EXIT repeatedly until GUIDE MENU disappears Start FULL MENU For the operating instruction refer to the next page GUIDE MENU You can adjust or set the functions used frequently Items Button operation guide The current input source Adjust and set it with the button indicated on the button operation guide According to the selected item the kin...

Page 44: ...n guide For the selection method of FULL MENU refer to the previous page ENTER ENTER Press ENTER Only the small list of the selected adjusting items is displayed This is useful as you can see a main picture not hidden under FULL MENU Adjust with VOL ADJ or selection buttons EXIT EXIT Press EXIT FULL MENU is displayed and you can select other items EXIT EXIT Press EXIT FULL MENU disappears and adju...

Page 45: ...documentimagingcamera Reduce the flicker Camera gain Adjusting the document imaging camera s gain ADJ Yes Yes Yes common for all of the inputs Yes common for all of the inputs Digital RGB Y PB PR Video The relationship between input source and item Yes Adjustable Not displayed S Video Camera AnalogRGB 1 AnalogRGB 2 Select it from follows so that flickering of the document imaging camera s picture ...

Page 46: ...signal format is fixed to 625i mode SET 750p The Y PB PR signal format is fixed to 750p mode SET 1125i The Y PB PR signal format is fixed to 1125i mode SET Shutter Auto The shutter speed is set automatically SET 50Hz The shutter speed is fixed to 50 Hz SET 60Hz The shutter speed is fixed to 60 Hz SET Screen size Full The picture is converted to XGA 1024 x 768 dot resolution SET thru The picture is...

Page 47: ...PR Video The relationship between input source and item Yes Adjustable Not displayed S Video Camera AnalogRGB 1 AnalogRGB 2 FULL MENU adjustments Position This menu is not displayed except analog RGB input The adjustment of each item in this menu is memorized for each RGB signal input The adjustments made are memorized automatically when the power is turned off by pressing the ON STANDBY button If...

Page 48: ...s Yes Yes Yes Yes Yes Yes Yes Yes Yes Yes Yes Yes Yes Yes Yes Yes Yes Yes Yes Yes Yes Yes Yes Yes Yes Yes Yes Yes Digital RGB Y PB PR Video The relationship between input source and item Yes Adjustable Not displayed S Video Camera AnalogRGB 1 AnalogRGB 2 FULL MENU adjustments Color The adjustments made are memorized automatically when the power is turned off by pressing the ON STANDBY button If th...

Page 49: ...annel is developed from the speaker SET Yes Yes Yes Yes Yes Yes Digital RGB Y PB PR Video The relationship between input source and item Yes Adjustable Not displayed S Video Camera AnalogRGB 1 AnalogRGB 2 FULL MENU adjustments and settings Audio When the camera input is selected the sound is not developed Each item can be set at every input sources except the camera input but the settings made at ...

Page 50: ...icon is not displayed SET Menu translucent On Off The menu background becomes translucent SET The menu background in normal state SET Menu position Upper left Upper right The menu is displayed to upper left on the screen SET The menu is displayed to upper right on the screen SET Bottom left The menu is displayed to bottom left on the screen SET Bottom right The menu is displayed to bottom right on...

Page 51: ...e power turns on by pressing the ON STANDBY button SET Auto When the power cord is plugged the power turns on SET Yes common for all of the inputs Startup screen On The opening picture is displayed when the power is turned on SET Off The opening picture is not displayed when the power is turned on SET Yes common for all of the inputs Yes common for all of the inputs Digital RGB Y PB PR Video The r...

Page 52: ...ugged or if a power failure occurs while the projector is on the settings are not memorized You can return the adjusting and setting value of all menus to the factory default setting H reference value below also returns to the value at the factory default setting The projector stores the standard conditions of horizontal installation but depending on the usage environment if the projector is subje...

Page 53: ...per left on the screen SET Upper left The sub picture is displayed to upper right on the screen SET Upper right The sub picture is displayed to bottom left on the screen SET Bottom left The sub picture is displayed to bottom right on the screen SET Bottom right PIP menu setting When a PIP sub picture is displayed the PIP menu screen appears You can make the PIP sub picture settings and the sound s...

Page 54: ...rectly project any materials documents illustrations etc without using an OHP film Camera control panel Focusing ring LED light Infrared remote sensor Camera lens Camera head Arm LOCK W BALANCE indicator Lights when the white balance is locked W BALANCE button To switch white balance settings between automatic adjustment and lock ARM LIGHT button To turn on or off the light CAMERA button To select...

Page 55: ... the camera head 6 Pull up the light 7 Turn the light STORE CAME RA ARM LIGHT LOCK W BALA NCE GAIN FOC US STORE CAME RA ARM LIGHT LOCK W BALA NCE GAIN Preparation of the document imaging camera Never give shocks or impacts to the camera or arm as this may cause malfunction While raising up or turning the arm the arm moves describing an arc be careful not to hit your face or your body The figures a...

Page 56: ...ra control panel Press ARM LIGHT The light turns on Set a document to be projected Place the document illustrations etc onto or around the projector and turn the camera head to the direction of the document Use the arm light according to the brightness of the room when necessary When setting the materials on the projector be careful not press the operation buttons Picture projection with the docum...

Page 57: ... You can also select it by pressing INPUT on the remote control or on the main unit Set the input source on the menu screen when selecting by the INPUT button The CAMERA button can be used regardless of the input setting Camera is displayed when the picture switches to the document imaging camera s picture Move the camera head to adjust the size of the picture Up To reduce Down To enlarge Focus on...

Page 58: ...he image may still flicker due to the lighting the document status the image adjustment etc even if the Shutter setting is changed Though this projector uses a 1 45 million pixel camera unit the images projected on the screen are 1024 x 768 dot images If the Screen size in the menu screen is set to Full the camera s full image is compressed to 1024 x 768 dots If Thru is selected the 1024 x 768 dot...

Page 59: ... by pressing INPUT Select the input source other than the camera input Set the white paper on a flat place and set the camera so that paper is projected to the full screen The white paper should be projected fully on the screen Press OVERLAY Draw any line on the paper with a red or blue pen A drawn line is projected on the screen overlapped with the picture of the input source The position of a pe...

Page 60: ...e screen Press W BALANCE to turn the LOCK indicator on The white balance is locked To release the white balance press W BALANCE again to turn the LOCK indicator off If you raise up the arm while the camera input is selected the color of the picture may vary for an instant due to the automatic white balance adjustment This is not a malfunction If you put back the arm and raise it up while the white...

Page 61: ...ed below to correct it With the document camera operating fully cover the camera lens with a piece of black paper or cloth Press ARM LIGHT on the camera control panel and EXIT on the projector s control panel simultaneously You can not use the remote control buttons Do not press ARM LIGHT and EXIT buttons simultaneously if the camera lens is not covered Doing so will not only erase the white spot ...

Page 62: ...oles are not covered Turn the projector off and leave it for a while and turn it on again Clean the air filter The icon appears before the power turned off The projector returns to the standby mode after the fault display has been shown for about 2 minutes The power turns off or does not come on Trouble with the cooling fan Unplug the power cord and call the dealer The icon appears before the powe...

Page 63: ...t 50 hours Unplug the power cord Clean the air filter Use a vacuum cleaner to carefully remove any dust and dirt from the air filter cover air filter and filter frame Be careful that the air filter is not sucked into the vacuum cleaner Detach the air filter Detach the air filter from the air filter cover The air filter cover air filter and filter frame can be disassembled Filter frame Air filter C...

Page 64: ...dry fully before reinstalling it Using it damp will result in malfunction If the air filter is damaged contact your store of purchase and replace it with a new one Using a damaged air filter will cause dust or dirt to get inside the projector and onto the images Assemble the air filter Place the air filter in the air filter cover then insert the four tabs on the filter frame into the holes in the ...

Page 65: ...from the surface To remove difficult stains use a soft cloth slightly moistened with a weak solution of synthetic detergent and water and finish with a soft dry cloth Replacing the intake exhaust fans and air filter To maintain the efficiency of the projector replace the intake and exhaust fans about every two to three years Ask the dealer for the replacement CAUTION If you use the projector mount...

Page 66: ...or longer than 1 hour before replacing it If the lamp should break please handle with care to avoid injury due to broken pieces and contact your dealer for repair service The lamp will eventually begin to project dark or dull pictures and finally will not light up Lamp s life length depends on the use condition In such a case replace the lamp with new one Unplug the power cord Wait until the lamp ...

Page 67: ...on Attach the lamp cover firmly after replacing the lamp If it is not set correctly the power will not turn on Use a new lamp when replacing it The lamp is made of glass and is very fragile Do not touch the lamp with your bare hands and do not jolt or damage it Do not use an exhausted lamp Dispose the exhausted lamp as toxic wastes Load a new lamp Slide until it hits the bottom and tighten the two...

Page 68: ...2 connector s input setting is wrong The signal cable type is wrong The COMPUTER IN 2 connector s input setting is wrong The signal cable type is wrong The lens is dirty The picture is out of focus The projection distance is not appropriate The projecting light is not hitting the screen squarely The Brightness Contrast Sharpness or Phase adjustments are not correct The Brightness or Contrast adjus...

Page 69: ...ensor The batteries are exhausted The USB cable is not properly connected The computer or OS is not compatible The batteries are exhausted The lens is dirty The picture is out of focus The light is not on Image is being affected by fluorescent light in the room The image s number of frames is low This is not a malfunction The image s number of frames is low This is not a malfunction Correction Mak...

Page 70: ... M D S data 0 T M D S data 0 5 shield T M D S data 5 T M D S data 5 T M D S clock shield T M D S clock T M D S clock Analog Video signal Red Analog Video signal Green Analog Video signal Blue Analog horizontal sync signal Analog GND R G B Pin No 16 17 18 19 20 21 22 23 24 C1 C2 C3 C4 C5 MONITOR OUT COMPUTER IN 1 5 1 10 15 11 6 COMPUTER IN 2 C5 C3 24 C4 C1 C2 8 1 16 17 9 Input signal Analog R G B s...

Page 71: ...0 128 1056 37 879 60 317 40 000 23 600 1 4 628 SVGA72 800 x 600 64 800 56 120 1040 48 077 72 188 50 000 23 600 37 6 666 SVGA75 800 x 600 160 800 16 80 1056 46 875 75 000 49 500 21 600 1 3 625 SVGA85 800 x 600 152 800 32 64 1048 53 674 85 061 56 250 27 600 1 3 631 MAC16 832 x 624 216 832 40 64 1152 49 725 74 550 57 283 39 632 1 3 667 XGA43i 1024 x 768 56 1024 8 176 1264 35 522 43 479 44 900 20 768 ...

Page 72: ...5 000 175 500 46 1200 1 3 1250 UXGA70 1600 x 1200 304 1600 64 192 2160 87 500 70 000 189 000 46 1200 1 3 1250 UXGA75 1600 x 1200 304 1600 64 192 2160 93 750 75 000 202 500 46 1200 1 3 1250 Mode fh kHz fv Hz fsc MHz NTSC 15 73 60 3 58 PAL 15 63 50 4 43 SECAM 15 63 50 4 25 or 4 41 PAL M 15 73 60 3 58 PAL N 15 63 50 3 58 PAL 60 15 73 60 4 43 NTSC4 43 15 73 60 4 43 Mode fh kHz fv Hz 525i 15 73 59 94 5...

Page 73: ...Sending data No connection Continued Controlling the projector by using RS 232C You can also control the projector by entering the command from a computer via RS 232C Signal assignment of RS 232C Interface format 1 Communication RS 232C method 9600 bps No parity Data length 8 bit Stop bit 1 bit 2 Communication STX 02h Command 3 bite ETX 03h format One command only can be used in one communication ...

Page 74: ...al format Auto SG0 Yes 525i SG1 Yes 525p SG2 Yes 625i SG3 Yes 750p SG4 Yes 1125i SG5 Yes Shutter Auto CSA Yes 50Hz CS0 Yes 60Hz CS1 Yes Screen size Full MSF Yes Yes Yes Yes Yes Thru MST Yes Yes Yes Yes Yes Wide MSW Yes Yes Overlay gain COG Yes Yes Yes Yes Yes Picture reset DRV Yes Yes Yes Yes Yes Position H position PHP Yes Yes V position PVP Yes Yes Phase PPH Yes Yes Frequency PCK Yes Yes Positio...

Page 75: ...n LR1 Yes Channel select Mini L R AMA Yes Yes Yes L AML Yes Yes Yes R AMR Yes Yes Yes Loudness Mini Off LM0 Yes Yes Yes On LM1 Yes Yes Yes Audio reset DRA Yes Yes Yes Yes Display V keystone PKV Yes Yes Yes Yes Yes Yes H keystone PKH Yes Yes Yes Yes Yes Yes Keystone reset DRK Yes Yes Yes Yes Yes Language English LEN Yes Yes Yes Yes Yes French LFR Yes Yes Yes Yes Yes German LGR Yes Yes Yes Yes Yes I...

Page 76: ...s Yes Yes Yes COMPUTER IN 2 On I20 Yes Yes Yes Yes Yes Off I21 Yes Yes Yes Yes Yes Analog RGB 2 IV0 Yes Yes Yes Yes Yes Digital RGB IV1 Yes Yes Yes Yes Yes VIDEO On I30 Yes Yes Yes Yes Yes Off I31 Yes Yes Yes Yes Yes S VIDEO On I40 Yes Yes Yes Yes Yes Off I41 Yes Yes Yes Yes Yes CAMERA On I60 Yes Yes Yes Yes Yes Off I61 Yes Yes Yes Yes Yes Projection mode Standard PJ0 Yes Yes Yes Yes Yes Rear PJ1 ...

Page 77: ... Yes Yes Yes Yes Yes RESIZE Increase the enlargement ratio RUP Yes Yes Yes Yes Yes Decrease the enlargement ratio Minimum reset status RDW Yes Yes Yes Yes Yes Move the enlargement section Up PO1 Yes Yes Yes Yes Yes Down PO2 Yes Yes Yes Yes Yes Left PO3 Yes Yes Yes Yes Yes Right PO4 Yes Yes Yes Yes Yes Enlargement reset RS0 Yes Yes Yes Yes Yes FREEZE On FON Yes Yes Yes Yes Yes Off FOF Yes Yes Yes Y...

Page 78: ...inued Sub PA1 Yes Yes PIP reset DRW Yes Yes AUTO SET PAT Yes Auto V keystone PKA Yes Yes Yes Yes Yes Overlay On CON Yes Yes Yes Yes Off COF Yes Yes Yes Yes Camera Shortcut CDR Yes Yes Yes Yes Yes Auto W B On CW1 Yes Yes Yes Yes Yes Off CW0 Yes Yes Yes Yes Yes Lighting On CL1 Yes Yes Yes Yes Yes Off CL0 Yes Yes Yes Yes Yes Controlling the projector by using RS 232C continued CONTENTS ...

Page 79: ... sub 15 pin Analog RGB Y PB PR combination S VIDEO IN Mini DIN 4 pin VIDEO IN 1V p p 75Ω RCA pin jack AUDIO L R IN 1 3V rms more than 22kΩ RCA pin jack x 2 AUDIO IN 1 3V rms more than 22kΩ φ3 5mm stereo mini jack CONTROL Mini DIN 8 pin RS 232C USB Type B Liquid crystal display Projection system 3 panels transmission Panel size 0 9 inches Driving system TFT active matrix Picture elements 786 432 pi...

Page 80: ...lacement lamp TLPL78 The design and specifications are subject to change without notice Specifications Continued Trademarks NEC PC 98 series are trademarks of NEC Corporation VGA SVGA XGA SXGA UXGA are trademarks or registered trademarks of International Business Machines Corporation Macintosh is a registered trademark of Apple Computer Inc Windows is a registered trademark of Microsoft Corporatio...

Reviews: