


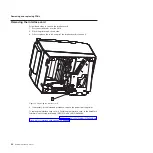


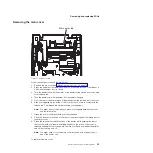


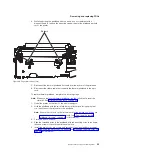


Removing the thermal printhead
Attention:
The printer should be powered off. The following ESD handling
procedure is recommended: You should touch the metal on the printer frame with
the back of your hand before allowing the printhead to make contact with the
printer. Also, see “Handling static-sensitive devices” on page 51.
Follow these steps to remove the thermal printhead assembly:
1. Remove the interface card (see “Removing the interface card” on page 52 for
information on how to remove the interface card).
2. Remove both the top and main covers (see “Removing the covers” on page 53
for information on how to remove the top covers).
3. Set the unit on its back.
A
Figure 19. Paper door release lever
Removing and replacing FRUs
58
SureMark Hardware Service
Summary of Contents for 1NA
Page 2: ......
Page 8: ...vi SureMark Hardware Service ...
Page 10: ...viii SureMark Hardware Service ...
Page 12: ...x SureMark Hardware Service ...
Page 16: ...xiv SureMark Hardware Service ...
Page 18: ...xvi SureMark Hardware Service ...
Page 46: ...28 SureMark Hardware Service ...
Page 56: ...38 SureMark Hardware Service ...
Page 88: ...70 SureMark Hardware Service ...
Page 90: ...Assembly 1 Models 1NR 1NA and 1ND 1 2 3 4 5 7 6 72 SureMark Hardware Service ...
Page 92: ...Assembly 1 continued 74 SureMark Hardware Service ...
Page 108: ...90 SureMark Hardware Service ...
Page 109: ......
Page 110: ...G362 0565 05 ...


