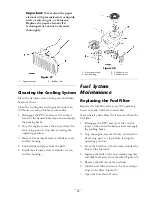


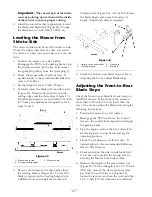


Checking the Spark Plug
1. Look at the center of the spark plug(s)
(Figure 31). If you see light brown or gray on
the insulator, the engine is operating properly.
A black coating on the insulator usually means
the air cleaner is dirty.
Important:
Never clean the spark
plug(s). Always replace the spark plug(s)
when it has a black coating, worn
electrodes, an oily film, or cracks.
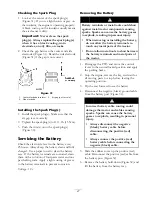
2. Check the gap between the center and side
electrodes (Figure 31). Bend the side electrode
(Figure 31) if the gap is not correct.
Figure 31
1. Center electrode insulator
3. Air gap (not to scale)
2. Side electrode
Installing the Spark Plug(s)
1. Install the spark plug(s). Make sure that the
air gap is set correctly.
2. Tighten the spark plug(s) to 11 ft.-lb. (15 N·m).
3. Push the wire(s) onto the spark plug(s)
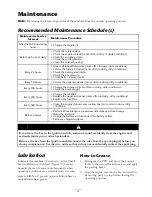
Servicing the Battery
Check the electrolyte level in the battery every
25 hours. Always keep the battery clean and fully
charged. Use a paper towel to clean the battery
case. If the battery terminals are corroded, clean
them with a solution of four parts water and one
part baking soda. Apply a light coating of grease
to the battery terminals to prevent corrosion.
Voltage: 12 v
Removing the Battery
Battery terminals or metal tools could short
against metal tractor components causing
sparks. Sparks can cause the battery gasses
to explode, resulting in personal injury.
•
When removing or installing the battery,
do not allow the battery terminals to
touch any metal parts of the tractor.
•
Do not allow metal tools to short between
the battery terminals and metal parts of
the tractor.
1. Disengage the PTO and move the control
levers to the neutral locked position and apply
the parking brake.
2. Stop the engine, remove the key, and wait for
all moving parts to stop before leaving the
operating position.
3. Tip the seat forward to see the battery.
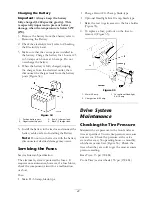
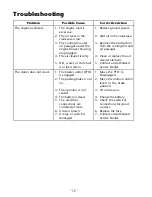
4. Disconnect the negative (black) ground cable
from the battery post (Figure 32).
Incorrect battery cable routing could
damage the tractor and cables causing
sparks. Sparks can cause the battery
gasses to explode, resulting in personal
injury.
•
Always disconnect the negative
(black) battery cable before
disconnecting the positive (red)
cable.
•
Always connect the positive (red)
battery cable before connecting the
negative (black) cable.
5. Slide the rubber cover up the positive (red)
cable. Disconnect the positive (red) cable from
the battery post (Figure 32).
6. Remove the battery hold-down (Figure 32) and
lift the battery from the battery tray.
27
Summary of Contents for TimeCutter ZX440
Page 7: ...Slope Chart 7 ...
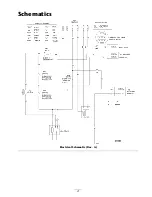
Page 41: ...Schematics Electrical Schematic Rev A 41 ...
Page 42: ...Notes ...
Page 43: ...Notes ...
Page 44: ......


