18
GTS 200
Carburetion
Carburetion
Contents
Carburetor Identification
18
. . . . . . . . . . . . . . . . . . . . . . . . . . .
Service Carburetor Walbro LMS
18
. . . . . . . . . . . . . . . . . . . . .
Remove Air Cleaner
18
. . . . . . . . . . . . . . . . . . . . . . . . . .
Remove Carburetor
19
. . . . . . . . . . . . . . . . . . . . . . . . . . .
Disassemble Carburetor
19
. . . . . . . . . . . . . . . . . . . . . . .
Carburetor Cleaning Recommendations
20
. . . . . . . . . . .
Assemble Carburetor
20
. . . . . . . . . . . . . . . . . . . . . . . . . .
Install Welch Plug
20
. . . . . . . . . . . . . . . . . . . . . . . .
Install Throttle Shaft
20
. . . . . . . . . . . . . . . . . . . . . .
Install Inlet Needle Seat
20
. . . . . . . . . . . . . . . . . . .
Install Inlet Needle and Float
20
. . . . . . . . . . . . . . .
High Altitude Compensation
21
. . . . . . . . . . . . . . .
Install Carburetor
21
. . . . . . . . . . . . . . . . . . . . . . . . . . . .
Install Air Cleaner
21
. . . . . . . . . . . . . . . . . . . . . . . . . . . .
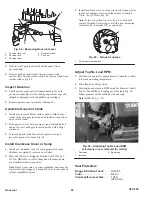
Carburetor Identification
Fig. 20 – Primer Carburetor
WARNING
NEVER START or operate engine with air cleaner
removed, fire can result.
CAUTION
TO PREVENT accidental starting when servicing
engine or equipment, always remove spark plug
wire from spark plug and prevent wire from
contacting spark plug.
Service Carburetor Walbro LMS
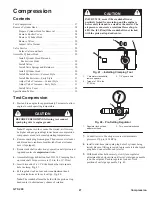
These carburetors have a fixed high speed main jet with
non-adjustable idle mixture, Fig. 21.
2
1
1
1
3
4
5
6
Fig. 21 – Fixed Main Jet Carburetor
1.
Float bowl
2.
Choke plate
3.
Choke lever
4.
Throttle lever
5.
Idle speed screw
6.
I.D. number
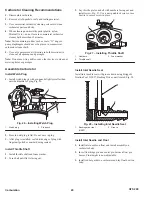
Remove Air Cleaner
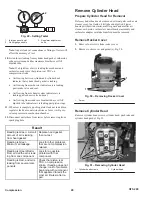
1. Remove air cleaner screws and air cleaner cover. Remove
air cleaner element, Fig. 22.
2. Then remove two (2) screws holding air cleaner/primer base
on carburetor, Fig. 22.
ÔÔÔÔ
ÔÔÔÔ
m–3664
1
2
3
4
5
Fig. 22 – Removing Air Cleaner
1.
2 screws
2.
Cover
3.
Pre-cleaner
4.
Cartridge
5.
Base

