1. INSTALLATION
• Place the answering machine on a hard flat surface.
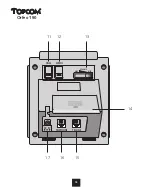
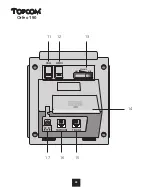
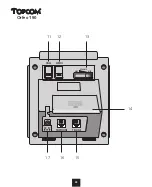
• Insert a 9V battery (not delivered) into the battery compartment (14) at
the back of the unit. If you do not use a battery, the Battery indicator
will blink.
• Insert the small adapter plug into the back of the unit (17) and the
other end into the electric wall socket.
• Insert one end of the telephone line into the answering machine (TEL
LINE) (15) and the other end into the telephone line wall socket.
• Insert one end of the telephone cable into the answering machine
(TELEPHONE) (16) and the other end into your telephone.
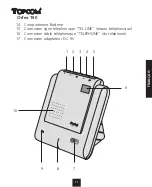
2. DESCRIPTION
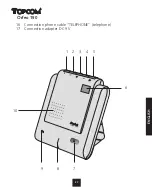
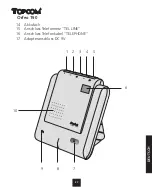
1. On/Off button
2. Rewind button
3. Erase button Ø
4. Forward button
5. Conversation Recording button
6. Message / Answering machine On/Off indicator (LED)
7. Playback button
8. Microphone
9. Battery indicator (LED)
10. Speaker
11. OGM button (= OutGoing Message “OGM”)
12. Memo button (MEMO)
13. Volume control
14. Battery compartment
15. Connection telephone line “TEL LINE”(telephone network)
Orfeo 150
26
Summary of Contents for ORFEO 150
Page 1: ...Orfeo 150 HANDLEIDING MODE D EMPLOI USER GUIDE BEDIENUNGSANLEITUNG ...
Page 2: ......
Page 8: ...Orfeo 150 8 TELEPHONE OGM MEMO TEL LINE DC 9V VOLUME MAX MIN 11 12 13 16 17 15 14 ...
Page 18: ...Orfeo 150 18 TELEPHONE OGM MEMO TEL LINE DC 9V VOLUME MAX MIN 11 12 13 16 17 15 14 ...
Page 28: ...Orfeo 150 28 TELEPHONE OGM MEMO TEL LINE DC 9V VOLUME MAX MIN 11 12 13 16 17 15 14 ...
Page 38: ...Orfeo 150 38 TELEPHONE OGM MEMO TEL LINE DC 9V VOLUME MAX MIN 11 12 13 16 17 15 14 ...
Page 44: ...www topcom be ...

