background image


17 


CUTTING A HOLE IN WOOD FLOORING TO 
INSTALL A HEATING VENT 

– cont’d 

 
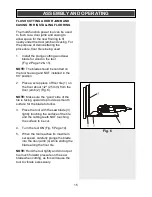
5.  While holding the tool tightly, slowly 

plunge the corner of the blade into the 
flooring until it cuts through the 
flooring. Once the plunge cut is 
complete, set the tool to its highest 
speed and complete the cut to the 
corner of the rectangle. 
 

6.  Turn the saw OFF, remove it from the 

cut and proceed to cut in the opposite 
direction to complete the cut for the 
first side of the rectangle. 
 

7.  Repeat steps #4, #5 & #6 to cut the 

remaining three sides of the rectangle. 
 

8.  When all cuts are complete, use a flat 

blade screw driver to carefully pry the 
cut-out from the floor.  


NOTE:

 Do 

NOT

 use the saw blade to pry 

the cut-out from the floor. You will break 
the blade. If the cut-out is not easy to pry 
from the floor, check to make sure each 
line is cut completely into the corner of the 
rectangle. 
 

USING THE DETAIL SANDER 
ATTACHMENT 
 

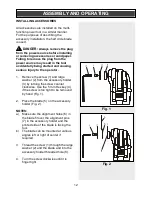
1.  Install the sanding pad on the multi-

function power tool as outlined on 
Pages 12 & 13, Fig. 2. 
 

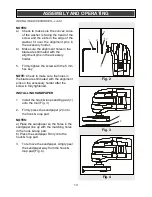
2.  Install the sandpaper on the sanding 

pad as outlined on Page 13,  
Fig. 3. 
 

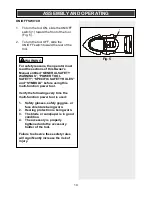
3.  Turn the switch ON as outlined on 

Page 14, Fig. 5. 

ASSEMBLY AND OPERATING 

Summary of Contents for 241-8501

Page 1: ...ual PRODUCT SPECIFICATIONS Rating 120 V 60 Hz AC Amperes 1 5 A Speed 21 000 OPM no load Weight 2 lb 10 oz 1 2 kg Need Assistance Call us on our toll free customer support line 1 866 349 8665 Technical questions Replacement parts Parts missing from package ...

Page 2: ...fic safety rules 7 Symbols 8 Know your multi function power tool 9 Accessories 9 Contents 10 11 Assembly and operating 12 18 Installing accessories 12 13 Installing sandpaper 13 ON OFF switch 14 Flush cutting a door jamb and casing for installing flooring 15 16 Cutting a hole in wood flooring to install a heating vent 16 17 Using the detail sander attachment 17 18 Using the scraper blade 18 Mainte...

Page 3: ...nt eyewear can cause serious injury if broken during the operation of a power tool SAVE THESE INSTRUCTIONS FOR REFERENCE WARNING Use hearing protection particularly during extended periods of operation of the tool or if the operation is noisy GENERAL SAFETY WARNINGS WARNING Before using this tool or any of its accessories read this manual and follow all Safety Rules and Operating Instructions The ...

Page 4: ...VIRONMENT WARNING Dust that is created by power sanding sawing grinding drilling and other construction activities may contain chemicals that are known to cause cancer birth defects or other genetic abnormalities These chemicals include Lead from lead based paints Crystalline silica from bricks cement and other masonry products Arsenic and chromium from chemically treated lumber The level of risk ...

Page 5: ...ver use the cord for carrying pulling or unplugging the power tool Keep cord away from heat oil sharp edges or moving parts Damaged or entangled cords increase the risk of electric shock When operating a power tool outdoors use an extension cord suitable for outdoor use Use of a cord suitable for outdoor use reduces the risk of electric shock If operating a power tool in a damp location is unavoid...

Page 6: ...toring power tools Such preventive safety measures reduce the risk of starting the power tool accidentally Store idle power tools out of the reach of children and do not allow persons unfamiliar with the power tool or these instructions to operate the power tool Power tools are dangerous in the hands of untrained users Maintain power tools Check for misalignment or binding of moving parts breakage...

Page 7: ...sitions where a sudden slip could cause your hand to move into the path of the saw blade Secure workpiece Use clamps or a vice to hold the workpiece It is safer than using your hand and it frees both hands to operate the tool Make sure there are no nails or foreign objects in the part of the workpiece to be cut or sanded To avoid injury from accidental starting always remove the plug from the powe...

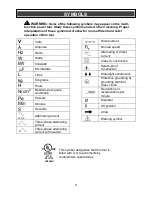
Page 8: ... Splash proof construction Watertight construction Protective grounding at grounding terminal Class I tools Revolutions or reciprocations per minute Diameter Off position Arrow Warning symbol SYMBOLS WARNING Some of the following symbols may appear on the multi function power tool Study these symbols and learn their meaning Proper interpretation of these symbols will allow for more efficient and s...

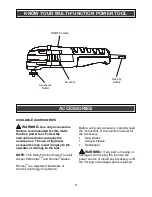
Page 9: ...accept Performax TM and Dremel blades Dremel is a registered trademark of Credo Technology Corporation Before using any accessory carefully read the instructions or the owner s manual for the accessory Saw blades Scraper blades Sandpaper WARNING If any part is missing or damaged do not plug the tool into the power source or install any accessory until the missing or damaged part is replaced KNOW Y...

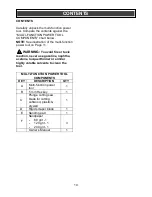
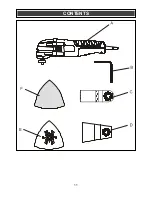
Page 10: ...o avoid fire or toxic reaction never use gasoline naphtha acetone lacquer thinner or similar highly volatile solvents to clean the tool CONTENTS MULTI FUNCTION POWER TOOL COMPONENTS KEY DESCRIPTION QTY A Multi function power tool 1 B 5 mm Hex key 1 C Plunge cutting saw blade for cutting softwood plastic drywall 1 D Rigid scraper blade 1 E Sanding pad 1 F Sandpaper 60 grit 1 120 grit 1 240 grit 1 3...

Page 11: ...11 CONTENTS ...

Page 12: ...her 2 from the accessory holder 3 by turning the screw counter clockwise Use the 5 mm Hex key 4 if the screw is too tight to be removed by hand Fig 1 2 Place the blade 5 on the accessory holder Fig 2 NOTES a Make sure the alignment holes 6 in the blade fit over the alignment pins 7 in the accessory holder and the printed side of the blade is facing the tool b The blade can be mounted at various an...

Page 13: ...key NOTE Check to make sure the holes in the blade are still mated with the alignment pins on the accessory holder after the screw is fully tightened INSTALLING SANDPAPER 1 Install the hook loop sanding pad 1 onto the tool Fig 3 2 Firmly press the sandpaper 2 onto the hook loop pad NOTES a Place the sandpaper so the holes in the sandpaper line up with the matching holes in the hook loop pad b Pres...

Page 14: ...L SAFETY SPECIFIC SAFETY RULES and SYMBOLS before using this multi function power tool Verify the following every time the multi function power tool is used 1 Safety glasses safety goggles or face shield are being worn 2 Hearing protection is being worn 3 The blade or sandpaper is in good condition 4 The accessory is properly tightened onto the accessory holder of the tool Failure to observe these...

Page 15: ...scrap piece of floor tile 1 on the floor about 1 2 25 mm from the door jamb 2 Fig 6 NOTE Make sure the good side of the tile is facing upward to provide a smooth surface for the blade to follow 3 Place the tool with the saw blade 3 lightly touching the surface of the tile and the cutting teeth NOT touching the surface to be cut 4 Turn the tool ON Fig 5 Page 14 5 When the tool reaches its maximum s...

Page 16: ... can be used to cut a hole in wood flooring for installing a heating vent 1 Install the plunge cutting saw blade for wood in the tool Fig 2 Page 12 13 NOTE The blade should be centred on the tool housing and NOT installed in the 90 position 2 Place the floor vent on the floor and use a soft lead pencil to trace the required rectangular hole 1 on the flooring Fig 7 3 Place the saw blade 2 near the ...

Page 17: ...peat steps 4 5 6 to cut the remaining three sides of the rectangle 8 When all cuts are complete use a flat blade screw driver to carefully pry the cut out from the floor NOTE Do NOT use the saw blade to pry the cut out from the floor You will break the blade If the cut out is not easy to pry from the floor check to make sure each line is cut completely into the corner of the rectangle USING THE DE...

Page 18: ... 2 Turn the switch ON When using the scraper blade to scrape old finishes or glue from a workpiece place the under side of the blade flat on the workpiece surface and then lift upward on the rear of the tool to allow the blade to form a very slight angle with the workpiece surface Feed the blade slowly into the material that is to be removed Do not force the tool as slower travel speeds will produ...

Page 19: ...ing oils etc to come into contact with plastic parts They contain chemicals that can damage weaken or destroy plastic DO NOT abuse power tools Abusive practices can damage the tool and the workpiece WARNING DO NOT attempt to modify tools or create accessories Any such alteration or modification is misuse and could result in a hazardous condition leading to possible serious injury It will also void...

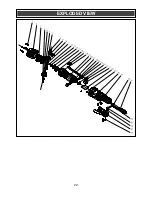
Page 20: ...20 EXPLODED VIEW ...
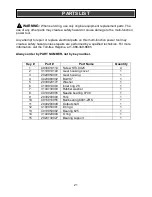
Page 21: ...ion call the Toll free Helpline at 1 866 349 8665 Always order by PART NUMBER not by key number Key Part Part Name Quantity 1 4030010114 Screw ST3 9X25 4 2 3110010140 Gear housing cover 1 3 2020050031 Gear housing 1 4 4020080032 Bolt1 4 1 5 2030020177 Washer 1 6 4100010003 Inner ring 28 1 7 3140130003 Rubber washer 1 8 4010020005 Needle bearing 0709 1 9 2030200004 Fork 1 10 4010010055 Ball bearing...

Page 22: ... holder 2 24 3150060005 Brush holder support 2 25 4010010035 Ball bearing 627 2Z 1 26 1061150016 Switch 1 27 3150160117 Switch support 1 28 1130080009 PCB 1 29 4030010026 Screw ST2 9X9 2 30 3011210004 Motor housing 1 31 3140060014 Rubber cap 2 32 3140010032 Cord guard 1 33 1190030008 Power cord 1 34 6140020006 Wrench 1 35 3150020004 Cord clamp 1 36 4030010074 Screw ST3 9X14 2 37 3160020021 Handle ...

Page 23: ...fic legal rights and you may have other rights which vary from state to state Be careful tools are dangerous if improperly used or maintained Seller s employees are not qualified to advise you on the use of this Merchandise Any oral representation s made will not be binding on seller or its employees The rights under this limited warranty are to the original purchaser of the Merchandise and may no...

Reviews: