background image

22

7. MEMORY VIEW

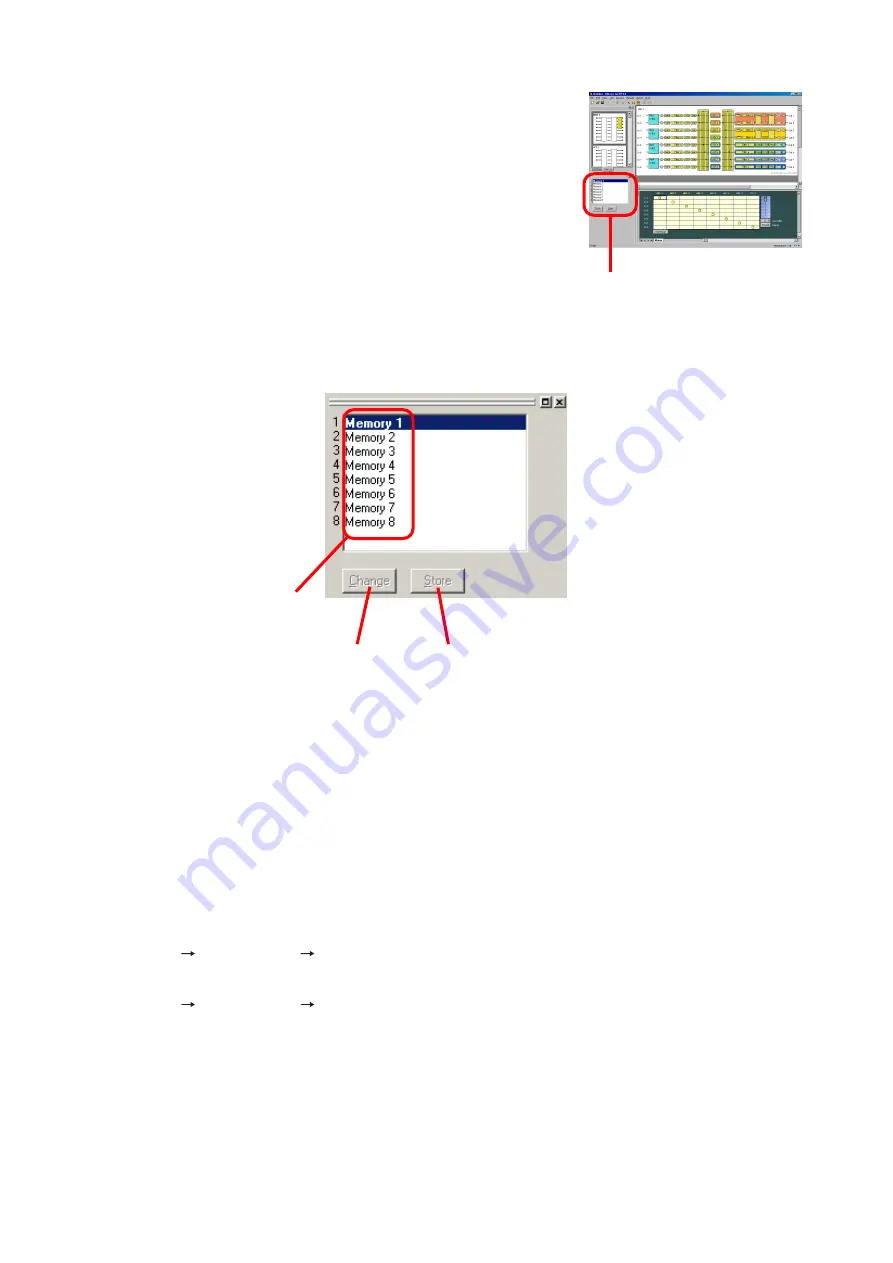
The memory view is located at the lower left of the main screen. 

• The preset memory being currently selected is highlighted in the memory list.

• To recall a preset memory, click the corresponding preset memory name and press the [Change] button.

The menu bar can also be used to recall. (See 

p. 58

.)

• The [Change] button turns to the [Trash] button when the recalled preset memory data is edited. Pressing

the [Trash] button discards the data in edit and recalls the original data.

• To write data into the preset memory, click the corresponding preset memory name and press the [Store]

button. The menu bar can also be used to write. (See 

p. 58

.)

• You can switch the memory view between docking and floating displays*.

[Docking display]

Select [View

Memory View

Docking] from the menu.

[Floating display] 

Select [View

Memory View

Floating] from the menu.

* Refer to 

p. 94 View Display Switching

.

It shows the preset memory names and the preset memory numbers being currently selected. It is possible to
recall preset memories and also to write data into the preset memories.

Memory list

Change button

Store button

Memory view

Summary of Contents for DP-K1

Page 1: ...Instruction manual configuration Operating Instructions separately attached Describes how to operate install and connect the DP K1 Software Setup Manual this document Describes the details of signal p...

Page 2: ...5 8 Changing Equipment Names 20 5 9 Storing the Configuration as a Template 20 5 10 Storing the Crossover Settings as a Template 20 6 UNIT VIEW 21 7 MEMORY VIEW 22 8 FLOW VIEW 23 9 CONTENTS VIEW 9 1...

Page 3: ...13 3 Changing the Name 58 14 LEVEL MONITOR VIEW 59 15 MUTE ALL WINDOW 60 16 COMMUNICATIONS 16 1 Connections 61 16 2 Method to Enable Communications between the PC and the Unit 62 16 3 Making Communica...

Page 4: ...NT 20 1 Docking Displays 94 20 2 Floating Displays 95 21 FIRMWARE UPDATE 21 1 Confirming the Unit s Firmware Version on the PC 96 21 2 Updating Firmware 97 22 SPECIFICATIONS 22 1 Software Specificatio...

Page 5: ...the PC and the unit are in communication online or not offline However some operation or display is enabled only online such as automatic creation of sound field correction filters ARC function ARC me...

Page 6: ...efore installation Follow the procedures below to install Step 1 Insert the supplied CD disk into the PC s CD drive Step 2 Open the CD drive from the Explorer or My Computer Step 3 Open the English fo...

Page 7: ...indication For example when the PC Setting Software version is 1 00 and Firmware version is 1 01 it is indicated as DPK1_PCv100_f101_e exe The following window is displayed Step 6 Check the contents o...

Page 8: ...com international to get the up to date version for the DP K1 Setting Software and software setting instructions The software version number can be confirmed using the Help menu The software version...

Page 9: ...start the DP K1 Setting Software from the start menu Press the Start button on the PC s desktop and select Programs TOA Digital Audio Control DACsys for DP K1 to start 2 Starting from the shortcut ico...

Page 10: ...10 4 MAIN SCREEN Starting the DP K1 Setting Software causes the main screen to appear Toolbar Menu see p 11 Flow view see p 23 Memory view see p 22 Unit view see p 21 Status bar Contents view see p 24...

Page 11: ...hows or hides the contents view Response View Shows or hides the response view See p 46 ARC Measurement View Shows or hides the ARC measurement view See p 49 Memory View Show hide Shows or hides the m...

Page 12: ...lid when connected online Connection Settings Allows you to perform network settings and to designate the unit s IP address to which this software can access Simple Connection Connects the PC to the u...

Page 13: ...5 1 Unit Configuration Settings Step 1 Click Click to add unit area on the main screen The Unit Configuration setting screen is displayed Step 2 Enter a unit name then select the Unit ID A maximum of...

Page 14: ...selection completion proceed to Step 4 by pressing the Next button which becomes active only when at least an input or output module is selected 3 2 Recalling a Unit configuration from the stored temp...

Page 15: ...configuration Step 5 Select a Zone and Filter pattern The number of selectable patterns differs depending on the set input output configuration Click the tab to select one Step 6 Press the Next button...

Page 16: ...s is displayed in the window on the right side of the screen 2 way 2 channel setting example Step 8 Press the Next button The Crossover Slope screen is displayed Step 9 Tick the checkboxes for the cro...

Page 17: ...Here button on its right A dialog box for selecting the file is then displayed If you select the file and press the Finish button the signal flow see below is displayed Step 10 Check to ensure that t...

Page 18: ...Select the unit for which you want to change the zone setting in the unit view or flow view Select Unit Zone from the menu to display the Zone Setting screen Zone settings can be changed in the same...

Page 19: ...e unit does not operate correctly Operating the unit according to the Module settings data Reinstall modules into the unit according to the module settings data Operating the unit according to the Mod...

Page 20: ...om the menu and the dialog for saving the file is displayed Select the unit for which you want to save the crossover settings as a template in the unit view or flow view Then assign a name and save 5...

Page 21: ...venient displays of the unit names numbers of inputs and outputs numbers of zones and crossover combinations Selecting the created unit by clicking on it displays the selected unit in the flow view as...

Page 22: ...and recalls the original data To write data into the preset memory click the corresponding preset memory name and press the Store button The menu bar can also be used to write See p 58 You can switch...

Page 23: ...Mute ON 3 Double clicking on the mute box or pressing the Mute button in the output gain view switches the mute function between ON and OFF Mute ON Mute OFF 4 The MAC address is displayed when the Sim...

Page 24: ...ut slot in the Flow View The Microphone Line Input Module View is then displayed 1 Phantom power ON OFF button Phantom Power Displays the phantom power ON OFF status of the selected channel Press this...

Page 25: ...nt power not turned on Non AUDIO Not an audio signal Non PCM Not PCM data DTS CD DTS CD The indications are shown by black text on white background for the LOCK status and white text on red background...

Page 26: ...inputs You can select the mode from the pull down menu if you press this button 2 ON OFF control 1 2 3 4 Displays the ON OFF setting status of the module s inputs 1 4 The input indicated by the symbol...

Page 27: ...d white text on red background for the error status In error status the error status indicator lights red on the D 937SP box in the Flow View as shown below 2 Sampling frequency indication Fs Hz Displ...

Page 28: ...he Off indication is displayed when no grouping has been set Clicking on this button permits grouping to be set or cancelled on the pull down menu Select either New Group or the number of a group that...

Page 29: ...e 4 Reverse polarity button Polarity Displays each channel s polarity Pressing this button permits the polarity to be reversed 5 Mute button Mute Displays the ON OFF setting status of the mute functio...

Page 30: ...n the filter control section To cancel it right click the filter point symbol again and select Through The circle on the filter control section disappears A yellow circle indicates the selected filter...

Page 31: ...al value Setting range 12 to 12 dB The setting can also be changed in 0 5 dB units in 0 1 dB units using the Option button with the use of the Up and Down buttons located on the right side 6 Q indicat...

Page 32: ...tric equalizer notch filter or all pass filter is selected Fraction and Value displays are available for the Octave Band display Fine Resolution Selection of Frequency permits the frequency step width...

Page 33: ...e gate threshold level 2 Compressor threshold handle Click and drag this handle up and down to change the compression threshold level 3 Compressor ratio handle Click and drag this handle up and down t...

Page 34: ...to change the value 9 Compressor release button Compressor Release ms Displays the compression release time for each channel by means of numerical values Pressing button permits setting values to be s...

Page 35: ...ected 1 2 3 Displayed in numerical form Pressing the Numerical value indication button No 4 permits the above screen to be displayed in numerical form 4 Matrix view Zone Assignment view indicates inpu...

Page 36: ...g button Level dB is displayed Indicates the signal level at the selected Crosspoint by means of numerical values If you press this button a dialog for level setting is displayed enabling you to set t...

Page 37: ...eating sound field correction filters The sound field correction filters are automatically created by the ARC Automatic Resonance Control measurement and their response curve is displayed on the scree...

Page 38: ...d in 1 24 octave units this step width can be changed with the Option button with the Up and Down buttons located on the right side 7 Gain indication button Gain dB Displays the gain of the selected f...

Page 39: ...manually changed this button does not operate any more 18 Default Select button Selected Reverts only the filter point being selected to the default normal value that has been automatically created Th...

Page 40: ...tab is first displayed if the box of Xover is clicked The indication displayed at the upper right of the screen changes depending on the type of selected filter When 12 dB Variable Q or 18 dB Variable...

Page 41: ...f filter of the selected filter point Pressing this button permits the filter type to be selected from the pull down menu 4 Frequency indication button Freq Hz Displays the frequency of the selected f...

Page 42: ...ntrol 9 10 2 Time correction settings between Xover boxes If you click the Driver Alignment tab the setting screen for time correction between Xover boxes is displayed 1 2 3 4 5 6 1 Minimum variation...

Page 43: ...s the delay time in each channel by means of a numerical value If you press this button a dialog for delay time setting is displayed enabling you to set the delay time by directly entering a numerical...

Page 44: ...can also set the temperature on the basis of which the delay distance displayed is calculated 3 Grouping button Grouping No The group number is displayed when grouping has been set and the Off indica...

Page 45: ...lay time by directly entering a numerical value 5 Delay distance indication button Distance meters inches feet Displays the delay distance in each channel by means of a numerical value If you press th...

Page 46: ...rom the pull down menu There are a full screen display that displays any one of amplitude phase and group delay responses and a dual split screen display that displays two of these 3 responses 2 Scale...

Page 47: ...esponse 1 2 3 4 5 6 7 8 9 1 Response indication selection button Displays the type of frequency response being currently displayed If this button is pressed the type of frequency characteristic to be...

Page 48: ...Delay to calibrate the phase response 5 Response display area 6 Response display button Press this button to select whether or not to display each channel s response 7 On Off button Press this button...

Page 49: ...lays a zone name For zone name entry refer to p 20 Changing Equipment Names 3 Multi point filter calculation selector button Selects point data to be used for making multi point filter calculations Se...

Page 50: ...n menu Measurement end frequency button Stop frequency Hz Displays the set measurement end frequency Initial value 1 000 Hz Pressing this button permits the setting value to be selected on the pull do...

Page 51: ...p 1 Press the measurement parameter setting button to set the microphone input channel measurement start frequency measurement end frequency and sweep time on the ARC measurement parameter setting scr...

Page 52: ...created filters are displayed on the ARC view Note The scale resolution is automatically adjusted on the basis of the measurement start and end frequencies so as to make the measurement results easy t...

Page 53: ...tering more effective press the Aggressive button To make filtering less effective press the Subtle button To revert the changed filtering back to the normal value press the Normal button 8 2 Changing...

Page 54: ...to the grouped ARC boxes are reassigned to the ARC box to be used for measurement and the measuring sound is output through this routing Note Displays of the Zone assignment box and the Flow view rema...

Page 55: ...ory Step 3 Select Option Export to CSV File ARC Filters from the menu Save As dialog is displayed Step 4 Save the parameters under a new file name in the designated folder The parameters of all ARC fi...

Page 56: ...ly when ARC boxes are grouped the unit operation during measurement differs from that in normal use For operation during measurement refer to p 54 Step 1 Select the boxes to be grouped on the Flow vie...

Page 57: ...t Edit Release Grouping on the menu Grouping is cancelled 3 2 Adding selected boxes to an existent group Select Add and the group number then press the OK button The group number is displayed over the...

Page 58: ...to recall from the Memory View see p 22 13 2 Writing Data into the Preset Memory Select Memory Store Memory 1 8 from the menu It is also possible to write on the Memory View see p 22 13 3 Changing the...

Page 59: ...re in communication mode For communication method refer to p 61 Displays the current cooling fan operating condition Input Output Indicates input output signal levels by LED lighting conditions as fol...

Page 60: ...while the PC is in communication with the units For the communication method refer to p 61 You can switch the display between docking and floating for the Window Mute ON Mutes all the outputs of all t...

Page 61: ...on may not be allowed In such cases make connections via a switching hub as shown above Reference LAN cable wiring diagrams The LAN wiring standard of ANSI TIA EIA 568 B specifies 2 wiring standards T...

Page 62: ...unications by selecting Remote Connect 2 2 Make communications by selecting Remote Bulk Transmission 2 3 Make communications by selecting Remote Bulk Receiving Making communications without performing...

Page 63: ...e settings separately PC s IP setting cannot be changed on the DP K1 setting software If the unit not to communicate with is displayed in the list advance to Step 4 to delete it from the list When con...

Page 64: ...fault Gateway checkbox enables default gateway setting The message at right is displayed when marking the checkbox Press the Yes button then set the default gateway 3 Press the Send Modified Settings...

Page 65: ...m the Check IP Settings screen Tip Trough the steps from 1 to 4 above settings related to the networks have been completed allowing the PC to communicate with the units displayed in Connectable Device...

Page 66: ...earlier than version 2 00 is installed it cannot be connected using this setting software since it is not compatible with multiple units connection function Its firmware should be updated See Step 6...

Page 67: ...ID setting screen is displayed 2 Select the corrected unit ID then press the OK button Unit ID is changed Step 7 Press the Next button then the Check Unit ID screen is displayed Note If the unit ID is...

Page 68: ...68 Step 9 Press the Finish button When the unit is set on the DP K1 setting software the IP address is displayed at the lower right of each unit IP address...

Page 69: ...he setting data of the PC differ from those of the destination units transfer direction can be set for each item Bulk Transmission Transfers all setting data from a PC to the units simultaneously Bulk...

Page 70: ...irmware as needed For the setting refer to p 63 Press the Skip the Searching Units button to connect the PC to the unit for which connection has been confirmed If unset units exist If no units have be...

Page 71: ...utton to disconnect communications and reinstall modules into the unit according to the Module settings data Operating the unit according to the Module status data Press the No button to disconnect co...

Page 72: ...lect xxx Unit name Unit 1 in the above example and then the transfer direction Designating transfer direction for each data item Select one Different data item and then its transfer direction Repeat t...

Page 73: ...om the menu All setting data can be transferred from the PC to the unit in bulk Data transfer is started with the display of Communication Status screen After designating the data transfer direction p...

Page 74: ...rred from the unit to the PC in bulk Data transfer is started with the display of Communication Status screen The Bulk Receive screen is displayed before the communication screen is displayed The scre...

Page 75: ...dd Target Unit screen is displayed 2 Enter the IP address for the unit to be added then press the OK button The unit is added to the list on the Bulk Receive screen The selected unit is deleted from t...

Page 76: ...76 When all the units to be connected are displayed start the bulk receiving Press the Start button The Communication Status screen is displayed allowing the data transfer...

Page 77: ...Complete button after data transfer completion When all setting data of PC and unit match the PC can control the unit Step 3 To terminate communications between the PC and the unit select Remote Disco...

Page 78: ...erforming network settings see p 62 instead of this simple connection method Step 1 Select Remote Simple Connection from the menu The Simple Connection screen is displayed Step 2 Read the displayed pr...

Page 79: ...n to disconnect communications and reinstall modules into the unit according to the Module settings data Operating the unit according to the Module status data Press the No button to disconnect commun...

Page 80: ...direction for each data item Select one Different data item and then its transfer direction Repeat this process for all Different data items Different transfer direction can be selected for each data...

Page 81: ...are Data transfer is started with the display of the Bulk Receive screen The transfer direction for all setting data is fixed to Unit PC and cannot be changed After designating the data transfer direc...

Page 82: ...of PC and unit match the PC can control the unit The unit s MAC address is displayed in the lower right corner of the flow view when the signal flow appears in the flow view Step 4 To terminate commu...

Page 83: ...t Selected then click on the button of the units to be printed Step 3 Set the memory to be printed Select All when printing all the data stored in 8 memories To print the data of the arbitrary memorie...

Page 84: ...en also sets the user level to Administrator Operator If you do not log on as an administrator on the logon screen the user level is set to Operator 18 1 Enabling the User Level Step 1 Select Option S...

Page 85: ...ser level has been enabled When logging on as an administrator enter a set password and press the OK button If a different method than this is used to close the logon screen the user level is logged o...

Page 86: ...ttings Operators cannot change the item and Restriction settings High Administrators cannot change the item but can change Restriction settings Operators cannot change the item and Restriction setting...

Page 87: ...on settings can be assigned to each of 8 memories If you select Memory from Store pull down menu the Restriction of store dialog for Restriction settings by memory is displayed enabling you to set 4 d...

Page 88: ...are preset to None or Break By changing the settings on the contact input and output setting screens many different functions can be assigned to the contact input and output 19 2 Contact Input Setting...

Page 89: ...3 1 Memory selection Assign preset memory Nos 1 8 to the terminals Step 1 Press each terminal s Function button to select Memory from the pull down menu Step 2 Press the Parameter button to select the...

Page 90: ...ngle pulse of over 100 ms 1 step continuous operation for every 70 ms for no voltage make of over 100 ms Can be reset when at break Step 1 Press each terminal s Function button to select Volume Up Dow...

Page 91: ...o select Mute from the pull down menu Step 2 Press the Control button to select Make or Pulse from the pull down menu Step 3 Click the channel button s to be muted in Output Channel Contact selection...

Page 92: ...isplayed 1 Function Sets the function of the terminal The individual terminal pins 1 8 are initially set to the Preset memory 1 8 and other pins all set to Break Break Always at break Make Always at m...

Page 93: ...input terminal used for status output operations from the pull down menu Note The contact inputs assignable by the D 981 are 1 8 19 5 Contact Output Function Assignment 19 5 1 Memory selection Assign...

Page 94: ...displays are possible in each view except the flow view 20 1 Docking Displays In the following example the docking display screen is shown Double clicking the window border indicated by the arrow swi...

Page 95: ...from the menu The floating display can be moved and its display size changed When moving right click on the title bar to select Move from the pull down menu then drag and drop the title bar Note If t...

Page 96: ...nfirmed at the xxx indication For example when the PC Software version is 3 00 and Firmware version is 3 01 it is indicated as DPK1_PCv300e_f301e exe 21 1 Confirming the Unit s Firmware Version on the...

Page 97: ...onnect both network communication terminals of the unit and the PC using a UTP Category 5 cable fitted with RJ45 connectors When connecting the unit to a PC directly use a cross cable When connecting...

Page 98: ...No Reply is displayed If the screen on the right appears after pressing the Update button confirm the following UTP Category 5 cable fitted with RJ45 connectors specification and connection When conn...

Page 99: ...rs are factory preset 22 3 1 Settings when the D 921E or D 921F is used Setting Item Setting Range Phantom Power ON OFF PAD Input Sensitivity 50 36 10 4 dB 22 3 3 Settings when the D 937SP is used Set...

Page 100: ...Gain 0 to 18 dB 0 5 dB steps ON OFF ON OFF Filter Settings Compressor Noise Gate Settings Setting Item Setting Range Compressor Threshold Level 16 to 24 dB 0 dB 1 dB steps Compressor Ratio 1 1 2 1 3...

Page 101: ...ssover combination settings Combination Cut off Frequency Initial Value Single Ch N HPF 125 Hz LPF 125 Hz 2way Ch N HPF 20 Hz LPF 2 9 kHz Ch N 1 HPF 2 9 kHz LPF 20 kHz 3way Ch N HPF 20 Hz LPF 500 Hz C...

Page 102: ...200705 URL http www toa jp...

Reviews: