background image

Your TileVision

®

5

Front View

Remote control sensor and indicator

Power Indicator Status

Connector Inputs

DC12V Power Input

PC/DTV Input (D-SUB)

PC Audio Input

EURO-SCART (RGB, FB, AV In, AV Out)

Headphone Output

S-VIDEO Input

Composite Video Input

Audio Inputs (R, L (Mono))

Antenna Input

1

2

3

4

5

6

7

8

9

1

2

3

4

5

6

7

8

9

12VDC

RGB

Audio In

EURO-SCART

L

Audio

R

Phones

S-Video

Antenna

Video

Status

Stand-by

Power on

Remote control

Indicator

Red

Green

Red blinking

Summary of Contents for TV/17/FR3/PS

Page 1: ...Operating Instructions P O RT E R L A N C A S T R I A N PORTER LANCASTRIAN LIMITED www tilevision tv TileVision is Designed and Manufactured by 17 ...

Page 2: ... last programme you were watching Teletext Function You can display teletext information at any time on your TileVision FM Radio Function Tune in to your favourite FM radio stations by selecting the Radio Mode This symbol is intended to alert the user to the presence of important operating and maintenance servicing instructions in the literature accompanying the appliance CAUTION RISK OF ELECTRIC ...

Page 3: ... or fire If an outside antenna is connected to the unit ensure the external to internal cable entry is fully sealed This may cause an electric shock or fire Do not connect too many extension cords or plugs to an outlet This may cause a fire Keep the power adaptor away from any heat source This may cause a fire Ensure the antenna is located away from overhead cables This may cause an electric shock...

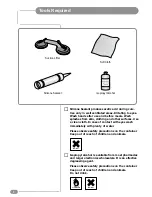
Page 4: ...thing and other surfaces Use a clean cloth In case of contact with eyes wash immediately with plenty of water Please observe safety precautions on the container Keep out of reach of children and animals Isopropyl alcohol is available from most pharmacies and larger electronics wholesalers It is an effective degreasing agent Please observe safety precautions on the container Keep out of reach of ch...

Page 5: ...TileVision On Off 12 Selecting a Picture from External Sources 12 Selecting your On screen Language 12 On screen Menus and Displays 13 Tuning Setup and Editing Programs 14 Picture Control 18 Sound Control 19 PC Picture Adjustment 21 PC Sound Adjustment 23 Clock 24 Blue Back 24 Auto Sleep 25 Child Lock 25 Radio 25 ARC Aspect Ratio Control 26 Radio Tuning and Setup 27 Calling the Programme List 28 T...

Page 6: ...r TileVision 1 TileVision glass front plate assembly complete with Velcro fixing strips 1 waterproof remote control 1 standard full function remote control 1 installation and instruction manual 1 mirror acrylic surround 1 remote control holder If any items are missing contact your dealer ...

Page 7: ...DTV Input D SUB PC Audio Input EURO SCART RGB FB AV In AV Out Headphone Output S VIDEO Input Composite Video Input Audio Inputs R L Mono Antenna Input 1 2 3 4 5 6 7 8 9 1 2 3 4 5 6 7 8 9 12VDC RGB Audio In EURO SCART L Audio R Phones S Video Antenna Video Status Stand by Power on Remote control Indicator Red Green Red blinking ...

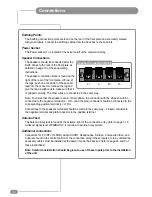
Page 8: ...s are in correct phase the conductor with the stripe should be connected to the negative terminal L or R and the plain conductor should be connected to the corresponding positive terminal L or R Connections to the speakers terminals should be made in the same way striped conductor to the negative terminal and plain conductor to the positive terminal Antenna Feed The Antenna input jack is found at ...

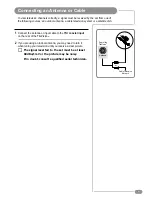
Page 9: ...ision until you receive a clear picture or Cable T elevision Network Rear of the TileVision Antenna To view television channels correctly a signal must be received by the set from one of the following sources an outdoor antenna a cable television system or a satellite dish The signal level fed to the set must be at least 60dBu 1mV or the picture may be noisy If in doubt consult a qualified aerial ...

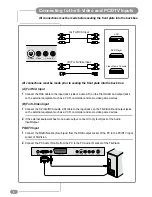
Page 10: ...RCA audio L R cable to the input jacks on the TileVision and output jacks on the external equipment such as a VCR camcorder and some video game devices 2 If the external equipment has mono audio output connect it only to left jack of the Audio Input Output PC DTV Input 1 Connect the RGB IN cable D sub jack from the RGB output socket of the PC to the PC DTV input socket of TileVision 2 Connect the ...

Page 11: ...adphone socket The other end of the extension lead should be terminated at a surface mounted socket of the appropriate type DVD Player VCR Video Game Console Satellite receiver 19 17 15 13 11 9 7 5 3 1 20 18 16 14 12 10 8 6 4 2 21 2VDC RGB Audio In EURO SCART Phones S Vide A SCART to SCART connector RGB Video Audio L R or Composite Video Audio L R B SCART to RCA connectors Composite Video Audio L ...

Page 12: ...s the Power 0 I button to put the unit in standby mode and isolate the unit using the remote pull switch Gently remove the front plate using a suction lifter please do not use a lever to remove the front plate as this will invalidate your guarantee Next remove the self adhesive protectors from the side and bottom Velcro strips and press the front panel into the back box with reasonable force Take ...

Page 13: ...on table buttons 10 to 15 11 Teletext Mix button 12 Teletext Hold button 13 ARC Aspect Ratio Control button Various picture formats are available Auto 16 9 14 9 4 3 16 9 zoom 14 9 zoom 4 3 zoom Press the ARC Button repeatedly to select the desired format Note only 16 9 and 4 3 are available in PC mode 14 Teletext Sub page and Time button Press to display the time when viewing TV programmes 15 TV A...

Page 14: ...C mode The input is shown at the top right corner of the screen 1 Press the MENU button 2 Press the PR UD buttons to select the Setup menu and then press the VOL R button 3 Press the PR UD buttons to select the Language menu and then press the VOL R button 4 Press the PR UD buttons to select your desired language and then press the VOL R button 5 Press the TV AV button All the on screen displays w...

Page 15: ...e System BG Start Manual Programme Programme 1 Channel 69 Table V UHF System BG Search Memorize Name Main menu Picture Sound Special Setup Clock Clock Off Time Off On Time Off On Programme 1 Programme Edit P00 P05 P01 P06 P02 P07 P03 P08 P04 P09 Delete Name Move Skip SSM OK MENU PR VOL TIME TEXT MIX HOLD PSM ARC TV AV SLEEP QV LIST 1 Press the MENU button to display the main menu 2 Press the PR UD...

Page 16: ...uth Africa DK CIS China East Europe L France 6 Press the PR UD buttons to select Start and press the VOL R button to confirm The Auto Programme will now start this will take a few minutes to complete 7 Press the TV AV button to return to normal TV viewing To delete skip move or name the stored programmes see Programme Edit on page 16 OK MENU PR VOL Main menu Picture Sound Special Setup Setup Auto ...

Page 17: ...TV system with the VOL LR buttons BG Germany Asia M East Africa Australia I UK Hong Kong South Africa DK CIS China East Europe L France 10 Press the PR UD buttons to select Search menu When you press the VOL LR buttons the TileVision changes programmes in sequence You will see all the programmes that the TileVision has memorised You will not see programmes that were either erased or not memorised ...

Page 18: ...R UD buttons to select Programme Edit and then press the VOL R button 4 Select the programme name to edit with the PR UD buttons and PR UD buttons Deleting a programme 1 Select a programme to be deleted with the PR UD or VOL LR buttons 2 Press the RED button once The selected programme is deleted all the following programmes shift up one position OK MENU PR VOL Main menu Picture Sound Special Setu...

Page 19: ...he TV AV button to return to normal TV viewing Moving a programme in Programme Edit menu 1 Select a programme to be moved with the PR UD or VOL LR buttons 2 Press the YELLOW button 3 Move the programme to the desired programme number with the PR UD or VOL LR buttons 4 Press the YELLOW button again to release this function Skipping a programme number in Programme Edit menu 1 Select a programme to b...

Page 20: ...e button repeatedly Each press of the button changes the screen display as below Dynamic Standard Mild Game User Dynamic Vivid Picture Standard Standard Picture Mild Softer Picture Game External Video Game Picture Setup User Manual Picture Setup 3 Press the button OK PSM Main menu Picture Sound Special Setup Picture Contrast 90 Brightness 75 Colour 75 Sharpness 60 You can adjust picture Contrast B...

Page 21: ...nd level adjustment with the PR UD buttons d Press the MENU button to return to the preceding menu and the TV AV button to return to normal TV viewing 07 Press the PR UD buttons to select Balance and adjust the left to right balance with the VOL LR buttons 08 Select AVL with the PR UD buttons and use the VOL LR buttons to select ON or OFF 09 Select Surround with the PR UD buttons and use the VOL L...

Page 22: ...ed at the factory for optimum sound reproduction and cannot be changed SSM Sound Status Memory 1 Press the SSM button 2 Press the button repeatedly to select Each press of the button changes the screen display as below Flat Music Movie Speech User 3 Press the button OK SSM SSM SSM PSM OK MENU PR VOL ...

Page 23: ...Press the VOL LR buttons to make appropriate adjustments 6 Press the TV AV button to exit the menu The Auto function is for the automatic adjustment of the screen position clock and clock phase The displayed image will disappear for a few seconds while the auto configuration is in process Reset returns the picture settings to those programmed at the factory and cannot be changed Signals from some ...

Page 24: ...1920 x 1080i 33 7 60 1920 x 1080i 28 1 50 H V Position H Position 50 V Position 50 When the screen size is 4 3 mode H Position is not available Signals from some graphics cards may not lock properly If the results are unsatisfactory adjust the clock and clock phase manually If the set is cold there may be a small flicker when first switched on This is normal there is nothing wrong with the equipme...

Page 25: ... VOL LR buttons and adjust the balance of the speakers 10 Select the AVL Automatic Volume Leveller menu ON or OFF 11 Select the Surround menu ON or OFF 12 Select the Sound Mode with the PR UD buttons 13 Press the VOL LR buttons to select modes L R L L R R L R The audio L input signal is sent to the left loudspeaker and the audio R input signal is sent to right loudspeaker L L The audio L input sig...

Page 26: ... on time with the PR UD buttons Select On or Off with the PR UD buttons When the setting is On the TileVision will be switched on automatically to the last selected programme 09 Press the PR UD buttons to select the On Programme You can select the first displayed programme when the set is switched on automatically with the VOL LR buttons 10 Press the TV AV button to return to normal TV viewing TV ...

Page 27: ...nnected to the TileVision via the ANT socket Before tuning into radio programmes the Radio On selection must be made in the Special menu 1 Press the MENU button 2 Press the PR UD buttons to select the Special menu press the VOL R button 3 Press the PR UD buttons to select the Radio 4 Press the VOL LR buttons to select Radio On or Off When Radio On is selected in the Special menu Radio Mode can be ...

Page 28: ...il the desired image is selected Auto 16 9 14 9 4 3 16 9 Zoom 14 9 Zoom 4 3 Zoom Note in Zoom mode you can adjust the position of the picture with the PR UD buttons ARC Special Clock Blue Back Off Auto Sleep Off Child Lock Off Radio Off ARC 16 9 14 9 14 9 zoom 4 3 4 3 zoom 16 9 16 9 zoom How ARC settings alter the picture ...

Page 29: ... UD buttons to select Memorize If you want to memorise this Radio Setup press the VOL R button 07 Press the PR UD buttons to select Delete Select Off with the VOL R button to delete the station 08 Press the PR UD buttons to select Auto Programme 09 Press the VOL R button repeatedly to automatically scan and tune to the next available station 10 Press the PR UD buttons to select Off Time Then press...

Page 30: ...ears on the screen Each programme list contains ten programmes Selecting a programme in the programme list Select a programme with the PR UD or VOL LR buttons Then press the OK button The set switches to the chosen programme Paging through the programme list There are 10 programme table pages giving a total of 100 programmes Pressing the PR UD or VOL LR buttons repeatedly turns the pages Programme...

Page 31: ... TIME TEXT MIX HOLD ARC TV AV SLEEP QV LIST A B C D F E 1 Press the TEXT button once to display the Teletext pages 2 Press the MIX button to display the Teletext pages superimposed on the TV picture 3 Press the TEXT button once more to display the Teletext pages and TV picture together 4 Press the TEXT button again to switch Teletext off and return to TV mode TEXT Double window Text TV mode Displa...

Page 32: ...lect and hold or change a four digit sub page number This is displayed along the bottom of the screen Press the button again to exit this function Selects double height text SIZE Press button to enlarge top half of the page Press again to enlarge the bottom half of the page Press again to return to normal size text INDEX Return to the index page Displays the TV picture on the screen while waiting ...

Page 33: ...heck another channel Press the button to increase the volume Check the speaker connections from the Tilevision to the speakers Make sure the channel is broadcasting in stereo Press the I II button to Select Mono The sound quality of a stereo broadcast may be poor in a weak signal area See page 19 Make sure the channel selection is correct Change the antenna direction to the right or left Adjust th...

Page 34: ...M colours Response Time 15 ms Typ External Antenna Impedence VHF UHF at 75 Ohm 2 5 W 2 5 W rms both channels driven Audio Output Nicam A2 Stereo Graphic Equaliser OSD Programme list edit Menu multi language halftone 12 VDC 5 0 A PC AUDIO Input PC ANALOG D SUB Connection Ports FULL EURO SCART RGB FB AV IN OUT S VIDEO ANTENNA TUNER Co axial Output Headphones 3 5 mm stereo jack Speakers clip terminal...

Page 35: ...Notes 33 ...

Page 36: ...PORTER LANCASTRIAN LIMITED www tilevision tv P O RT E R L A N C A S T R I A N TV 17 FR3 PS 17 Tilevision Operating Instructions February 2007 Part No TVS 00215 04 ...

Reviews: