background image

20

21

How to make Recordings

Folders

Programmes on your DTR are automatically placed in folders
to help organise your library and make them easy to find
later. Each recording can reside in more than one folder, the

ALL 

category and typically one other genre folder, for

example, Movies, Sport, Kids etc.

To move between folders use the 

LEFT

and 

RIGHT 

arrow

buttons. To highlight a programme use the 

UP

and 

DOWN

buttons. To view the programme, press the 

OK

button. 

Synopsis

With the highlighter over a recording, pressing the 

INFO

button will pop-up a small window with a

brief summary of the contents of that given programme. Press 

INFO

again to exit synopsis.

Delete

With the highlighter over a recording, press the 

BLUE

button. You will see a confirmation pop-up to

confirm that you wish to delete the programme or exit without deleting.

Icons

There are two icons used to assist you in managing your 

Programme Library.

The 

at the end of the 

programme name

field is used to indicate that a programme has been watched. 

The 

at the end of the 

programme name

field is used to indicate that a programme is currently ‘playing’.

Pop-ups

Finally, you need to be aware of a few pop-ups that may appear to help you with your selections.

Depending upon the way you have set-up your DTR, or if you
have not set-up enough storage space on your DTR or you
have simply run out of space, your DTR will prompt you that
there is not enough space to store your selection. If this
happens, you will need to delete some of your recordings if
you wish to save additional programmes.

Also, a similar pop-up may appear if you are saving a
programme that will limit the storage space for any future
recording. In this instance you may save this programme, but
you should also go to the 

Planned Recordings

menu to make

sure you have enough space and if necessary delete old
recordings. 

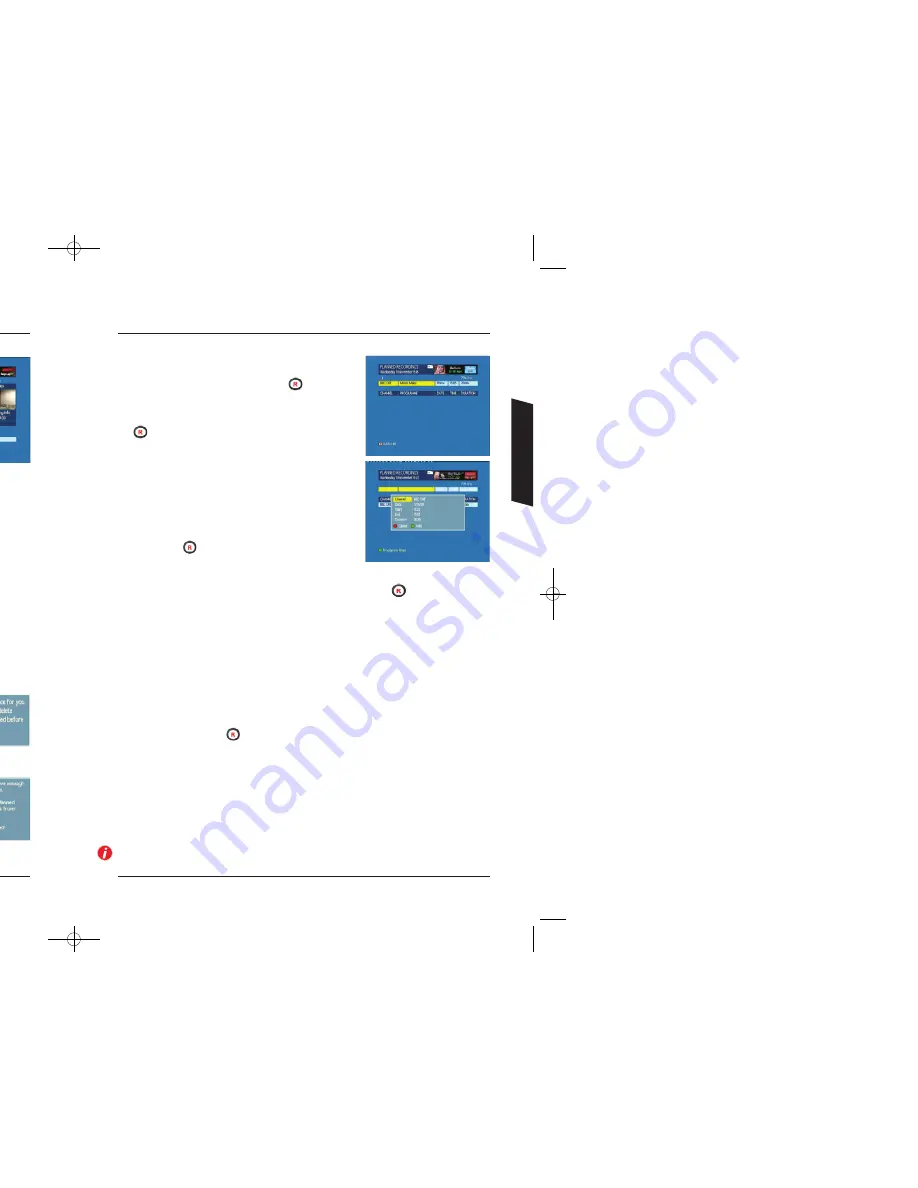
Using Your DTR

Your DTR will allow you to customise the way your record a
programme.

In this section, we will show you just what options are available 
to you. Typically you will have pressed the 

button in the 

Programme Guide

which will have automatically taken you to this

screen, but you may also wish to set a recording manually. If you
have arrived at this screen via the 

Programme Guide

, simply press

the       button to accept the default settings and your recording
will be added to the list and completed without further interaction.

If you wish to set-up a manual recording via the 

Planned 

Recordings

menu, you will typically be presented with a virtually

blank screen as shown.

Press the 

GREEN

button to continue and you will be prompted to

enter the channel, date, start and stop times. Use the 

LEFT

and

RIGHT

arrow buttons to amend the detail of the selections, and

the 

UP

and 

DOWN

arrow buttons to move between the settings.

Finally press the     button to add the event to your 

Planned

Recordings

list.

Instant record

If while watching a programme you decide you wish to record it, press the      button on your remote
control and hold for 

3

seconds. Y our DTR will automatically record the programme to the end of the

scheduled time and add any of that programme that exists in your review buffer. 

Editing an event

There may be an occasion where you wish to adjust the recording (event) that you are setting. This
DTR allows you to change both the start time (

TIME

) and the duration of a recording.

Entering a recording from the 

Programme Guide

or manually from the 

Planned Recordings 

menu, the

highlighter will be positioned over the 

PROGRAMME

field. Press the 

RIGHT

arrow button to move

the highlighter over the 

TIME

field. Use the 

GREEN

or 

YELLOW

buttons to increase or decrease the

start time. You can also move the highlighter to the 

DURATION

field again with the 

RIGHT

arrow and

use the 

GREEN

or 

YELLOW

buttons to increase or decrease the recording duration. Once satisfied with

your adjustments, press the      button to add this recording to the list.

Why edit an event?

There may be occasions where multiple recordings overlap and your DTR will warn you that two
recordings collide. You may know that the programme you wish to record has moved due to an 
over-run of a previous programme. Or simply, you know that the part of the programme you are
interested in starts later than the actual programme start time; for example, a football match. Editing
the timing will allow you to record programmes that would otherwise conflict with each other and
save space on your DTR for future recordings. 

Your DTR is also capable of automatically adding time to a recording to guard against programme
over-run. Please refer to page 

27

for more information on 

Guard Times

.

3674 3658100D DTI 6021 Common User Manual:Layout 1  24/11/09  13:03  Page 20

Summary of Contents for DTI 6021

Page 1: ...Thomson DTI 6021 Digital Television Recorder DTR e 1...

Page 2: ...p Information Index 4 Introduction 5 Quick Start Guide 11 Basic Functions 12 Basic Operation 13 Using the Quick TV Guide 14 Using the Menus 15 Using the Programme Guide 17 TV Favorites 19 Using your P...

Page 3: ...ital TV Recorder First things first Be sure you can receive Digital Terrestrial TV Freeview services in your area If you are not sure you should ask your retailer to check your postcode for you or try...

Page 4: ...n before pressing any buttons Step 3 Your DTR is ready to scan for channels Press the DTR button on your remote The button will momentarily flash This will confirm that the remote control is working c...

Page 5: ...mote control now switch to channel 16 and check you are getting a picture If you are not getting a picture on channel 16 please refer to the Troubleshooting section for help To activate the extra chan...

Page 6: ...te using the arrow buttons Look at a future day s programmes Press the GREEN button whilst in the GUIDE Setting a Reminder Press the YELLOW button whilst that programme is highlighted in the GUIDE Rec...

Page 7: ...t appears at the bottom of the screen during channel changes or when you press an arrow button Shows the current date and time Next Shows the programme name and start time Shows short details of the p...

Page 8: ...ions of 30 minutes each The information contained in a time segment usually shows the name of the programme This is only the case when the programme takes up the whole of that 30 minute time slot As p...

Page 9: ...ch whenever it suits you By subscribing to Top Up TV for a small monthly fee your DTR will automatically record and download programmes from providers like Warner TV National Geographic and more for y...

Page 10: ...lightly different There are two differences The first and most important is the Days Left column and the second is the RED Save button Days Left This shows how many days the programme will remain stor...

Page 11: ...that programme that exists in your review buffer Editing an event There may be an occasion where you wish to adjust the recording event that you are setting This DTR allows you to change both the star...

Page 12: ...h whilst recording This is the ability to view a programme that is currently being recorded as part of a scheduled record or an instant record process There are two ways to view a programme while it i...

Page 13: ...facility across the Programme Guide and recorded programmes When enabled the RED key is used to access the Search screen and the WHITE R key is used to record programmes within the Guide If disabled...

Page 14: ...can pause and rewind the channel you are watching back by 30 minutes or by the amount of time you have set as the Pause live TV buffer size As with the guard times this obviously takes up space on you...

Page 15: ...n that will tell you basic information about your DTR If you require further assistance please call the telephone number shown on screen in the Help menu which is option 6 in the Set Up menu There is...

Page 16: ...e at the Digital Audio Output socket Connect VCR to your amplifier directly No power or indicators not lit Check mains plug is inserted correctly and the power is switched on Check that the mains sock...

Page 17: ...eans the DTR has encountered an error but it can usually be restored The following sequence will restore the settings of your DTR to the factory default and will retain your saved programmes Unplug th...

Page 18: ...will allow you to archive to a permanent media If your VCR supports auto start recording then the DTR will control the VCR automatically Use a pair of stereo coax phono leads to connect the L R AUDIO...

Page 19: ...s supply 230V 50Hz only It must not be connected to DC mains Note The mains lead of the receiver is fitted with a moulded plug If the mains sockets are not compatible or if for any reason the plug is...

Page 20: ...he product Mains Connection This receiver is suitable for use on AC mains supply 230V 50Hz only Operating voltage 230 Volts AC 50Hz Nominal Power consumption 20W Standby Power consumption passive 1W G...

Page 21: ...ations and requirements in Clauses 6 1 7 3 and or 7 4 8 2 8 as a consequence of our failure to deliver the DTR caused by events outside our reasonable control this includes but is not limited to trans...

Page 22: ...roblem Solving 5 10 30 33 Programme Finding 11 15 Information 11 13 Library 11 19 Search 11 18 25 Recording Currently Showing Programme Instant 11 17 21 Editing an Event 21 Future Programmes Using the...

Reviews: