background image

ii

3660181C

Safety

FCC Radiation Exposure Statement

This equipment complies with FCC RF radiation exposure limits set forth for an uncontrolled environment.

Base Station:

Radiofrequency radiation exposure Information:

This equipment complies with FCC radiation exposure limits set forth for an uncontrolled environment. This equipment should be installed and 

operated with minimum distance of 20 cm between the radiator and your body.
This transmitter must not be co-located or operating in conjunction with any other antenna or transmitter.

Portable Part (Phone):

Radiofrequency radiation exposure Information:
The radiated output power of the device is far below the FCC radio frequency exposure limits. Nevertheless, the device shall be used in such a 

manner that the potential for human contact during normal operation is minimized.

North American Cable Installer

This reminder is provided to call your attention to Article 820-40 of the National Electrical Code (Section 54 of the Canadian Electrical Code, Part 

1) which provides guidelines for proper grounding and, in particular, specifies that the cable ground shall be connected to the grounding system of 

the building as close to the point of cable entry as practical.

FCC Compliance Statement

This device complies with part 15 of the FCC rules. Operation is subject to the following 2 conditions: 1. This device may 

not cause harmful interference; 2. This device must accept any interference received, including interference that may cause 

undesired operation. Responsible party (contact for FCC matter only):

THOMSON Inc.

101 W. 103rd St.

Indianapolis, IN 46290 U.S.A.

Using Equipment Safely - Handset

In order to understand the key features of your TH58 Handset, it is recommended that you read this guide carefully, including all the safety 
instructions, before using the product. It is recommended that you inform other members of your family (especially your children) of the detailed 
warnings given in this guide. 

Phone Installation 

Digital Security System

Your cordless phone uses a digital security system to protect against false ringing, unauthorized access, and charges to your phone line.
INSTALLATION NOTE: Some cordless telephones operate at frequencies that may cause or receive interference with nearby TVs, microwave 
ovens, and VCRs. To minimize or prevent such interference, the base of the cordless telephone should not be placed near or on top of a TV, 
microwave ovens, or VCR. If such interference continues, move the cordless telephone farther away from these appliances.
Certain other communications devices may also use the 1.9 GHz frequency for communication, and, if not properly set, these devices may 
interfere with each other and/or your new telephone. If you are concerned with interference, please refer to the owner’s manual for these devices 
on how to properly set channels to avoid interference. Typical devices that may use the 1.9 GHz frequency for communication include wireless 
audio/video senders, wireless computer networks, multi-handset cordless telephone systems, and some long-range cordless telephone systems.

Important Installation Guidelines

•  Avoid sources of noise and heat, such as motors, fluorescent lighting, microwave ovens, heating appliances and direct sunlight.
•  Avoid areas of excessive dust, moisture and low temperature.
•  Avoid other cordless telephones or personal computers.
•  Never install telephone wiring during a lightning storm.
•  Never install telephone jacks in wet locations unless the jack is specifically designed for wet locations.
•  Never touch non-insulated telephone wires or terminals, unless the telephone line has been disconnected at the network interface.
•  Use caution when installing or modifying telephone lines.

When your Handset is connected to the Internet, you may download software updates for the Gateway and Handset. Applying these updates and 
the improvements they contain may slightly modify the menus.

To clean your Handset, use an antistatic cloth.

Summary of Contents for 905

Page 1: ...Advanced Cable Gateway 905 satellite telecom cable terrestrial User manual ...

Page 2: ...her company or product names are either trademarks or registered trademarks of their respective owners This product contains free software code released under the GNU General Public License GPL Version 2 available at http www gnu org licenses gpl txt Anyone may obtain from us a copy of the source code for the Linux packages The full text of the GPL is included on these materials The source package...

Page 3: ...tact with the power source which can be lethal or cause severe electric shock Do not remove the cover of the Gateway Should the Gateway fail contact Customer Service for repair or service Do not insert anything into any opening of the case Do not block the Gateway s ventilation slots do not place it on unstable surfaces like carpets Do not put anything on the Gateway which might spill or drip into...

Page 4: ...of your family especially your children of the detailed warnings given in this guide Phone Installation Digital Security System Your cordless phone uses a digital security system to protect against false ringing unauthorized access and charges to your phone line INSTALLATION NOTE Some cordless telephones operate at frequencies that may cause or receive interference with nearby TVs microwave ovens ...

Page 5: ... or relocate the receiving antenna that is the antenna for radio or television that is receiving the interference Reorient or relocate and increase the separation between the telecommunications equipment and receiving antenna Connect the telecommunications equipment into an outlet on a circuit different from that to which the receiving antenna is connected If these measures do not eliminate the in...

Page 6: ...ivate the Advanced Cable Gateway 14 Step 7 Setup Wireless Access for Your Laptop PC or Other Device 15 Step 8 Becoming Familiar with Handset Operation 16 Day to Day Use 17 Making Calls 17 Receiving Calls 17 Ending Calls 17 Mute 17 Handset Screen Icons 18 Call Volume 18 Access and Change Gateway Advanced Settings Outline of Web Manager 19 Gateway Status Web Page Group 20 1 Software 20 2 Connection ...

Page 7: ...ols Easy Access to Advanced Diagnostics Web Pages Refer to www thomson store com for information about purchasing additional handsets batteries If Enabled by your service provider IBM PC COMPATIBLE MACINTOSH CPU Pentium preferred Power PC Operating System Windows NT 2000 Me XP Vista Linux Mac OS 10 4xor higher Video VGA or better SVGA preferred VGA or better SVGA built in preferred Ethernet 10Base...

Page 8: ... Power Cord Wi Fi Card DECT handset TH 58 with Dock User Guide on CD Become Familiar with Your Gateway and Handset 1 Gateway Front Panel POWER Power BATTERY Battery Back Up Level low full empty or no battery detected DS US Cable DOCSIS State LED ON during start up operation ONLINE Internet Active LINK Gateway ActivityLED ON when a PC is connected to the Ethernet port TEL Voice Over IP Information ...

Page 9: ...ll connected Handsets short press or Add another DECT Handset to the Gateway press for more than 12 seconds or Reset to factory settings press at power off keep pressing for 5 seconds while powering on the Advanced Cable Gateway USB USB 2 0 Connector master RESET Reset short press ETHERNET 1 Ethernet 10 100 BaseT RJ 45 Connector ETHERNET 2 Ethernet 10 100 BaseT RJ 45 Connector TEL Telephone RJ 11 ...

Page 10: ... page 16 Color Ring outside perimeter of NavKey Displays differing color lights as incoming calls messages are received NavKey Navigation Key described on page 16 Talk Key Green Key Press this key to get a dial tone After pre dialing a number press to make a call Press to activate the Hands Free function Keypad These keys are used for dialing phone numbers or entering text See additional descripti...

Page 11: ...he Gateway 10 Step 5 Connect Cables Connections Overview 11 Connect One or Two Computers with Ethernet Cables 12 Connect More than Two Computers with Ethernet Cables 13 Connect Telephone or Fax with Standard Analog Phone Line 13 Step 6 Activate the Advanced Cable Gateway 14 Step 7 Set up Wireless Access for Your Laptop Wireless PC or Other Device 15 Step 8 Become Familiar with the Handset Operatio...

Page 12: ...cated on the upper right hand side of the Gateway Make certain that the front of the Wi Fi card is facing you Insert the Wi Fi card in the slot as far as it will go without forcing it Cover for Wi Fi slot removed WARNING The Gateway must be unplugged from the wall socket before you attempt to install the Wi Fi card FRONT of Wi Fi card this side must face you during insertion BACK of Wi Fi card Slo...

Page 13: ...er up down to allow for battery insertion Insert the battery into the compartment marked Battery 1 Readjust the slider to prevent the battery from moving and replace the battery cover Plug the power cord into an electrical outlet that is not controlled by a wall switch this will assure that the unit has uninterrupted power The battery will fully charge within 5 hours CAUTION To reduce the risk of ...

Page 14: ...Check that the screen lights up then replace the cover Wait for about 30 seconds to allow the system to start up When your Handset is registered to its Gateway the screen displays the number 1 alongside the green has signal symbol The handset packaged with your Gateway is pre registered to the Gateway To register additional Handsets please refer to page 35 Battery Safety Precautions Do not burn di...

Page 15: ...apter is attached to both the dock and a power outlet Step 4 Charge the Handset Two Ways Charge the Handset with the DC Adapter The DECT Handset will charge when securely placed in the Handset Dock so long as the dock has power The dock can charge your handset while attached to the front of the Advanced Cable Gateway or by using the DC adapter included with the Gateway DECT Handset in its Dock C A...

Page 16: ...of the Advanced Cable Gateway or by using the DC adapter included with the Gateway ACG Cover Be certain that the power cord to the Advanced Cable Gateway is unplugged Remove the Gateway s Cover on the front panel Attach the DECT Handset Dock where the cover was Place the Handset into its receptacle on top of the Dock Dock snaps onto front of Gateway here Back of Dock Once installation is complete ...

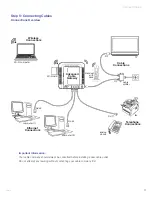
Page 17: ...iring without contacting your cable company first Step 5 Connecting Cables Connections Overview computer 1 computer 2 analog phone fax cable splitter TV Wi Fi card Handset with dock Telephone Connections Cable Connections Ethernet Connections RF RF RJ 45 RJ 45 RJ 11 Advanced Cable Gateway Wi Fi computer Wireless Connections Esc F1 F2 F3 F4 F5 F6 F7 F8 F9 ...

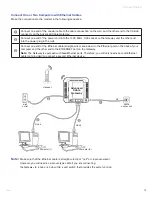
Page 18: ...0 5A socket on the Gateway and the other end into the power plug in the wall Connect one end of the Ethernet cable straight wired see below to the Ethernet port on the back of your computer and the other end to the ETHERNET port on the Gateway Note The Gateway is equipped with two Ethernet ports Therefore you will only need a second Ethernet cable not provided to connect a second Ethernet device N...

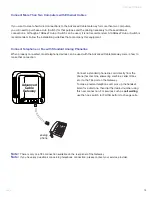
Page 19: ...alog Phoneline When properly connected most telephone devices can be used with the Advanced Cable Gateway Here is how to make that connection Note If you have any questions concerning telephone connection please contact your service provider Note There is only one TEL connection available on the rear panel of the Gateway analog phone Advanced Cable Gateway Connect a standard phone line cord direct...

Page 20: ...Power Failure Low Battery DS US Normal AC Power Failure Initialization OR Error if Blinking persists Online Normal AC Power Failure Initialization OR Error if Blinking persists LINK Ethernet Wi Fi Link No Ethernet Wi Fi Link Ethernet Wi Fi Traffic Tel All Lines Good Telephone line s not available One or More Telephones in use WiFi Card LEDs Light Indicators on the Gateway After installation of the...

Page 21: ...product label press Connect Method 2 Go to Start Control Panel Network Connections Double click Wireless Network Connections Highlight your SSID name as printed on your gateway product label press Connect When prompted enter the WPA key twice as printed on your gateway product label press Connect Method 3 Go to Start Network Connections Double click Wireless Network Connections Highlight your SSID...

Page 22: ...left Pressing the key repeatedly will cycle through the characters on the key Text entry tips Pressing the key in text entry mode alternates among the following sentence case Abc upper case ABC lower case abc numeric 123 Press 0 to enter a space in lower or upper case mode If in numeric mode pressing 0 will enter the number 0 If a special character is needed press the Star key the lower left corne...

Page 23: ... of the call in hours minutes and seconds and the telephone number you dialed while you are on a call After a call ends the call summary will be displayed showing the length of the call in hours minutes and seconds Note The speakerphone provides you a hands free option while on a call During a call press the green key to alternate between speakerphone and normal handset use Green key Press once re...

Page 24: ...nd the volume level will be saved automatically Handset Screen Icons As you move from screen to screen the icons at the top of the screen change and display important information Top Bar Icons Login Menu The visibility and color of this icon tell you the status of the phone s connection the number is referring to the handset s number Green with a number the handset is registered to the Advanced Ca...

Page 25: ...nect to 192 168 0 1 X Thomson User name Password Remember my password OK Cancel Outline of Web Manager The main screen will be shown as below Select a Main Menu item first and the pages or groups of pages associated with that topic will appear in the sidebar Main Menu The hyperlinks on the top of the page including Gateway VoIP Router Wireless eMTA Settings and several sub menu items Title The sid...

Page 26: ...ocedures downstream and upstream status and so on The information can be useful to your cable company s support technician if you re having problems Administration Status Telephony Router Wireless EMTA Settings Gateway Status Software Connection Password Connection This page displays information on the status of the cable modem and IP network Startup Procedure Procedure Status Acquire Downstream C...

Page 27: ... RFPI IPEI 00 f9 4d 0e ac Handset 5 subscribed narrowband RFPI IPEI 00 f9 4d 0f 1b Clear all Subcriptions Update Status Subscribe a Handset Gateway Telephony Web Page Group 1 Base This page displays information on the DECT Handset base station 2 Handsets This page displays information on the DECT Handsets subscribed to the Gateway Administration Status Telephony Router Wireless EMTA Settings Gatew...

Page 28: ...o change the lowest IP address that your Gateway will issue to your PCs enter it into the DHCP Range Start Address box and then click Apply Note It is highly recommended that these setting not be changed Administration Status Telephony Router Wireless EMTA Settings Gateway Router LAN WAN Computer Firewall Forward DMZ WAN This page displays information on the WAN parameters of the gateway WAN IP Ad...

Page 29: ... the incoming traffic and allows all outgoing traffic Already established connections are accepted Maximum Level of Security This level blocks all the incoming and outgoing traffic with the following exceptions Connections to the following services servers located on the WAN are accepted FTP port 20 21 www port 80 in TCP http port 443 in TCP SMTP port 25 in TCP and UDP POP2 port 109 in TCP and UDP...

Page 30: ...on apply is used to validate the rules entered Button cancel is used to cancel the last action Button remove all is used to remove all the rules List of common applications and ports they use AUTH port 113 DNS port 53 FTP port 21 FTP_DATA port 20 FTP_SRV ports 1024 to 65535 HTTP port 80 HTTPS port 443 IPSEC port 500 NTP port 123 POP3 port 110 PPTP port 1723 SMTP port 25 SSH port 22 TELNET port 23 ...

Page 31: ...ectly from the Internet Because of this it becomes more vulnerable to hackers see the Router forwarding section on page 24 to open only specific ports on your PC Administration Status Telephony Router Wireless EMTA Settings Gateway Router LAN WAN Computer Firewall Forward DMZ DMZ This page allows all ports on one chosen computer to be open to the internet Warning The computer in the DMZ can be see...

Page 32: ...very sluggish or dramatically slower communication compared with the speed you achieve on your PC that is wired to the Gateway try changing the channel number See the 802 11b g Basic Web Page discussion below for details Authentication Authentication enables you to restrict your Gateway from communicating with any remote wireless PCs that aren t yours The following minimum authentication related c...

Page 33: ...ess 00 19 df 80 00 68 Network Name SSID ACG Welcome New Channel 5 Current Channel 5 Data Encryption Mode wpa2 Cancel Apply The Gateway Wi Fi radio frequently transmits a beacon signal which can contain this network name SSID The network Type is Open so your SSID is included in that beacon and is therefore detectable by any nearby wireless equipped PCs in the area Setting Description Value List or ...

Page 34: ... alphanumeric character set consists of the numbers 0 to 9 and letters A to Z Enter it into the WPA Passphrase box and as directed verify your passphrase by typing it again in the next field Click on apply WPA2 PSK AES authentication and encryption The authentication uses a 4 way handshake to check wether the Pre shared Keys PSKs are identical Advanced Encryption Standard is the state of the art e...

Page 35: ...he MAC addresses of the connected clients into the fields and then click Apply to add them to the list for access control A maximum of 9 MAC addresses can be entered After proper configuration click on the button to invoke the settings Connected Clients The information of currently connected clients will be displayed here Administration Status Telephony Router Wireless EMTA Settings Gateway Wirele...

Page 36: ...e displays information on the status of the cable modem s HFC and IP connectivity RF Downstream Frequency 405 000 MHz Power 13 5 dBmV SNR 39 5 dB Modulation QAM 256 RF Upstream Frequency 33 000 MHz Power 43 8 dBmV SNR 2560Ksym sec Modulation QPSK Administration Status Telephony Router Wireless eMTA Settings Gateway Basic Hardware Status CM MTA Hardware Event Log CM MTA State This page displays the...

Page 37: ...b page 4 CM State This page shows the current state of the cable modem Administration Status Telephony Router Wireless EMTA Settings Gateway Basic CM MTA State Status CM MTA Hardware Event Log CM MTA State This page displays the state of the CM MTA CM State CM State Operational Docsis Downstream Scanning Done Docsis Ranging Done Docsis DHCP Done Docsis TFTP Done Docsis Data Reg Complete Done Telep...

Page 38: ...ct key located in the center of the navigation key The menu structure is as follows Handset ID Register Handset Select Base De Register Registration Ring Tone Ring Tone Ring Volume Beep Tone External Calls choice of 6 ringtones Internal Calls choice of 6 ringtones Key Beep on off Low Battery on off Out of Range on off Notifications on off Profile Settings Voicemail Settings Change Zipcode Change A...

Page 39: ... home screen select Menu by pressing the softkey Select the settings icon and confirm Select Ring Tone and confirm Select Beep Tones and confirm Select Key Beep and confirm Select Off or On and confirm Low Battery In the home screen select Menu by pressing the softkey Select the settings icon and confirm Select Ring Tone and confirm Select Beep Tones and confirm Select Low Battery and confirm Sele...

Page 40: ...pressing the softkey Select the settings icon and confirm Select Profile Settings and confirm Select Voicemail Settings and confirm Enter telephone number and confirm Enter voicemail PIN and confirm b Changing the Zipcode In the home screen select Menu by pressing the softkey Select the settings icon and confirm Select Profile Settings and confirm Select Zipcode and confirm Enter Zipcode and confi...

Page 41: ...rs stored in the phonebook the call log and the most recently dialed numbers list will be retained In the home screen select Menu by pressing the softkey Select the settings icon and confirm Select Phone Settings and confirm Select Reset To Default and confirm Enter the PIN 0000 by default and confirm 5 Call Lists a Understanding Caller Identification Data If you subscribe to your network provider...

Page 42: ... replacement handset b Selecting a Base Each Handset may be registered to 4 different Gateway bases If you register your handset with a non Thomson Advanced Cable Gateway base you will not be able to access the data functions To change base Select Menu by pressing the softkey Select the settings icon and confirm Select Registration and confirm Select Select Base and confirm Select the number of th...

Page 43: ...rst point the cable enters your home The splitter must be rated for at least 1GHz Grounding Wire Grounding Rod New Cable Wire ACG Modem TV converter TV converter TV converter Splitters New 2 way splitter One leg goes directly to the Gateway modem One leg goes directly to the IN on the next splitter Cable Drop ...

Page 44: ...f you need assistance or to arrange a professional installation Q Can I watch TV surf the Internet and talk to my friends through the Advanced Cable Gateway at the same time A Absolutely Q What if my Gateway has a problem A Consult the troubleshooting appendix or contact your service provider Q Where can I get additional handsets and other accessories A Refer to www thomson store com Q What do the...

Page 45: ...e cable wall connector Verify you are using a standard RG 6 coaxial cable and the connectors on both ends are not loose or improperly connected to the coaxial cable Power Cycle the Gateway by doing the following 1 Remove any installed Gateway battery 2 Unplug Gateway power cable from the wall socket and plug it in again 3 Wait for the DS US and ONLINE lights to stop blinking 4 Re install Gateway b...

Page 46: ...s Access for Your Laptop Wireless PC or Other Device for how to do this If you do not see any wireless networks try unplugging the Gateway power cable from the wall socket and plug it in again wait for the DS US and ONLINE lights to stop blinking If you still see no wireless networks consult your service provider If you see your wireless network SSID name printed on the Gateway product label or a ...

Page 47: ... unplug the Gateway power cable from the wall socket and plug it in again wait for the DS US and ONLINE lights to stop blinking If you are still unable to make or receive calls contact your service provider for assistance 3 If one or more other Handsets are working Verify the Handset battery is charged Verify the Handset batteries are properly installed Verify your Handset is registered to the Gat...

Page 48: ...ON LAN Active No Ethernet or WiFi Link ON ON ON ON OFF X Ethernet or WiFi Link ON ON ON ON ON X Tx Rx Ethernet or WiFi Traffic ON ON ON ON FLASH X ACG in dect association mode Page but ton has been pressed for more than 12s ON ON ON ON FAST BLINK X X indicates that this LED is not used to show the state of operation described on this line Check in this column for the state in which this LED is ON ...

Page 49: ...g the FLASH memory ON ON SLOW BLINK SLOW BLINK SLOW BLINK X Restore to Factory Settings ACG is powered off Press the Page button while powering on the ACG Hold the page button for 5s Turn on all LEDs when factory RESET starts eMTA Reset soft Reset Upon pressing the Rest button LEDs behave as if the device is powering up Legend ON LED is on SLOW BLINK LED is blinking slowly OFF LED is off FAST BLIN...

Page 50: ...an radiate radio frequency energy and if not installed and used in accordance with the instructions may cause harmful interference to radio communications However there is no guarantee that interference will not occur in a particular installation If this equipment does cause harmful interference to radio or television reception which can be determined by turning the equipment off and on the user i...

Page 51: ...e following measures Reorient or relocate the receiving antenna that is the antenna for radio or television that is receiving the interference Reorient or relocate and increase the separation between the telecommunications equipment and receiving antenna Connect the telecommunications equipment into an outlet on a circuit different from that to which the receiving antenna is connected If these mea...

Page 52: ...mpany then warranty service may be provided through your cable provider or its authorized representative For information on 1 Ordering Service 2 Obtaining Customer Support or 3 Additional Service Information please contact your cable company If you purchased your Advanced Cable Gateway from a retailer see the enclosed warranty card ...

Page 53: ...vice programmed into the Media Access Control layer in the network architecture during the modem s manufacture Network Driver A file that is loaded on the computer to allow the computer to recognize the Ethernet card or USB port NID Network Interface Device The interconnection between the internal house telephone wiring and a conventional telephone service provider s equipment These wiring connect...

Page 54: ... Modem State 31 Event Log 31 Status 30 Router Web Page Group 22 Computers 22 DMZ Host 25 Firewall 23 Forwarding 24 LAN 22 WAN 22 Status Page Group 20 Connection 20 Password 20 Software 20 Telephony Web Page Group 21 Base 21 Handsets 21 Wireless Web Page 26 Authentication 26 Performance 26 Security 26 802 11b g Basic 27 802 11b g Security 28 Access Control 29 Wi Fi 6 14 15 installation 6 15 SSID 15...

Reviews: