

Optiset Plus
The controller can be programmed with OptiSet Plus
temperature profiles that allow the user to select named
products and/or numeric setpoints. See the appropriate
Operator’s Manual for more detailed information about
using OptiSet Plus.
•
Numeric Setpoint -
If the controller does not have
named products loaded, the far left soft key will
display
S
ETPOINT
as shown below. This is the factory
default setting. Change the numeric setpoint like you
normally would on an SR-2 Controller.
•
Named Products -
The controller can be
programmed to allow only named products to be
selected. In which case the far left soft key will
display
P
RODUCT
as shown below.
Named products can have a single setpoint, or they
can have a setpoint range that allows the user to
select a setpoint within that range.
NOTE: In OptiSet Plus the terms “numeric setpoint”
and “setpoint” mean the same thing and are
displayed as numbers. The terms “named product”
and “product” mean the same thing and are displayed
as words.
NOTE: Alarm Code 127, Setpoint Not Entered, may be
generated if the
+
or
-
soft keys are used to change
the numeric setpoint or named product, but the
Y
ES
or
N
O
soft keys are not used to accept or decline the
new setting within 10 seconds.
•
Named Products or Numeric Setpoint -
The
controller can be programmed to allow named
products or numeric setpoints to be selected. In
which case the far left soft key will display
P
RODUCT
/
S
ETPOINT
as shown below.
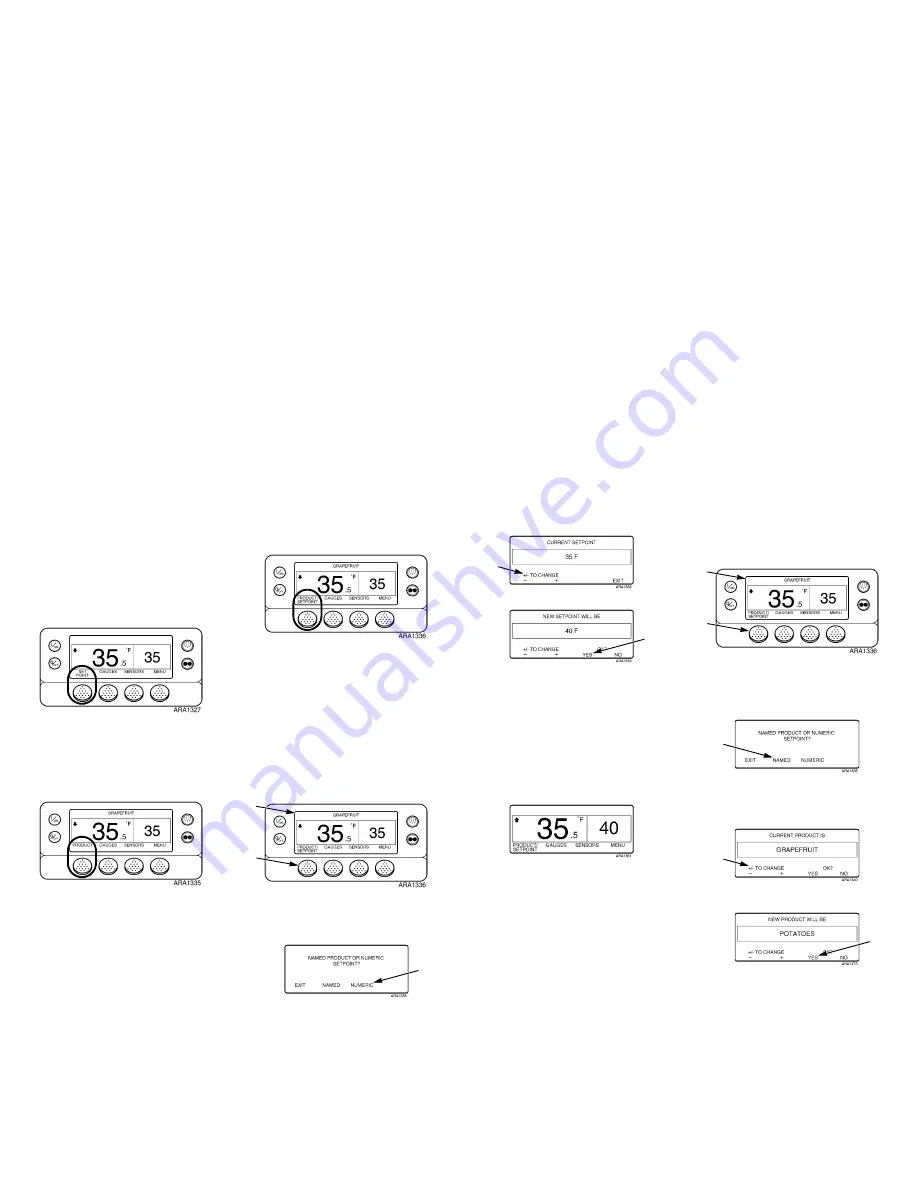
Selecting a Numeric Setpoint
To select or change a numeric setpoint complete the
following steps. This example shows the Standard Display
with the
P
RODUCT
/S
ETPOINT
soft key. Using the
Standard Display with the
S
ETPOINT
soft key is basically
the same but some of the screens differ slightly.
1.
Begin at the Standard Display.
If the Temperature Watch Display is showing, press
the
M
ENU
soft key once to return to the Standard
Display.
2.
Press the
P
RODUCT
/S
ETPOINT
(or
S
ETPOINT
) soft
key on the Standard Display.
3.
The “Named Product / Numeric Setpoint?” Screen
briefly appears, then the “Named Product or Numeric
Setpoint?” Screen will appear.
4.
Press the
N
UMERIC
soft key.
5.
The “Setpoint” Screen briefly appears, then the
“Current Setpoint Is” Screen will appear.
6.
Press the
+
or
-
soft keys to change the setpoint.
7.
Press the
Y
ES
soft key to select the new setpoint.
•
If the
N
O
key is pressed the setpoint change selected
with the
+
or
-
soft keys
will not
be accepted, the
setpoint will not be changed and the display will
return to the Standard Display.
•
If the
Y
ES
soft key is pressed, the setpoint change
selected with the
+
or
-
soft keys will be accepted,
and the following screens will appear.
8.
The “Programming New Setpoint” Screen will briefly
appear.
9.
The “New Setpoint Is 40” Screen briefly appears.
10. The Standard Display appears with the new setpoint.
NOTE: Pressing the
E
XIT
soft key at any point will
return to the Standard Display.
NOTE: If no keys are pressed for 30 seconds while in
the Named Product Changer Screens, the HMI will
return to the Standard Display.
Selecting a Named Product
To select or change a named product complete the
following steps. This example shows the Standard Display
with the
P
RODUCT
/S
ETPOINT
soft key. Using the
Standard Display with the
P
RODUCT
soft key is basically
the same but some of the screens differ slightly.
1.
Begin at the Standard Display.
If the Temperature Watch Display is showing, press
the
M
ENU
soft key once to return to the Standard
Display.
2.
Press the
P
RODUCT
/S
ETPOINT
(or
P
RODUCT
) soft
key on the Standard Display.
3.
The “Named Product / Numeric Setpoint?” (or Named
Product) Screen briefly appears, then the “Named
Product or Numeric Setpoint?” (or Named Product)
Screen will appear.
4.
Press the
N
AMED
soft key.
5.
The “Product” Screen briefly appears, then the
“Current Product Is” Screen will appear.
6.
Press the
+
or
-
soft keys to change the named
product.
7.
Press the
Y
ES
soft key to select the new named
product.
•
If the
N
O
key is pressed the named product change
selected with the
+
or
-
soft keys
will not
be
accepted, the named product will not be changed and
the display will return to the Standard Display. (Over)
1
2
4
6
7
1
2
4
6
7


