background image

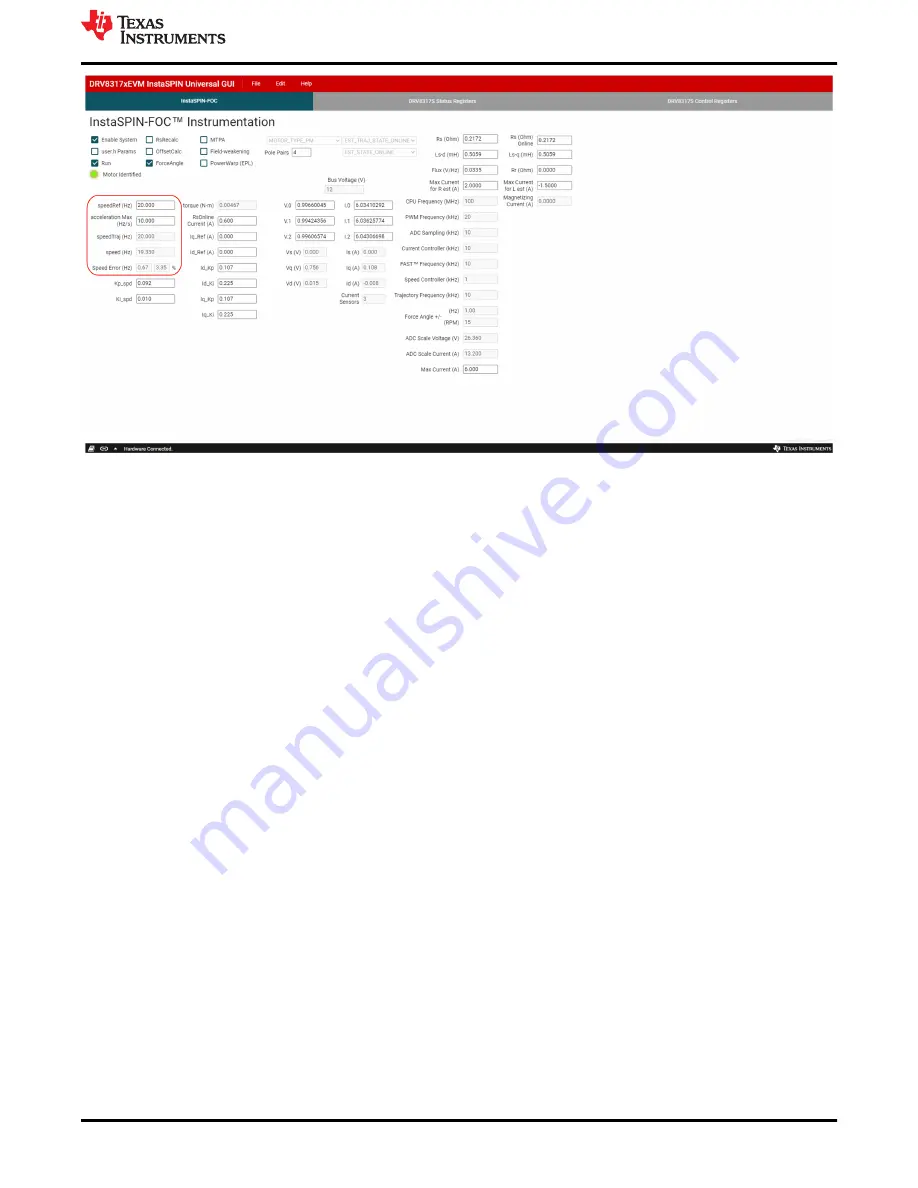
Figure 6-4. Sensorless-FOC commutation using the DRV8317HEVM InstaSPIN GUI

6.4 Torque Control, Speed Control, and Advanced Modulation Techniques

To implement more advanced modulation techniques such as torque control, speed control, and algorithms such 
as MTPA, Field-weakening, and PowerWarp (EPL) using the DRV8317HEVM InstaSPIN Universal GUI, please 
consult the MotorControl SDK InstaSPIN Lab Guide found in MotorControl SDK.

This document contains detailed lab overviews of how to implement each advanced modulation technique when 
using sensorless FOC to spin the BLDC motor in Code Composer Studio. In order to use the project with the 
GUI, the user must build and compile the project in CCS, and import the .out binary file for that project into the 
GUI properties through GUI Composer. More information can be found in the README when the GUI is first 
opened.

6.5 SPI Communication (DRV8317S only)

The DRV8317HEVM InstaSPIN_Universal_GUI includes two SPI register tabs for the DRV8317S device variant: 
Status Registers and Control Registers.

1. Click on the “DRV8317S Control Registers” tab to access the DRV8317S Control Registers as shown in 

Figure 6-5

.

2. Choose the desired settings by selecting from the drop-down menus for each setting. Clicking a setting 

description selects the bits required for that control register setting. Consult the 

DRV8317 datasheet

 (in the 

DRV8317 Registers

 section) for detailed definitions of settings.

3. Click on “Write” to write to all control registers in the device with the configured settings.
4. To read all status and control registers in the device, click on “Read”. The statuses and settings will 

auto-populate in the DRV8317S Status Registers and Control Registers.

5. Alternatively, to write data to a specific address, input the address and data in decimal into the address and 

data inputs above the “Manual Write” box. Click on the “Manual Write” box to write the data to that address. 
To read data from a specific address, input the address in decimal into the address above the “Manual Read” 
box. Click on the “Manual Write” box to read the data from that address.

www.ti.com

Firmware and GUI Application

SLVUCL3 – DECEMBER 2022

Submit Document Feedback

DRV8317HEVM User's Guide

17

Copyright © 2022 Texas Instruments Incorporated

Summary of Contents for DRV8317HEVM

Page 1: ...ide 4 4 Hardware and Software Overview 5 4 1 Hardware Connections Overview DRV8317HEVM LAUNCHXL F280049C 5 4 2 Connection Details 5 4 3 LED Lights 7 4 4 DRV8317HEVM Configurability Jumpers and Resisto...

Page 2: ...EACH A component in this module contains a REACH Restriction candidate Table 1 1 REACH Components Component Name Manufacturer Part Number Candidate Listed Chemical Chemical Identity CAS Concentration...

Page 3: ...317S SPI variant The DRV8317HEVM can be interfaced with the TMS320F280049C microcontroller on the LAUNCHXL F280049C LaunchPad in correspondence with the reference software to provide the algorithm to...

Page 4: ...Hall sensors to the appropriate locations on the 5 pin connector J7 as shown in Figure 4 2 Select 3V3 or Ext on jumper J2 to choose the Hall power source voltage to be either from the 3 3 V on the boa...

Page 5: ...he DRV8317HEVM 4 2 Connection Details Figure 4 2 shows the power supply and motor connections made to the DRV8317HEVM in order to spin a 3 phase sensored or sensorless Brushless DC motor A 4 5 V to 20...

Page 6: ...C to provide communication between the LaunchPad firmware and GUI as well as the correct installment of the DRV8317HEVM to the J1 J3 and J2 J4 headers of the LaunchPad Hardware and Software Overview w...

Page 7: ...on The fault LED will light up when the driver reports a fault and the MCU LED tied to GPIO59 can be used for debugging and validation Table 4 1 shows the LED descriptions with the LEDs that are on du...

Page 8: ...ummary of those selectable settings is listed in Table 4 2 defaults in bold and can be seen on the board in Figure 4 5 Section 4 4 2 describes the changes that need to be made to the board in order to...

Page 9: ...aunchPad R36 is DNP Supply 5 V externally if desired from the 5V test point F Supply 3 3 V from buck 0 ohm R7 resistor connects buck 3 3 V voltage to supply main 3 3 V R7 is populated Connects buck ou...

Page 10: ...1 and R12 must be left unpopulated This allows the user to select settings using the MODE SLEW and GAIN pins by using jumpers on J10 J9 and J8 An outline of the various hardware selectable settings ca...

Page 11: ...2 and JP3 are populated R13 is populated R7 is not populated external 3V3 supplied to EVM through the 3V3 test point MCU is powered both from the USB of the LaunchPad and from the external 3V3 supplie...

Page 12: ...sensing Table 4 6 Connections for Header J4 on DRV8317HEVM J4 Pin Number DRV8317HEVM Function LAUNCHXL F280049C Function Description 1 INHA GPIO10 PWM6A PWM used to switch High side FET of Phase A 2...

Page 13: ...O18 XCLKOUT not connected Not used 18 Not used GPIO23 LED4 LED reserved on LaunchPad 19 CSA_REF DNP GPIO25 For internal use only 20 MCU_LED GPIO59 Visual feedback for LaunchPad connection www ti com H...

Page 14: ...EVM to the LAUNCHXL F280049C The motor and power connectors will face to the LaunchPad s Micro USB connector 3 Connect the three phases from the brushless DC motor to the 3 pin connector J6 on DRV8317...

Page 15: ...l need to login with a myTI account in order to access the GUI 3 Accept the readme if the readme message pops up 4 Select the InstaSPOIN FOC tab at the top right hand corner to go to the main page of...

Page 16: ...value in the GUI which is automatically set to 20 0 Hz Use the speedRef Hz input to change the current speed of the motor as shown in Figure 6 4 The GUI automatically calculates the current reference...

Page 17: ...rol Registers 1 Click on the DRV8317S Control Registers tab to access the DRV8317S Control Registers as shown in Figure 6 5 2 Choose the desired settings by selecting from the drop down menus for each...

Page 18: ...DRV8317HEVM InstaSPIN GUI SPI Control Registers Firmware and GUI Application www ti com 18 DRV8317HEVM User s Guide SLVUCL3 DECEMBER 2022 Submit Document Feedback Copyright 2022 Texas Instruments Inc...

Page 19: ...Schematics 7 1 Main Supply Figure 7 1 Main Supply schematic www ti com Schematics SLVUCL3 DECEMBER 2022 Submit Document Feedback DRV8317HEVM User s Guide 19 Copyright 2022 Texas Instruments Incorporat...

Page 20: ...7 2 DRV8317H S Figure 7 2 DRV8317H S schematic Schematics www ti com 20 DRV8317HEVM User s Guide SLVUCL3 DECEMBER 2022 Submit Document Feedback Copyright 2022 Texas Instruments Incorporated...

Page 21: ...Regulator and VREF Figure 7 3 3 3V Buck Regulator and VREF schematic www ti com Schematics SLVUCL3 DECEMBER 2022 Submit Document Feedback DRV8317HEVM User s Guide 21 Copyright 2022 Texas Instruments...

Page 22: ...LaunchPad Connections schematic 7 6 Connectors Interface Figure 7 5 Connectors Interface schematic Schematics www ti com 22 DRV8317HEVM User s Guide SLVUCL3 DECEMBER 2022 Submit Document Feedback Copy...

Page 23: ...8 Revision History NOTE Page numbers for previous revisions may differ from page numbers in the current version DATE REVISION NOTES December 2022 Initial Release www ti com Schematics SLVUCL3 DECEMBE...

Page 24: ...ther than TI b the nonconformity resulted from User s design specifications or instructions for such EVMs or improper system design or c User has not paid on time Testing and other quality control tec...

Page 25: ...These limits are designed to provide reasonable protection against harmful interference in a residential installation This equipment generates uses and can radiate radio frequency energy and if not in...

Page 26: ...instructions set forth by Radio Law of Japan which includes but is not limited to the instructions below with respect to EVMs which for the avoidance of doubt are stated strictly for convenience and s...

Page 27: ...any interfaces electronic and or mechanical between the EVM and any human body are designed with suitable isolation and means to safely limit accessible leakage currents to minimize the risk of electr...

Page 28: ...R DAMAGES ARE CLAIMED THE EXISTENCE OF MORE THAN ONE CLAIM SHALL NOT ENLARGE OR EXTEND THIS LIMIT 9 Return Policy Except as otherwise provided TI does not offer any refunds returns or exchanges Furthe...

Page 29: ...change without notice TI grants you permission to use these resources only for development of an application that uses the TI products described in the resource Other reproduction and display of thes...

Reviews: