background image

Brushed Motor Demo Application

www.ti.com

5.

Method 2: Flashing the project through CCS debugger

Open Code Composer Studio

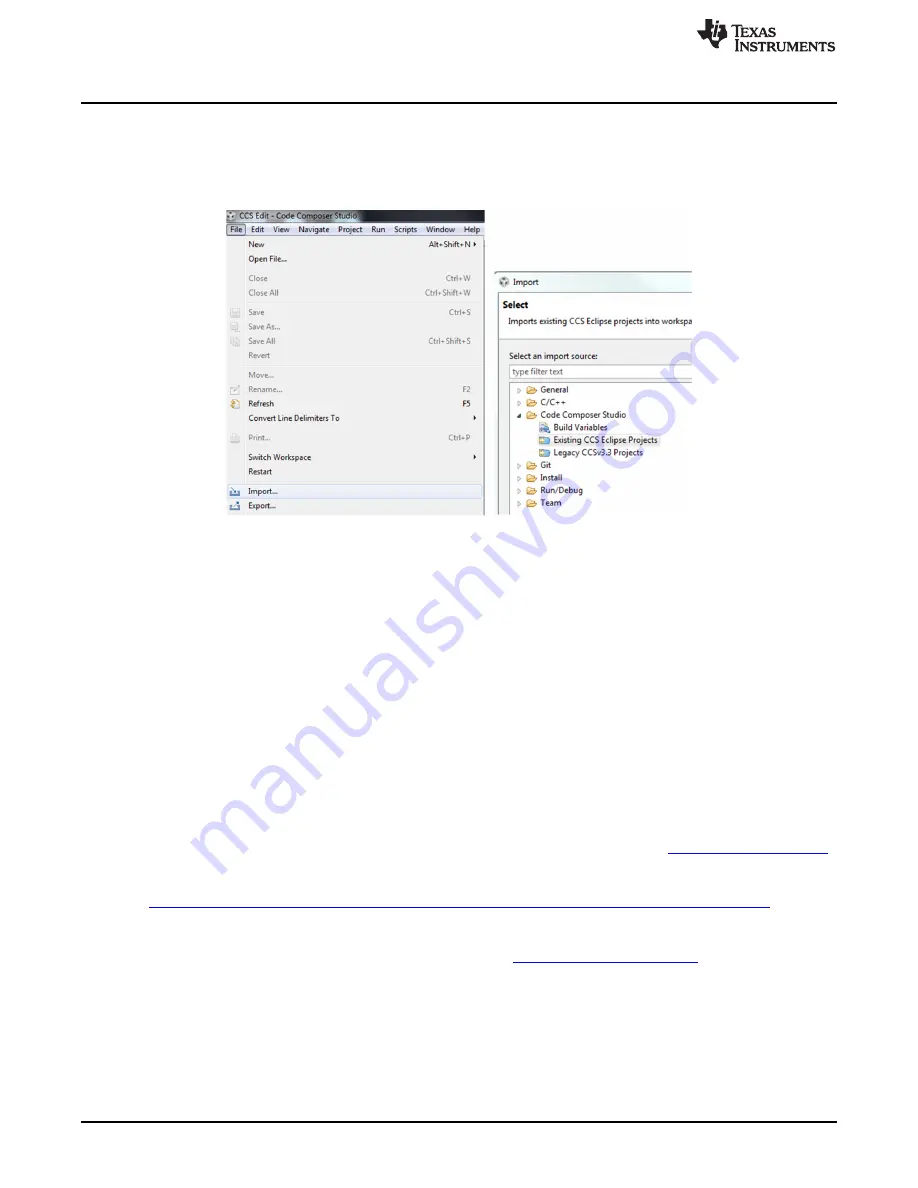
Go to File -> Import

Select

Existing CCS Eclipse Projects

under the

Code Composer Studio

tab

Figure 12. Existing CCS Eclipse Projects

Check the

Copy projects into workspace

option and then browse to the

BOOST-

DRV8848_FIRMWAREvX.X

directory located with the

Application

folder within the

BOOS-

DRV8848 Hardware and Software Files

folder. The project should now show up in the

Discovered Projects

section. Ensure that it is checked and select

Finish

.

Select the BOOST-DRV8848_FIRMWAREv1.0 project in the

Project Explorer

and click the

Debug

icon.

CCS now builds the project and loads it onto the MSP430G2533.

Update the binary file that the GUI is referencing (since CCS has recompiled it). Replace the

appProgram.out

file (Application\BOOST-DRV8848_GUIvX.X\appProgram.out) with the

BOOST-

DRV8848_FIRMWAREvX.X.out

file (Application\BOOST-

DRV8848_FIRMWAREvX.X\Debug\BOOST-DRV8848_FIRMWAREvX.X.out). Delete the old
“appProgram.out” and rename the new file to “appProgram.out

Close CCS

4.3

Setting up the BOOST-DRV8848 GUI

1. To the run the BOOST-DRV8848 GUI, first download the latest version of the

GUI Composer Runtime

.

Register for a TI account if you don’t already have one. Select the appropriate version for your
operating system and follow the installation instructions.

http://processors.wiki.ti.com/index.php/Category:GUI_Composer#GUI_Composer_Downloads

2. After installing the GUI Composer Runtime, copy the BOOST-DRV8848_GUIvX.X folder, located in the

Application

directory of the BOOST-DRV8848 Hardware and Software Files folder and paste this folder

into the GUI Composer webapps folder located in the 

C:\ti\guicomposer\webapps\

” directory.

If a non-default installation directory was selected in Step 1, the top-level directory may differ.

3. To run the GUI, double click the BOOST-DRV8848_GUIvX.X.exe file within the BOOST-

DRV8848_GUIvX.X folder of the webapps directory. A shortcut to this .exe can be created in order to
start it from other file locations.

10

BOOST-DRV8848

SLVUAE1 – December 2014

Submit Documentation Feedback

Copyright © 2014, Texas Instruments Incorporated

Summary of Contents for BoosterPack BOOST-DRV8848

Page 1: ...ing up the BOOST DRV8848 GUI 10 4 4 Spinning the Brushed Motor 11 5 Hardware Files Schematic Gerber 14 List of Figures 1 BOOST DRV8848 2 2 BOOST DRV8848 on Top MSP430G2 LaunchPad 2 3 DRV8848 Solution...

Page 2: ...T DRV8848 and Figure 2 pictures the BOOST DRV8848 connected to the MSP430G2 LaunchPad Figure 1 BOOST DRV8848 Figure 2 BOOST DRV8848 on Top MSP430G2 LaunchPad 2 BOOST DRV8848 SLVUAE1 December 2014 Subm...

Page 3: ...ak 1 A RMS Parallel mode available for higher current Wide power supply voltage range 4 0 V 18 0 V Fully protected drive stage including overcurrent short circuit over temperature and undervoltage wit...

Page 4: ...ernal power supply 4 V 18 V that is connected to the terminal block header J5 4 pin terminal block header J6 for connecting two brushed DC motors Parallel mode jumper in order to supply 2x current to...

Page 5: ...ent power supply 3 2 Launchpad Configuration For the MSP EXP430G2 LaunchPad keep the P1 0 LED1 and P1 6 LED2 jumpers for correct operation of the Status indication of the BoosterPack firmware Align th...

Page 6: ...nd GND For full performance ensure as much current as your motor may demand is supplied The brushed motor BoosterPack has a designed operating range from 4 0 18 V up to 1 A RMS 2 A peak for each H Bri...

Page 7: ...ex php Download_CCS 2 Obtain the BOOST DRV8848 firmware and GUI by downloading the BOOST DRV8848 Hardware and Software Files from the tool folder www ti com tool boost drv8848 This zip folder contains...

Page 8: ...ure 7 Target Configuration Setup Go back to View Target Configurations Right click the newly created Target Configuration file and select Launch Selected Configuration see Figure 8 Figure 8 Launch Sel...

Page 9: ...nto the Application subdirectory and then go into the GUI subdirectory Select the appProgram out file Application BOOST DRV8848_GUIvX X appProgram out Figure 10 Load Program Selection After a short de...

Page 10: ...FIRMWAREvX X out Delete the old appProgram out and rename the new file to appProgram out Close CCS 4 3 Setting up the BOOST DRV8848 GUI 1 To the run the BOOST DRV8848 GUI first download the latest ver...

Page 11: ...not load after a few minutes X s disappear a connection issue may have occurred Try restarting the application Figure 13 BOOST DRV8848 GUI 4 4 1 Quick Start 1 Set the nSLEEP pin high in order to enabl...

Page 12: ...L7 for more information on decay modes 4 nFAULT will assert when the DRV8848 is reporting a FAULT condition See the DRV8848 datasheet for more information on the various FAULT conditions 5 The DRV8848...

Page 13: ...el Mode Figure 15 illustrates the GUI in parallel mode Figure 15 GUI Parallel Mode In Parallel Mode both outputs are controlled through the B motor inputs 13 SLVUAE1 December 2014 BOOST DRV8848 Submit...

Page 14: ...igure 16 Parallel Mode Operation 5 Hardware Files Schematic Gerber The complete design files can be found in the tool folder http www ti com tool boost drv8848 including the schematic gerbers layout f...

Page 15: ...sponsible for compliance with all legal regulatory and safety related requirements concerning its products and any use of TI components in its applications notwithstanding any applications related inf...

Page 16: ...Mouser Electronics Authorized Distributor Click to View Pricing Inventory Delivery Lifecycle Information Texas Instruments BOOST DRV8848...

Reviews: