2
- [EN] English
K345 Issue 4
Safety (Continued)
• UPM only. To prevent a dangerous release of
pressure, isolate and bleed the system before you
disconnect a pressure connection.
Before you start an operation or procedure in this
publication, make sure that you have the necessary skills
(if necessary, with qualifications from an approved training
establishment). Follow good engineering practice at all
times.
Safety - Marks and symbols on the instrument
To start
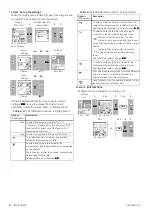
To start - Location of items
…
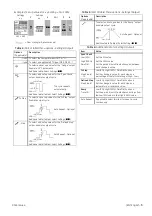
To start - Items on the display
To start - Prepare the instrument
Before you use the instrument for the first time:
• Make sure that there is no damage to the instrument,
and that there are no missing items.
• Remove the plastic film that protects the display. Use
the tag (
◗
) in the top right-hand corner.
• Install the batteries (refer to B1). Then re-attach the
cover.
Complies with European
Union directives
Warning - refer to the
manual
Read the manual
Battery
Ground (Earth)
ON/OFF
Do not dispose of this product as household waste. Refer to
“Maintenance”.
Item
Description
1.
❍
On or off button.
2.
■
■
Left-hand soft-key. Selects the function above it on
the display (Item 25). Example: Edit
3.
ESC
Moves back one menu level.
Leaves a menu option.
Cancels the changes to a value.
4.
▲
▼
Increases or decreases a value.
Highlights a different item.
5.
HOLD
Holds the data on the display. To continue, press the
HOLD
button again.
6.
MENU
OK
Shows the
Select Task
menu.
Selects or accepts an item or value.
Selects [
✓
] or cancels [ ] a selection.
7.
■
■
Right-hand soft-key. Selects the function above it on
the display (Item 25). Example: Settings
8.
Display. Refer to A3
9.
SENSOR
/ PC
Communications port. Use to connect a Universal
Measurement Module (UMM) or a RS232 cable.
10.
RTD connectors: To measure, use the 2 Wire, 3 Wire,
or 4 Wire “INPUT” connectors. To simulate, use only
the two “OUT” connectors. Refer to “Operation”.
11.
Connection point for some of the optional
accessories. Refer to the datasheet.
12.
Battery compartment. Refer to B1.
13., 14., 15.
DPI 812 only. Terminals to measure current, to supply
24V source, and to do switch tests.
A1
A2
Item
Description
16.
DPI 812 only. Task indication for the switch test.
= switch closed
= switch open
UPM only. Task indication for the leak test.
Refer to: Select Task (Table 2/3)
17.
DPI 812 only. The loop power supply is on.
Refer to: Select Task (Table 2/3)
18.
The measured value satisfies one of the alarm
conditions.
Refer to: Settings (
19.
The data on the display is on hold. To continue, press
the
HOLD
button again.
20.
Shows the battery level: 0 ... 100%.
21.
Identifies the type of data and the measurement
range.
= Input
= Output
= IDOS input
Refer to: Select Task (Table 2/3)
22. ... 24.
The settings applied to the input or output.
22.
°C
The units or a specified scale (x:y) - (Table 4/
).
Pt...
The RTD type (Pt50, ...) - (Table 4/
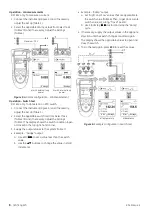
RTD input connections: 2, 3, or 4 (Figure 1)
23.
, ... ,
= Output operation (Table 5)
24.
= Filter
= Tare
= Maximum
= Average
= Minimum
25.
A soft-key function. To select an available function,
press the soft-key below it. Example:
= Move left
= Move right
26.
The measured value or values applicable to the task
selection.
27.
The
Edit
display to set up text labels (
≤
6 characters):
x:y
Scaling (
.
OK
= Accept the new text label
Shift
= Change the keys: 123ABC or -_+abc
= Add a space
BS
= Back space (Delete character)
A3


