10
- [EN] English
K345 Issue 4
Maintenance
This section gives procedures to maintain the unit in a
good condition. Return the instrument to the
manufacturer or an approved service agent for all repairs.
Do not dispose of this product as household waste. Use an
approved organisation that collects and/or recycles waste
electrical and electronic equipment.
Maintenance - Clean the unit
Clean the case with a moist, lint-free cloth and a weak
detergent. Do not use solvents or abrasive materials.
Maintenance - Replace the batteries
To replace the batteries, refer to B1. Then re-attach the
cover.
Make sure that the time and date are correct. The
calibration facility uses the date to give service and
calibration messages.
All the other configuration options stay in memory.
Calibration
Note: GE can provide a calibration service that is traceable
to international standards.
We recommend that you return the instrument to the
manufacturer or an approved service agent for
calibration.
If you use an alternative calibration facility, make sure that
it uses these standards.
Calibration - Before you start
To do an accurate calibration, you must have:
• the calibration equipment specified in Table 8.
• a stable temperature environment: 70 ± 2°F (21 ± 1°C)
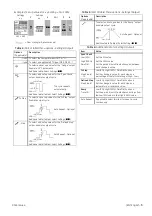
Table 8:
Calibration equipment
Before you start the calibration, make sure that the time
and date on the instrument are correct (Table 1).
Selection sequence:
➤
Select Task
➤
Set Up
➤
Calibration
➤
.
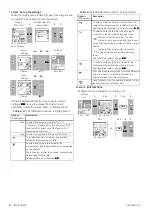
Table 9:
Calibration options
When you select a channel, the display shows the
applicable instructions to complete the calibration.
When the calibration is complete, select
Calibration Due
and set the new calibration date for the instrument.
Calibration - Procedures (Ohms input)
1. Let the equipment get to a stable temperature
(minimum: 5 minutes since the last power on).
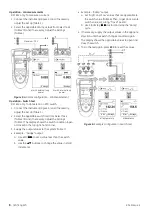
2. Use the calibration menu (Table 9) to do a two-point
calibration for each range.
• Range: 0-399.9
Ω
a. Nominal zero ohms: Make a 4 wire connection to
the 0
Ω
resistor (Figure 1).
b. Nominal positive full-scale ohms: Make a 4 wire
connection to the 400
Ω
resistor (Figure 1).
• Range: 400
Ω
-4k
Ω
a. Nominal zero ohms: Make a 4 wire connection to
the 400
Ω
resistor (Figure 1).
b. Nominal positive full-scale ohms: Make a 4 wire
connection to the 4k
Ω
resistor (Figure 1).
The display shows the applicable instructions to
calibrate each range.
Function
Calibration equipment
(ppm = parts per million)
Ohms
- Standard 0
Ω
resistor
- *Standard resistor (
Ω
): 100, 200, 300
Tolerance: 50 ppm + 0.6 ppm/°C + 5 ppm/year
*
Or an equivalent resistance simulator
- *Standard resistor (
Ω
): 400, 1k, 2k, 4k
Tolerance: 10 ppm + 0.6 ppm/°C + 5 ppm/year
Ohms
An ohmmeter or an RTD measurement system
with these limits for the excitation current:
range (
Ω
):
Excitation (mA)
0 ... 400
Ω
: 0.50 to 3.0 mA
400 ... 1500
Ω
: 0.05 to 0.8 mA
1500 ... 3200
Ω
: 0.05 to 0.4 mA
3200 ... 4000
Ω
: 0.05 to 0.3 mA
Pressure
UPM only. Refer to the user manual for the IDOS
UPM.
mA
mA calibrator.
Accuracy: Refer to Table 12.
B1
1
Display: Enter
Calibration PIN
2
3
Menu:
Select Channel
4
5
▲
▼
+
■
■
▲
▼
Factory PIN = 4321
Options
Description
Ohms To calibrate the input resistance.
Ohms To calibrate the output resistance
IDOS ...
UMM only. To calibrate the specified IDOS UMM.
Refer to the user manual for the IDOS UMM.
mA
DPI 812 only. To calibrate the mA input.
Calibration Due:
To set the date of the next
calibration for the instrument.
After the specified calibration date, there is a
warning message. There is a selection box to stop
the warning.
To change the calibration PIN (Personal
Identification Number).


