


September 2016
Service and Repair Manual
Specifications
Part No. 1268528
Z-40/23N, Z-40/23N RJ
9
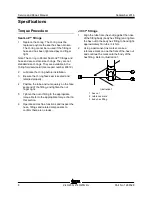
3 Working clockwise on the body hex fitting,
make a second mark with a permanent ink
marker to indicate the proper tightening
position. Refer to Illustration 2.
Note: Use the JIC 37° Fitting table in this section to
determine the correct number of flats, for the
proper tightening position.
Note: The marks indicate the correct tightening
positions have been determined. Use the second
mark on the body hex fitting to properly tighten the
joint after it has been loosened.
Illustration 2
1 body hex fitting
2 reference mark
3 second mark
4 Tighten the hex nut until the mark on the hex
nut is aligned with the second mark on the
body hex fitting.
5 Operate all machine functions and inspect the
hose, fittings and related components to
confirm there are no leaks.
Summary of Contents for Genie Z-40/23N
Page 63: ...September 2016 Service and Repair Manual Manifolds Part No 1268528 Z 40 23N Z 40 23N RJ 53 ...
Page 111: ...September 2016 Service and Repair Manual 101 Electrical Schematic Chassis ...
Page 114: ...Service and Repair Manual September 2016 104 Electrical Schematic Ground Controls ...
Page 115: ...September 2016 Service and Repair Manual 105 Electrical Schematic Platform Controls ...
Page 118: ...Service and Repair Manual September 2016 108 Ground Control Box Wiring Diagram ...
Page 119: ...September 2016 Service and Repair Manual 109 Platform Control Box Wiring Diagram ...
Page 122: ...Service and Repair Manual September 2016 112 Platform Control Box Wiring Diagram Options ...
Page 123: ...September 2016 Service and Repair Manual 113 Hydraulic Schematic ...
Page 125: ......